")
The speech recognition API in JavaScript is an API available to all developers since HTML5, such as the Battery API. It's an API that allows us to "talk" to the browser, enabling us to execute voice commands with JavaScript or convert our voice to text. As you can see, the ways we can use this API are endless; our imagination is the limit, and we can even create or use libraries.
With this HTML5 API, we can execute voice commands based on our data, since we implement the logic ourselves.
This is just one of the many JavaScript APIs we've seen.
Working with speech recognition in JavaScript is one of those things that seems complex… until you use the Web Speech API and discover that you can actually convert speech to text, create voice commands, or validate pronunciation with just a few lines of code.
In my case, I've used this API for a language app where, when the user pronounces a word, my application plays the correct audio if the recognition matches. And let me tell you: it not only works, but it opens up a whole world of possibilities.
In this guide, I explain everything you need to know, from the basics to advanced integration, common errors, and examples in Spanish.
What the Web Speech API is and how voice recognition works
The Web Speech API offers two main functions:
- SpeechRecognition → convert voice to text: Captures voice and converts it to text. Ideal for commands, dictation, language apps.
- SpeechSynthesis → convert text to voice: Speaks text aloud. Very useful if you want spoken responses in your app.
The recognition engine is usually browser-dependent. In Chrome, for example, your audio is sent to a server, so the API doesn't work offline and can be used for voice dictation with JavaScript.
"The JavaScript API that invites us to speak with applications"
In this post we will take the first steps with the Voice Recognition API
speechRecognition()in JavaScript which, in other words, gives our applications the ability to recognize voice based on the configured language through the PC or mobile device microphone.
Current limitations (Chrome, permissions, HTTPS)
- Chrome only allows microphone access if the website has HTTPS or you are on localhost.
- It only works completely well on Chrome and Android.
- iOS has partial support.
Getting Started with the Voice Recognition API in JavaScript
The skeleton of the code we will use is the following and we will analyze it in the next section:
if (!('webkitSpeechRecognition' in window)) {
  alert("¡API no soportada!");
} else {
  var recognition = new webkitSpeechRecognition();
  recognition.continuous = true;
  recognition.interimResults = true;
  recognition.lang = "es-Ve";

  recognition.onstart = function() {}
  recognition.onresult = function(event) {}
  recognition.onerror = function(event) {}
  recognition.onend = function() {}
}
Or the more complete way:
const SpeechRecognition = window.SpeechRecognition || window.webkitSpeechRecognition;
const recognition = new SpeechRecognition();
Just like with all "new" APIs, it's necessary to verify the availability of the Voice Recognition API in the browser by checking if the webkitSpeechRecognition object exists; if it doesn't exist, a message is simply displayed saying that the API is not available in your browser:
if (!('webkitSpeechRecognition' in window))
{ alert("API not supported!");
 }else{ ... }
If the Voice Recognition API is available or implemented in the browser, the next section of code enclosed by the else is executed; the first line of code:
recognition.continuous = true;Initializes the continuous attribute (set to false by default) with the goal of defining continuity when speaking; that is, it is established that when the user stops speaking, Voice Recognition ends (the onend event is fired).
This other line of code:
recognition.interimResults = true;Specifies whether the returned results are final and will not change (false) or not (true).
The next line of code:
recognition.lang = "es-VE";Initializes the lang attribute which specifies the language that is going to be recognized when making the request; in other words, the language to be used by the user.
Main Events of the Voice Recognition API in JavaScript
Once the above attributes are set, it is now the turn of the events, which are what will actually allow controlling and obtaining the user's words in plain text:
- onstart: when it starts listening
- onresult: when a result arrives
- onend: when listening ends
- onerror: generic error (lack of permissions, noise, etc.)
  recognition.onstart = function() {}
  recognition.onresult = function(event) {}
  recognition.onerror = function(event) {}
  recognition.onend = function() {}
The onstart event of the SpeechRecognition API
This event is executed when the start() function is invoked and the browser begins to "listen"; in other words, it represents the moment when the application begins to listen; to invoke the onstart event we must do the following:
var recognition = new webkitSpeechRecognition(); ... recognition.start();The onerror event of the SpeechRecognition API
This event is executed if and only if an error has occurred; here we can inform our user of the error so that they can solve it, for example, if the microphone was not found or if there was a problem with its permissions.
The onend event of the SpeechRecognition API
This event is executed when the user has finished speaking, which means that the voice recognition has come to an end; it is a good candidate to make some visual change in our API, so that the user knows that they are no longer being listened to and that the processing of what they expressed through voice is going to be carried out.
The onresult event of the SpeechRecognition API
Finally, this event returns the result obtained; put another way, the words expressed verbally converted into plain text; as you can see, this is the "strong" method of this API and it is where we can process our user's desired response in text format; we don't have to do anything with audio, the API does everything for us and gives us the text equivalent of what the user expresses through voice.
This is the interesting part of the API; here we finally get the response obtained by the user in the following structure:
{
  ..
  results: {
    0: {
      0: {
        confidence: 0.6...,
        transcript: "Hola"
      },
      isFinal:true,
      length:1
    },
    length:1
  },
  ..
}
To get the last paragraph pronounced by the user we can do the following:
if(event.results[i].isFinal)
    event.results[i][0].transcript;
Complete Example of the Voice Recognition API in JavaScript: Voice to Text
Having explained the "strong" part of the code, or what is the same, the basics of the API, it is possible to create a small program that allows using Voice Recognition in a web application and displaying the result in a text field:
	var recognition;
	var recognizing = false;
	if (!('webkitSpeechRecognition' in window)) {
		alert("¡API no soportada!");
	} else {

		recognition = new webkitSpeechRecognition();
		recognition.lang = "es-VE";
		recognition.continuous = true;
		recognition.interimResults = true;

		recognition.onstart = function() {
			recognizing = true;
			console.log("empezando a escuchar");
		}
		recognition.onresult = function(event) {

		 for (var i = event.resultIndex; i < event.results.length; i++) {
			if(event.results[i].isFinal)
				document.getElementById("texto").value += event.results[i][0].transcript;
		    }

			//texto
		}
		recognition.onerror = function(event) {
		}
		recognition.onend = function() {
			recognizing = false;
			document.getElementById("procesar").innerHTML = "Escuchar";
			console.log("terminó de escuchar, llegó a su fin");

		}

	}

	function procesar() {

		if (recognizing == false) {
			recognition.start();
			recognizing = true;
			document.getElementById("procesar").innerHTML = "Detener";
		} else {
			recognition.stop();
			recognizing = false;
			document.getElementById("procesar").innerHTML = "Escuchar";
		}
	}
Providing some considerations about the previous code:
- We use the
recognizingvariable to easily know when the browser is or is not "listening". - We currently cannot use this API on sites that do not have an HTTPS connection.
With this simple example we see how easy it is to convert voice to text using the native HTML5 API for voice recognition.
Problems with browsers in voice recognition
Remember that for security reasons, to use devices like microphones and cameras from the browser, if the website does not have the HTTPS certificate, the request to access either the device's camera or microphone will not work. This causes many problems if we do not have said HTTPS certificate on our website or the website where we want to use the script to access the device's web camera or microphone.
Handling permissions in Google Chrome
Google Chrome has a system of permissions for the devices that can be accessed by different websites; to do this we locate the script developed in this post (or any other that attempts to access our equipment's microphone) and go to the small icon presented in the navigation bar located in the upper right corner and click on it; the problem that exists with recent versions of Google Chrome is that regardless of the option we select:

Google Chrome never allows us to access the microphone for any website that does not have the HTTPS certificate, unless it is localhost.
and we click on "Manage microphone settings":
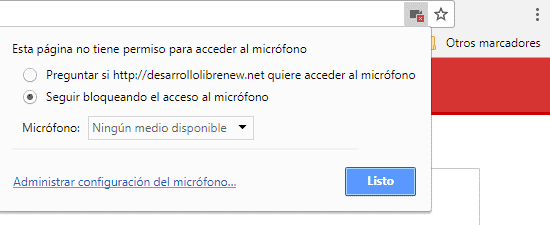
Here we can see the websites that are allowed to access our microphone; as an important point, we see that Google Chrome allows microphone access if we are accessing from localhost, so if we copy the script provided in this post and copy it to our localhost it will be able to function correctly when Google Chrome requests the permission and we subsequently grant it. An important point is that we will NOT see any website in this section that does not have the HTTPS certificate, no matter what option we choose in the previous window.
Extra voice command with a JavaScript library
In this complement that we bring to you, we are going to see how to process voice commands with the annyang library in JavaScript; remember that you need a web server with HTTPS or from localhost; the operation is simple, we only need to indicate the voice commands:
var commands = {
	// annyang will capture anything after a splat (*) and pass it to the function.
	// e.g. saying "Show me Batman and Robin" is the same as calling showFlickr('Batman and Robin');
	'show me *tag': showFlickr,

	// A named variable is a one word variable, that can fit anywhere in your command.
	// e.g. saying "calculate October stats" will call calculateStats('October');
	'calculate :month stats': calculateStats,

	// By defining a part of the following command as optional, annyang will respond to both:
	// "say hello to my little friend" as well as "say hello friend"
	'say hello (to my little) friend': greeting
};
And then we define the functions that we are going to use, one function for each command:
var showFlickr = function (tag) {
	$('#frace').text("Tag: " + tag);
	console.log("Tag: " + tag)
}

var calculateStats = function (month) {
	$('#frace').text("Data de " + month);
	console.log("Data de " + month)
}

var greeting = function () {
	$('#frace').text("Hola Mundo");
	console.log("Hola Mundo")
}
Finally, we add the commands, optionally the language to be used, and start() to initiate everything.
// We add our commands to annyang.
annyang.addCommands(commands);
//We set the language
annyang.setLanguage("es-MX");
// We start listening. annyang.start();
Although if you don't want to use an external library and only want to use the native API provided in HTML5, you can also do it. You can do it in many ways: if you are going to create simple commands you can compare the text returned by the user completely; if you are interested in grabbing keywords, you can use the indexOf function provided by the JavaScript API; if there are several commands, then you use a grouped switch or an if; you must take all these considerations into account in the onresul function:
recognition.onresult = function(event) {
		 for (var i = event.resultIndex; i < event.results.length; i++) {
			if(event.results[i].isFinal)
				document.getElementById("texto").value += event.results[i][0].transcript;
Simplified example
Here is a simpler example of what was done previously:
<button onclick="recognition.start()">Hablar</button>
<p id="texto"></p>
<script>
const recognition = new (window.SpeechRecognition || window.webkitSpeechRecognition)();
recognition.lang = "es-ES";
recognition.continuous = true;
recognition.onresult = (event) => {
 const texto = event.results[event.results.length - 1][0].transcript;
 document.getElementById("texto").innerText = texto;
};
</script>
How to implement voice commands without libraries
You can start with something as simple as:
if (texto.includes("open wikipedia")) {
 window.open("https://es.wikipedia.org/wiki/Wikipedia:Portada");
}
Handling with switch or includes:
switch (true) {
 case texto.includes("play"):
   reproducirAudio();
   break;
 case texto.includes("siguiente"):
   pasarAlSiguiente();
   break;
}
Practical example (commands in Spanish)
if (texto.toLowerCase().trim() === "reproducir audio") {
 audioElement.play();
}
Voice recognition in a language app
We can make Duolingo-type applications, in which we can check the user's pronunciation:
recognition.onresult = (event) => {
 const dicho = event.results[event.results.length - 1][0].transcript.toLowerCase().trim();

 if (dicho === objetivo) validarPronunciacion();
};
If it's OK, we reproduce an audio:
function validarPronunciacion() {
 document.getElementById("god").play();
}
Common problems I found
- Very similar words ("pero / perro" - but / dog in Spanish) can be confused.
- If there is background noise, you should use longer phrases.
- Switching between several languages (Spanish, English) requires reconfiguring recognition.lang between listens.
Common errors and how to solve them
- Chrome blocks the microphone (HTTPS mandatory)
- If you are on HTTP, you will see errors like:
- DOMException: Permission deniedSolution:
- use localhost or activate HTTPS (Let's Encrypt works perfectly)
- No audio is detected
- May be due to:
- misconfigured microphone
- ambient noise
- blocked permissions
- May be due to:
- Permissions denied (getUserMedia)
navigator.mediaDevices.getUserMedia({ audio: true }) .catch(() => console.log("No microphone permission"));- Events “no-speech” and “network”
- These occur when:
- no words were heard
- connection dropped
- Chrome could not send the audio to the server
Interesting ideas to implement in a project
- JSGF Grammars for closed vocabularies
- Perfect for apps where only specific words are accepted:
- var grammar = ‘#JSGF V1.0; grammar colors; public <color> = red | blue | green ;’
- Using SpeechSynthesis as voice feedback
new SpeechSynthesisUtterance("Correct, you pronounced it well");
- Libraries like annyang
- Useful if you want advanced commands:
annyang.addCommands({ "hello world": () => console.log("Hello!") }); annyang.start();
Frequently asked questions
- Does it work offline?
- No. Chrome sends your voice to a server.
- How do I use multiple languages?
- Change recognition.lang before each start().
- Is it viable for language apps?
- Yes, in fact I myself use it to validate pronunciation and play audio based on what was said.
- Can I use it on mobile?
- On Android, yes. On iOS it is limited.
Conclusion
Voice recognition in JavaScript is a powerful, simple, and perfect tool for interactive projects: language apps, voice assistants, spoken forms, or command systems.
The best part is that you don't need external libraries: SpeechRecognition, a few events, and a little logic are enough. With the right structure and by controlling permissions and errors, you can build totally professional voice functionalities.
Now, learn how to write, read, and drag and drop files with JavaScript.