
Content Index
Bootstrap 5 is the latest version of the popular component-based web framework known as Bootstrap. Bootstrap is a set of web design tools that allows developers to quickly and efficiently build websites and web applications and customize the experience with relative ease. Bootstrap 5 is the most recent version of the library, and it has new features and improvements compared to previous versions.
We will use the records we created earlier through a file upload form to display them in a list.
Defining a style for the different modules of our application is a common process, whether you want to create a custom style created by you from scratch or an existing toolkit like Tailwind or in this case Bootstrap; in this book, we are going to use Bootstrap instead of other similar solutions, since it is a solution with a long time in the market, with good documentation and we can use existing components; therefore, implementing Bootstrap on our app is very easy to apply and therefore understand, and you can use the steps we are going to see in this chapter as a template in case you want to use another solution to handle styling in your application.
Remember that this is not a guide on Bootstrap 5, it is assumed that the reader has at least basic knowledge in the use of this technology.
Instalation
Let's start by installing Bootstrap; since CodeIgniter is a framework without any link to Node, we must use the Bootstrap CDN which we can obtain from the official page:
Click on "Download" and then again on "Download" in the following section:
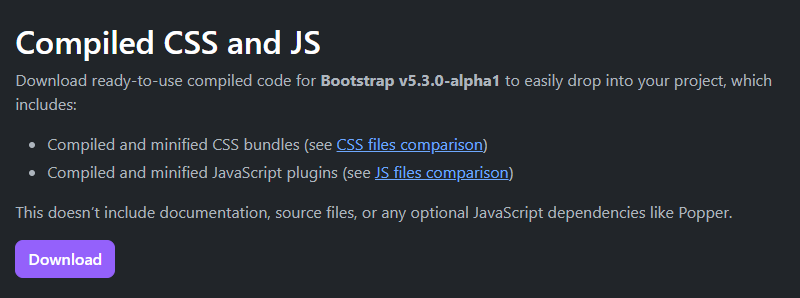
Bootstrap, being a client-side web framework, uses CSS and JavaScript to be able to use any Bootstrap component or functionality; once the previous compressed file has been downloaded and the folder has been generated (which, to simplify the process, we rename as bootstrap) we need the following files:
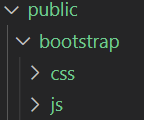
bootstrap/css/bootstrap.min.css
bootstrap/js/bootstrap.min.js
Which we are going to copy into the public folder of the project in CodeIgniter 4:
What we configure in our layouts:
app\Views\Layouts\dashboard.php
app\Views\Layouts\web.php
<!DOCTYPE html>
<html lang="en">
<head>
    ***
    <link rel="stylesheet" href="<?= base_url() ?>/bootstrap/css/bootstrap.min.css">
</head>
<body>
    ***
    <script src="<?= base_url() ?>/bootstrap/js/bootstrap.min.js"></script>
</body>
</html>
With these files loaded in the layout, we can use Bootstrap in any view that uses the layout, which in the case of our application, would be the entire management module.
Now with this, we can use Bootstrap in our project; by having a couple of layouts that make up the entire application, we can configure the necessary Bootstrap files to be able to use it in all views; which would be Bootstrap's CSS and JS.
If we go to the browser, we should see a certain style applied:
IMPORTANT: Remember to check in the developer console if you don't have a broken link:
Bootstrap components
Bootstrap is a component-based framework, we have components for the most important elements in web development, such as buttons, containers, navigation menus, modals, among others:
https://getbootstrap.com/docs/5.3/components/
We can customize these components at the style level, but by default there is already a style applied; in this section, we are going to use various Bootstrap components to style the dashboard module.
Container
Let's start by preventing forms and listings from taking up the entire page, for this, we're going to use a container component:
app\Views\Layouts\dashboard.php
<div class="container">
<h1><?= $this->renderSection('header') ?></h1>
<?= view('partials/_session') ?>
<?= $this->renderSection('contenido') ?>
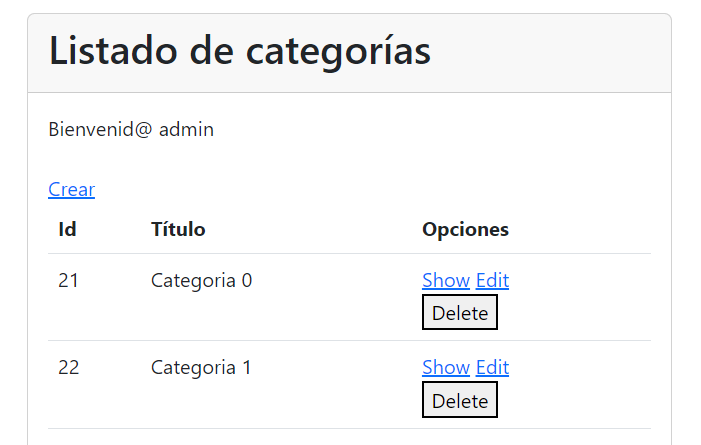
</div>Table
We are going to define a style for each of the tables; to do this, we have a base style using the table class:
app\Views\dashboard\pelicula\index.php
app\Views\dashboard\etiqueta\index.php
app\Views\dashboard\categoria\index.php
<table class="table">
  ***
And we will have:
Card
With the card component, we can use it for many developments, such as to show details, lists or in this case, as a container; the card component defines a solid default white color with rounded corners and a shading, which we can apply from the layout. For tables and forms to have this container; with the card-body class, a PADDING is applied.
Most of the components in Bootstrap work in a similar way, they are nothing more than a set of nested HTML with some specific classes so that they look as we want, the card component also has other classes that we can use for example the card-footer to define, for example, action buttons, which in our case would not be necessary:
app\Views\Layouts\dashboard.php
<div class="container">
    <div class="card">
        <div  class="card-header">
            <h1><?= $this->renderSection('header') ?></h1>
        </div>
        <div class="card-body">
            <?= view('partials/_session') ?>
            <?= $this->renderSection('contenido') ?>
        </div>
    </div>
</div>
And we will have:
Navigation menu
Now, we are going to create a header for the navigation, which, like the chart component, has a specific organization so that it works as expected; at least, we must define the following classes:
We will use the typical classes we have in Bootstrap to create a basic navbar like:
- navbar-brand to place the name or brand of the application.
- navbar-nav and nav-link for the links.
- collapse and navbar-collapse for positioning.
In the following distribution:
app\Views\Layouts\dashboard.php
<body>
    <nav class="navbar navbar-expand-lg mb-3">
        <div class="container-fluid">
            <a class="navbar-brand">Code4</a>
            <div class="navbar-collapse">
                <ul class="navbar-nav">
                    <li class="nav-item">
                        <a href="<?= base_url() ?>/dashboard/categoria" class="nav-link">Categoría</a>
                    </li>
                    <li class="nav-item">
                        <a href="<?= base_url() ?>/dashboard/pelicula" class="nav-link">Películas</a>
                    </li>
                    <li class="nav-item">
                        <a href="<?= base_url() ?>/dashboard/etiqueta" class="nav-link">Etiquetas</a>
                    </li>
                </ul>
            </div>
        </div>
    </nav>
***
And we will have:

Pagination
Bootstrap's pagination component looks like the following:
<nav>
  <ul class="pagination">
    <li class="page-item"><a class="page-link" href="#">Previous</a></li>
    <li class="page-item"><a class="page-link" href="#">1</a></li>
    <li class="page-item"><a class="page-link" href="#">2</a></li>
    <li class="page-item"><a class="page-link" href="#">3</a></li>
    <li class="page-item"><a class="page-link" href="#">Next</a></li>
  </ul>
</nav>
It has 3 main blocks, the previous page, the numbers and the next page.
The pagination, being generated internally by CodeIgniter, we have to vary the current format; remember that the pagination configuration is in:
app\Config\Pager.php
public $templates = [
    'default_full'   => 'App\Views\partials\pagination',
    'default_simple' => 'CodeIgniter\Pager\Views\default_simple',
    'default_head'   => 'CodeIgniter\Pager\Views\default_head',
];
By default, ' default_full ' is used; if, for example, you wanted to use the pagination in the simple format, from the view, you would have to place:
<?= $pager->simpleLinks() ?>If we look for the source code of the 'default_full ' page:
vendor\codeigniter4\framework\system\Pager\Views\default_full.php
<?php
use CodeIgniter\Pager\PagerRenderer;
/**
 * @var PagerRenderer $pager
 */
$pager->setSurroundCount(2);
?>
<nav aria-label="<?= lang('Pager.pageNavigation') ?>">
        <ul class="pagination">
                <?php if ($pager->hasPrevious()) : ?>
                        <li>
                                <a href="<?= $pager->getFirst() ?>" aria-label="<?= lang('Pager.first') ?>">
                                        <span aria-hidden="true"><?= lang('Pager.first') ?></span>
                                </a>
                        </li>
                        <li>
                                <a href="<?= $pager->getPrevious() ?>" aria-label="<?= lang('Pager.previous') ?>">
                                        <span aria-hidden="true"><?= lang('Pager.previous') ?></span>
                                </a>
                        </li>
                <?php endif ?>
                <?php foreach ($pager->links() as $link) : ?>
                        <li <?= $link['active'] ? 'class="active"' : '' ?>>
                                <a href="<?= $link['uri'] ?>">
                                        <?= $link['title'] ?>
                                </a>
                        </li>
                <?php endforeach ?>
                <?php if ($pager->hasNext()) : ?>
                        <li>
                                <a href="<?= $pager->getNext() ?>" aria-label="<?= lang('Pager.next') ?>">
                                        <span aria-hidden="true"><?= lang('Pager.next') ?></span>
                                </a>
                        </li>
                        <li>
                                <a href="<?= $pager->getLast() ?>" aria-label="<?= lang('Pager.last') ?>">
                                        <span aria-hidden="true"><?= lang('Pager.last') ?></span>
                                </a>
                        </li>
                <?php endif ?>
        </ul>
</nav>
It has exactly the same 3 blocks (pre, numbering and post) as we mentioned before, so we can directly adapt the Bootstrap component; we are going to replicate it in a new page so as not to modify files inside the vendor folder using Bootstrap style:
app\Views\partials\pagination.php
<?php
use CodeIgniter\Pager\PagerRenderer;
/**
 * @var PagerRenderer $pager
 */
$pager->setSurroundCount(2);
?>
<nav aria-label="<?= lang('Pager.pageNavigation') ?>">
    <ul class="pagination">
        <?php if ($pager->hasPrevious()) : ?>
            <li class="page-item">
                <a class="page-link" href="<?= $pager->getFirst() ?>" aria-label="<?= lang('Pager.first') ?>">
                    <span aria-hidden="true"><?= lang('Pager.first') ?></span>
                </a>
            </li>
            <li class="page-item">
                <a class="page-link" href="<?= $pager->getPrevious() ?>" aria-label="<?= lang('Pager.previous') ?>">
                    <span aria-hidden="true"><?= lang('Pager.previous') ?></span>
                </a>
            </li>
        <?php endif ?>
        <?php foreach ($pager->links() as $link) : ?>
            <li class="page-item" <?= $link['active'] ? 'class="active"' : '' ?>>
                <a class="page-link" href="<?= $link['uri'] ?>">
                    <?= $link['title'] ?>
                </a>
            </li>
        <?php endforeach ?>
        <?php if ($pager->hasNext()) : ?>
            <li class="page-item">
                <a class="page-link" href="<?= $pager->getNext() ?>" aria-label="<?= lang('Pager.next') ?>">
                    <span aria-hidden="true"><?= lang('Pager.next') ?></span>
                </a>
            </li>
            <li class="page-item">
                <a class="page-link" href="<?= $pager->getLast() ?>" aria-label="<?= lang('Pager.last') ?>">
                    <span aria-hidden="true"><?= lang('Pager.last') ?></span>
                </a>
            </li>
        <?php endif ?>
    </ul>
</nav>
And we use it:
app\Config\Pager.php
public $templates = [
    'default_full'   => 'App\Views\partials\pagination',
    // 'default_full'   => 'CodeIgniter\Pager\Views\default_full',
    'default_simple' => 'CodeIgniter\Pager\Views\default_simple',
    'default_head'   => 'CodeIgniter\Pager\Views\default_head',
];
With this, we will have a pagination like the following:

Creating a listing in CodeIgniter 4
In this entry we are going to see one of the fundamental CRUD operations, the one that centralizes the rest of the CRUD operations, which would be the listing; you can use any type of HTML component in conjunction with CSS and JavaScript to give it the design you want; but in our case of interest we are interested in the back part, our backend to obtain all the data that we want to manipulate.
In this entry we are going to create a simple paginated table to show how we can create a paginated list in CodeIgniter 4; but it can be anything, although the element used par excellence for pagination is a table.
In our Movie controller that we created earlier to process a form, we can create another function that by convention following our resource type path would be index, the first function that returns the first CRUD resource of our app, the one that allows us to display all our records.
Building the listing from the controller
So here we could get all the records with the all function:
$people->asObject()->get()But in CodeIgniter 4 we have a function that has been around for a long time in other frameworks such as Laravel, Flask or Django and it is the function called pagination that allows us to obtain the data in a paginated way; Internally, it uses a parameter that travels via management called payment to know which block of paginated records you want to work with:
public function index()
{
$people = new PersonModel();
$data = [
'people' => $people->asObject()->paginate(10),
'pager' => $people->pager
];
return view('person/index',$data);
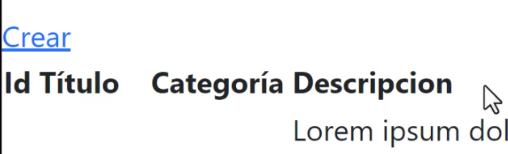
}And with this, we can perfectly create a view; from our index function:
And with this the view:
<!DOCTYPE html>
<html lang="en">

<head>
    <meta charset="UTF-8">
    <meta name="viewport" content="width=device-width, initial-scale=1.0">
    <title>Index</title>
</head>

<body>

    <a href="/people/new" class="btn btn-success mb-4"><i class="fa fa-plus"></i> Crear</a>

    <table>
        <thead>
            <tr>
                <th>Id</th>
                <th>Nombre</th>
                <th>Apellido</th>
                <th>Edad</th>
                <th>Opciones</th>
            </tr>
        </thead>
        <tbody>
            <?php foreach ($people as $key => $p) : ?>
                <tr>
                    <td><?= $p->id ?></td>
                    <td><?= $p->name ?></td>
                    <td><?= $p->surname ?></td>
                    <td><?= $p->age ?></td>
                </tr>
            <?php endforeach ?>
        </tbody>
    </table>

    <?= $pager->links() ?>
</body>

</html>
As you can see, it simply has a php foreach to iterate the data that we are passing to it.
Pagination links
For the pagination links we can use the function called links:
<?= $pager->links() ?>If you want to see how to adapt CodeIgniter 4 with Bootstrap 5
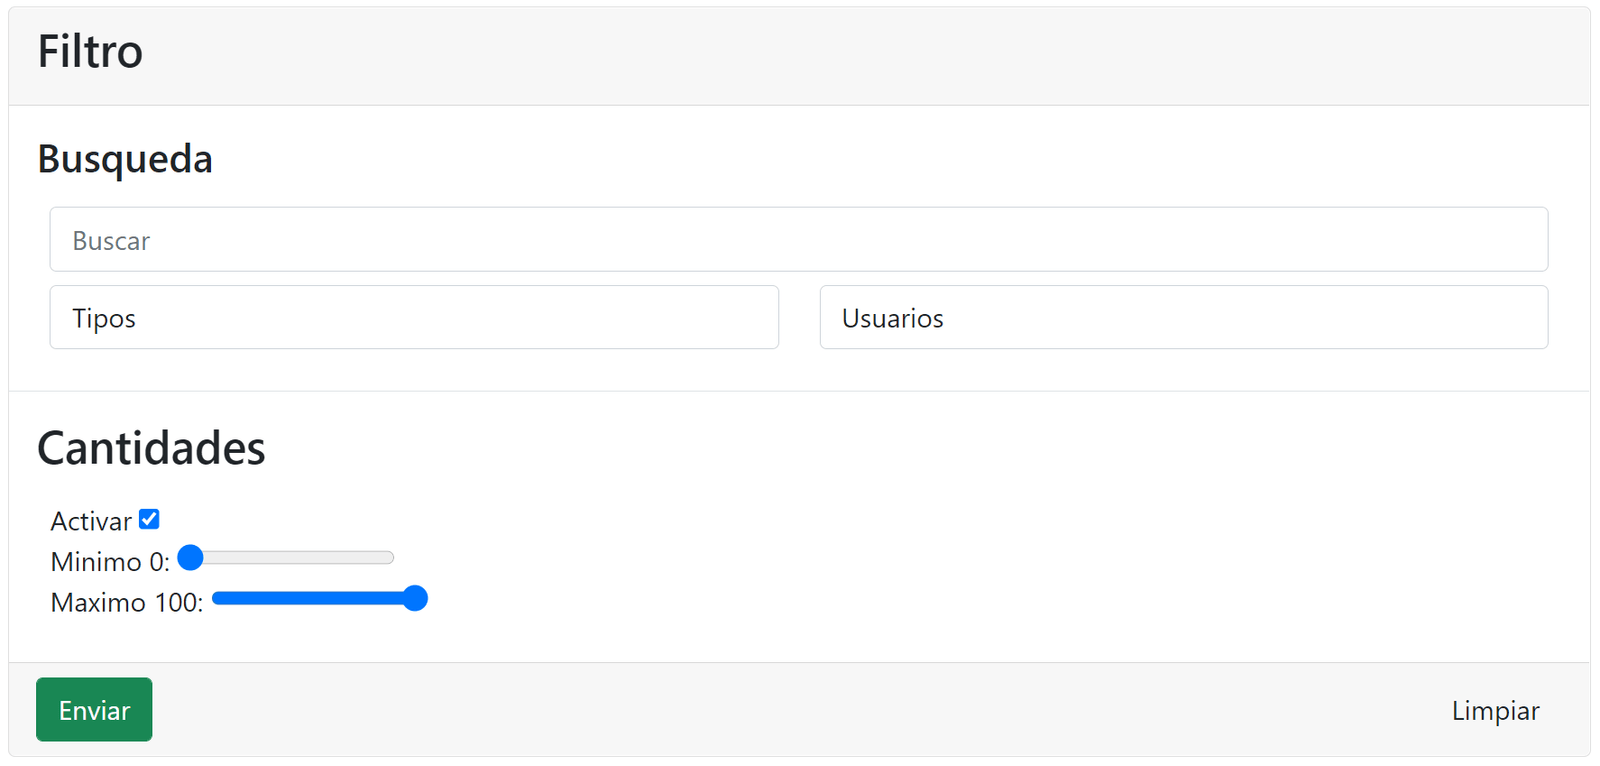
Define filters or search fields in CodeIgniter 4

Filters are a very useful tool in web development as they allow users to search, sort and filter information efficiently. Filters can be used to sort and classify data in a table or list and access the desired information without having to search through large amounts of data. Let's see how to implement a simple filter in CodeIgniter 4.
In CodeIgniter 4, as in many frameworks, it's very easy to create filter-like functions; in this case it is through a text type field; so for this, we are going to create a field like the following:
<input type="text" name="search" placeholder="search" value="<?= $search ?>">Which is part of our complete formulary:
<form method="get" id="formFilter">
    <select name="type">
        <option value="">Tipos</option>
        <option <?= ($typeId == "exit") ? "selected" : "" ?> value="exit">Salida</option>
        <option <?= ($typeId == "entry") ? "selected" : "" ?> value="entry">Entrada</option>
    </select>
    <select name="user_id">
        <option value="">Usuarios</option>
        <?php foreach ($users as $u) : ?>
            <option <?= ($u->id == $userId) ? "selected" : "" ?> value="<?= $u->id ?>"><?= $u->username ?></option>
        <?php endforeach ?>
    </select>
    <br>
    <h4>Búsqueda</h4>
    <input value="<?= $search ?>" type="text" name="search" placeholder="Buscar">
    <h3>Cantidades</h3>
    <label for="check_cant">
        Activar
        <input type="checkbox" name="check_cant" id="check_cant" checked>
    </label>
    <br>
    <label for="min_cant">
        Minimo <span><?= $minCant ? $minCant : 0 ?></span>:
        <input type="range" name="min_cant" value="<?= $minCant ? $minCant : 0 ?>" min="0" max="90" step="1">
    </label>
    <br>
    <label for="max_cant">
        Maximo <span><?= $maxCant ? $maxCant : 100 ?></span>:
        <input type="range" name="max_cant" value="<?= $maxCant ? $maxCant : 100 ?>" min="10" max="100" step="1">
    </label>
    <br>
    <button type="submit">Enviar</button>
    <a href="<?= route_to('product.trace',$product->id) ?>">Limpiar</a>
</form>
In which you can place other fields of any type for your filters; which we do in the full CodeIgniter 4 course; these fields at the end are nothing more than those used in the forms to perform any other saving or editing operation, we have the SELECT and text fields but you can use others such as CHECKBOX or RADIUS if you consider them necessary.
But that is another story; note that the action of the form is not defined, which means that when sending the request it will be processed by the same page that paints the search form; in the case of the course, it is a list of product details.
Whose filter, as you can see in the previous form, is processed by the same controller that processes the previous table; In our controller, to know if we are going to process any search data, we ask from the filter:
   $searchs = explode(" ", trim($this->request->getGet('search')));
        if ($this->request->getGet('search')) {
            //->orGroupStart()
            $query->groupStart();
            foreach ($searchs as $s) {
                $query->orLike('u.username', $s)
                    ->orLike('u.email', $s)
                    ->orLike('puc.description', $s);
            }
            $query->groupEnd();
Here are several aspects that you have to take into account:
- We use the explode function to search for tokens.
- We iterate the tokens and search for partial matches with the like on the columns we want to search for; in our case, a username, email and description that make sure they belong to different tables.
Since we are using OR operations, it is possible that they interfere with other where or similar filters in the rest of the query; therefore, we group them (in SQL we put them in parentheses) so that they only affect the section of the search with the groupStart and groupEnd
In essence all of the above steps are optional and depending on your needs you may want to search for exact matches; if that's the case, you just need to define it as:
$query->where('u.username', $this->request->getGet('search'))To find an exact match on the username column.
You can see the complete code in case you have doubts
https://github.com/libredesarrollo/codeigniter4-inventario/blob/main/app/Controllers/Dashboard/Product.php
The important thing here is to note that we are building the query to tokens or pieces, in which we ask through a conditional if we have data received by the user and with this we build the query; as in our example is a lookup field that we want to build
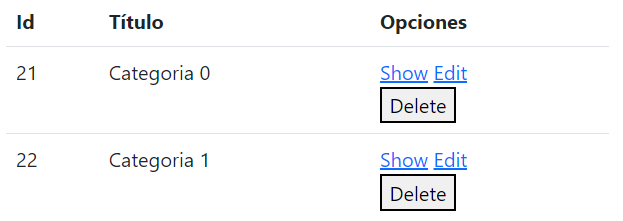
The next step is to complete the CRUD process and implement the option to delete records in CodeIgniter 4.