
Content Index
- What is a WebSocket?
- The problem with the traditional Client-Server model (HTTP)
- The solution: WebSockets and Full-Duplex communication
- States and Technical Operation: The lifecycle of a WebSocket
- How to identify a WebSocket in the browser
- Creating a minimal application with WebSockets in FastAPI
- WebSocket Implementation on the Server
- Why do we use async?
- The Client: Connection from the Browser
- The ws:// Protocol
- JavaScript
- Verification in Developer Tools
- Exceptions, Disconnection, and Simple Connections
- Comparison and Lifecycle: FastAPI vs Django Channels
- Handling Disconnection with WebSocketDisconnect
- Simple Connections
- Managing Multiple Connections (Connection Manager)
- Creating a ConnectionManager class
- Constructor and connection handling
- Connect method
- Disconnect method
- Handling disconnection
- Sending messages and broadcast
- Creating the WebSocket route
- Configuring CORS in FastAPI for Vue Consumption
- What is CORS?
- Third-Party Applications and Connectivity
- The CORS Problem
- Enabling CORS in FastAPI
- Authentication System Implementation (Login)
- Connection Testing and WebSocket Protection
- Login Endpoint Implementation
- Logout Component Configuration in Vue
- Configure Logout at the time of login
- Connection Testing and Debugging
- Conclusion
- Creating Models for the Chat with WebSockets
- 1. The Pivot Table (Many-to-Many): room_users
- 2. User Model and Identity
- 3. Token Management
- 4. Rooms and Messages (Alerts)
- API Router Implementation in FastAPI
- 1. Database Connection
- 2. Alerts and Rooms Endpoints
- 3. The Login Process
- Token Generation
- 4. Logout Implementation
- Registration Endpoint Implementation
- 1. Backend Logic
- Vue.js Interface
- Registration, Login, and Logout Testing: FastAPI + Vue
- 1. API Configuration and Routes
- 2. User Management
- 3. Security
- Running the Tests
- Logout Test
What is a WebSocket?
The first thing we must understand is that WebSockets are not a technology exclusive to FastAPI or Python; they are a global standard. Just like the HTTP protocol, WebSockets exist to solve a specific communication problem, but they operate in a completely different way.
A WebSocket is a communication protocol that provides a full-duplex communication channel over a single TCP connection. Unlike the HTTP request-response cycle, which is stateless, a WebSocket connection remains open, allowing both the client and the server to send messages at any time.
- HTTP (Stateless): The client sends a request, the server responds, and the connection closes. Each request is independent and has no knowledge of previous ones. To simulate interactivity, techniques like polling are used, which is inefficient.
- WebSockets (Stateful, Full-duplex): A persistent connection is established. The server can "push" data to the client without the client explicitly requesting it, and vice versa. This reduces latency and overhead.
While traditional applications (FastAPI, Django, Flask, Laravel) use HTTP to serve content, WebSockets are a protocol that allows a bidirectional and persistent connection.
This entire implementation can be adapted for a clean architecture in FastAPI
The problem with the traditional Client-Server model (HTTP)
In the classic HTTP scheme, communication works like this:
- The Client (Browser): Makes a request whenever "it feels like it" (when reloading or navigating).
- The Server: Receives the request, processes it, and returns a response.
- End of communication: Once the response is delivered, the connection dies.
If the server has new information, it is impossible for it to send it to the client unless the client requests it first. In a traditional design, if there is no user action, the server cannot communicate with you.
The solution: WebSockets and Full-Duplex communication
What if you need a real-time chat application (like WhatsApp or Telegram)? If we used HTTP, the client would have to ask every 2 or 3 seconds: "Are there new messages? How about now? Now?". This is extremely inefficient and consumes unnecessary resources.
WebSockets solve this by creating a persistent communication channel. It is like entering a room:
- Persistent connection: Once the server accepts the client, the channel remains open (like an active phone call).
- Full-Duplex: The server can send you updates whenever it wants, and you can send data to it simultaneously without closing the connection.
States and Technical Operation: The lifecycle of a WebSocket
Unlike HTTP, which is a "stateless" protocol, WebSockets introduce additional states that we must manage:
- Handshake: The client asks to join and the server decides whether to accept.
- Active connection: The state where messages are exchanged.
- Message exchange: Data is sent in "frames" that can be text, binary, or JSON.
- Disconnection: Either because the client closes the browser or the server decides to "kick" the user.
In tools like FastAPI or Django Channels, this translates into specific methods for connecting, receiving messages, and disconnecting.
How to identify a WebSocket in the browser
When you inspect a normal web page in the Network section, you will see that requests start with http:// or https://. However, WebSockets use a different scheme:
- ws:// (Simple WebSocket)
- wss:// (Secure WebSocket)
In FastAPI code, you will see this reflected not with the typical @app.get or @app.post decorators, but with @app.websocket.
Common use cases:
- Live chats: Instant communication between users.
- Push Notifications: Alerts that reach the phone or browser instantly.
- Live collaboration: Like Google Docs, where you see what others write in real-time.
- Financial markets: Second-by-second updates of stock or cryptocurrency prices.
Now that we are clear on the theory and the difference between a stateless channel (HTTP) and a persistent one (WebSocket), we are ready to start with the practice in FastAPI!
Creating a minimal application with WebSockets in FastAPI
Our purpose in this section is to build a basic application to connect to a WebSocket. To do this, we will use Jinja2 to render the HTML template from which we will consume the service.
The minimal structure of our application would look like this:
from fastapi import FastAPI, APIRouter, WebSocket, Request
from fastapi.templating import Jinja2Templates
app = FastAPI()
router = APIRouter()
templates = Jinja2Templates(directory="templates")
WebSocket Implementation on the Server
Unlike traditional routes (GET, POST, etc.) that use the HTTP protocol, we will define a specific endpoint for WebSockets:
@router.websocket("/ws")And we create a "Hello World" type of WS, meaning it's as simple as possible:
api.py
@router.websocket("/ws")
async def websocket_endpoint(websocket: WebSocket):
   await websocket.accept() # We accept the connection
   while True:
       data = await websocket.receive_text() # We wait for messages
       await websocket.send_text(f"Message received: {data}") # We respond
As we mentioned before, since WS is a stateful and permanent connection between the client and the server, there is a previous step before sending/receiving messages, which is to accept the connection:
websocket.accept()Logically, you can implement logic before accepting the connection depending on the application's purpose. For example, if it were a paid service, you could verify the user's payment registration BEFORE accepting the request.
The rest of the function waits for a message from the user (which we will send through a form that we implement in the next section):
data = await websocket.receive_text() # We wait for messagesAnd then sends the message back with an additional wrapper of “Message received: ”:
await websocket.send_text(f"Message received: {data}") # We respondWhy do we use async?
The function must be asynchronous (async def). This is vital because a WebSocket connection is like a permanent "room". If we were to use a synchronous scheme (as in old versions of Django), the server thread would get "stuck" waiting for the user's response.
With async, if the user is not interacting, the server can release that thread to process other requests, making FastAPI extremely efficient.
The previous method is totally efficient even if you see an infinite loop with `while True`. In it, by having an `async` call inside, the asynchronous thread does NOT wait, which would happen if the function were NOT asynchronous. Instead, the thread can perform any task WHILE it awaits responses from the other asynchronous functions it is waiting for:
data = await websocket.receive_text() # We wait for messages
await websocket.send_text(f"Message received: {data}") # We respond
The Client: Connection from the Browser
To interact with our API, we will create an HTML form and use Vanilla JavaScript. It is important to remember that JavaScript is independent of the backend framework; the connection will be the same whether you use FastAPI, Django, or Node.js:
templates\ws\chat.html
<!DOCTYPE html>
<html lang="en">
<head>
    <meta charset="UTF-8">
    <meta name="viewport" content="width=device-width, initial-scale=1.0">
    <title>Document</title>
</head>
<body>
    <h1>WebSocket Chat</h1>
        <form action="" onsubmit="sendMessage(event)">
            <input type="text" id="messageText" autocomplete="off"/>
            <button>Send</button>
        </form>
        <ul id='messages'>
        </ul>
        <script>
            var ws = new WebSocket("ws://localhost:8000/ws");
            ws.onmessage = function(event) {
                var messages = document.getElementById('messages')
                var message = document.createElement('li')
                var content = document.createTextNode(event.data)
                message.appendChild(content)
                messages.appendChild(message)
            };
            function sendMessage(event) {
                var input = document.getElementById("messageText")
                ws.send(input.value)
                input.value = ''
                event.preventDefault()
            }
        </script>
</body>
</html>
The ws:// Protocol
The first thing you'll notice in the script is that the connection URL doesn't start with http, but with ws:// (or wss:// if it's secure), as it is a different standard protocol.
var ws = new WebSocket("ws://localhost:8000/ws");JavaScript
Connection to the server:
const socket = new WebSocket("ws://localhost:8000/ws");Listening for messages from the server:
socket.onmessage = function(event) {
   const messages = document.getElementById('messages');
   const message = document.createElement('li');
   message.textContent = event.data;
   messages.appendChild(message);
};
For the rest of the code above, what it does is get a reference to the HTML, the UL, create a LI, and set it, which corresponds to the message back from the server.
Sending messages to the server:
function sendMessage(event) {
   const input = document.getElementById("messageText");
   socket.send(input.value);
   input.value = '';
   event.preventDefault();
}
In the code above, when the form is submitted, the sendMessage() function is called, gets the reference to the input, its value, and sends it to the server.
Verification in Developer Tools
When running the application with uvicorn, we can open the browser console (F12) and go to the Network tab.
- Handshake: You will see a request with a 101 Switching Protocols status. This indicates that the server has agreed to "switch" from HTTP to WebSocket.
- Frames: Within the connection, you will be able to see the up arrows (messages sent by you) and the down arrows (responses from the server).
- If you close the tab or stop the server, the onclose event will be triggered, closing the communication "room". This flow of Accept -> Listen/Send -> Close is the basis of any real-time system.
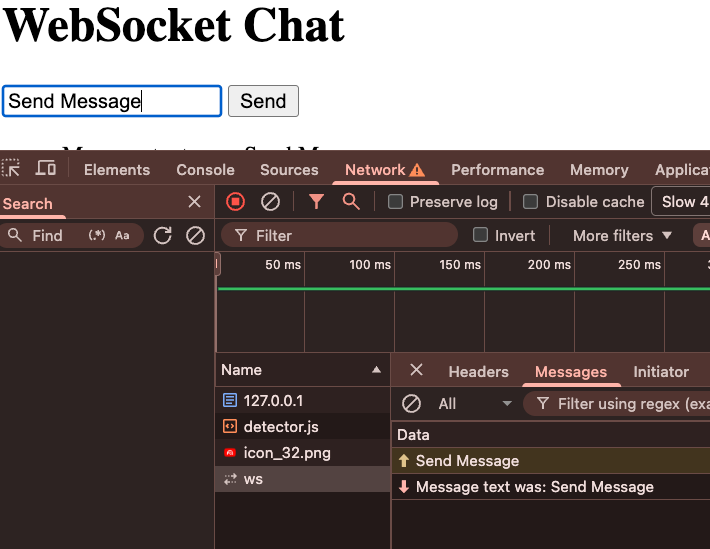
Figure 14-1: Connection and sending of messages via WS
Exceptions, Disconnection, and Simple Connections
In the previous implementation, we saw a WebSocket in its simplest form; what we could call the "Hello World" of this technology. In short, it allowed us to send a message from our application and receive it back.
It is important to note that we are not using HTTP here, but rather the WS protocol. So far, we have seen three main methods:
- Accept connection: The initial handshake.
- Receive text: Listening to what the client sends.
- Send text: The server's response.
Unlike the traditional HTTP scheme (one-way client-server), WebSockets function like a room where messages flow in a Full-Duplex manner. This means that both the client and the server can speak at the same time without waiting for the other to finish.
Comparison and Lifecycle: FastAPI vs Django Channels
To help you better understand the structure, we can compare it with an implementation in Django Channels. Although the syntax varies depending on the technology, the concept is identical. In Django, we usually have more organized methods such as connect, disconnect, and receive:
import json
from channels.generic.websocket import WebsocketConsumer
class ChatConsumer(WebsocketConsumer):
    def connect(self):
        print('Connect')
        self.accept()
    def disconnect(self, code):
        print("Disconnet")
    def receive(self, text_data):
        text_data_json = json.loads(text_data)
        message = text_data_json['message']
        print(message)
        self.send(text_data=json.dumps({ 'message':message }))
In FastAPI, even though it might seem like everything is more "mixed together" inside a while True loop, we can complete the scheme by handling disconnection through exceptions.
Handling Disconnection with WebSocketDisconnect
It is essential to implement a disconnection method to free up resources. If you are creating a chat or an application that requires tracking connection time, you need to know when the client leaves.
To do this, we wrap our logic in a try...except...finally block:
@app.websocket("/ws")
async def websocket_endpoint(websocket: WebSocket):
    await websocket.accept()
    try:
        while True:
            print('conection open')
            data = await websocket.receive_text()
            await websocket.send_text(f"Message text was: {data}")
    except WebSocketDisconnect:
        # --- EVENT: UPON DISCONNECTION (Clean close) ---
        print("El cliente cerró la conexión")

    except Exception as e:
        # Capture other unexpected errors
        print(f"Error inesperado: {e}")

    finally:
        # --- FINAL LOGIC ---
        # This block always executes, ideal for resource cleanup
print("Connection cleanup finished")- except WebSocketDisconnect: This runs when the client closes the tab or loses the connection. You can execute cleanup logic here.
- finally: A block that will always execute, regardless of whether the connection ended successfully or with an error. It is the ideal place to close internal processes.
Simple Connections
To close this section, we must identify a critical limitation in our current implementation. If you open two browser tabs (two client instances) and type in one, you will see that the message does not appear in the other.
Why does this happen? Currently, each connection is treated as a private room where only the client and the server exist. Every time we connect, FastAPI creates a separate space, and these spaces do not communicate with each other.
If we wanted to create a group chat application or a collaborative tool, this scheme is ineffective because we need the server to be able to retransmit (broadcast) the message to all connected clients, which we will see in the next section.
Managing Multiple Connections (Connection Manager)
So far, our communication via WebSockets was quite limited, as we couldn't interact with other users connected to the same server. Each connection was an isolated "island." To solve this and allow the creation of rooms or groups where messages are shared among several participants, we are going to implement connection management logic.
In a real application, we don't just chat with ourselves. We need a way to manage multiple connected clients and send them messages.
Since each WebSocket connection is handled by a separate instance of our endpoint function, we cannot simply use a local list to track connections. We need a singleton class or a global object that manages the state of all active connections.
Creating a ConnectionManager class
To better organize the code, we have created a class called ConnectionManager. This class is responsible for manually tracking who is connected, since in FastAPI we must manage this list ourselves.
This class will centralize the logic for connecting, disconnecting, and sending messages to clients.
api_multiple.py
from fastapi.templating import Jinja2Templates
templates = Jinja2Templates(directory="templates/")
app = FastAPI()
router = APIRouter()
@app.get('/')
def form(request: Request):
    return templates.TemplateResponse(request=request, name='ws/chat.html')
@app.websocket("/ws")
async def websocket_endpoint(websocket: WebSocket):
    await websocket.accept()
    try:
        while True:
            print('conection open')
            data = await websocket.receive_text()
            await websocket.send_text(f"Message text was: {data}")
    except WebSocketDisconnect:
      # --- EVENT: ON DISCONNECTION (Clean Closure) ---
      print("The client closed the connection")

    except Exception as e:
        # Capture other unexpected errors
        print(f"Unexpected error: {e}")

    finally:
      # --- FINAL LOGIC ---
      # This block always executes, ideal for resource cleanup
      print("Connection cleanup complete")
Constructor and connection handling
In the constructor method, what we are going to do is handle multiple connections.
In the case of FastAPI, we have to add those connections manually. That is, when connections occur, we are going to add them to a list.
Notice here that we declare an array of type WebSocket, because they are the connections, and we initialize it by default as an empty list. When the server starts, this loads like this, empty, waiting for connections.
Connect method
Now we have a method called connect, in which we will receive the client's connection. This is precisely the WebSocket connection.
The first thing we do is accept the connection, that is, we wait for the process to complete successfully.
Here you could add any business logic: verify authentication, validate permissions, check some state, etc.
Once the connection is accepted, we add it to the array we declared before. Therefore, we already have one stored connection, or several connections, which in our example will be two or more when we test it.
Disconnect method
The disconnect method simply removes the connection from the list.
There is no additional logic here because the connection already exists: we simply remove it from the list when the client disconnects.
Handling disconnection
When the client disconnects, we use the same scheme: we call disconnect and remove the connection from the list.
This method does not need to be asynchronous because the connection no longer exists; we simply remove it from the list.
Sending messages and broadcast
Then we have the methods to send messages.
The message is an interesting topic because the format can vary: plain text, JSON, etc., but we will see that later.
Here we always use the WebSocket to send messages.
The broadcast method is asynchronous, like all operations working with WebSockets.
If we have active connections, we send the message to each one of them. This doesn't happen by magic: we do it manually, iterating over the list of connections and sending the message one by one.
Finally, this would be the entire definition of the class.
Creating the WebSocket route
Just like before, we now create a route that allows us to consume this WebSocket.
@app.websocket("/ws/{client_id}")Notice that we are now receiving a parameter called client_id. This parameter identifies the room.
All clients that have the same client_id will connect to the same WebSocket and will be able to communicate with each other.
We create the method, receive the connection and the client_id, use the manager instance, and call the connect method. Then we enter the while true, wait to receive data, and call the broadcast method, which sends the message to all clients connected to that room.
In the template, place a fixed client for demonstrative purposes:
templates\ws\chat.html
var ws = new WebSocket("ws://localhost:8000/ws/5");ConnectionManager to use a dictionary instead of a list: self.active_connections: Dict[str, WebSocket] = {}.Configuring CORS in FastAPI for Vue Consumption
As I mentioned at the beginning of this section, my idea is to compare what we did in the Django course. If you haven't taken that training, I recommend it so you can get a glimpse of another excellent framework (personally, Django is my favorite).
Although it is not mandatory, since I will explain everything from scratch here, in that course we created a small project in Vue to consume a REST API.
We will adapt project, which originally consumed Django Channels, to connect it now with FastAPI using WebSockets. This will allow us to identify some common problems in communication between applications:
https://github.com/libredesarrollo/curso-libro-django-vue-channels
What is CORS?
In case we didn't mention it before, CORS stands for Cross-Origin Resource Sharing. It is a security mechanism implemented by browsers to control how resources are shared between different domains. In our case, being separate projects, FastAPI blocks access for security until we explicitly tell it which applications have permission to connect.
Third-Party Applications and Connectivity
Something interesting you will notice is that, until now, we have consumed WebSockets directly from the same FastAPI project. It's as if we created an API to consume it ourselves; it makes sense for some tests, but the true potential of an application arises when it interconnects with third-party applications, such as this Vue project.
When trying to connect an external application, we run into the first big obstacle: the dreaded CORS (Cross-Origin Resource Sharing).
How to test the Vue project:
- Make sure you have Node.js installed.
- Clone the repository with git clone.
- Install dependencies with npm install.
The code you should start adapting looks like:
src\App.vue
<template>
  <div class="container">
    <MessageComponent />
  </div>
</template>
<script>
import MessageComponent from '@/components/MessageComponent.vue'
export default {
  mounted() {
    this.tokenAuth = this.$cookies.get('token') ?? ''
  },
  data() {
    return {
      tokenAuth: '',
      roomIdSelected: ''
    }
  },
  computed: {
    tokenAuthRest: function () {
      const res = this.tokenAuth.split('_')
      return res[0] + ' ' + res[1]
    }
  },
  name: 'App',
  components: {
    MessageComponent
  }
}
</script>
Which is the Vue component used to connect to the WS we made before from FastAPI, but this time we do it from a Vue project.
Run the project with:
$ npm run devIn the Messages.vue component, you will see that the logic to connect the WebSocket is almost identical to the one we used before, only the "wrapper" changes: we define the address (ws://...) and the method runs automatically when the component is mounted:
src\components\MessageComponent.vue
<template>
  <div class="chat-container">
    <div class="messages-area" ref="messagesArea">
      <!-- <AlertsComponent ref="alertsComponent" @loaded="scrollToBottom" /> -->
      <p v-if="connecting">Connecting to chat...</p>
    </div>
    <div class="input-area">
      <textarea
        v-model="message"
        @keydown.enter.exact.prevent="send"
        placeholder="Type a message..."
        class="form-control"
        :disabled="connecting"
      ></textarea>
      <button @click="send" class="btn btn-primary" :disabled="connecting || message.trim() === ''">
        Send
      </button>
    </div>
  </div>
</template>
<script>
export default {
  components: {
  },
  data() {
    return {
      alertSocket: null,
      connecting: true
    }
  },
  mounted() {
    // Using setTimeout to ensure that root properties are available.
    // Consider a more robust state management solution (like Vuex or Pinia) in a larger app.
    setTimeout(this.websocketInit, 1000)
  },
  methods: {
    websocketInit() {
      const wsUrl = `ws://127.0.0.1:8000/ws/5`;
      this.alertSocket = new WebSocket(wsUrl);
      this.connecting = true;
      this.alertSocket.onopen = () => {
        console.log('WebSocket connection established.');
        this.connecting = false;
      };
      this.alertSocket.onmessage = (event) => {
        console.log('Message received:', event.data);
      };
      this.alertSocket.onclose = () => {
        console.log('WebSocket connection closed.');
        this.connecting = true; // Or handle reconnection logic
      };
      this.alertSocket.onerror = (error) => {
        console.error('WebSocket error:', error);
        this.connecting = false;
      };
    },
    send() {
      if (this.message.trim() !== '' && this.alertSocket && this.alertSocket.readyState === WebSocket.OPEN) {
        this.alertSocket.send(JSON.stringify({ message: this.message }));
        this.message = '';
        // We update getMessage to show our own message in the alerts component
        // this.$refs.alertsComponent.getAlerts();
      }
    },
  beforeDestroy() {
    if (this.alertSocket) {
      this.alertSocket.close();
    }
  }
}
</script>
<style scoped>
.chat-container {
  display: flex;
  flex-direction: column;
  height: 80vh; /* Example height, adjust as needed */
  border: 1px solid #ccc;
  border-radius: 8px;
  overflow: hidden;
}
.messages-area {
  flex-grow: 1;
  overflow-y: auto;
  padding: 15px;
  background-color: #f9f9f9;
}
.input-area {
  display: flex;
  padding: 10px;
  border-top: 1px solid #ccc;
  background-color: #fff;
  flex-shrink: 0;
}
.input-area textarea {
  flex-grow: 1;
  margin-right: 10px;
  resize: none; /* Prevents manual resizing which can break layout */
}
.input-area button {
  flex-shrink: 0;
}
p {
    text-align: center;
}
</style>
The CORS Problem
If you try to connect Vue with FastAPI without configuring anything, you will see a characteristic CORS error in the browser console. This happens because the browser blocks requests when the domain (or port) is different from the server's:
INFO:     127.0.0.1:55956 - "WebSocket /ws/alert/room/" 403
INFO:     connection rejected (403 Forbidden)
INFO:     127.0.0.1:64104 - "OPTIONS /api/alerts HTTP/1.1" 404 Not Found
INFO:     connection closed
In my case, I had to change the default Vue port (5173) for testing, as browsers sometimes store a kind of "cache" of CORS permissions and allow the connection even if you comment them out in the code. By changing the port, we force the browser to validate security again.
Enabling CORS in FastAPI
To fix this and allow external applications to consume our resources, we must configure a Middleware in FastAPI:
- Import the package: We need CORSMiddleware.
- Define origins: We create a list called origins with the allowed URLs (for example, the one from our Vue project).
- Add the Middleware: We inject it into the application instance.
api_multiple.py
from fastapi.middleware.cors import CORSMiddleware
***
# Define los orígenes permitidos (puedes usar ["*"] para permitir todo,
# pero no es recomendable en producción)
origins = [
    "http://localhost:3000",
    "http://127.0.0.1:3000",
    "http://localhost:5173", # Puerto común de Vue/Vite
]
app = FastAPI()
app.add_middleware(
    CORSMiddleware,
    allow_origins=origins,
    allow_credentials=True,
    allow_methods=["*"],
    allow_headers=["*"],
)
When restarting the server with this configuration, the connection will be established correctly. You will be able to see in the browser's Network tab how FastAPI accepts the connection and starts receiving messages from the server.
Authentication System Implementation (Login)
We are going to implement a simple authentication system. To do this, we will create a new method that we will later inject as a dependency, just as we have seen throughout the course. For now, we will not use databases; we will handle everything locally:
api_multiple.py
async def get_token(token: str = Query(...)): # REQUERIDO
    # Validación simple de token
    if token != "token-secreto":
        raise HTTPException(
            status_code=status.HTTP_403_FORBIDDEN,
            detail="Token inválido"
        )
    return token
# para conectar al WebSocket, el cliente
# deberá incluir el parámetro token: ws://localhost:8000/ws/123?token=token-secreto
@app.websocket("/ws/{client_id}")
async def websocket_endpoint(websocket: WebSocket, client_id: int, token: str = Depends(get_token)):
The method will receive a token. Remember that, being defined with "three dots" in our logic, it is mandatory and comes via URL parameters. Here we validate the token; in a real scenario, this would be the place to consult the database, something we have already practiced and that you can adapt yourself. For now, and for practical purposes, the user must provide the value "token-secreto".
This is purely a demonstration. If the token is different from what is expected, we return a 403 Forbidden exception indicating that access is prohibited. If it is correct, we return the token.
Connection Testing and WebSocket Protection
If we go back to the Vue application, we should receive a 403 error. When checking the Network tab, you will see that the connection was rejected because we are not sending the token yet. This is, precisely, the way to protect our WebSocket.
To fix this, we must pass the parameter via GET (Query Parameter) at the moment of connection:
src/components/MessageComponent.vue
const wsUrl = `ws://localhost:8000/ws?token=token-secreto`;If the token is correct, you will see in the Network panel that the connection is successfully established. If you enter anything else, you will receive the 403 error.
Here is the improved text, organized with headings and corrected for a smoother read, maintaining your explanatory and technical style.
Login Endpoint Implementation
We are going to implement a simple endpoint to perform the login. Initially, the validation will be local (hardcoded), although traditionally you would consult a database.
For this, we will use a Pydantic model that receives username and password. The validation logic will compare if both fields are equal to "admin". If the data is correct, we will return the "super secret token" that we will use for subsequent checks. Otherwise, we will return a 401 (Unauthorized) error with the message "Invalid credentials":
src\components\LoginComponent.vue
<template>
    <div>
        <div class="row">
            <div class="col-md-6 offset-3 mt-3">
                <div class="card">
                    <div class="card-header">
                        Login
                    </div>
                    <div class="card-body">
                        <input type="text" v-model="username" class="form-control" placeholder="User">
                        <input type="password" v-model="password" class="form-control mt-3" placeholder="Password">
                        <button class="btn btn-success btn-sm mt-3" @click="send">Send</button>
                    </div>
                </div>
            </div>
        </div>

    </div>
</template>
<script>
export default {
    data() {
        return {
            username:'admin',
            password:'12345'
        }
    },
    methods: {
        send:function(){
            const data = {
                username:this.username.trim(),
                password:this.password.trim(),
            }
            this.$axios.post('http://127.0.0.1:8000/api/login',data).then(
                (res) => {
                    console.log(res.data)
                    this.$root.tokenAuth=res.data.token
                    this.$cookies.set('token', this.$root.tokenAuth)
                }).catch((error) =>{
                    console.error(error)
                    // this.$cookies.set('token', "token-secreto")
                })
        }
    },
}
</script>
Logout Component Configuration in Vue
Before testing the login, we must enable the Logout component in our application. It is a simple process:
We have a button that triggers the logout function:
src\components\LogoutComponent.vue
<template>
    <div class="d-flex justify-content-end my-2 me-3">
        <button class="btn btn-danger" @click="logout">Logout</button>
    </div>
</template>
<script>
export default {
    methods: {
        logout() {
            this.$axios.post('http://127.0.0.1:8000/api/logout', {
                'token': this.$root.tokenAuth
            }).then(
                (res) => {
                    this.$root.tokenAuth = ''
                    this.$cookies.set('token', '')
                }).catch((error) => {
                    console.error(error)
                    this.$root.tokenAuth = ''
                    this.$cookies.set('token', '')
                })
        }
    },
}
</script>
This function:
this.$cookies.set('token', '')Is responsible for clearing the token, both in the execution memory (local state) and in the cookies.
It is important to handle errors: if the server fails or the resource does not exist, we still remove the token locally. This ensures that, from the user's perspective, the session is closed regardless of the server's state.
Configure Logout at the time of login
With the Logout component ready, we are going to load it as well at the time of login.
To organize the Login and Logout components in the interface, we will use the <template> tag instead of a <div>:
src\App.vue
<template>
  <div class="container">

    <LoginComponent v-if="tokenAuth == ''" />
    <template v-else >
      <MessageComponent />
      <LogoutComponent />
    </template>
  </div>
</template>
Why? Unlike a <div>, the <template> tag does not render in the final HTML, which keeps the DOM cleaner and more elegant.
Connection Testing and Debugging
In the Login component, we make the request using Axios:
this.$axios.post('http://127.0.0.1:8000/api/login',data).then(***)If we enter incorrect credentials, the console will show us the 401 error. Once we enter "admin/admin", the server returns the token correctly.
Conclusion
By checking the Network tab, we see that the connection is established and the token is stored, allowing for a persistent session. The most important thing about this class is not the database itself, but seeing how applications interconnect: a Vue frontend communicating with a FastAPI backend. As you can see, it's nothing out of this world; it's following the same integration logic.
Creating Models for the Chat with WebSockets
Now that we have practiced with WebSockets and simulated user behaviors using the Client ID (which actually represents the Room), it's time to formalize the structure. We are going to create the database models:
models.py
from sqlalchemy import Column, Integer, String, ForeignKey, DateTime, Table
from sqlalchemy.orm import relationship
from sqlalchemy.sql import func
from database import Base
import secrets
# Intermediate table for the ManyToMany relationship between Room and User
room_users = Table('room_users', Base.metadata,
    Column('room_id', Integer, ForeignKey('rooms.id')),
    Column('user_id', Integer, ForeignKey('users.id'))
)
class User(Base):
    __tablename__ = "users"
    id = Column(Integer, primary_key=True, index=True)
    username = Column(String, unique=True, index=True)
    password = Column(String)

    alerts = relationship("Alert", back_populates="user")
    rooms_joined = relationship("Room", secondary=room_users, back_populates="users")
    auth_token = relationship("Token", back_populates="user", uselist=False)
class Alert(Base):
    __tablename__ = "alerts"
    id = Column(Integer, primary_key=True, index=True)
    content = Column(String(200))
    user_id = Column(Integer, ForeignKey("users.id"))
    room_id = Column(Integer, ForeignKey("rooms.id"))
    created_at = Column(DateTime(timezone=True), server_default=func.now())

    user = relationship("User", back_populates="alerts")
    room = relationship("Room", back_populates="alerts")
class Room(Base):
    __tablename__ = "rooms"
    id = Column(Integer, primary_key=True, index=True)
    name = Column(String(60), unique=True)

    alerts = relationship("Alert", back_populates="room")
    users = relationship("User", secondary=room_users, back_populates="rooms_joined")
class Token(Base):
    __tablename__ = "tokens"
    # We generate a key similar to DRF
    key = Column(String, primary_key=True, index=True, default=lambda: secrets.token_hex(20))
    user_id = Column(Integer, ForeignKey("users.id"))

    user = relationship("User", back_populates="auth_token")
The schemas:
schemas.py
from pydantic import BaseModel
from typing import List, Optional
from datetime import datetime
class UserBase(BaseModel):
    username: str
class User(UserBase):
    id: int
    class Config:
        from_attributes = True
class AlertBase(BaseModel):
    content: str
class Alert(AlertBase):
    id: int
    created_at: datetime
    user_id: int
    class Config:
        from_attributes = True
class RoomBase(BaseModel):
    name: str
class Room(RoomBase):
    id: int
    users: List[User] = []
    class Config:
        from_attributes = True
# Schemas for Request Body
class LoginRequest(BaseModel):
    username: str
    password: str
class LogoutRequest(BaseModel):
    token: str
Remember to install SQL:
$ pip install SQLAlchemyIn Summary:
1. The Pivot Table (Many-to-Many): room_users
Let's start with the relationship between users and rooms. A room can have multiple users, and a user can belong to multiple rooms.
To handle this Many-to-Many relationship, we need an intermediate (Pivot) table. The identifier we previously called Client ID will now formally be a Room.
2. User Model and Identity
The User model will have the basic fields: id, username, and password.
Relationships: The user is related to their "Alerts" (which in this context are chat messages).
Tokens: We also include a One-to-One relationship with a tokens table to handle authentication. I have configured uselist=False in SQLAlchemy to ensure that each token returns a single object and not a list.
3. Token Management
The tokens table will automatically generate a unique key using a lambda function with secrets.token_hex. This is vital so that the server can validate who is trying to connect to the room before granting permission.
4. Rooms and Messages (Alerts)
Finally, we define the Room and Message models (called Alert in the code):
Rooms: Contain the list of users (using the secondary pivot table) and the list of associated messages.
Messages: Store the content, creation date, and relationship with the author.
Correction note: I have corrected an important detail. Initially, the messages were not directly associated with the room. I have added the room_id field and its respective Foreign Key (FK) so that when a room is loaded, the system can filter and display only the messages that belong to that group.
API Router Implementation in FastAPI
To keep things organized, we will create the necessary REST resources for rooms and messages. I have configured an APIRouter to avoid cluttering the main application file.
1. Database Connection
We use the standard FastAPI schema for dependency injection. We implement a function with yield to efficiently get the database session; this ensures that the connection is automatically closed when the HTTP request finishes, as we did before:
rest_api.py
from fastapi import APIRouter, Depends, HTTPException, status, Header
from fastapi.responses import JSONResponse
from sqlalchemy.orm import Session
from typing import List, Optional
import models
import schemas
from database import SessionLocal, engine
# Create tables in the DB (for the purposes of this example)
models.Base.metadata.create_all(bind=engine)
router = APIRouter()
# Database Dependency
def get_db():
    db = SessionLocal()
    try:
        yield db
    finally:
        db.close()
2. Alerts and Rooms Endpoints
Two main routes are defined:
- Alerts (/alerts): This method returns a list of messages. Currently, it performs a simple query ordered by creation date. Later, we will add a filter by room_id so that it only returns the messages from a specific room.
- Rooms (/rooms): Returns the "pool" or list of available rooms. On the frontend, these will be clickable to allow the user to enter each one.
rest_api.py
@router.get("/alerts", response_model=List[schemas.Alert])
def alerts(user: models.User = Depends(get_current_user), db: Session = Depends(get_db)):
    alerts = db.query(models.Alert).order_by(models.Alert.created_at).all()
    return alerts
@router.get("/rooms", response_model=List[schemas.Room])
def rooms(db: Session = Depends(get_db)):
    return db.query(models.Room).all()
3. The Login Process
The first thing is to create the POST route. For the login, we will use the LoginRequest schema from Pydantic, where we will simply request the username and password.
Implementation steps:
- Search: We inject the database and search for the user by their username.
- Existence Validation: If the user does not exist, we return an error.
- Security Note: I usually return a generic message like "Incorrect username or password". This avoids giving clues to a potential attacker about whether a username is valid or not, although since this is a demo, you can customize it as you prefer.
- Password Verification: If the user exists, we verify the password using verify_password. This is done using the bcrypt package that we installed at the end of this section, which allows us to create a password hash (remember that a hash, in short, consists of converting a set of data, a text -password in this example- into a unique alphanumeric string that cannot be reversed to obtain the original value, which is ideal for passwords).
rest_api.py
import bcrypt
***
def verify_password(plain_password: str, hashed_password: str) -> bool:
    password_byte_enc = plain_password.encode('utf-8')
    hashed_password_enc = hashed_password.encode('utf-8')
    return bcrypt.checkpw(password_byte_enc, hashed_password_enc)

@router.post("/login")
def login(request: schemas.LoginRequest, db: Session = Depends(get_db)):
    user = db.query(models.User).filter(models.User.username == request.username).first()

    if not user:
        return JSONResponse("User invalid", status_code=status.HTTP_401_UNAUTHORIZED)

    if not verify_password(request.password, user.password):
        return JSONResponse("Password invalid", status_code=status.HTTP_401_UNAUTHORIZED)

    # Get or Create Token
    token = db.query(models.Token).filter(models.Token.user_id == user.id).first()
    if not token:
        token = models.Token(user_id=user.id)
        db.add(token)
        db.commit()
        db.refresh(token)

    return {"token": f"Token_{token.key}"}
Token Generation
Once the credentials are valid, we proceed to manage the token:
- We search the tokens table to see if one already exists for that user (maintaining our 1-to-1 relationship).
- If it does not exist, we create it, add it to the database, and commit.
- Finally, we return the token's key to the client.
rest_api.py
@router.post("/login")
def login(request: schemas.LoginRequest, db: Session = Depends(get_db)):
    user = db.query(models.User).filter(models.User.username == request.username).first()

    if not user:
        return JSONResponse("User invalid", status_code=status.HTTP_401_UNAUTHORIZED)

    if not verify_password(request.password, user.password):
        return JSONResponse("Password invalid", status_code=status.HTTP_401_UNAUTHORIZED)

    # Get or Create Token
    token = db.query(models.Token).filter(models.Token.user_id == user.id).first()
    if not token:
        token = models.Token(user_id=user.id)
        db.add(token)
        db.commit()
        db.refresh(token)

    return f"Token_{token.key}"
schemas.py
class LoginRequest(BaseModel):
    username: str
    password: str
Remember to install:
$ pip install bcrypt4. Logout Implementation
The goal of Logout is to delete the token from the database to invalidate the session.
Unlike login, here the schema does not ask for a username and password, but for the token directly. Generally, the token arrives in a specific format (like Bearer), so we perform a split to separate the word "Bearer" from the actual key.
Process logic:
- We verify that the format is correct (that the split returns exactly two parts).
- We filter the database to find that token.
- Deletion: If the token is valid and exists, we delete it from the table and commit.
- Response: We return an "OK" message. If the token did not exist, we also return "OK", since, either way, the user is no longer authenticated in the system.
rest_api.py
@router.post("/logout")
def logout(request: schemas.LogoutRequest, db: Session = Depends(get_db)):
    token_str = request.token
    if len(token_str.split('_')) == 2:
        token_name, token_key = token_str.split('_')
        if token_name == 'Token':
            token = db.query(models.Token).filter(models.Token.key == token_key).first()
            if token:
                db.delete(token)
                db.commit()
    return "ok"
schemas.py
class LogoutRequest(BaseModel):
    token: str
Registration Endpoint Implementation
To test the Login and Logout processes, we need to have users in our system. Therefore, we are going to create a registration endpoint (/register).
1. Backend Logic
We will use a POST type route that will return a 201 Created status. The data schema will be very similar to the login one (username and password).
The registration flow follows these steps:
- Verification: We search the database to see if the username already exists. If so, we throw an exception indicating that the username has already been taken.
- Password Hashing: If the user is new, we convert the password into a secure hash before saving it.
- Persistence: We create the entity, save it in the database, and return a success message.
rest_api.py
import bcrypt
def get_password_hash(password: str) -> str:
    # We convert the password to bytes
    pwd_bytes = password.encode('utf-8')
    # We generate the salt and the hash
    salt = bcrypt.gensalt()
    hashed_password = bcrypt.hashpw(pwd_bytes, salt)
    # We return as a string to save in the DB
    return hashed_password.decode('utf-8')

@router.post("/register", status_code=status.HTTP_201_CREATED)
def register(request: schemas.RegisterRequest, db: Session = Depends(get_db)):
    user = db.query(models.User).filter(models.User.username == request.username).first()
    if user:
        raise HTTPException(status_code=status.HTTP_400_BAD_REQUEST, detail="Username already registered")

    hashed_password = get_password_hash(request.password)
    new_user = models.User(username=request.username, password=hashed_password)
    db.add(new_user)
    db.commit()
    return {"message": "User created successfully"}
schemas.py
class RegisterRequest(BaseModel):
    username: str
    password: str
Vue.js Interface
On the frontend, I have adapted the Login component to create a Registration one. To keep the exercise simple and not complicate it with vue-router, I have implemented a component swapping logic based on a boolean variable (showRegister).
- Parent Component: Handles the state and decides whether to show the access form or the registration form.
- Child Component (Registration): Emits a custom event to the parent after a successful registration so that the interface hides the registration form and returns to login automatically.
src/components/RegisterComponent.vue
<template>
    <div>
        <div class="row">
            <div class="col-md-6 offset-3 mt-3">
                <div class="card">
                    <div class="card-header">
                        Register
                    </div>
                    <div class="card-body">
                        <input type="text" v-model="username" class="form-control" placeholder="User">
                        <input type="password" v-model="password" class="form-control mt-3" placeholder="Password">
                        <button class="btn btn-success btn-sm mt-3" @click="send">Register</button>
                        <button class="btn btn-link btn-sm mt-3" @click="$emit('show-login')">Login</button>
                    </div>
                </div>
            </div>
        </div>

    </div>
</template>
<script>
export default {
    data() {
        return {
            username:'',
            password:''
        }
    },
    methods: {
        send:function(){
            const data = {
                username:this.username.trim(),
                password:this.password.trim(),
            }
            this.$axios.post('http://127.0.0.1:8000/api/register',data).then(
                (res) => {
                    console.log(res.data)
                    this.$emit('show-login')
                }).catch((error) =>{
                    console.error(error)
                    // this.$cookies.set('token', "token-secreto")
                })
        }
    },
}
</script>
src/components/LoginComponent.vue
<template>
    <div>
        <div class="row" v-if="!showRegister">
            *** Login Form
        </div>
        <RegisterComponent v-else @show-login="showRegister = false" />
    </div>
</template>
<script>
import RegisterComponent from './RegisterComponent.vue'
export default {
    components: {
        RegisterComponent
    },
    data() {
        return {
            ***
            showRegister: false
        }
    },
    ***
}
</script>
Registration, Login, and Logout Testing: FastAPI + Vue
We are going to review the most important points of the Login and Logout modules. These are the pillars of our development, and it is essential that you verify your configuration matches so you can consume the FastAPI app from Vue.
1. API Configuration and Routes
We are employing a multiple API scheme. It is important to note that, although we have a Websocket configured, it allows only one connection; meaning, for now, we cannot connect multiple users in the same room.
Regarding the routes:
We are using the /api prefix to be consistent with the configuration we have in the frontend (Vue.js).
The main router (API router) manages the Login and Logout endpoints.
To access them, the final routes are: api/login and api/logout:
app.include_router(api_router, prefix="/api")2. User Management
You create a user through registration and use those details to attempt authentication via the login component.
3. Security
When generating the token, we append the word "token" before the generated string:
return {"token": f"Token_{token.key}"}This is a convention similar to those used by frameworks like Laravel or Django (which use Bearer or Token prefixes).
I have implemented this as a basic protection measure. Upon receiving the Logout request, the system verifies that the string has this structure before processing it. If it doesn't, we don't even attempt the operation, thus avoiding potential errors or processing issues.
Running the Tests
- We start the application (it may take a moment due to the initial Websocket connection).
- We enter the user credentials.
- Upon clicking Sign In, we see in the console that the data is passed correctly.
- The token is generated (or retrieved if a valid one already existed) and the cookie is configured in the browser.
Logout Test
The logout flow is as follows:
- We click on Logout.
- The application deletes the local token and automatically redirects us to the Login screen.
- If we try to reload or navigate without the token, the system denies us access. The flow works perfectly.
Check the database when you generate the token and when it is deleted through logout to see that everything is working perfectly.
Next step, learn how to create your own AutoCRUD for your models in FastAPI.
Source code:
https://github.com/libredesarrollo/curso-libro-django-vue-channels