
Content Index
- Laragon, the easiest environment for developing in Laravel
- Problems when starting with Laravel
- About Laragon to develop apps in Laravel
- Verify Installations: Composer
- Install laravel/installer
- Difference between composer.json and composer.lock
- Update project
- Extra: Update Composer to version 2
- Go to the composer installation directory
- Check Composer V1 version
- Download Composer 2
- Install (run the PHP script) Composer V2
- Laravel Installer Update
- Laravel Installer Update
- Valet Linux Installation on CachyOS
- Prerequisites and System Dependencies
- General System Update
- Installation of PHP and Essential Extensions
- php-fpm
- php.ini File Configuration
- Composer Installation (Global)
- PATH Configuration for Fish Shell
- Laravel Valet Installation and Deployment
- Launching the Valet Installer
- Technical Workflow (Daily Use)
- Diagnostic Commands and Common Utilities
- MariaDB Installation and Configuration
- Data Directory Initialization
- Service Activation and Security Startup
- Import Database
- Other Useful Commands
- Performance is Incredible, but Changing Versions is Manual
- Cache Problems
- Enable SQLite Driver
- Official Laravel 13 Visual Studio Code Extension
- Requirements and compatibility
- ⚠️ Caution with fake extensions
- Infinite Starter Kits in Laravel Thanks to the Community - Filament, Svelte, Wave and much +
- What does it consist of?
- How it's used
- How to fix Laravel command not found for zsh on MacOS
- How to fix Problem with the pdo_sqlite extension
In this entry we are going to talk about the UNofficial environment that is perfect for developing our applications if you are using Windows, which cannot be other than the one known as Laragon; this peculiar tool brings us everything necessary to develop our applications in this popular framework for PHP; first, let's see what Laragon is.
Laragon, the easiest environment for developing in Laravel
Laragon is a tool for developers that allows you to create different web development environments; not only for Laravel, but you can use it for other technologies such as PHP with other frameworks, Node, Python, Java, Go, Ruby and much more. Laragon runs on Windows, and is created to work with web applications in the Laravel framework; that is, as soon as we download the installer, we will be able to create projects in Laravel from now on without the need to install additional dependencies.
And as a reward, Laragon provides an isolated development environment, which means that it does not make changes at the Operating System level, otherwise it lives in a separate folder from the Operating System, therefore, you can have other solutions such as XAMPP and enable one or the other.
In addition, Laragon is fast and powerful and allows you to deploy projects with a single click; In the case of Laravel, when restarting the server, the clean URL is automatically generated by an Apache Virtual Host of the PHP projects, including Laravel, therefore, we already have the access URL to the project. Furthermore, Laragon is an interesting option for those developers looking for a solution to work with PHP on Windows; since, it even installs a friendlier console than the Windows CMD to develop.
Problems when starting with Laravel
One of the drawbacks that Laravel has is its learning curve or the first contacts we have with the framework, what happens from installation to taking the first steps with it; the installation of the framework ecosystem goes through several steps of complexity that goes from the range of technologies that it can cover that goes from our LAMP to reaching the entire Node ecosystem until reaching the installation of the environment to develop our applications in any OS.
In the case of Windows, it is not particularly easy to install this entire ecosystem (although it is not as simple as expected in MacOS either) whose official steps involve installing a virtualization of the system, that is, installing a virtual machine based on Ubuntu.
Luckily, there is a tool known as Laragon, which brings us everything we need to develop our applications in Windows.
As I told you before, to develop our applications in Laravel, we require multiple tools, a set of tools that we have to have installed on our computer and Laragon basically offers us a package of all these tools, so, in a few words, with With just one installer, we can have the entire necessary ecosystem.
About Laragon to develop apps in Laravel
On the official website you can see all the features and technologies that this tool offers us:
- PHP
- Apache
- Nginx
- MySQL
- Node
- A decent terminal
- Among other things
Install Laragon on Windows
Installing Laragon has been the usual; download and install:
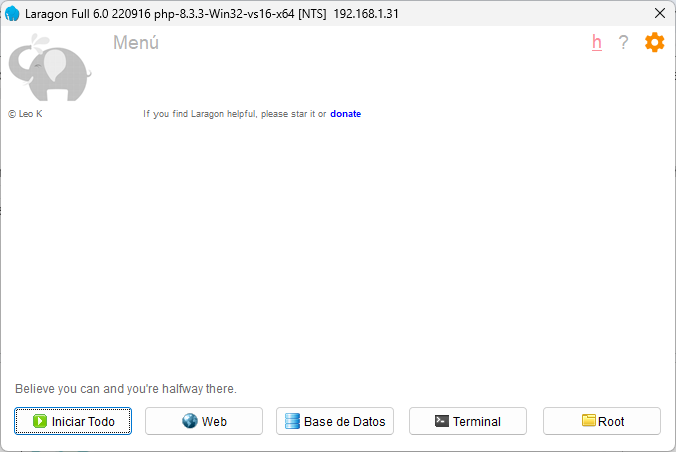
Here I recommend the full version (Laragon Full) that weighs about 130Mb
Remember to give it permissions on the OS, since it must touch system files when generating projects, such as the Windows host that has to match the generated virtualhost that is necessary when generating the clean URL to be able to develop our applications in Laravel.
Verify Installations: Composer
Now with our Laragon fully loaded, let's do some testing to install the Laravel installer even if it sounds redundant...
Install laravel/installer
On the official Laravel page, you can find all the information you need to start developing your applications in Laravel; among that pertinent information we have the necessary ecosystem (our Laragon works perfectly for us) and how we can install Laravel.
To install Laravel you have to open your Laragon terminal and run the following composer command:
$ composer global require laravel/installerAnd position yourself on the www folder of your Laragon (in case you are no longer there):
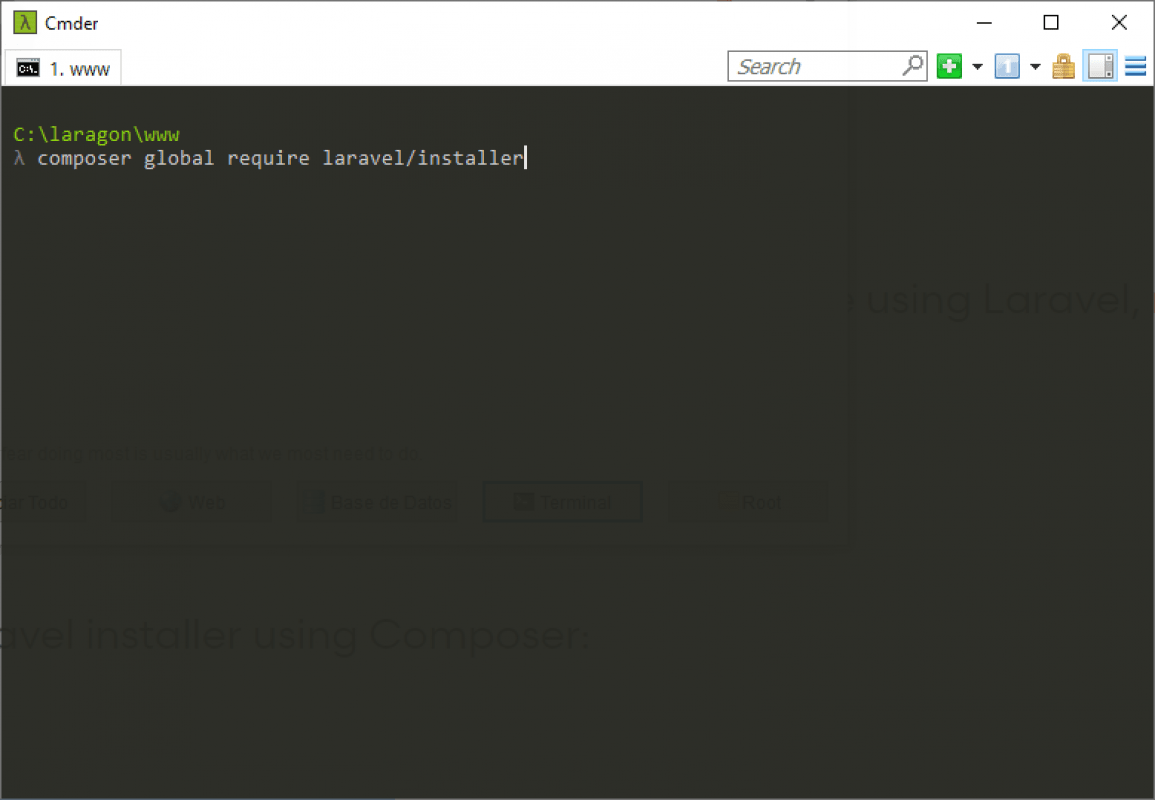
Which would be the one we use to install the Laravel installer according to the official documentation:
And with this, we are ready to create our first project; for that we execute:
$ laravel new laratestAnd if we restart our Laragon (turn off the services and start again) we are ready to see our brand new project in the browser:
http://laratest.test/
Where the url is basically the name of your project with the extension of .test
Difference between composer.json and composer.lock
Composer is a dependency manager for PHP and for PHP, which means that we can easily install packages for PHP if we use a project with PHP support; currently, all modern PHP frameworks such as Laravel or CodeIgniter already come with Composer support for free, therefore, the use of this tool is essential.
Composer is a tool that allows you to declare the libraries on which the project depends and the specific versions of these; automatically when doing a composer install or update the dependencies are installed.
In Laravel and any PHP project that uses composer to manage packages, we have two types of files, composer.json and composer.lock and in this post we will see what the difference is between them.
In composer.json you specify which packages should be installed and with what versions, that is, the packages that make up the project are found. For example:
   "require": {
       "artesaos/seotools": "^1.3",
       "laravel/framework": "^11.0",
This file is generated by composer and is used by it to download and install the project dependencies in Laravel or another.
In the previous example, we are indicating the Laravel/framework and Artesaos/seotools packages that must be installed with version 1.3 or higher and 11 or higher respectively. If you wanted an exact version, you would remove the ^ character.
In this file you will also find other rules such as name, project description and minimum versions, such as:
"php": "^8.2",The composer.json is useful for much more, but this is the fundamental thing.
While composer.lock records the specific versions you are installing and is what composer reads when you run composer update, this file is automatically generated when you run the previous command.
Update project
Usually, when you want to update the project, you can delete this file and run the composer.json command again, with this the .lock is regenerated with new versions
Extra: Update Composer to version 2
We are going to learn how you can migrate or update your composer version from 1 to 2 using Laragon, although you can repeat the steps regardless of the system you are using.
Go to the composer installation directory
In your terminal, you have to cd to the location of the composer installation in Laragon:
? cd..
C:\laragon\www
?
Check Composer V1 version
To find out which version of composer you are working with, you have to run the following command:
composer -VIn my case, it gives me something like the following:
Composer version 1.10.7 2026-12-03 17:18:15Download Composer 2
The download and installation of composer in its version 2 can be done through the command line using php; for it:
php -r "copy('https://getcomposer.org/installer', 'composer-setup.php');"What the previous command does is download the composer 2 installer in the directory where we are positioned; now we have to execute the same.
Install (run the PHP script) Composer V2
php composer-setup.php
And that's it, with this we have composer in its version 2, therefore, we can now delete the installer:
Remove installer
To remove the composer installer once used, we can use the php unlink function using the following command:
php -r "unlink('composer-setup.php');"Check Composer V2 version
Finally, we are going to verify the version of composer that we have installed, which at this point, if we did everything right, should be 2.x
composer -VA version that includes 2.x
Composer version 2.0.8 2026-12-03 17:20:38Laravel Installer Update
Laravel Installer is a command line tool that allows you to easily install Laravel on your computer; Of course, for this, first remember to have your development environment installed, such as Laragon or Sail, which you will also find articles in this blog. When you run the command:
$ composer global require "laravel/installer" The latest stable version of the Laravel Installer is downloaded and installed on your system. You can then create a new Laravel project using the command:
$ laravel new <nombre_del_proyecto> The necessary files from the Internet that make up our Laravel project will automatically begin to be downloaded and with this, our Laravel project will be automatically created without doing anything else.
Keeping the Laravel installer up to date is important since many times the latest versions of the framework require having an updated version of it.
Laravel Installer is a command line tool that allows you to install Laravel on a PC previously configured using Laragon, Sail, etc; When you run the command:
$ composer global require "laravel/installer"The latest stable version of the Laravel Installer is downloaded and installed on your system. You can then create a new Laravel project using:
$ laravel new <name_proyect> And wait for the process to finish, in which the necessary files will begin to be downloaded from the Internet to create a project in Laravel and with this, create our project in Laravel ready to use. Like everything, sometimes it is necessary to update its version, let's see a simple mechanism to do it.
Installing the new Laravel installer using Composer is easy, but what if you already have it installed? The latest Laravel installer will be essential for your workflow, so make sure you get the latest version. If you're scratching your head, we've got you covered!
Laravel Installer Update
If you already have globally required laravel/installer on your local machine, you can update to the latest version of laravel/installer by uninstalling and reinstalling it:
$ composer global remove laravel/installer
$ composer global require laravel/installer
Valet Linux Installation on CachyOS
For developers who choose Linux as their primary working environment, managing the local Laravel environment presents particular challenges. Unlike macOS or Windows, which have integrated official tools, on Linux we do not have an official version of dedicated graphical environments. Common alternatives are reduced to using containers via Laravel Sail —which adds the complexity layer of Docker— or configuring the entire web server, PHP, and databases manually, a process that is usually tedious.
To solve this, the community developed Valet Linux. It is important to highlight that it is not an official tool from the Laravel core, but a fork maintained by the community. Valet Linux works similarly to its Valet counterpart for macOS: it sets up an agile and lightweight development environment based on Nginx, but without a graphical interface and with certain limitations, such as less flexibility to quickly alternate between PHP versions. Despite this, its performance is excellent and its initial configuration is extremely simple.
There is a port of Laravel Valet maintained by the community for Linux (cpriego/valet-linux) that manages Nginx and DnsMasq in the background to automatically give you local .test domains because the Laravel team does NOT support Laravel Herd and Valet on Linux.
Prerequisites and System Dependencies
Before proceeding with the global installation of Valet, it is recommended to prepare the operating system with the necessary dependencies. Unlike packaged solutions, here we must install PHP and its extensions manually.
General System Update
Before installing critical dependencies, it is mandatory to synchronize the main CachyOS and Arch repositories to avoid shared library conflicts:
$ sudo pacman -Syu --noconfirmThe main challenge in Linux is distribution fragmentation, since each one handles a different package manager. The following steps and instructions are specifically designed for CachyOS (and Arch Linux-based distributions that use pacman). If you use another distribution (such as Ubuntu, Debian, or Fedora), you can adapt these packages to the corresponding commands of your manager (apt or dnf).
This section shows a technical and structured way to install and configure Laravel Valet (Linux) on Linux, specifically on Arch distributions, although you can ask an AI chat to translate the commands for the distribution you are using.
Unlike Docker or heavy environments, Valet offers unmatched native speed while consuming minimal system resources.
Installation of PHP and Essential Extensions
Laravel and Valet require specific PHP components to compile in addition to nginx, make secure connections, and process structured data. We install the base package along with its usual extensions:
$ sudo pacman -S php php-fpm php-gd php-intl php-sqlite php-sodium php-imagick --noconfirmOther extensions:
$ sudo pacman -S nginx curl git unzip jq base-devel nss xsel networkmanager libsodium --noconfirmValet automatically manages reverse proxy servers (Nginx), DNS requests (DnsMasq), and SSL certificates (NSS). We install the tools that Valet will invoke in the background:
- nss: So Valet can generate and inject local SSL certificates (https://).
- jq: JSON processor to read configurations.
- xsel: Automatically copies generated .test URLs to your clipboard.
- networkmanager: For local DNS management (CachyOS already includes it by default, but it doesn't hurt to make sure).
You can see the official requirements at:
https://cpriego.github.io/valet-linux/requirements
php-fpm
php-fpm (FastCGI Process Manager) is the tool that allows Nginx to process PHP code. When you install and run valet install:
- Valet automatically modifies php-fpm configuration files.
- It configures a Linux "socket" so Nginx sends requests from your .test sites directly and ultra-fast.
- It manages the service for you (starts, stops, or restarts it when you change something).
You enable it with:
$ sudo systemctl enable --now php-fpmphp.ini File Configuration
By default, Arch Linux keeps almost all extensions disabled in the global configuration file. We must enable the necessary modules by editing the file:
$ sudo nano /etc/php/php.iniLook for the following lines, removing the semicolon (;) at the beginning to activate them:
extension=bcmath
extension=curl
extension=exif
extension=fileinfo
extension=gd
extension=iconv
extension=intl
extension=mbstring
extension=openssl
extension=pdo_mysql
extension=pdo_sqlite
extension=sodium
extension=zip
Or
$$ sudo sed -i 's/;extension=curl/extension=curl/' /etc/php/php.ini
$ sudo sed -i 's/;extension=iconv/extension=iconv/' /etc/php/php.ini
$ sudo sed -i 's/;extension=mbstring/extension=mbstring/' /etc/php/php.ini
$ sudo sed -i 's/;extension=openssl/extension=openssl/' /etc/php/php.ini
$ sudo sed -i 's/;extension=pdo_mysql/extension=pdo_mysql/' /etc/php/php.ini
$ sudo sed -i 's/;extension=zip/extension=zip/' /etc/php/php.ini
$ sudo sed -i 's/;extension=sodium/extension=sodium/' /etc/php/php.ini
$ sudo sed -i 's/;extension=bcmath/extension=bcmath/' /etc/php/php.ini
The sudo sed -i command modifies files directly on the system. It consists of two parts:
- sed: It is a text editor that searches, replaces, or deletes patterns.
- -i: Indicates that changes are applied "in place", altering the original file permanently.
Composer Installation (Global)
We download the standard PHP dependency manager from the Arch repositories, ensuring immediate global access:
$ sudo pacman -S composer --noconfirmPATH Configuration for Fish Shell
Global binaries installed by Composer are stored in the user's directory. For your terminal to recognize commands like valet or laravel, add the path to the Fish configuration file:
$ fish_add_path ~/.config/composer/vendor/binLaravel Valet Installation and Deployment
With the entire dependency ecosystem ready, we install the Valet Linux executable package via Composer:
$ composer global require cpuncker/valet-linuxWe add composer to the path:
$ fish_add_path ~/.config/composer/vendor/binLaunching the Valet Installer
Run the native installer. This command will modify your local network configurations, create the proxies in Nginx, and bring up DnsMasq automatically:
$ valet installTechnical Workflow (Daily Use)
To deploy projects immediately without manually configuring virtual servers, follow this standard procedure:
Create a root folder in your user directory where your developments will live:
$ mkdir -p ~/Sites && cd ~/SitesRegister that folder in the Valet routing mapping engine:
$ valet park- Add the Laravel installer to the PATH in fish:
$ fish_add_path ~/.config/composer/vendor/bin
- The command
valet parkregisters the current location. From this moment on, any Laravel project folder located within that directory will be accessible from the web browser via a clean URL structured ashttp://folder-name.test.
Create any PHP or Laravel project inside that folder. For example:
$ laravel new my-project- Open your browser immediately and go to http://my-project.test without needing to configure hosts or open ports manually.
Diagnostic Commands and Common Utilities
The key tools for managing the lifecycle of the environment are listed below:
valet stop: Stops all services (Nginx, PHP-FPM, DnsMasq) to free up RAM.valet start: Initializes the development environment again.valet status: Shows the status of the services used by Valet.valet restart: Useful after modifying thephp.inifile to apply changes immediately.valet secure [project-name]: Generates signed local SSL certificates to simulate HTTPS production environments.
MariaDB Installation and Configuration
MariaDB provides the relational database engine in the local environment.
$ sudo pacman -S mariadb --noconfirmData Directory Initialization
Before starting the service for the first time, it is imperative to initialize the engine's internal structure:
$ sudo mariadb-install-db --user=mysql --basedir=/usr --datadir=/var/lib/mysqlService Activation and Security Startup
We enable the service to start automatically with the machine and proceed to configure the base credentials:
$ sudo systemctl enable --now mariadb
$ sudo mariadb-secure-installation| Wizard Question | Recommended Action | Technical Explanation |
|---|---|---|
| Enter current password for root | Press Enter | By default, it comes empty in new installations. |
| Switch to unix_socket authentication | Type n | Allows authenticating with traditional username and password from IDEs. |
| Change the root password? | Type Y | Sets your development password (previously used example: root). |
| Remove anonymous users? | Type Y | Removes unidentified access for local security. |
| Disallow root login remotely? | Type Y | Restricts management connections solely to 127.0.0.1. |
| Reload privilege tables now? | Type Y | Applies password changes immediately. |
Import Database
If you want to export an existing database:
# 2. Import the file passing the user 'root' and the password 'root'
mariadb -u root -proot database_name < your_backup_file.sql
Other Useful Commands
Restart the PHP-FPM service:
$ sudo systemctl restart php-fpmPerformance is Incredible, but Changing Versions is Manual
- Speed: As there are no virtualization layers or containers involved, PHP requests are processed at the
maximum speed allowed by your hardware. - Versions: On Arch/CachyOS, being rolling release distributions, when you install php you will always get the absolute
latest version available (for example, PHP 8.4 or 8.5 depending on the current repository). - The Downside: If you have an old project that strictly requires a previous version (like PHP 8.2), on
Valet Linux you cannot switch versions with a simple click like in Herd.- You would have to resort to specific AUR packages
(like php82) and manually configure Valet to point to that binary.
- You would have to resort to specific AUR packages
Cache Problems
If you notice that changes to the code are NOT reflected in the browser, try disabling the opcode cache (which is a cache that allows PHP to store precompiled code):
$ sudo nano /etc/php/php.iniFind the following lines and make sure to leave them as they are (if they have a semicolon at the beginning, delete it to enable them):
opcache.enable=0
opcache.enable_cli=0
Restart Valet to apply the new PHP configuration:
$ valet restartEnable SQLite Driver
To avoid the error:
could not find driver connection pgsql / sqlite / mysqlWhen trying to use SQLite, you must install and enable it. To do so:
If you use SQLite (the most common default driver):
$ sudo pacman -S php-sqliteIf you use MySQL / MariaDB:
$ sudo pacman -S php-gd php-pdo_mysqlIf you use PostgreSQL:
$ sudo pacman -S php-pgsqlOpen the configuration file:
$ sudo nano /etc/php/php.iniSearch for (using Ctrl + W):
;extension=pdo_sqlite
;extension=sqlite3
;extension=pdo_mysql
Remove the semicolon (;) at the beginning of the extension you want to use to enable it.
Save changes (Ctrl + O, Enter) and exit (Ctrl + X).
Restart the daemon:
$ sudo systemctl restart php-fpmOfficial Laravel 13 Visual Studio Code Extension
As an Editor, I recommend Visual Studio Code with its official extension.
This means it is no longer necessary to install 40 different extensions from various developers. In principle, you only need this one, which centralizes the essential functionalities for working with Laravel.
Although, in my case, I also had to install the Laravel Blade formatter, because for some reason the official extension didn't recognize it correctly yet (even though according to the description it should). Even so, it's a huge step forward to have an official and unified package.
Requirements and compatibility
Keep in mind that this extension requires PHP 8 or higher, which makes perfect sense, as the minimum supported version for the latest versions of Laravel is PHP 8.2.
⚠️ Caution with fake extensions
A very important point: make sure you install the correct extension, from the official link above.
Many malicious extensions are currently appearing on the Marketplace, so always check the editor identifier, which must be:
laravel.vscode-laravel
This way, you ensure that you are installing the official extension from the Laravel team and not a fake or potentially dangerous copy.
Infinite Starter Kits in Laravel Thanks to the Community - Filament, Svelte, Wave and much +
When creating a project in Laravel, we have several flavors or configurations that we can use.
This functionality allows us to directly indicate the "template" or base boilerplate we want to use, leveraging existing community projects.
What does it consist of?
Basically, anyone can create their own Laravel installation, modify it by adding the packages, configurations, or structures they consider useful, and then share it as a reusable template.
This way, we can clone and create a new project based on that template with a single command.
How it's used
When creating the project, we simply use the --using option followed by the repository that contains the template:
$ laravel new example-app --using=<REPO>For example, if we want to use a specific template hosted on GitHub, we just have to indicate the repository URL.
Practical example
An example of a repository that implements this functionality is the following:
https://github.com/tnylea/laravel-new
In short, instead of manually cloning a project you found online, you can now do it directly from the Laravel creation command, which makes the process much faster and cleaner.
How to fix Laravel command not found for zsh on MacOS
The terminal commands are great in the Laravel ecosystem since they allow you to create the project to be able to manage different parts of it; when we install the Laravel installer globally with composer, many times it is not recognized as a valid command until we add it to the path; let's see how to do it.
To allow the use of commands beginning with 'laravel', you will need to edit your .zshrc file; usually this happens when executing the laravel installer:
laravel new proyectolaravelThis file should be in your home folder.
First, check if the file exists:
open -e ~/.zshrc
Next, add the following code to the bottom of your .zshrc file:
PATH="$HOME/.composer/vendor/bin:$PATH"Save the file. The changes will now be implemented in any new terminal session. Please stop the current session or run the code below, and then it will work for the current session as well:
source ~/.zshrcHow to fix Problem with the pdo_sqlite extension
It is important to point out that you must have at least PHP version 8.3.3 to work with Laravel 11; on my YouTube channel, I explain how you can configure Laragon with PHP 8.
For the rest, Laragon already brings us everything we need to start working on Laravel.
From the button that says ”Start All”, you start both Apache and MySQL (which you must do in order to work with Laravel); so, if you have another LAMP environment enabled on your computer, first, you must download said services and then up the service with the aforementioned button:

In addition to installing Laragon, you must enable the following "pdo_sqlite" extension:
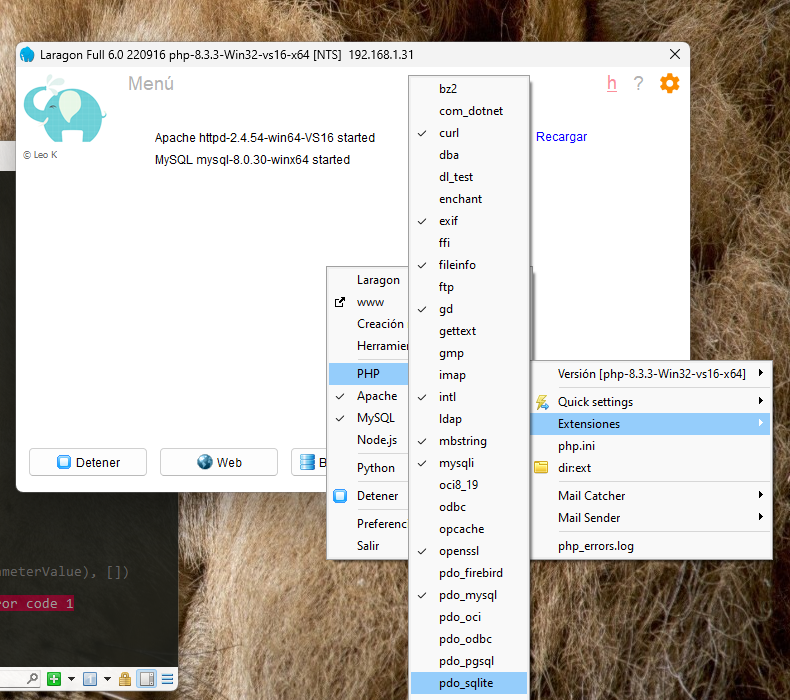
Or when creating the project in Laravel it may stop with an error or when starting the server an error like the following:
could not find driver PRAGMA foreign_keys = ON;And it is because you must enable the previous extension.
On linux, you can install the following dependency:
$ sudo apt-get install php-sqlite3And it is to prevent it from throwing an error like the following:
   INFO  Application key set successfully.

    > @php -r "file_exists('database/database.sqlite') || touch('database/database.sqlite');"
    > @php artisan migrate --ansi

   Illuminate\Database\QueryException

  could not find driver (Connection: sqlite, SQL: PRAGMA foreign_keys = ON;)

  at vendor\laravel\framework\src\Illuminate\Database\Connection.php:813
    809                     $this->getName(), $query, $this->prepareBindings($bindings), $e
    810                 );
    811             }
    812
    813           throw new QueryException(
    814                $this->getName(), $query, $this->prepareBindings($bindings), $e
    815             );
    816         }
    817     }
In addition to installing Laragon, you must enable the following "pdo_sqlite" extension:
Although Laragon was great, it's now a paid tool and is listed as just another option, but for modern development, I recommend Laravel Herd for developing Laravel applications.