
Content Index
- What you need before deploying Laravel on Apache
- Shared Hosting vs. VPS: What you should consider
- Laravel's compatibility with old PHP versions
- Node Integration
- Files and folders to publish
- Simplify or discard the .env file
- Uploading the project to the hosting
- Finish project configuration
- Production environment and initial configuration
- Permissions and security in Laravel with Apache
- Activating and deactivating debug mode correctly
- Managing the .env file in production
- Configure the database
- Importing the database from local
- Configuring the database in production
- .htaccess
- PHP Dependencies: vendor folder and Composer
- Files and folders you should upload to the server: Which folders to upload and which not
- Correct project structure on the hosting
- Correct location in public_html or www
- Configuring the VirtualHost in Apache
- ⭐️ Hostinger, the best hosting for Laravel
- ✨ Advantages of Using Hostinger with Laravel
- Features and Tools
- Uploading the project to the hosting (FTP and cPanel)
- Creating FTP credentials from the panel
- Uploading the project with FileZilla
- Domains, subdomains, and pointers
- Optimizing Laravel in production
- Recommended Artisan commands
- Choosing a hosting for Laravel with Apache
- What a modern hosting for Laravel should offer
- Why a hosting compatible with Laravel supports everything
- Recommendations for Laravel production: Optimize your files
- What does each part do?
- Clearing cache (very important)
- Practical recommendations
- DON'T forget to check the project log in Laravel when it is in production
- Final tip
- Frequently asked questions about Laravel deployment on Apache
- Conclusion: how to make a solid Laravel deployment on Apache
Once you've finished implementing your amazing Laravel project, the next thing you'll surely want to do is show it to everyone—that is, take it to production or deploy it. The steps you need to follow don't differ much from any other PHP project, regardless of whether it's a framework or not. However, in this chapter, we'll look at some considerations you can take into account. It's important to remember that there are many ways to do the same thing, and the steps may vary depending on the options provided by the hosting you are using.
The quintessential server used to publish or serve a Laravel project on a hosting provider is Apache. Laravel can be served in several ways:
https://laravel.com/docs/master/deployment
But, if we look at the current market, most hosting providers offer at least the following features for their basic, most affordable plan:
- PHP
- MySQL
- Apache
Now with our application debugged using the Laravel debug bar.
What you need before deploying Laravel on Apache
Minimum server requirements (PHP, extensions, and versions)
Laravel is demanding with its environment, and that's a good thing. For current versions, you need:
PHP 8.2 or higher
Common extensions: mbstring, openssl, pdo, xml, curl, fileinfo, etc.
Web server: Apache
Database: MySQL or compatible
Composer
(Optional but common) Node.js
If your hosting doesn't support PHP 8.2, the problem isn't Laravel. In my case, this was the main reason for leaving an old hosting provider that simply wouldn't let me use Laravel 11 or higher.
The first thing you should do in these cases is to check the minimum versions. Usually, the most important one is the PHP version, which for the current version of the framework is 8.2 or higher. If your hosting doesn't have the minimum PHP version, you won't be able to use version 11 or higher. In these cases, you can use a lower version of the framework that is supported by the hosting, and this is the first recommendation you should keep in mind. Likewise, if you have doubts, you can ask the hosting provider you plan to hire if they support Laravel.
One of the great advantages and disadvantages of Laravel is that the latest versions usually use modern versions of PHP. This is good because we can use all the modern features and security fixes, but it's also a disadvantage because it's often not possible to use the latest PHP versions, or the hosting provider simply hasn't updated to them.
Shared Hosting vs. VPS: What you should consider
Tutorials often assume a clean VPS with Ubuntu. The reality is that many projects live on:
- Shared hosting
- cPanel
- FTP
- public_html
And yes, Laravel works perfectly on shared hosting, as long as:
- It supports the correct PHP version
- It allows configuring the DocumentRoot or using .htaccess
In fact, after migrating my Laravel 13 blog to a modern hosting provider, the performance improved noticeably without touching a single line of code.
Laravel's compatibility with old PHP versions
Laravel moves fast. This has a clear advantage (security, performance) and a disadvantage: not all hosting providers keep up.
If your hosting only goes up to PHP 7.4:
- You won't be able to use Laravel 12 or higher
- You'll have to downgrade or switch providers
My recommendation is clear: choose the hosting first and then the Laravel version, not the other way around.
With the main aspect to consider when publishing our project clear, let's address another important point: Node.
Node Integration
As has been mentioned, one of the fundamental differences in Laravel compared to other frameworks is its direct integration with Node. We can easily add client-side (or server-side if required) technologies with Node, install React, Vue, or Angular to develop our applications. For example, suppose we also have an integration with Vue, as taught in the book. Before publishing, remember to also run the command to generate the client-side files for production, which is usually:
$ npm run buildAnd automatically, you should test the development done in Node, which should work the same way as it did in the development environment:
$ npm run devIf the application was developed correctly, in case you have an error, you must fix it and run the command:
$ npm run buildAgain.
You can check the commands used to generate the builds in:
package.json
Although usually the two mentioned above are sufficient.
We have already used the `dev` command, which is used during development. For production, you should use the build command; with this, the output files will be generated in the public folder.
Files and folders to publish
The next point to consider is what we are going to take to production. We must publish the entire project except for the node_modules folder.
Pay special attention to the vendor folder, which is where the libraries and packages that make up the project are located, including the Laravel framework itself, which tends to be quite large. The node modules folder is only used in the development phase.
Simplify or discard the .env file
As we mentioned earlier, avoid using environment variables in the .env file as much as possible. If it's essential for you, you can use it, but simplify it as much as you can.
Uploading the project to the hosting
At this point, we are assuming that you have a hosting plan. In the hosting administration panel, there is a section to manage FTP connections, which will allow us to upload each of the project's folders and files as listed previously. So, you should create an account from your hosting's cPanel.
And with this data, you can use an FTP client like FileZilla, where in the section:
- Files - Site Manager
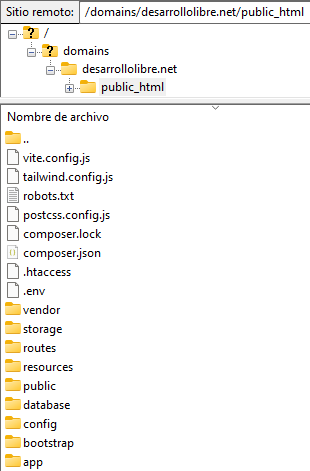
You can enter the credentials specified by your hosting and user; with this, it is possible to establish a connection and upload all the project files. Usually, you should upload them to the public_html or www folder. You will likely have several folders on the hosting, but there should be one of them where they indicate with a file like the following:
- /domains/<YourDomain>/DO_NOT_UPLOAD_HERE
- /domains/<YourDomain>/public_html
Where you can upload the files and where you cannot. Usually, you should drop all the project content into the root of this directory. This is so that, from the domain configured on the server, you have direct access without concatenating the folder or folders in the domain's URL; for example:
- /domains/<YourDomain>/public_html/laravelproject
- YourDomain.com/laravelproject
There are some servers like iPage where you can place a pointer to be able to place the project's root folder in the domain, and in this way, it is easier to organize several projects on the same server since you can point the domain not to the server's root but to a specific folder within it.
Here you can see how the project looks when uploaded to Hostinger:
Finish project configuration
Production environment and initial configuration
At this point, you should have all the project files and folders on the hosting. As a recommendation, keep the development environment active to see the project's errors as we have it up to this point:
.env
APP_ENV=local
APP_DEBUG=true
Since with this we can quickly check when an error occurs. Also, remember that when you have the project in production, Laravel generates an error log in:
storage/logs/laravel.log
As an additional recommendation, try to keep all possible configurations in their corresponding files and avoid using the .env file, which, although it can be used in both development and production environments, is more prone to errors, such as deleting or changing a key-value pair by mistake or simply being deleted by accident.
This can have fatal consequences for your application and cause it to fail catastrophically; by managing the configurations in their corresponding files, you make the application more secure against this type of situation.
Permissions and security in Laravel with Apache
Laravel needs to write to:
- storage
- bootstrap/cache
Otherwise, it will fail.
Activating and deactivating debug mode correctly
- Activate it only for testing
- Always deactivate it at the end
Managing the .env file in production
I have a clear opinion on this based on experience:
the less you depend on the .env file in production, the better.
I'm not saying don't use it, but:
- Simplify it as much as possible
- Avoid scattered critical configurations
I've seen applications break simply because someone deleted or edited a .env file incorrectly.
Configure the database
From your hosting, you must create a database and run your project's database. Since it's a production application, you must decide which records to delete and which to keep for production. The process begins by exporting the database from your project. For this, you can use any client like the ones we use in this book, such as HeidiSQL or TablePlus, and export it in SQL format.
Then, with this exported database, the next step is to create an empty database on the hosting for the subsequent execution of the previously generated SQL. When creating the database, remember to put the connection data in the production project:
config\database.php
'mysql' => [
    'driver' => 'mysql',
    'url' => env('DB_URL'),
    'host' => env('DB_HOST', '127.0.0.1'),
    'port' => env('DB_PORT', '3306'),
    'database' => env('DB_DATABASE', '<YourDB>'),
    'username' => env('DB_USERNAME', '<YourUsername>'),
    'password' => env('DB_PASSWORD', '<YourPassword>'),
Importing the database from local
Export from local in SQL and then import it into production using:
- phpMyAdmin
- HeidiSQL
- TablePlus
Configuring the database in production
Create the database on the hosting
From the panel:
- Create the database
- Create the user
- Assign permissions
.htaccess
Possibly, if you try to access the application from the production domain, you will see a 403 error or similar. This is because the only public files are inside the public folder, which is in the project root. We need a mechanism to tell Apache that the framework's startup file, index.php, is inside the public folder and not in the root. For this, we define the following content inside the .htaccess file:
.htaccess
<IfModule mod_rewrite.c>
    RewriteEngine On
    RewriteRule ^(.*)$ public/$1 [L]
</IfModule>
With this configuration ready, the application should now work normally.
PHP Dependencies: vendor folder and Composer
In production, you need the vendor folder, yes or yes. That's where Laravel and all its dependencies are.
Options:
- Upload vendor via FTP
- Or run composer install --no-dev on the server
What you should never upload:
- node_modules
Files and folders you should upload to the server: Which folders to upload and which not
You should upload the entire project, except:
- node_modules
Pay special attention to:
- vendor
- storage
- bootstrap/cache
Correct project structure on the hosting
You will normally work with paths like:
/domains/your-domain/public_htmlIdeally, the project should be in the root or the domain should point directly to the correct folder.
Avoid scenarios like:
yourdomain.com/laravelproject
Whenever possible.
Correct location in public_html or www
Some hosting providers allow domain pointers. This is ideal if you manage several projects on the same server and want order.
Not all of them allow it, but when it exists, use it.
Configuring Apache correctly for Laravel
DocumentRoot pointing to the public folder
Golden rule:
Apache must ALWAYS point to the public folder
Never move index.php out of public.
This not only breaks things: it exposes sensitive files.
This error appears a lot in forums, and it always leads to problems.
Configuring the VirtualHost in Apache
Usually, you DON'T have to touch any of this, but, depending on your hosting, you might have to. Here is an example:
<VirtualHost *:80>
   ServerName yourdomain.com
   DocumentRoot /var/www/laravel/public
   <Directory /var/www/laravel/public>
       AllowOverride All
       Require all granted
   </Directory>
</VirtualHost>
Each project should have its own VirtualHost. Otherwise, you'll end up breaking other projects, as often happens when Apache "redirects everything" to the same site.
⭐️ Hostinger, the best hosting for Laravel
Hostinger is the hosting of the moment, and it's not just a trend. It's a really good hosting provider, with many options to customize our experience and it's affordable. In other words, it's the best value for money, and best of all, we can use it to publish or deploy our Laravel application.
I have migrated my blog (created in the latest version of Laravel, version 11) to Hostinger, and the experience has been superior to what I had with my previous hosting provider, iPage.
- Personal Experience: I was with iPage for years, and although it was good at first, the last few months were terrible: speed issues, unexpected downtime, and a very high price. Also, it didn't allow updating to Laravel 11 due to its outdated environment.
- Savings and Value: I paid approximately €360 for 4 years at Hostinger. In contrast, iPage cost me $160 annually.
If you are looking for a hosting that meets modern PHP requirements and offers customization at a low cost, Hostinger is my top recommendation.
- ✅ Compatibility: If it supports Laravel, it supports any framework with lower requirements, like CodeIgniter 4.
- Guarantee: If you're not convinced, you have 30 days to request a full refund.
✨ Advantages of Using Hostinger with Laravel
Hostinger is an excellent option for hosting PHP-based web applications, even with its shared plan (the most affordable one). Here are the main reasons:
- Impressive Performance (LiteSpeed)
- Hostinger uses LiteSpeed servers, which ensures very fast processing of HTTP/2 requests. This is crucial for SEO, as a fast page load improves your ranking on Google and other search engines.
- Compatibility with the Latest Versions of PHP and MySQL
- One of the best features is its constant support for the latest versions of PHP and MySQL. This is fundamental because Laravel always stays at the forefront with the most recent PHP versions.
- Security
- Hostinger offers excellent security, including application-level malware scanning for uploaded files.
- Excellent Value for Money
- It offers an unparalleled relationship between cost and the features it provides.
Features and Tools
Using Hostinger is very easy, as it has all the necessary tools for managing our applications:
- Database and Administration: Includes MySQL servers with administration via PHPMyAdmin.
- Web Server: Uses the Apache server.
- Flexible Configuration: Allows you to easily change PHP and MySQL versions, as well as manage extensions (DLLs).
- Control Panel: Its control panel is pleasant and easy to use, with many custom options.
- Support: Their customer service is fast, although, as is common on many platforms, they usually do not provide highly technical information for specific PHP projects.
If you want to get Hostinger at a special price, here is my referral link: https://hostinger.es?REFERRALCODE=1ANDRS96
Common Apache errors (403, broken routes, Index Of)
The most common errors I see:
- 403 Forbidden
- Apache showing Index Of
- Routes that don't work
In 90% of cases:
- DocumentRoot misconfigured
- .htaccess not being read
- Incorrect permissions
Uploading the project to the hosting (FTP and cPanel)
Creating FTP credentials from the panel
From cPanel or the hosting's own panel:
- Create FTP user
- Limit access to the correct folder
Uploading the project with FileZilla
FileZilla is still sufficient:
- Drag and drop folders
- Verify that everything was uploaded correctly
This is where many errors are born: incomplete uploads.
Domains, subdomains, and pointers
If you can point a domain directly to /public, do it.
It will save you extra configurations and errors.
Optimizing Laravel in production
Configuration, route, and view cache
In production, I always run:
$ php artisan optimizeIt noticeably improves performance.
Recommended Artisan commands
- config:cache
- route:cache
- view:cache
Performance on Apache: Here I noticed a clear difference after migrating hosting: Laravel wasn't slow, the server was.
Choosing a hosting for Laravel with Apache
Common problems on old hostings
- Outdated PHP
- Downtime
- Little flexibility
- High prices
Exactly what happened to me after years of using a provider that didn't evolve.
What a modern hosting for Laravel should offer
- Updated PHP
- Good performance
- Flexible configuration
- Reasonable price
Why a hosting compatible with Laravel supports everything
If it supports Laravel, it supports any PHP framework with fewer requirements. It's that simple.
Recommendations for Laravel production: Optimize your files
I wanted to add a little additional information related to the vendor folder, as it's key to understand how it works, especially when we go into production. We can compare it to what happens in the Node.js ecosystem with the node_modules folder.
When we create a project in Laravel, it's common to also have a node_modules folder, especially if we work with tools like Vue, React, Tailwind, etc. This folder contains packages needed only during development, and we then run npm run build to generate files optimized for production.
A similar thing happens with the vendor folder. Although you can upload it as is to your production server, it's best to optimize it beforehand, as it also contains dependencies that are only used during development.
Recommended command to optimize vendor:
composer install --no-dev --optimize-autoloaderWhat does each part do?
- install Installs dependencies.
- --no-dev: Avoid installing dependencies marked as development in composer.json.
- --optimize-autoloader: Generates a more efficient autoloader to improve performance.
This is equivalent, in simple terms, to having a “minified” version of your PHP dependencies for production.
Clearing cache (very important)
In production, it's also recommended to clear the cache, as it could be causing errors that don't appear locally.
You can do this with:
php artisan config:clear
php artisan route:clear
php artisan view:clear
php artisan cache:clear
If you don't have access to a terminal (such as on shared hosting), you can do this manually from an FTP client. For example, you can:
- Rename the bootstrap/cache folder
- Create a new, empty folder called cache
Upload the project and verify that everything works.
If everything checks out after a few days, you can delete the old folder.
Practical recommendations
Before running the Composer command: Move or rename the current vendor folder, in case you need it later, as it's the folder we use when developing.
Do not upload the vendor or node_modules folders to the Git repository. This is important if, based on the previous steps, you rename the vendor folder and keep it in the project; it will be tracked by Git.
If you're uploading the project via FTP: you can also compress it with a ZIP file (including the new optimized vendor folder), upload it, and unzip it on the server.
DON'T forget to check the project log in Laravel when it is in production
Surely when you upload your excellent application in Laravel to production and obviously you pass the flag to production here in your .env, or you simply do not upload the .env to production as I have mentioned in other videos, then surely you are left trembling from possible problems that may arise. occur in your application that is, errors and you do not know how to detect them; You can easily do this when you pass this check to production and automatically all errors are saved in a log and you do not have to configure anything else; so, the only thing you have to do here is look for that log that is in
storage/logs
From the records you can start applying corrections, so you simply download it, open it and evaluate what is shown in it and make the relevant corrections based on it from time to time.
Final tip
I apply these recommendations myself, for example, when I am going to update the files in the public/build folder. I do not delete it immediately, but rather rename it (for example, __build) and keep that backup for a few days until you are sure that everything works correctly.
Frequently asked questions about Laravel deployment on Apache
- Is it safe to move index.php out of public?
- No. Never.
- Does Laravel work well on shared hosting?
- Yes, perfectly, if the environment is correct.
- Apache or Nginx for Laravel?
- Both work. Apache is still very common in hosting.
- Why does Laravel fail in production and not in local?
- Almost always due to the environment, not the code.
Conclusion: how to make a solid Laravel deployment on Apache
The steps shown in this chapter are for informational purposes and to be taken as a reference when you want to serve your project in production. However, depending on the project and the hosting you are going to use, you may have to use more configurations or vary the ones specified here.
Deploying Laravel with Apache is not complicated, but it does require understanding the real environment where the application will run. Most problems do not come from Laravel, but from the hosting, a misconfigured Apache, or unrealistic expectations.
If you choose the server well, prepare the project correctly, and respect Laravel's structure, it works and works very well in production.
If you want to know how you can deploy a Laravel application in Docker using Railway.