
Content Index
- Why use PayPal as a payment gateway in Laravel?
- Advantages of integrating PayPal into your web projects
- Access keys and test users
- ⚙️ Configure credentials in Laravel (.env and config/app.php)
- Implement the PayPal payment button with JavaScript SDK
- Create the button with paypal.Buttons()
- ️ Process the PayPal order from Laravel (backend)
- Server response validation
- Common errors and how to solve them
- Final tips based on my experience
PayPal is the e-wallet par excellence and is widely used for online shopping, meaning over the Internet, and we can easily use it in any web project. Laravel is no exception, and we can easily configure it as a payment gateway.
In this section, we will learn the steps to configure PayPal as a payment method for a product we want to sell.
Although we don't have a dedicated PayPal package for Laravel, we do have a solution in JavaScript, which does not require using an exclusive PHP package, as we'll see later:
https://www.npmjs.com/package/@paypal/paypal-js
The first thing we must do is install the package using the following command, only if you want to use the Node option:
$ npm install @paypal/paypal-jsWe will use the CDN option.
Why use PayPal as a payment gateway in Laravel?
PayPal offers a fast and global way to receive payments without worrying about card management.
Furthermore, by integrating it into Laravel, you can leverage the framework's structure and keep your application secure, modular, and scalable.
Advantages of integrating PayPal into your web projects
- User trust (globally recognized brand).
- Compatibility with Laravel and JavaScript SDK.
- Testing environment (sandbox) ideal for developers.
- No need to handle sensitive customer data.
Prerequisites and development environment
- Laravel 10 or higher.
- PayPal Developer Account.
- Node.js (if using npm) or just access to the official PayPal CDN.
- Axios (already included by default in Laravel).
In my case, I prefer to use the PayPal SDK CDN because it avoids additional configurations and simplifies script loading.
Access keys and test users
To integrate PayPal into our application, we must have a PayPal account. Once obtained, we go to the PayPal developer site:
https://developer.paypal.com/home
We click on the option that says "API Credentials" and create an application. To do this, we press the "Create App" button, and a dialog like the following will appear:
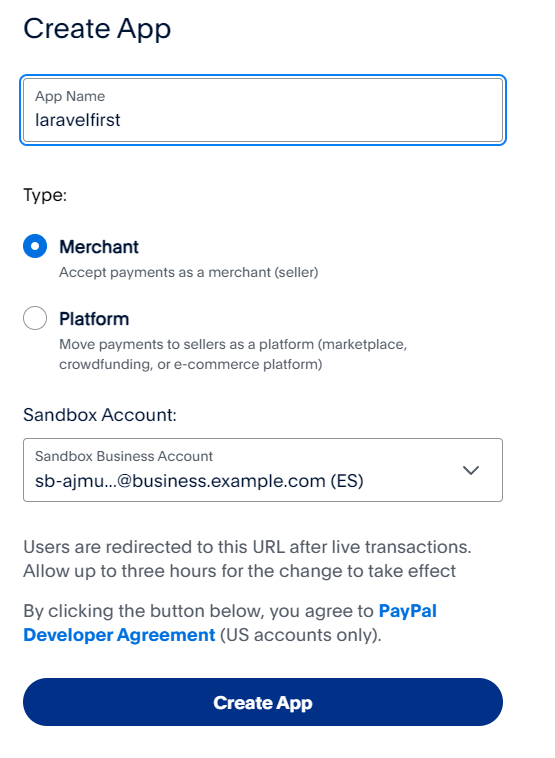
You can leave the "Merchant" option and "Create App".
Once the credentials to use the PayPal API are created, they will be listed at the bottom:
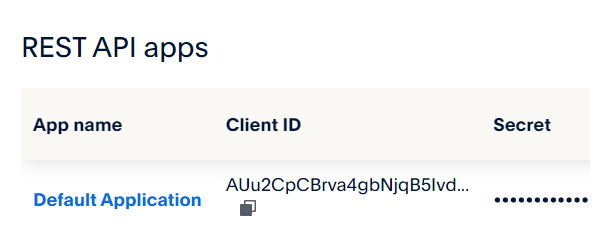
We have a secret key that we will use on the server and a public one that we will use on the client, so it will be exposed to anyone who views the page's source code from their browser. In turn, we have access to test keys, which we can use to make requests to a test or sandbox account.
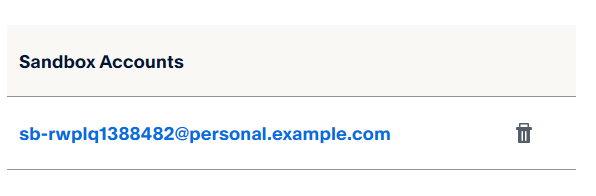
Apart from the keys, test users are generated that we will use to make connections to the PayPal testing API available under "Sandbox accounts":
⚙️ Configure credentials in Laravel (.env and config/app.php)
On the server, we must configure the access keys. As a recommendation, define the test ones as environment variables:
.env
PAYPAL_CLIENT_ID="<YOUR_DEV_PAYPAL_CLIENT_ID>"
PAYPAL_SECRET="<YOUR_DEV_PAYPAL_SECRET>"
And the production ones in the configurations:
config\app.php
return [
   ***
    'paypal_id' => env('PAYPAL_CLIENT_ID', "<YOUR_PRO_PAYPAL_CLIENT_ID>"),
    'paypal_secrect' => env('PAYPAL_SECRET',"<YOUR_PRO_PAYPAL_SECRET>"
),
Implement the PayPal payment button with JavaScript SDK
When using this package, we have to do development on both sides, the client and the server. Let's start with the client, where we do most of the configuration.
You can use npm:
$ npm install @paypal/paypal-jsOr the official CDN:
<script src="https://www.paypal.com/sdk/js?client-id={{config('app')['paypalCreate the button with paypal.Buttons()
On the client, let's start by creating a DIV that will serve as the container element for the PayPal widget. You can place any identifier that we will later use to reference the HTML element:
<div id="paypalCard"></div>The following function allows us to create the PayPal widget. First, we get a reference to the PayPal API that we will use to create the widget by:
paypal = await loadScriptWe have to do this if we work with the package in Node and some CDN options.
The next step is to create the order. There are many configuration parameters, but in this example, we only use the amount:
{
     amount: {
       value: this.price,
     },
},
Continuing with the implementation, we have the **onApprove()** callback, which executes when the user clicks on the widget and authorizes the payment. In it, we have a reference to the already created order, which consists of the payment information as well as the client information, which we will then use on the server. Therefore, the next step is to pass this data to the server to authorize it (and the private key is used on the server), for example, using an axios request:
onApprove: function (data, actions) {
   // TODO send data.orderID to server
}
The implementation with the PayPal CDN has two formats:
<!DOCTYPE html>
<html lang="en">
<head>
    <title>Document</title>
    src="https://unpkg.com/@paypal/paypal-js@8.0.0/dist/iife/paypal-js.min.js"></script>
</head>
<body>
    <div id="paypalButtons"></div>
    <script>
        window.paypalLoadScript({
            clientId: "{{config('app')['paypal_id']}}"
        }).then((paypal) => {
            paypal.Buttons().render("#paypalButtons");
        });
    </script>
</body>
</html>
Or the following, which is the one we are going to use:
resources\views\paypal.blade.php
<!DOCTYPE html>
<html lang="en">
<head>
    <title>Document</title>
    <script src="https://www.paypal.com/sdk/js?client-id={{config('app')['paypal_id']}}"></script>
</head>
<body>
    <div id="paypalButtons"></div>
    <script>
        paypal.Buttons({
            createOrder: function(data, actions){
                return actions.order.create({
                    purchase_units:[
                        {
                            amount: {
                                value:50
                            }
                        }
                    ]
                })
            },
            onApprove: function(data, actions){
                // TODO send order to server
                console.log(data.orderID)
                axios.post('paypal-process-order/'+data.orderID)
            }
        }).render("#paypalButtons");
    </script>
</body>
</html>
In the previous code, we send the order identifier using axios. For this, we use vite (remember that axios is installed by default in Laravel in the resources\js\bootstrap.js file).
We create the controller and the route:
routes\web.php
Route::get('/paypal', [PaymentPaypalController::class, 'paypal']);
Route::post('/paypal-process-order/{order}', [PaymentPaypalController::class, 'paypalProcessOrder']);
app\Http\Controllers\PaymentPaypalController.php
<?php
namespace App\Http\Controllers;
class PaymentPaypalController extends Controller
{
    public function paypal()  {
        return view('paypal');
    }
    function paypalProcessOrder(string $order)  {
        dd($order);
    }
}
In the controller, you can see that we use a simple conditional to always use the production PayPal access keys when we are in production or the development keys when we are in development.
In case you want to use Node, the code looks like this:
function setPaypal() {
    let paypal;
    try {
      paypal = await loadScript({
        "client-id":{{ config('app')['paypal_id']  }},
      });
    } catch (error) {
      console.error("failed to load the PayPal JS SDK script", error);
    }
    if (paypal) {
      try {
        await paypal
          .Buttons({
            createOrder: function (data, actions) {
              // This function sets up the details of the transaction, including the amount and line item details.
              return actions.order.create({
                purchase_units: [
                  {
                    amount: {
                      value: this.price,
                    },
                  },
                ],
              });
            }.bind(this),
            onApprove: function (data, actions) {
                 // TODO send data.orderID to server
            }.bind(this),
          })
          .render("#paypalCard");
      } catch (error) {
        console.error("failed to render the PayPal Buttons", error);
      }
    }
  },
}
It is important to note that when you are in a testing environment, the PayPal URL indicates that it is in sandbox mode:
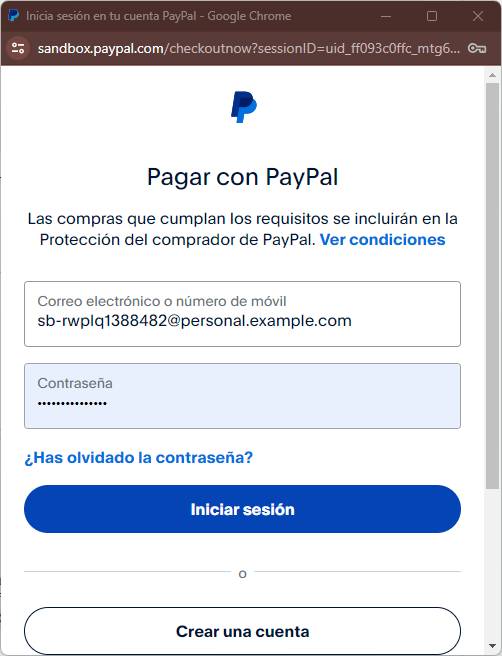
https://www.sandbox.paypal.com/checkoutnow?***
And in production, it looks like this:
https://www.paypal.com/checkoutnow?***
With **createOrder()**, we create the order, which is based on the data provided (the price in this example of $50) and the user's authentication, which indicates they will pay for the order. The **onApprove()** function executes when the order has been approved and is passed to the server for subsequent completion.
With this, the PayPal plugin is generated on the client, with the processing of the order on the server side remaining.
️ Process the PayPal order from Laravel (backend)
Routes and controller to process the payment
Define your routes:
Route::get('/paypal', [PaymentPaypalController::class, 'paypal']);
Route::post('/paypal-process-order/{order}', [PaymentPaypalController::class, 'paypalProcessOrder']);
And the controller:
class PaymentPaypalController extends Controller {
 public function paypal() {
   return view('paypal');
 }
 public function paypalProcessOrder(string $order) {
   dd($order); // Aquí procesarás la orden con tu lógica de negocio
 }
}
Server response validation
The received orderID must be validated using the official PayPal API and the private keys.
This ensures that the payment was genuinely approved and not manipulated.
Tests with Sandbox environment
During your tests, you will see URLs like:
https://www.sandbox.paypal.com/checkoutnow?token=...
And in production:
https://www.paypal.com/checkoutnow?token=...
I always visually confirm that the URL indicates “sandbox” before testing, thus avoiding actual charges.
Common errors and how to solve them
- The PayPal button is not displayed
- Verify the client-id.
- Check that the div #paypalButtons exists and is not hidden.
- Error with credentials or test environment
- Always use the correct credentials (sandbox or production).
- Check if the SDK was loaded with the correct client-id.
- Issues with Axios or routes in Laravel
- Make sure to include @csrf in your forms or correctly configure the CSRF token.
- Check that the POST route exists and returns a valid JSON response.
Final tips based on my experience
In my tests, using the official CDN gave me fewer errors than the npm package.
- Implementing backend payment validation logic allowed me to detect fake transactions.
- I always record the orderID in the database for traceability.
- ⚡ Extra Tip: Test the SDK's response times, as a slow load can prevent the button from rendering correctly.
❓ Frequently Asked Questions about Laravel and PayPal
- How to integrate PayPal step by step in Laravel?
→ Create the credentials, configure the .env, add the SDK script, and process the order on the backend. - How to test payments with PayPal Sandbox?
→ Use the sandbox credentials in the .env and check that the URL includes “sandbox.paypal.com”. - What to do if the button does not appear?
→ Verify the SDK load, the client-id, and the button container. - Can I use the JS SDK together with a PHP package?
→ Yes, but it is not necessary. The JS SDK is sufficient for most basic integrations.