
In Flutter application development, you have to combine the continuous variation or change of data (mutability) with the uncertainty of when they occur (asynchrony). We already saw how to use the Provider state manager in Flutter.
For small applications, this combination is not as problematic since there are multiple ways in which you can carry out this process; in a more manual way; for example, if we have the following screens:

As you can see, it is a very small app with few related screens—in this case, just two: a listing page and another one to modify these records. Logically, if a title appears on the listing of a particular item, for example, and you want to modify it, you go to the next screen to edit it, and after you return to the previous screen, that change should be visible in the listing. There are multiple ways to do this: you can use methods from the lifecycle of a Flutter app itself, you can trigger the navigator's promise function to refresh the changes, and many other things.
Here, the key factor I want you to understand from the previous example is that we are talking about uncertainty, about these changes or mutability that can occur at any moment.
The problem arises when we have many related screens, for example in an online store application. Although the one we are going to build in the course won't have many screens for practical reasons, in general, these types of applications have a good number of related screens; and what do I mean by related screens:

For example, the previous screen shows a slightly larger app and some related screens. For this example, we have a product listing screen for our small store, and multiple screens and options to modify this data, to mutate it. With this, we have to implement a state to indicate these changes to the previous screens, whether through these example options we add the product to favorites, change its title, add a comment (and therefore on the detail screen we have to display one more comment or at least update the total number of comments), add or remove the product from the cart... in short, a lot of mutability in the data, a lot of changes that in the end we have to reflect in our application across multiple screens. Here we could continue with the initial idea of checking the state of the product every time we return to the previous screen—checking if it was added to favorites, deleted, added to the cart, and a long etcetera—but as you can imagine, this is already a minor hell, and if we do it the way I indicated before, we are cluttering the application, filling our pages with a lot of business logic that only serves to maintain the application's state.
State management
For these cases, there are multiple ways in which we can maintain that application state in Flutter.
By this point in the course, we have already seen one: the pattern called Bloc, for which you can find multiple implementations, but we also have Cubit, providers, and of course Redux and many more.
All these schemes for our application's state management solve the same problem in different ways, as with everything in life where we have variants. But what is important to note here is that there are ways we can place this at a global scope within the application or in certain related screens so that every time a change occurs in the data, the data mutates across the entire app and the screens are updated; in such a way that we get automatic updates in the app and with this, in practice, we are handling the state management of the app.
The core principles of Redux
Single source of truth, store: In Redux, there is a single object that stores the state of the entire application, called the store. In practice, we have a single file where we handle all the business logic, which in the case of our app would be accessing the local database, connecting to an API, managing user data saved in user preferences, and a long etcetera; so that with this global class or object, we can manage different data providers.
Immutability, state is read-only: No interaction can change it directly. The only thing you can do to achieve a change in it is to emit an action that expresses your intention to change it, and this is obviously a user click, a scroll, navigating to another screen, any thing or interaction that we register from the user.
Pure functions: It uses purely functions to define how the state changes based on an action. In Redux, these functions are known as reducers, and since they are pure, their behavior is predictable; therefore, we have functions that receive only an action and the current state:
(state, action) => newStateOf the application, and it simply returns a new state (a modified state) (since we cannot modify the original one, because it is immutable) and it is specific to what we are working on. For example, if we have user and product information in the state, and the reducer we are invoking is responsible for adding a product, then the new state will only return what concerns the products and nothing about the user or anything else you have in that state, hence its name: reducers.
Key concepts
As I mentioned before, we have two main elements: the Store, which is unique and global to our application and is the place where ALL the data of our application is stored.
And the State, which keeps the information of our application and is not modified directly.
The reducer is a function that allows us to create a new state based on the old state and the action.
Basic cycle
- The component receives an event (a click, for example) and emits an action.
- This action is passed to the store, which is where the single state is saved.
- The store communicates the action along with the current state to the reducers.
- The reducers return a new state, probably modified based on the action.
- The components/widgets receive the new state from the store.
- The user interface updates automatically.
Obviously, at the code level, all of this has a particular structure, but we will see that in practice.
Basic Redux diagram:
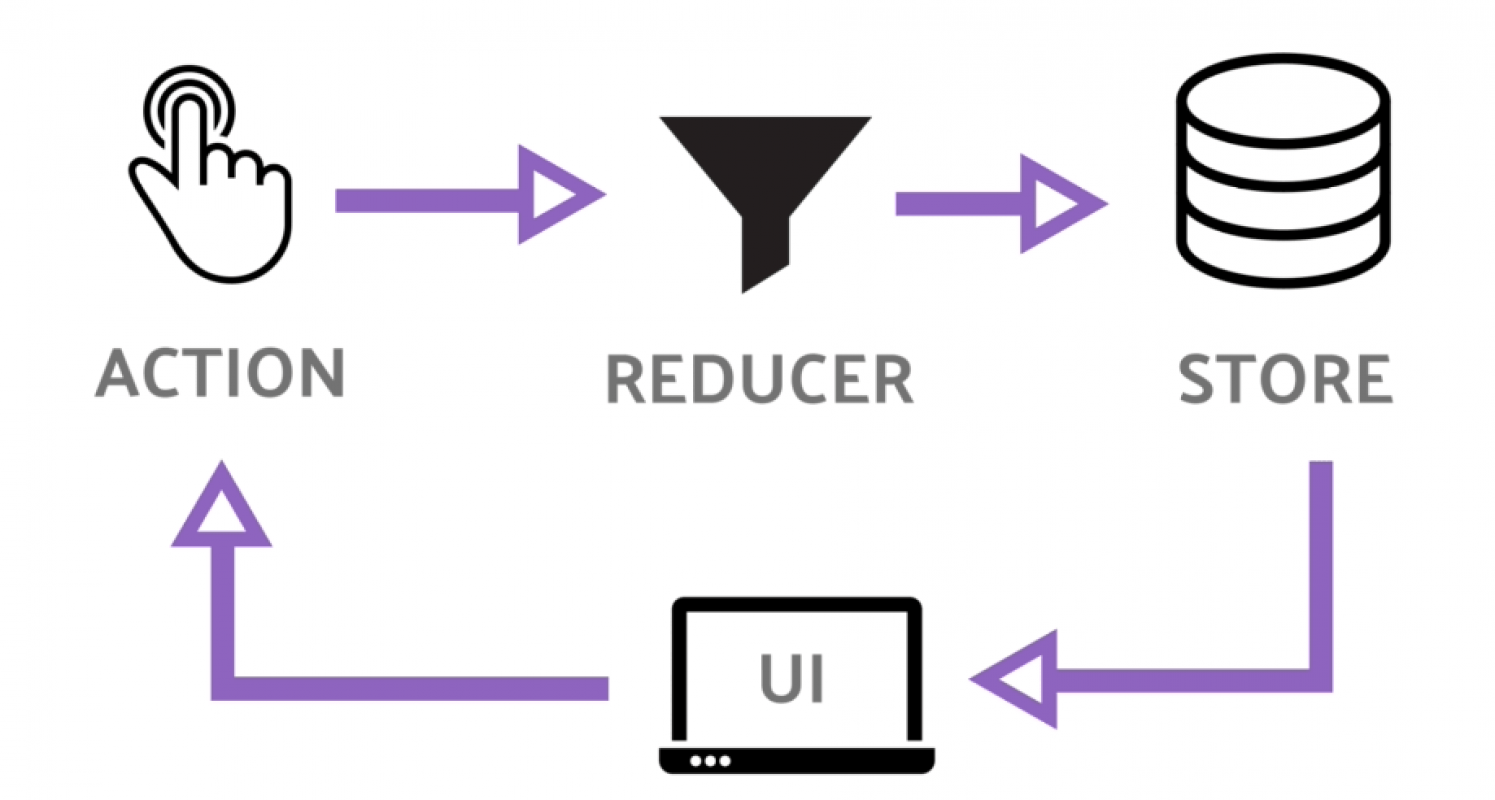
Diagram with Redux Middleware:

This variation is the one we are going to use in the course, and it is because we need a Middleware that allows us to make certain calls to our API; our API can be a database in SQLite, Sembast, our SharedPreferences, and a long etcetera. Finally, with the response from the API, we will send the response to the Reducer that interacts with our Store, our data, and it will finally return a response to our view so that it refreshes the widgets.
Another very important point is that Redux is a library that was born for JavaScript and whose structure or pattern was migrated to Flutter; so if you want to look for more information, which I highly recommend, you will surely find a lot of information about it applied to JavaScript.
In this chapter, we will build a complete online store with Flutter. The project is developed incrementally: we start with the pages and navigation, then we add a global visual theme, and finally, we integrate the Redux pattern to manage the state of the entire application in a centralized and predictable way.
At the moment these words are being written, the package hasn't been updated for 3 years; therefore, we can conclude the following:
Ecosystem Trend: Most Flutter developers looking for robust state management have migrated towards:
- Riverpod: Currently the de facto standard due to its flexibility and compile-time safety.
- Bloc / Cubit: Very popular for its separation of business logic and its excellent developer tool support.
- Redux Toolkit (if you come from JS): If you prefer to keep the Redux architecture, some use manual implementations or more modern combinations, although Redux has lost a lot of traction in Flutter compared to the options mentioned above.
Should you use it?
If it's a new project: I would recommend looking into Riverpod or Bloc. They have much more active communities and constant updates.
If it's for maintenance: It's not "dangerous" to use, but keep in mind that it doesn't take advantage of the framework's most recent improvements from recent years.
Therefore, I leave you this chapter with Redux so that you know the scheme, and the reader is recommended NOT to use Redux in new developments.
In this chapter, we will build a complete online store with Flutter. The project is developed incrementally: we start with the pages and navigation, then we add a global visual theme, and finally we integrate the Redux pattern to manage the entire application's state in a centralized and predictable way.
At the time these words are written, the package hasn't been updated for 3 years, therefore, we can conclude the following:
Ecosystem Trend: Most Flutter developers looking for robust state management have migrated towards:
- Riverpod: Currently the de facto standard due to its flexibility and compile-time safety.
- Bloc / Cubit: Very popular for its separation of business logic and its excellent developer tool support.
- Redux Toolkit (if you come from JS): If you prefer to maintain the Redux architecture, some use manual implementations or more modern combinations, although Redux has lost a lot of traction in Flutter compared to the options mentioned above.
Should you use it?
If it's a new project: I would recommend looking into Riverpod or Bloc. They have much more active communities and constant updates.
If it's for maintenance: It's not "dangerous" to use, but keep in mind that it doesn't take advantage of the most recent framework improvements from the last few years.
Therefore, I leave you this chapter with Redux so you know the pattern, but it is recommended to the reader NOT to use Redux in new developments.
1. Project Creation and Page Structure
Every Flutter project starts with a clear structure. For an online store, we need at least three fundamental screens: the products page, the login page, and the registration page. In Flutter, each screen is a widget that resides in its own file within the lib/pages/ folder.
The products folder is organized as a dedicated subfolder, separating the general catalog from the details of each item:
lib/
  pages/
    login_page.dart
    register_page.dart
    product/
      products_page.dart
      detail_page.dart
    cart/
      index_page.dart
  models/
  redux/
  widgets/
Each page declares a static constant ROUTE that identifies its navigation route. This establishes a clear contract between the pages and the routing system, avoiding duplicated strings in the code.
2. The Entry Point: main.dart and the Routing System
The main.dart file is the heart of the application. It's where the root widget MyApp is declared, the global theme is configured, and the map of named routes is defined. In Flutter, named routes allow navigating between pages using strings instead of instantiating widgets directly.
void main() {
  runApp(MyApp());
}

class MyApp extends StatelessWidget {
  @override
  Widget build(BuildContext context) {
    return MaterialApp(
      title: 'Online Store',
      initialRoute: ProductsPage.ROUTE,
      routes: {
        ProductsPage.ROUTE: (_) => ProductsPage(),
        LoginPage.ROUTE:    (_) => LoginPage(),
        RegisterPage.ROUTE: (_) => RegisterPage(),
        DetailPage.ROUTE:   (_) => DetailPage(),
      },
    );
  }
}
The initialRoute property determines which page is shown when the application starts. In this case, the main products screen is the first to appear.
3. Global Theme: Dark Mode and Color Palette
One of the great advantages of Flutter is the centralization of style through ThemeData. By defining colors and typographies only once in main.dart, any design change is automatically reflected throughout the entire application.
For this store, we chose a dark mode with a palette based on deep purple as the primary color and orange as the accent color, a modern and contrasting combination.
theme: ThemeData(
    colorScheme: ColorScheme.fromSwatch(
      primarySwatch: Colors.deepPurple,
      brightness: Brightness.dark,
    ).copyWith(
      secondary: const Color(0xFFFF5722),
    ),
    textTheme: const TextTheme(
        displayLarge: TextStyle(fontSize: 35.0, fontWeight: FontWeight.bold),
        displayMedium: TextStyle(fontSize: 21.0, fontWeight: FontWeight.bold),
        displaySmall: TextStyle(fontSize: 17.0),
        titleLarge:   TextStyle(fontSize: 15.0),
        bodyLarge:    TextStyle(fontSize: 14.0),
        bodyMedium:   TextStyle(fontStyle: FontStyle.italic, color: Colors.grey),
    ),
    useMaterial3: true),
The typographic system establishes a visual hierarchy equivalent to HTML headings. displayLarge acts as a large-sized H1 for the title of each page, while bodyLarge covers the general content text.
4. Login Page: Forms with Validation
The login page is a StatefulWidget because it needs to maintain local state: whether the form is being submitted, whether the password is hidden, and the values of the text fields. All that information changes over time and affects the interface.
4.1 Widget Structure
The Scaffold wraps the form, which in turn uses a GlobalKey<FormState> to be able to validate all fields programmatically from the submit button.
class LoginPage extends StatefulWidget {
  static const String ROUTE = "/login";

  @override
  _LoginPageState createState() => _LoginPageState();
}

class _LoginPageState extends State<LoginPage> {
  final _formKey     = GlobalKey<FormState>();
  bool _obscurePassword = true;
  bool isSubmitted      = false;

  final _emailController    = TextEditingController();
  final _passwordController = TextEditingController();

  @override
  Widget build(BuildContext context) {
    return Scaffold(
      appBar: AppBar(title: Text("Login")),
      body: Form(
        key: _formKey,
        child: Container(
          margin: EdgeInsets.all(8),
          child: Column(children: [
            _title(),
            SizedBox(height: 15),
            _emailTF(),
            _passwordTF(),
            _actions(),
          ]),
        ),
      ),
    );
  }
}
4.2 Text Fields as Private Methods
When a widget grows in complexity, the widget tree inside build becomes difficult to read. A recommended practice is to extract parts of the tree into private methods that return a Widget. This improves readability without the overhead of creating new classes.
Widget _emailTF() {
  return Padding(
    padding: const EdgeInsets.only(bottom: 8.0),
    child: TextFormField(
      controller: _emailController,
      validator: (val) => val!.length < 3 ? 'Invalid account' : null,
      decoration: InputDecoration(
          border: OutlineInputBorder(),
          labelText: 'Email or username',
          hintText: 'Enter an email or username',
          icon: Icon(
            Icons.email,
            color: Theme.of(context).colorScheme.secondary,
          )),
    ),
  );
}
The validator parameter receives a function that returns null when validation is successful, or a string with the error message when it fails. Flutter automatically shows that text under the field.
4.3 Password Toggle
Showing or hiding the password is a very common pattern. It is implemented with a boolean state variable and a GestureDetector that inverts it when tapped.
Widget _passwordTF() {
  return TextFormField(
    obscureText: _obscurePassword,
    controller: _passwordController,
    validator: (val) => val!.length < 5 ? 'Invalid password' : null,
    decoration: InputDecoration(
        suffixIcon: GestureDetector(
            onTap: () {
              setState(() {
                _obscurePassword = !_obscurePassword;
              });
            },
            child: Icon(
                _obscurePassword ? Icons.visibility : Icons.visibility_off)),
        border: OutlineInputBorder(),
        labelText: 'Password',
        icon: Icon(Icons.lock,
            color: Theme.of(context).colorScheme.secondary)),
  );
}
The obscureText property of TextFormField controls whether the text is shown or hidden. By calling setState, Flutter redraws the widget with the new boolean value, changing both the icon and the text visibility.
4.4 Form Validation on Submit
The submit button uses the form key to invoke validate(), which traverses all fields and executes their validator functions. If all return null, the method returns true and proceeds.
Widget _actions() {
  return Column(
    children: [
      isSubmitted
          ? CircularProgressIndicator()
          : ElevatedButton(
              style: ElevatedButton.styleFrom(
                backgroundColor: Theme.of(context).primaryColor,
              ),
              child: Text("Send",
                  style: Theme.of(context)
                      .textTheme
                      .bodyLarge!
                      .copyWith(color: Colors.white)),
              onPressed: () {
                if (_formKey.currentState!.validate()) {
                  print("Form is valid!");
                  _loginUser();
                } else {
                  print("errors in the form");
                }
              }),
      TextButton(
          onPressed: () {
            Navigator.pushReplacementNamed(context, RegisterPage.ROUTE);
          },
          child: Text("Already have an account?"))
    ],
  );
}
The CircularProgressIndicator replaces the button while isSubmitted is true, giving visual feedback to the user during the HTTP request without the need for a separate modal.
5. Registration Page: Extending the Form
The registration page is structurally identical to the login page, with the difference that it adds an additional field for the username. This illustrates how to reuse established patterns.
class _RegisterPageState extends State<RegisterPage> {
  final _formKey = GlobalKey<FormState>();
  bool _obscurePassword = true;
  bool isSubmitted = false;

  final _usernameController = TextEditingController();
  final _emailController    = TextEditingController();
  final _passwordController = TextEditingController();

  Widget _usernameTF() {
    return Padding(
      padding: const EdgeInsets.only(bottom: 8.0),
      child: TextFormField(
        controller: _usernameController,
        validator: (val) => val!.length < 3 ? 'Invalid username' : null,
        decoration: InputDecoration(
            border: OutlineInputBorder(),
            labelText: 'Username',
            hintText: 'Enter a username',
            icon: Icon(Icons.person,
                color: Theme.of(context).colorScheme.secondary)),
      ),
    );
  }
}
The title of each page is also built as a private method that consumes the global theme, guaranteeing typographic consistency throughout the application:
Widget _title() {
  return Text(
    'Register',
    style: Theme.of(context).textTheme.displayLarge,
  );
}
Mobile E-Commerce App: MongoDB, Strapi (Node.js), and Flutter
Up to this point, the application has a complete interface and a state system with Redux. The next step is the most significant: abandoning static data and connecting the app to a real backend. In this chapter, we will configure the entire server infrastructure, implement user registration, and build the complete authentication flow, including visual feedback, session persistence, and automatic redirection.
1. Why Not Connect Flutter Directly to MongoDB?
When learning about databases, it's natural to wonder: Why not connect Flutter directly to MongoDB? The answer has to do with fundamental security.
To connect to MongoDB you need credentials: a database user and password. If you included them in the Flutter app code, anyone downloading the APK could extract them with reverse engineering tools and would have unlimited access to your entire database. The consequence would be catastrophic.
The solution we adopt is a three-tier architecture:
- MongoDB Atlas (Data): The database lives in the cloud and only accepts connections from the backend server's IP, not from mobile devices.
- Strapi on Node.js (API): It is the secure intermediary. It connects to MongoDB with protected credentials on the server and exposes only the resources and operations we explicitly define to Flutter, through a REST API with JWT authentication.
- Flutter (Client): Never touches the database directly. It only speaks with Strapi through standard HTTP requests, sending and receiving JSON.
The choice of Strapi is strategic: it automatically generates authentication routes, user management, and an admin panel without writing a line of backend code, allowing us to focus on Flutter.
2. Setting Up MongoDB Atlas
MongoDB Atlas is the official MongoDB cloud service with a free tier (M0 Free) sufficient for development and small-scale projects. The great advantage is that you don't need to install anything locally.
The process has four steps. It is important not to skip any; especially the IP Whitelist one, whose resulting error gives no descriptive hint of the cause.
- Create an account, organization, and project at cloud.mongodb.com. The structure is: Organization → Project → Cluster.
- Create a free Cluster. Select any provider (AWS, GCP, or Azure) and make sure it says "Free" or "$0/month". The process can take between 3 and 10 minutes.
- Create a database user in "Database Access". Give them read and write permissions. Save the username and password because you will need them when installing Strapi.
- Add your IP to the Whitelist in "Network Access". Without this step, MongoDB silently rejects all incoming connections. For development, you can use "Add Current IP Address" or allow
0.0.0.0/0temporarily. If you change networks, you must add the new IP.
Finally, go to "Connect" → "Connect your application" and copy the Connection String:
mongodb+srv://mongo:<password>@cluster0.xxxxx.mongodb.net/market?retryWrites=true&w=majority3. Installing Strapi and Connecting it to MongoDB
With Node.js installed on your computer, use npx to create the Strapi project. Choose the Custom option in the wizard (not --quickstart, which creates the database with local SQLite):
npx create-strapi-app marketIn the wizard configure: Database = MongoDB, Database name = market, and paste the Atlas Connection String. If the connection is successful, Strapi confirms it in the console. Then start the server:
cd market
npm run develop
Strapi starts on port 1337. Open http://localhost:1337/admin and create your admin user. This user is exclusive to the control panel and is independent of the Flutter app users.
From the Strapi panel, there are two key sections for this project:
- Content-Types Builder: Data modeler. Each collection you create (Products, Orders, etc.) automatically becomes a REST route for your API.
- Roles & Permissions: By default, the API is completely blocked. You must explicitly enable the endpoints you want to be public or authenticated.
The authentication routes we will use in Flutter already exist by default in Strapi: POST /auth/local/register to register a user and POST /auth/local to log in. Both respond with the JWT token and user data.
4. Installing the HTTP Package in Flutter
With the backend ready, we move to the Flutter side. Add the http and shared_preferences packages in pubspec.yaml:
dependencies:
  flutter:
    sdk: flutter
  http:               ^1.2.0
  shared_preferences: ^2.2.0
Run flutter pub get and add the imports in the registration page:
import 'package:http/http.dart' as http;
import 'dart:convert';
The as http alias is an important convention: it makes each call explicit (http.post()) and prevents name collisions with other project functions.
5. Registering a User from Flutter
Strapi exposes the POST /auth/local/register route to create new users. There is a critical technical detail before writing the URL: if you use the Android emulator, you cannot use localhost. The emulator is a virtual machine with its own network; when it writes localhost it looks for a server inside the virtual phone itself, not on your computer. The special address that the Android emulator uses to refer to the host computer is 10.0.2.2.
void _registerUser() async {
  // 1. Block the UI to prevent duplicate submissions
  setState(() => isSubmitted = true);

  // 2. POST request to Strapi's registration endpoint
  final res = await http.post(
    Uri.parse('http://10.0.2.2:1337/auth/local/register'),
    body: {
      'username': _usernameController.text,
      'email':    _emailController.text,
      'password': _passwordController.text,
    },
  );

  // 3. Restore the button when the response arrives
  setState(() => isSubmitted = false);

  // 4. Convert the body from JSON String to Dart Map
  final responseData = json.decode(res.body) as Map<String, dynamic>;

  // 5. Evaluate the result
  if (res.statusCode == 200) {
    _successResponse();
    _storeUserData(responseData);
    _redirectUser();
  } else {
    // Strapi returns errors with this nested structure:
    // { "message": [{ "messages": [{ "message": "Email already taken" }] }] }
    final errorMessage = responseData['message'][0]['messages'][0]['message'];
    _errorResponse(errorMessage);
  }
}
The function uses async/await: await pauses this function until the HTTP response is received, without blocking the main UI thread. The rest of the application continues to function normally.
6. Improving the User Experience (UX)
A professional application must not only work but also clearly communicate to the user what is happening. We will implement three vital improvements to our user experience.
A. Blocking the Submit Button
If a user taps the "Send" button repeatedly because their internet is slow, our app will send multiple requests to the server, which could cause errors. To prevent this, we replace the button with a progress indicator while processing the data, using the isSubmitted variable.
// In our page's build method:
isSubmitted
    ? const CircularProgressIndicator()
    : ElevatedButton(
        onPressed: () {
          if (_formKey.currentState!.validate()) {
            _registerUser();
          }
        },
        child: const Text("Send"),
      )
B. Visual Feedback with SnackBars
When registration fails (for example, the email is already in use) or when it succeeds, we must tell the user in an elegant way. Material Design SnackBars are perfect for this. We use ScaffoldMessenger to invoke them easily from anywhere.
void _successResponse() {
  final snackBar = SnackBar(
    content: Text(
      'Congratulations, ${_usernameController.text}! User created successfully.',
      style: TextStyle(color: Theme.of(context).colorScheme.secondary),
    ),
  );
  ScaffoldMessenger.of(context).showSnackBar(snackBar);
}

void _errorResponse(String msj) {
  final snackBar = SnackBar(
    backgroundColor: Colors.red,
    content: Text(
      msj,
      style: const TextStyle(color: Colors.white, fontWeight: FontWeight.bold),
    ),
  );
  ScaffoldMessenger.of(context).showSnackBar(snackBar);
}
C. Programmatic Redirection with Delay
When registration is successful, we want to take the user to the products page. However, if we perform the navigation immediately, the user won't have time to read our success message. We use Future.delayed to create a 2-second pause.
Additionally, we use Navigator.pushReplacementNamed to destroy the registration page from the history. This way, if the user presses the back button on their phone, they won't return to the registration screen accidentally.
void _redirectUser() {
  Future.delayed(const Duration(seconds: 2), () {
    Navigator.pushReplacementNamed(context, ProductsPage.ROUTE);
  });
}
7. Session Persistence with SharedPreferences
When Strapi responds with a 200 code, it returns a JSON with the JWT token and user data. The JWT is the credential you must send in the headers of all future requests that require authentication.
If we don't save this token persistently, the user will have to log in every time they close and open the app. SharedPreferences is Flutter's idiomatic solution: it stores key-value pairs in the device's storage and keeps them between sessions.
void _storeUserData(Map<String, dynamic> responseData) async {
  final prefs = await SharedPreferences.getInstance();

  prefs.setString('jwt',      responseData['jwt']);
  prefs.setString('id',       responseData['user']['_id']);
  prefs.setString('username', responseData['user']['username']);
  prefs.setString('email',    responseData['user']['email']);
}
When starting the app, you can read the token with prefs.getString('jwt'). If it is not null, the user already has an active session and you can send them directly to the store. This integrates with the Redux ThunkAction getUserAction which initializes the Store with user data at start.
Important advice: When installing shared_preferences for the first time, perform a full app restart (stop and run again, not just Hot Reload). Native plugins require the application to be recompiled so its native code is correctly linked.
8. Replicating the Flow on the Login Page
The login process is structurally identical to the registration one. The pattern repeats: block button → HTTP request → process response → save data → redirect. Only two things change:
- The URL: now it is
POST /auth/local(without "/register"). - The identifier field: Strapi uses
identifier, which accepts both email and username. The user can log in with either.
void _loginUser() async {
  setState(() => isSubmitted = true);

  final res = await http.post(
    Uri.parse('http://10.0.2.2:1337/auth/local'),
    body: {
      'identifier': _emailController.text, // email or username
      'password':   _passwordController.text,
    },
  );

  setState(() => isSubmitted = false);

  final responseData = json.decode(res.body) as Map<String, dynamic>;

  if (res.statusCode == 200) {
    _successResponse();
    _storeUserData(responseData);
    _redirectUser();
  } else {
    final errorMessage = responseData['message'][0]['messages'][0]['message'];
    _errorResponse(errorMessage);
  }
}
The successful login response has exactly the same structure as the registration one: { "jwt": "...", "user": { ... } }. That's why we can reuse the _storeUserData and _redirectUser functions in both pages without changes.
Conclusion
Congratulations! We have taken a great technical leap. You have learned to decouple your application's logic using a clean architecture with Flutter, Strapi, and MongoDB. Now your application is not just an empty shell; it can securely connect to the cloud, register real users, handle their credentials with encryption (courtesy of Strapi), persist the session locally, and communicate with the user through fluid notifications.
These asynchronous patterns and API handling you've learned here are the daily bread of professional mobile development. It doesn't matter if tomorrow you decide to change Strapi for Firebase, Laravel, or Django; the concepts of HTTP requests, JSON parsing, local persistence, and handling loading states in Flutter will always be exactly the same.
Full source code: https://github.com/libredesarrollo/flutter2-market-09/
Extending the App with Redux and Strapi: Products, Cart, and Favorites
With our backend working and authentication integrated, we need a robust system to manage the state shared between screens: the product catalog, the cart, and the favorites. Manual state dispersed in each widget quickly becomes unmanageable. The Redux pattern solves this by centralizing all information into a single, global, and immutable object.
1. Why Redux: The Problem of Shared State
Imagine the user adds a product to the cart from the detail page. That change must be reflected in: the cart icon in the AppBar, the list on the products page (which shows if it's already in the cart), and the cart page itself. Coordinating that without a centralized tool involves passing callbacks through multiple widget levels (prop drilling) or reloading data from the server on each screen.
Redux solves this with a clear unidirectional flow:
- Store: The single global object that contains all app state.
- AppState: Immutable class that defines the shape of the state: user, products, cart, favorites.
- Actions: Classes or functions that express the intent of a change ("add to cart", "mark favorite").
- Reducers: Pure functions that receive the current state and an action, and return a new state.
- Thunk Actions: Asynchronous functions that can call external APIs before dispatching the simple action to the reducer.
Install the dependencies in pubspec.yaml:
dependencies:
  flutter_redux: ^0.10.0
  redux_thunk:   ^0.4.0
2. Redux Pattern File Structure
We organize all Redux-related code in a redux/ folder within lib/:
lib/
  redux/
    reducers.dart   <-- Global reducer that delegates to specific reducers
    actions.dart    <-- Actions and Thunk Actions
  models/
    app_state.dart  <-- The immutable AppState class
    user.dart
    product.dart
Keeping AppState in models/ makes sense because it controls the entire application and is not exclusive to the Redux module.
3. Creating the AppState
The AppState is a class annotated with @immutable, which tells the Dart analyzer that all its properties must be final and that it should never be modified directly. To change it, a new copy is created:
import 'package:meta/meta.dart';

@immutable
class AppState {
  final dynamic user;
  final List<dynamic> products;

  const AppState({required this.user, required this.products});

  // Named constructor that returns the initial application state
  factory AppState.initial() {
    return AppState(user: null, products: const []);
  }
}
The factory AppState.initial() constructor is mandatory in Redux. It is the state with which the app starts before loading any data from the network or device.
4. Creating the Reducers
We create a global reducer (appReducer) that delegates each part of the state to a specific reducer. Each reducer only manipulates its portion of the state and returns the rest untouched:
// redux/reducers.dart
import '../models/app_state.dart';
import 'actions.dart';

AppState appReducer(AppState state, dynamic action) {
  return AppState(
    user:     userReducer(state.user, action),
    products: productsReducer(state.products, action),
  );
}

dynamic userReducer(dynamic state, dynamic action) {
  if (action is GetUserAction) {
    return action.user;
  }
  return state;
}

List<dynamic> productsReducer(List<dynamic> state, dynamic action) {
  if (action is GetProductsAction) {
    return action.products;
  }
  return state;
}
The key is that userReducer never touches the products list, and productsReducer never touches the user. Each function is "pure": no side effects, no network calls, no mutations.
5. Creating the Actions (Actions and Thunk Actions)
Actions are simple classes that carry data to the reducer. Thunk Actions are functions that first call an API and then dispatch the simple action to the reducer:
// redux/actions.dart
import 'dart:convert';
import 'package:http/http.dart' as http;
import 'package:redux/redux.dart';
import 'package:shared_preferences/shared_preferences.dart';
import '../models/app_state.dart';

// --- Simple action (data typing) ---
class GetUserAction {
  final dynamic user;
  GetUserAction(this.user);
}

// --- Thunk Action (asynchronous) ---
ThunkAction<AppState> getUserAction = (Store<AppState> store) async {
  final prefs = await SharedPreferences.getInstance();
  final email = prefs.getString('email');

  if (email == null) {
    store.dispatch(GetUserAction(null));
    return;
  }

  // Builds a Map with locally saved user data
  final user = {
    'email':    email,
    'username': prefs.getString('username'),
    'id':       prefs.getString('id'),
    'jwt':      prefs.getString('jwt'),
  };
  store.dispatch(GetUserAction(user));
};
The pattern reads like this: when getUserAction is called, the Thunk middleware executes the function. This function accesses SharedPreferences, builds the user map, and dispatches GetUserAction with those data. The reducer then updates the AppState with the new user.
6. Connecting Redux to the Widget Tree
In main.dart we create the Store and inject it into the entire app using StoreProvider:
void main() {
  final store = Store<AppState>(
    appReducer,
    initialState: AppState.initial(),
    middleware: [thunkMiddleware],
  );
  runApp(MyApp(store: store));
}

class MyApp extends StatelessWidget {
  final Store<AppState> store;
  const MyApp({required this.store});

  @override
  Widget build(BuildContext context) {
    return StoreProvider<AppState>(
      store: store,
      child: MaterialApp(
        // routes...
      ),
    );
  }
}
7. Consuming the Store with StoreConnector
StoreConnector is the widget that connects any part of the widget tree to the Store. It is parameterized with two types: the global state and the "view model" (the specific data this widget is interested in).
To show the user's name in the AppBar and dispatch data loading when entering the products screen, we use the onInit callback:
// In products_page.dart
StoreConnector<AppState, AppState>(
  converter: (store) => store.state,
  onInit: (store) {
    store.dispatch(getUserAction);
    store.dispatch(getProductsAction);
  },
  builder: (context, state) {
    final user = state.user;
    return Scaffold(
      appBar: AppBar(
        title: Text(user != null ? 'Hello, ${user['username']}' : 'Store'),
        actions: [
          PopupMenuButton(
            itemBuilder: (_) => [
              if (user != null)
                PopupMenuItem(value: 'logout', child: Text('Logout'))
              else
                PopupMenuItem(value: 'login', child: Text('Login')),
            ],
            onSelected: (value) {
              if (value == 'logout') store.dispatch(logoutAction);
              if (value == 'login') Navigator.pushNamed(context, LoginPage.ROUTE);
            },
          )
        ],
      ),
      body: /* GridView of products */,
    );
  },
)
8. Product Catalog: Strapi and Redux
8.1 Configuring the Content Type in Strapi
Before showing products in Flutter, they must exist in the backend. In the Strapi panel, we use the Content-Types Builder to create a products collection with fields: name (Text), description (Rich Text), price (Number decimal), and image (Media). We create several test products from the Content Manager panel.
After populating the collection, go to Settings → Roles & Permissions → Public and enable the find and findOne methods for products. Without this step, Strapi responds with 403 even if the endpoint exists.
8.2 Thunk Action to Get Products
class GetProductsAction {
  final List<dynamic> products;
  GetProductsAction(this.products);
}

ThunkAction<AppState> getProductsAction = (Store<AppState> store) async {
  final res  = await http.get(Uri.parse('http://10.0.2.2:1337/products'));
  final data = json.decode(res.body) as List<dynamic>;
  store.dispatch(GetProductsAction(data));
};
This action is dispatched in the onInit of the StoreConnector on the products page, along with getUserAction. Both run in parallel upon entering the screen.
9. The Product Model
To work with strong typing, we create the Product class. In addition to the server fields, it includes local state properties (favorite and cartCount) that Redux needs to reflect the UI state without affecting the persisted data:
class Product {
  final String id;
  final String name;
  final String description;
  final double price;
  final String image;
  bool favorite;
  int  cartCount;

  Product({
    required this.id,
    required this.name,
    required this.description,
    required this.price,
    required this.image,
    this.favorite  = false,
    this.cartCount = 0,
  });

  factory Product.fromMap(Map<String, dynamic> map) {
    return Product(
      id:          map['_id'].toString(),
      name:        map['name'] ?? '',
      description: map['description'] ?? '',
      price:       (map['price'] as num).toDouble(),
      image:      map['image'] != null
                     ? 'http://10.0.2.2:1337\${map['image']['url']}'
                     : '',
    );
  }
}
The image URL needs the server prefix because Strapi returns relative paths like /uploads/product.jpg. The fromMap method automatically adds that prefix.
10. Responsive Catalog GridView
With the typed products in the global state, we display them with a GridView.builder. The number of columns varies according to screen orientation and width:
builder: (context, state) {
  final orientation = MediaQuery.of(context).orientation;
  final width       = MediaQuery.of(context).size.width;
  int columns = 2;
  if (orientation == Orientation.landscape) columns = 3;
  if (width > 800) columns = 4;

  return GridView.builder(
    gridDelegate: SliverGridDelegateWithFixedCrossAxisCount(
      crossAxisCount: columns,
    ),
    itemCount: state.products.length,
    itemBuilder: (context, i) {
      final p = state.products[i];
      return GestureDetector(
        onTap: () => Navigator.pushNamed(
          context, DetailPage.ROUTE, arguments: p,
        ),
        child: Card(
          child: Column(children: [
            Expanded(child: Image.network(p.image, fit: BoxFit.cover)),
            Text(p.name),
            Text('\$\${p.price.toStringAsFixed(2)}'),
          ]),
        ),
      );
    },
  );
}
11. Product Detail Page
By tapping, we navigate with Navigator.pushNamed passing the Product object as a route argument. The detail page retrieves it with:
final Product product =
    ModalRoute.of(context)!.settings.arguments as Product;
This screen shows the image at a large scale, description, price, and the Favorites and Cart buttons. Both buttons are wrapped in a StoreConnector to reflect the product's current state in real-time and dispatch actions directly to the Store.
12. Favorites Functionality (Toggle)
The favorites button toggles a heart icon. We dispatch an action that inverts the product's favorite boolean in the state's list:
class ToggleFavoriteAction {
  final Product product;
  ToggleFavoriteAction(this.product);
}

// In the products reducer:
if (action is ToggleFavoriteAction) {
  return state.map((p) {
    if (p.id == action.product.id) p.favorite = !p.favorite;
    return p;
  }).toList();
}
In the UI, the icon updates instantly because StoreConnector rebuilds the widget upon detecting any change in the Store:
IconButton(
  icon: Icon(
    product.favorite ? Icons.favorite : Icons.favorite_border,
    color: product.favorite ? Colors.red : null,
  ),
  onPressed: () => store.dispatch(ToggleFavoriteAction(product)),
)
13. Cart: Page, CartItem, and Dismissible
13.1 Cart Page and CartItem Widget
The cart page filters the state showing only products with cartCount > 0. We create a CartItem widget that encapsulates: image, name, unit price, quantity selectors (+/−), and that product's partial total.
13.2 Removing with Dismissible and Confirmation
We wrap each CartItem in a Dismissible. The confirmDismiss callback shows an AlertDialog before processing the gesture, avoiding accidental removals:
Dismissible(
  key: Key(product.id),
  direction: DismissDirection.endToStart,
  background: Container(
    color: Colors.red,
    alignment: Alignment.centerRight,
    child: const Icon(Icons.delete, color: Colors.white),
  ),
  confirmDismiss: (_) async {
    return await showDialog<bool>(
      context: context,
      builder: (_) => AlertDialog(
        title: const Text('Remove product?'),
        actions: [
          TextButton(
            onPressed: () => Navigator.pop(context, false),
            child: const Text('Cancel'),
          ),
          TextButton(
            onPressed: () => Navigator.pop(context, true),
            child: const Text('Remove'),
          ),
        ],
      ),
    );
  },
  onDismissed: (_) => store.dispatch(RemoveFromCartAction(product)),
  child: CartItem(product: product),
)
The key must be the product's real ID, not the list index. With the index, Flutter might apply the red removal background to the wrong element after rebuilding the list.
13.3 Quantity Selectors
class IncrementCartAction { final Product product; IncrementCartAction(this.product); }
class DecrementCartAction { final Product product; DecrementCartAction(this.product); }

// In the reducer:
if (action is IncrementCartAction) {
  return state.map((p) {
    if (p.id == action.product.id) p.cartCount++;
    return p;
  }).toList();
}
if (action is DecrementCartAction) {
  return state.map((p) {
    if (p.id == action.product.id && p.cartCount > 0) p.cartCount--;
    return p;
  }).toList();
}
14. Cart Schema in Strapi and Creation on Registration
To persist the cart between sessions, we create a Cart type in Strapi with a one-to-one relationship to User, many-to-many to Product, and a quantities (Text/JSON) field for quantities. When registering a user, we create their empty cart:
await http.post(
  Uri.parse('http://10.0.2.2:1337/carts'),
  headers: {
    'Content-Type':  'application/json',
    'Authorization': 'Bearer \$jwt',
  },
  body: json.encode({
    'user': userId, 'products': [], 'quantities': '{}',
  }),
);
15. Synchronizing the Cart with Strapi (Thunk Action)
Each modification of the cart updates first the local state (immediate feedback) and then persists the data in Strapi with HTTP PUT:
ThunkAction<AppState> saveCartAction(Product product) {
  return (Store<AppState> store) async {
    store.dispatch(ToggleCartAction(product));

    final state      = store.state;
    final cartItems  = state.products.where((p) => p.cartCount > 0).toList();
    final quantities = {for (var p in cartItems) p.id: p.cartCount};

    await http.put(
      Uri.parse('http://10.0.2.2:1337/carts/\${state.user['cartId']}'),
      headers: {
        'Content-Type':  'application/json',
        'Authorization': 'Bearer \${state.user['jwt']}',
      },
      body: json.encode({
        'products':   cartItems.map((p) => p.id).toList(),
        'quantities': json.encode(quantities),
      }),
    );
  };
}
16. Loading the Cart at App Startup
At startup, after loading user and products, we initialize the cart from Strapi and update the cartCount of each product in the local state:
ThunkAction<AppState> initCartAction = (Store<AppState> store) async {
  final user = store.state.user;
  if (user == null) return;

  final res  = await http.get(
    Uri.parse('http://10.0.2.2:1337/carts?user=\${user['id']}'),
    headers: {'Authorization': 'Bearer \${user['jwt']}'},
  );
  final data = json.decode(res.body) as List;
  if (data.isEmpty) return;

  final cart       = data[0];
  final quantities = json.decode(cart['quantities'] ?? '{}') as Map<String, dynamic>;
  store.dispatch(SetCartQuantitiesAction(cart['_id'], quantities));
};
17. Favorites with Strapi Persistence
The Favorite type in Strapi follows the same pattern as Cart: one-to-one relationship with User and many-to-many with Product. It is created when the user registers. The toggle Thunk Action follows the same bipartite flow: update local state → HTTP PUT with JWT:
ThunkAction<AppState> saveFavoriteAction(Product product) {
  return (Store<AppState> store) async {
    store.dispatch(ToggleFavoriteAction(product));

    final state     = store.state;
    final favorites = state.products.where((p) => p.favorite).toList();

    await http.put(
      Uri.parse('http://10.0.2.2:1337/favorites/\${state.user['favoriteId']}'),
      headers: {
        'Content-Type':  'application/json',
        'Authorization': 'Bearer \${state.user['jwt']}',
      },
      body: json.encode({'products': favorites.map((p) => p.id).toList()}),
    );
  };
}
18. Loading Indicators
To block duplicate interactions during network operations, we add isLoading to the AppState and toggle it from the Thunks:
// AppState:
final bool isLoading;

// Action:
class SetLoadingAction { final bool value; SetLoadingAction(this.value); }

// Inside a Thunk:
store.dispatch(SetLoadingAction(true));
// ... network request ...
store.dispatch(SetLoadingAction(false));

// In the UI:
builder: (context, state) => state.isLoading
    ? const Center(child: CircularProgressIndicator())
    : /* normal content */
Chapter Conclusion
You have built a complete e-commerce architecture with Flutter and Strapi. The Redux pattern clearly separates each responsibility: the UI builds widgets, Actions describe intents, Reducers calculate the new state predictably, and Thunk Actions orchestrate asynchronous communication with the backend.
The result is an application where any change —adding to cart, marking as favorite, changing quantity— is reflected instantly on all screens thanks to StoreConnector, and persists between sessions thanks to synchronization with MongoDB Atlas through Strapi.
Source code: https://github.com/libredesarrollo/flutter2-market-09/
Strengthening the App: Global Optimizations and Middleware
With the main store flow working, this section addresses the problems that appear as soon as the application grows and is used in real conditions: infinite request loops, network failures, expired tokens, and centralized authorization logic through Middleware.
1. The Infinite Request Loop
When integrating the cart and favorite actions, a critical problem arises: when the user is authenticated, the application enters an infinite request loop. This happens because the actions are dispatched from the builder method of the StoreConnector. Each time Redux updates the state, the builder re-executes, which dispatches the actions again, which updates the state again, ad infinitum.
The root cause: placing store.dispatch() inside the builder is dangerous because that block is called on each reconstruction of the widget tree. The solution is to use the onInit callback of the StoreConnector, which executes only once when the widget is mounted, regardless of how many times it is rebuilt:
StoreConnector<AppState, AppState>(
  converter: (store) => store.state,
  // ✅ onInit runs only once upon entering the screen
  onInit: (store) async {
    final user = await store.dispatch(getUserAction);
    // Only dispatch cart and favorites if the user is authenticated
    if (user != null) {
      store.dispatch(initCartAction);
      store.dispatch(initFavoritesAction);
    }
  },
  builder: (context, state) {
    // The builder only builds the UI, never dispatches actions
    return /* widget */;
  },
)
An important detail: to be able to use the result of getUserAction as an await, the Thunk Action has to return the user. By default, it only dispatches GetUserAction to the reducer but doesn't return anything. Adding a return user; at the end of the function allows chaining the cart and favorites logic on that data.
2. The part of File to Organize Actions
As the actions.dart file grows with all actions (user, products, cart, favorites, errors), it becomes difficult to maintain. Dart offers the part of directive to divide a logical file into multiple physical files:
// actions.dart (main file)
part 'user_actions.dart';
part 'product_actions.dart';
part 'cart_actions.dart';

// user_actions.dart
part of 'actions.dart';

class GetUserAction { ... }
ThunkAction<AppState> getUserAction = ...;
This allows each set of actions to live in its own file without losing access to the main file's imports. It is Dart's idiomatic solution to maintain separation of responsibilities without multiplying imports in each consumer file.
3. Capturing Connection Errors
When the Strapi server is unavailable (no internet, server down, timeout), the http package throws a SocketException. Without handling it, the exception reaches Flutter and freezes the application.
The solution is to wrap every network request inside a try/catch block within the Thunk Action:
ThunkAction<AppState> getProductsAction = (Store<AppState> store) async {
  try {
    final res  = await http.get(Uri.parse('http://10.0.2.2:1337/products'));
    final data = json.decode(res.body) as List<dynamic>;
    store.dispatch(GetProductsAction(data));
  } catch (e) {
    // The application continues to function; we only log the error
    print('Connection error: $e');
    store.dispatch(SetErrorAction('Could not connect to the server.'));
  }
};
With this, if the server is down, the app doesn't freeze: it shows an empty list and the error message to the user. Once the server is back, the user can reload manually.
4. Handling Errors with Redux: Three Approaches
There are several ways to integrate errors into the Redux state. The course shows three variants from least to most elegant:
4.1 Manual Way (if/else in the Action)
Directly in the Thunk Action, we check the statusCode and dispatch as appropriate. It is the most explicit approach but generates repeated code in each action:
if (res.statusCode == 200) {
  store.dispatch(GetProductsAction(products));
} else {
  store.dispatch(SetErrorAction('Error ${res.statusCode}'));
}
4.2 Extracting Logic to a Function
We create a reusable function that encapsulates the response verification. This function receives the response and returns the data if successful, or null if there's an error:
dynamic parseResponse(http.Response res, Store<AppState> store) {
  if (res.statusCode == 200) {
    return json.decode(res.body);
  } else {
    store.dispatch(SetErrorAction('Error ${res.statusCode}'));
    return null;
  }
}
4.3 Using an Error Action in the AppState
The cleanest approach adds an error field to the AppState. The UI reads it with StoreConnector and shows the corresponding message. This centralizes all application errors into a single observable place:
// In AppState:
final String? error;

// Action:
class SetErrorAction {
  final String? message;
  SetErrorAction(message);
}

// In the reducer:
if (action is SetErrorAction) return action.message;

// In the UI:
if (state.error != null)
  Text(state.error!, style: TextStyle(color: Colors.red))
5. Loading Screen Again (Loading State)
To show the loading indicator while a request is resolving, we add the isLoading field to the AppState. The correct flow inside any asynchronous Thunk Action is:
store.dispatch(SetLoadingAction(true));
try {
  final res = await http.get(...);
  store.dispatch(GetProductsAction(...));
  store.dispatch(SetErrorAction(null)); // Clear previous errors
} catch (e) {
  store.dispatch(SetErrorAction('No connection'));
} finally {
  store.dispatch(SetLoadingAction(false)); // Always turn off the loader
}
Using finally guarantees that the loading indicator always deactivates, even if an exception occurs. Without this block, an exception would leave the spinner spinning indefinitely.
6. The Trap of Cloning Lists and Objects in Redux
This is one of the most subtle and frequent errors when working with Redux in Dart. When you assign a list or an object to another variable, in Dart (as in most object-oriented languages), you are not creating a copy: you are pointing to the same memory location.
// ❌ Dangerous: both variables point to the same list in memory
final cartProducts = store.state.products;
cartProducts.add(newProduct); // Also modifies store.state.products

// ✅ Correct: create an independent copy
final cartProducts = List.from(store.state.products);
// or using the spread operator:
final cartProducts = [...store.state.products];
This is especially critical in Redux because the principle of immutability requires that the current state never be directly modified. If we mutate the original list before dispatching, we are breaking the Redux contract: the previous and new states will be the same object in memory, which can cause the UI not to update or changes to appear on screens where they shouldn't.
The three equivalent ways to clone a list in Dart:
final copy1 = List.from(original);      // Classic way
final copy2 = [...original];            // Spread operator (more modern)
final copy3 = original.toList();        // List method
7. Handling 401 Errors (Invalid or Expired Token)
When the user's JWT expires or becomes corrupted, Strapi responds with a 401 Unauthorized code to any protected request. The application must detect it and react intelligently, not just show an empty screen.
The strategy is to check the statusCode in each Thunk Action that uses authentication:
ThunkAction<AppState> saveCartAction(Product product) {
  return (Store<AppState> store) async {
    try {
      final res = await http.put(
        Uri.parse('http://10.0.2.2:1337/carts/${store.state.user!['cartId']}'),
        headers: {'Authorization': 'Bearer ${store.state.user!['jwt']}'},
        body: json.encode({...}),
      );

      if (res.statusCode == 200) {
        store.dispatch(UpdateCartAction(product));
      } else if (res.statusCode == 401) {
        // Invalid token: clear session and redirect to login
        store.dispatch(LogoutAction());
        store.dispatch(SetErrorAction('Session expired. Please log in again.'));
      }
    } catch (e) {
      store.dispatch(SetErrorAction('Connection error.'));
    }
  };
}
8. Destroying the Session Upon Receiving a 401
The LogoutAction must clear both the global state (Redux) and the local state (SharedPreferences), so the app starts in a clean state next time:
class LogoutAction {}

// In the user reducer:
if (action is LogoutAction) return null;

// Logout thunk (clears SharedPreferences):
ThunkAction<AppState> logoutAction = (Store<AppState> store) async {
  final prefs = await SharedPreferences.getInstance();
  await prefs.clear();
  store.dispatch(LogoutAction());
};
9. Middleware: Intercepting the Action Flow
A Middleware in Redux is a function that sits between the dispatch of an action and the Reducer. It can inspect, modify, block, or enrich any action before it reaches the reducer. It's the ideal place for cross-cutting logic: logging, authorization, analytics, automatic retries.
The complete flow with middleware is:
UI (dispatch) → [Middleware 1] → [Middleware 2] → Reducer → New State → UIIn the project, we already use thunkMiddleware for asynchronous actions. Now we are going to create our own middlewares.
10. Creating a Custom Middleware (as a Function)
A function-based custom middleware has the following signature. It receives the store, the next function in the chain (next), and the action:
// lib/redux/middleware/auth_middleware.dart

Middleware<AppState> checkAuthStatus() {
  return (Store<AppState> store, dynamic action, NextDispatcher next) {
    print('Action intercepted: ${action.runtimeType}');

    // Authorization logic: if it's a function action (ThunkAction)
    // and the user is NOT authenticated, block the action
    if (action is Function && store.state.user == null) {
      print('Action blocked: user not authenticated');
      // Not calling next(action) is equivalent to blocking the action
      return;
    }

    // If everything is OK, pass the action to the next middleware or reducer
    next(action);
  };
}
The key to the middleware is the next parameter: if you call it, the action continues its normal flow. If you don't call it, the action is blocked at this point and never reaches the reducer.
11. Class-Based Middleware
The class-based alternative inherits from MiddlewareClass and overrides the call method. It is more explicit and facilitates dependency injection:
class AuthMiddleware extends MiddlewareClass<AppState> {
  @override
  void call(Store<AppState> store, dynamic action, NextDispatcher next) {
    if (action is Function && store.state.user == null) {
      store.dispatch(SetErrorAction('You must log in first.'));
      return;
    }
    next(action);
  }
}
It is registered in the Store like any other middleware:
final store = Store<AppState>(
  appReducer,
  initialState: AppState.initial(),
  middleware: [
    checkAuthStatus(), // Function middleware
    AuthMiddleware(),  // Class middleware
    thunkMiddleware,   // Always at the end if you use Thunks
  ],
);
12. TypedMiddleware: Specific Middleware by Action Type
Instead of intercepting all actions and filtering manually, TypedMiddleware allows linking a middleware only to actions of a specific type. This makes the code much cleaner and declarative:
// This middleware only executes when ToggleCartAction is dispatched
TypedMiddleware<AppState, ToggleCartAction>(
  (store, action, next) {
    if (store.state.user == null) {
      store.dispatch(SetErrorAction('Log in to use the cart.'));
      return; // Blocks the action without reaching the reducer
    }
    next(action); // The user is authenticated: continue
  },
)
You can pass multiple TypedMiddleware in the middlewares array, each responding to a different type of action:
middleware: [
  TypedMiddleware<AppState, ToggleCartAction>(requireAuthMiddleware),
  TypedMiddleware<AppState, ToggleFavoriteAction>(requireAuthMiddleware),
  thunkMiddleware,
]
13. Middleware Order Matters
Middlewares execute in the order they appear in the array. If the thunkMiddleware is before your custom middleware, the Thunk Actions (functions) will be processed by Thunk first and your middleware will never see them as functions.
// ❌ If thunkMiddleware goes first, the functions were already processed
// and your middleware cannot intercept them as functions
middleware: [thunkMiddleware, checkAuthStatus()]

// ✅ If your middleware goes first, you can intercept functions and classes
middleware: [checkAuthStatus(), thunkMiddleware]
14. Summary: The Value of Middleware for Global Authorization
The primary use case for middlewares in this application is centralized authorization. Without middleware, each Thunk Action would have to manually include the verification of whether the user is authenticated before executing its logic. With middleware, that verification happens once, transparently, before any action that requires authentication reaches the reducer.
- Without middleware: verify authentication in each of the 10+ actions that require a user.
- With TypedMiddleware: a single function, registered in the Store, handles all of them.
This is the middleware philosophy: centralize cross-cutting concerns so that business code (Thunk Actions and Reducers) can focus exclusively on its primary responsibility.
15. toggleCartProductAction and changeCartProductAction: The Real Cart
The cart actions used in production are more sophisticated than the conceptual examples seen earlier. The project organizes them using part of in lib/redux/actions/cart.dart. There are three main operations:
15.1 toggleCartProductAction: Adding or Removing a Product
This Thunk Action is the cornerstone of the cart. Its name reflects its toggle nature: if the product is already in the cart, it removes it; if it isn't there, it adds it. It receives the product and an initial quantity (count). The project's real signature:
ThunkAction<AppState> toggleCartProductAction(Product cartProduct, int count) {
  return (Store<AppState> store) async {
    // 1. Clone the cart list (NEVER mutate state directly)
    final List<Product> cartProducts = List.of(store.state.productsCart);
    final User user = store.state.user;

    // 2. Check authentication before continuing
    if (!_checkUserAuth(store)) return;

    // 3. Toggle logic: find product by ID
    final int index = cartProducts.indexWhere((p) => cartProduct.id == p.id);

    if (index > -1) {
      // Already exists: remove it from the cart
      cartProduct.cartCount = 0;
      cartProducts.removeAt(index);
    } else {
      // Doesn't exist: add it with the indicated quantity
      cartProduct.cartCount = count;
      cartProducts.add(cartProduct);
    }

    // 4. Prepare payload for Strapi: list of {product_id, count}
    final List<Map> cartProductsIds = cartProducts
        .map((p) => {'product_id': p.id, 'count': p.cartCount})
        .toList();

    // 5. Persist on the backend with JWT in the header
    final res = await http.put(
      Uri.parse('http://10.0.2.2:1337/carts/\${user.cartId}'),
      body: {'products': json.encode(cartProductsIds)},
      headers: {'Authorization': 'Bearer \${user.jwt}'},
    );

    // 6. Only update local state if server confirmed the change
    if (res.statusCode == 200) {
      store.dispatch(TogleCartProductAction(cartProducts));
    } else if (res.statusCode == 401) {
      store.dispatch(logoutUserAction);
      store.dispatch(ErrorAction(ErrorEnum.Forbidden, 'Login issues'));
    }
  };
}
Key design points:
List.of(store.state.productsCart): creates a real copy of the list to avoid mutating the Redux state directly (see §6 of this chapter)._checkUserAuth(store): guard function defined inactions.dartthat checks if a user exists in the state. If there's no user, it dispatches anErrorActionof typeForbiddenand returnsfalseto cut the Thunk's execution.- Payload to Strapi: instead of sending full
Productobjects, only the list of{product_id, count}is sent. This makes the payload lighter and compatible with Strapi's API. - Conditional Update: local state (
TogleCartProductAction) is only dispatched if the server response is200 OK. A401triggers automatic logout.
The CartItem widget uses it as follows: the StoreConnector converts the store into a VoidCallback that, when executed, calls toggleCartProductAction with count = 0 (for removal). That callback is linked both to the remove button of the Dismissible and to the swipe gesture:
StoreConnector<AppState, VoidCallback>(
  converter: (store) =>
      () => store.dispatch(toggleCartProductAction(widget.product, 0)),
  builder: (_, callback) => Dismissible(
    key: ValueKey(widget.product.id),
    onDismissed: (direction) => callback(), // Swiping removes the product
    confirmDismiss: (_) => showDialog(...),  // Asks for confirmation first
    child: /* Product Card */,
  ),
)
Note that the StoreConnector's converter returns a VoidCallback directly (not the full state). This is an important optimization: the widget only rebuilds if the callback changes, not on every change of the global state.
15.2 changeCartProductAction: Updating Quantity
This action updates the quantity of units of a product already in the cart. It is triggered from the editable text field inside the CartItem:
ThunkAction<AppState> changeCartProductAction(Product cartProduct, int count) {
  return (Store<AppState> store) async {
    final List<Product> cartProducts = store.state.productsCart;
    final User user = store.state.user;

    // Update quantity locally in the state copy
    final int index = cartProducts.indexWhere((p) => cartProduct.id == p.id);
    if (index > -1) {
      cartProducts[index].cartCount = count;
    }

    // Synchronize with Strapi
    final List<Map> cartProductsIds = cartProducts
        .map((p) => {'product_id': p.id, 'count': p.cartCount})
        .toList();

    final res = await http.put(
      Uri.parse('http://10.0.2.2:1337/carts/\${user.cartId}'),
      body: {'products': json.encode(cartProductsIds)},
      headers: {'Authorization': 'Bearer \${user.jwt}'},
    );

    store.dispatch(ChangeCartProductAction(cartProducts));
  };
}
The cart's text field has validations to prevent invalid quantities: it uses FilteringTextInputFormatter.allow(RegExp('[0-9]')) to accept only digits, and forces the value to 1 if the user enters 0 or an empty value. Each change recalculates the total price shown in the row with setState:
onChanged: (String value) {
  int n = 1;
  try {
    n = int.parse(value);
    if (n <= 0) {
      n = 1;
      _quantity.text = n.toString();
    }
    callback(); // Dispatches changeCartProductAction
  } catch (e) {}

  setState(() {
    totalPrice = widget.product.price * n; // Updates subtotal
  });
},
15.3 The _checkUserAuth Guard Function
Instead of duplicating authentication verification in every cart and favorites action, the project extracts that logic to a private function in actions.dart:
_checkUserAuth(store) {
  if (store.state.user == null) {
    store.dispatch(ErrorAction(ErrorEnum.Forbidden, 'Auth error'));
  }
  return store.state.user != null;
}
Any Thunk Action requiring authentication calls it at the start:
if (!_checkUserAuth(store)) return; // Cuts execution if there's no userIt is a guard pattern (guard clause) that avoids duplicated code and guarantees that the authentication error is always reported to the state consistently.
15.4 The ErrorEnum Enum and the ErrorAction Action
Errors are not simple strings. The project uses an enum to categorize error types, allowing the UI to respond differently depending on the type:
enum ErrorEnum {
  Ok,
  ConnectionTimeOut,
  Forbidden,
}

class ErrorAction {
  final ErrorEnum _errorEnum;
  final String _msj;

  ErrorEnum get errorEnum => this._errorEnum;
  String get msj => this._msj;

  ErrorAction(this._errorEnum, this._msj);
}
This allows distinguishing in the UI between a Forbidden (redirect to login) and a ConnectionTimeOut (show retry button). The presentation logic is thus cleanly separated from the business logic.
Chapter Conclusion
In this section, you've learned to shield your Redux application against real-world problems. The infinite request loop is solved using onInit instead of builder. Network errors are captured with try/catch and propagated to the state with error actions. Accidental state mutation is avoided by cloning lists and objects. Expired tokens are detected by the 401 code and the session is destroyed cleanly. And Middleware centralizes all authorization logic, avoiding repeated code in every action.
These optimizations are what make the difference between a prototype app and a production-ready application.
Source code:
https://github.com/libredesarrollo/flutter2-market-09
Next step, PhotoView or photo viewer in Flutter