
Content Index
- What will we cover?
- Tools we will use
- Projects we will configure
- Key Concepts
- Similarities with Python, Virtual Environments, Node, and PHP
- Where are the dependencies saved?
- Docker
- Image
- Container
- Docker Daemon (dockerd)
- Docker Client (docker)
- Installation
- What we are installing
- Installation Verification
- Essential Commands
- Basic Functioning
- View Images
- View Containers
- Remove Images
- What does RMI mean?
- Stopping Containers
- Identifying Containers
- Stopping Containers
- Removing Containers
- Container Logs
- Interactive Bash Mode
- Prior Considerations
- Difference with Docker Run -it
- What is sleep 1000 for?
- What happens if you don't use sleep?
- The docker stats Command
- Limiting Container Resources
- Testing Container Consumption
- Building Custom Images: Dockerfile
- Building Custom Images
- Dockerfile
- 1. Create the Instruction File
- 2. Define the Base Image (FROM)
- 3. Set the Working Directory (WORKDIR)
- 4. Copy Your Local Files (COPY)
- 5. Execute Configuration Commands (RUN)
- 6. Specify the Startup Command (CMD)
- 7. Inform About Ports (EXPOSE)
- Complete Dockerfile Example
- The docker build Command
- Flask App
- Step by Step: Building the Dockerfile
- Build and Run the Image
- Run the Container
- With Gunicorn
- Substituting the development server with Gunicorn
- Django App
- ENV PYTHONDONTWRITEBYTECODE=1
- ENV PYTHONUNBUFFERED=1
- Connecting Docker with the Local Machine: Practical Explanation: host.docker.internal
- Trying with host.docker.internal
- Volumes
- What are Volumes?
- Where We Start
- Problems when working with Docker in development
- Creation and Use of Volumes
- Mounting the volume in a container
- Docker Compose: What the hell is this and what happened with volumes?
- Reminder: volumes
- What is Docker Compose?
- And how do we communicate them?
- Summary of the definition
- Basic use of Docker Compose
- The example project with Flask and Redis
- Dockerfile and considerations
- The docker-compose.yml file
- Services
- Spinning up the application
- Outstanding problem: change synchronization
- Important considerations
- Docker Compose
- The Docker Layer Structure
- Initial Configuration
- Difference between Watch Mode and No Watch Mode
- Activating Watch in Docker Compose
- Watch Verification
- Special Considerations
- Summary
- Useful Commands (watch up down ps)
- The Example Project with Django and MySQL
- 1. Django and Dependency Configuration
- 2. Creating the docker-compose.yml File
- A. MySQL Service (db)
- B. Django Service (web)
- 3. Startup and Command Execution
- 1. Bringing up the Services
- 2. Running Migrations (External Commands)
- ⚠️ 4. Testing and Troubleshooting (Debugging)
- Laravel Sail
- Algunas recomendaciones
This is basic training to learn how to use Docker. Therefore, we ONLY cover the basic and necessary elements so you can start administering Docker and deploying your first projects; you have the complete documentation on this page:
Welcome to this completely free Docker course for developers. And what do I mean by developers? Web developers, as simple as that. There are many facets to employing Docker, and in this case, I'm going to explain the bare minimum and necessary for you to be able to use Docker in your web projects.
What will we cover?
We will learn the basics of Docker. That's the first point we'll address: what Docker is per se, its ecosystem, what on earth it brings us, the use of containers, images, and a little later, volumes.
From there, we'll create our first Dockerfile so we can start a project, but we'll quickly realize that simply virtualizing a project is quite good... but what about services? What if I want to include Redis, or MySQL, or anything else for which an image exists?
For that, we need to use Docker Compose, so we can orchestrate multiple services as if they were simply a single application using containers.
Tools we will use
We will primarily use the command line, as it's the most powerful tool we have. But we'll also rely heavily on the visual part with the graphical interface. When we install Docker—and I also talk about this in the corresponding video—we mainly install two things:
- The graphical interface.
- The command line.
What I want to give you here is the bare minimum necessary, to make it as short as possible. And, after learning about those three aspects I just mentioned—the Docker basics, the Dockerfile, and Docker Compose to orchestrate everything—we'll configure some example projects.
Projects we will configure
- Laravel, with Sails - which got a little out of hand because it's a tool that is really above everything mentioned.
- We're going to configure a project in Flask, in FastAPI, in Django, in CodeIgniter, and basically that's what we'll do.
This is a basic training to learn how to use Docker, therefore, we ONLY cover the basic and necessary elements so you can start managing Docker and deploying your first projects; on this page you have the complete documentation:
https://docs.docker.com/get-started/
Key Concepts
As with everything in life, we must first be clear on some concepts before moving on to practice. In frameworks, we usually talk about the MVC, MTV, and other patterns.
The same thing happens here: we need to understand how this program called Docker is formed. What the heck is it? Because believe me, when we move on to practice, everything will be understood much more easily.
Similarities with Python, Virtual Environments, Node, and PHP
The use of containers, images, and Docker is very similar to virtual environments in Python.
- Python uses Pipenv, Conda, or simply venv.
- Laravel and Node install dependencies inside the project (vendor/, node_modules/).
But Python, by default, installs everything at the operating system level, which is a problem.
Practical example:
You have a project made in Django 3 years ago (Django version 4), and today you need to create another project but with Django 7.
If you installed everything directly on the operating system, a collision is guaranteed.
And it doesn't just happen with Python:
- You cannot have 3 different PHPs active on the same system.
You also cannot mix dependencies in a disorderly fashion without isolating each project.
- That's why, in Python, we create a virtual environment per project, which encapsulates and isolates its dependencies. And this is exactly where the parallel with Docker appears.
Where are the dependencies saved?
In Laravel, we have vendor/, in Node, we have node_modules/.
In Python, the equivalent is a folder usually called .venv or .pvenv, where only the dependencies of that project are saved.
This doesn't happen automatically: you must install and activate the virtual environment, just like with Docker, which you must also install and configure manually.
With this, you can understand what we can use Docker for: as an environment where we can run our projects in an isolated manner and the similarities with images and containers, in which, the images are simply the dependencies, as happens with dependencies like Django or Laravel, which are simply static files, and containers are when the images are already being executed or interpreted.
Docker
Docker is a platform that allows you to "package" applications with all their dependencies (libraries, configuration, etc.) so they can run consistently in any environment (your machine, servers, cloud).
You can view Docker as a kind of virtual environment, like those we have in Python using vnvs, in which we can install packages (images would be the equivalent in Docker) which are the dependencies of our project; the advantage of this is that they run in an isolated manner from the operating system; with this, we can have multiple dependencies with different versions for different projects installed on the same operating system but virtualized through containers in Docker; for example, we can have multiple Python versions installed for different projects.
Another example is like the vendor folders in PHP or the node_modules in Node, in which we have the dependencies (images would be the equivalent in Docker) for each project; it is not exactly this, but with this idea, it will be easier for you to understand how Docker works
Docker is not only a development tool; it is widely used in production, and Railway is a very clear example of this.
Image
A Docker image is like an immutable template, meaning read-only, that contains everything necessary to run an application: file system, dependencies, code, environment variables, etc.; with this, the containers in Docker are created, which is the next point we will cover.
- Images are formed by layers that represent changes incrementally applied one on top of the other.
- Once created, it is not modified: if you want to change something, you create a new image or do a "build" on an existing base.
Imagine that a Docker image is like an .exe file on your computer.
The .exe contains all the necessary code and resources to run a program (libraries, dependencies, configurations...), but as long as you don't execute it, the program is not running and does not occupy resources.Similarly, a Docker image is a static package that includes the base system, the environment, the dependencies, and the application ready to run. But it does nothing on its own until you create a container from it — which would be the equivalent of running the .exe.
Another analogy is with classes, a defined class:
class Category(models.Model):
title = models.CharField(max_length=500)
slug = models.SlugField(max_length=500)Is like an image, by itself, we don't do anything with it, but it is when we execute it (a container), that is, we create an instance, that said class/image is used.
An image is like an immutable, read-only template.
It is a reference, an environment with its base system and dependencies included.
Real examples of available images:
- python
- ubuntu
- nginx
- mysql
- postgres
Container
A container is the running instance of an image. Think of the image as the blueprint or mold, and the container as the house built from that blueprint.
Once you launch a container, it functions as an isolated process, with its own file system (based on the image), environment, network, etc.
Containers share the host operating system kernel, which makes them lighter than full virtual machines.
Being a process, you can run it, create it, stop it, move it, or delete the process; for that, commands like docker create container, pull, cet are used:
$ docker run -i -t ubuntu /bin/bashImagine that a Docker container is like running an .exe program on your computer.
While the Docker image is the file saved on your disk (ready but inactive), the container is that same program already running: with its window open, its processes running, and its own environment functioning independently.
When you close the program, the process ends, but the .exe remains intact.
Similarly, when you stop or delete a container, the original image remains available to create another new container at any time.
Docker containers are:
- Self-contained: each container includes everything it needs to function, without depending on programs or libraries installed on the machine where it runs.
- Isolated: containers run independently of the system and other containers, which improves security and prevents conflicts.
- Independent: you can create, stop, or delete one container without affecting the others. Each one is managed separately.
- Portable: a container can run anywhere. The same one you use on your computer will work the same on a server or in the cloud.
Other functional concepts:
Docker Daemon (dockerd)
The Docker Daemon is the process that actually runs and manages everything in Docker.
It is responsible for:
- Create and run containers.
- Download or build images.
- Handle networks, volumes, and other Docker resources.
- Communicate with other daemons (e.g., in distributed or clustered environments).
In short:
It is the Docker "engine," the one that does the heavy lifting.
It normally runs in the background as a system service and is the one that receives the commands sent by the client, which is the next section we are going to discuss.
Docker Client (docker)
The Docker client is the tool you interact with — for example, when you type commands like:
docker run -d -p 8080:80 nginxThis command does not run the container directly.
The client simply sends a request to the daemon (using the Docker API) telling it what to do, and the daemon is the one who actually executes it.
Also, a single client can communicate with multiple daemons (for example, a local Docker and another remote one in the cloud).
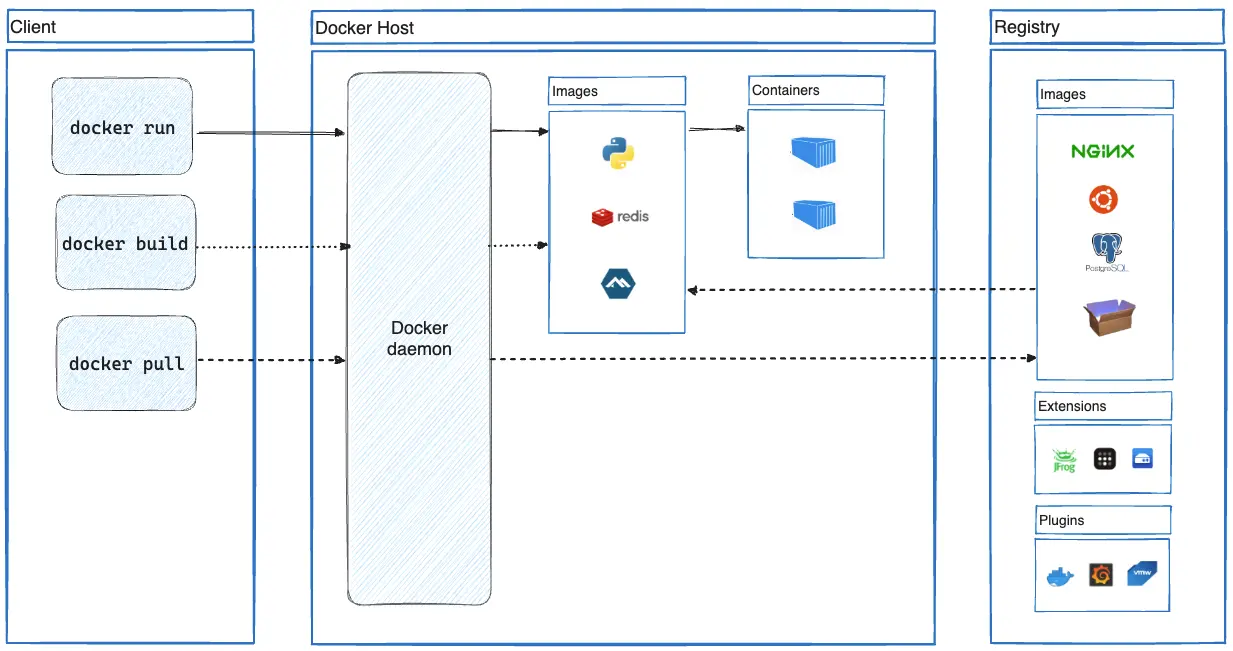
| Component | What it does | Example |
| ---------------------- | -------------------------------------------------------- | --------------------------------------------------------- |
| Client (docker) | Receives your commands. | docker build, docker run, docker ps |
| Daemon (dockerd) | Executes the client's orders and manages resources. | Creates images, starts containers, configures networks, etc. |
In this image, taken from the Docker website, you can clearly see the distinction between the Docker Client (docker) (the commands) and the Docker daemon (dockerd) which is the one that receives the commands and makes the changes at the level of our images and containers, which are THE FUNDAMENTAL AND BASIC PIECE IN DOCKER:
Installation
Installing Docker is very simple. To start, search Google for "Docker Install." Among the results, select the official Docker page (Docker Start).
Once the page is loaded, the download option will be displayed according to your operating system: macOS, Windows, Linux, macOS with Intel, etc. Simply download it and install it following the usual steps: Next, Next, Next.
What we are installing
When installing Docker, two main components are installed:
- Graphical Interface: allows you to visually manage containers and configurations.
- CLI (Command Line Interface): the command line that allows you to execute Docker commands from the terminal. Although the name sounds technical, it is very simple to use.
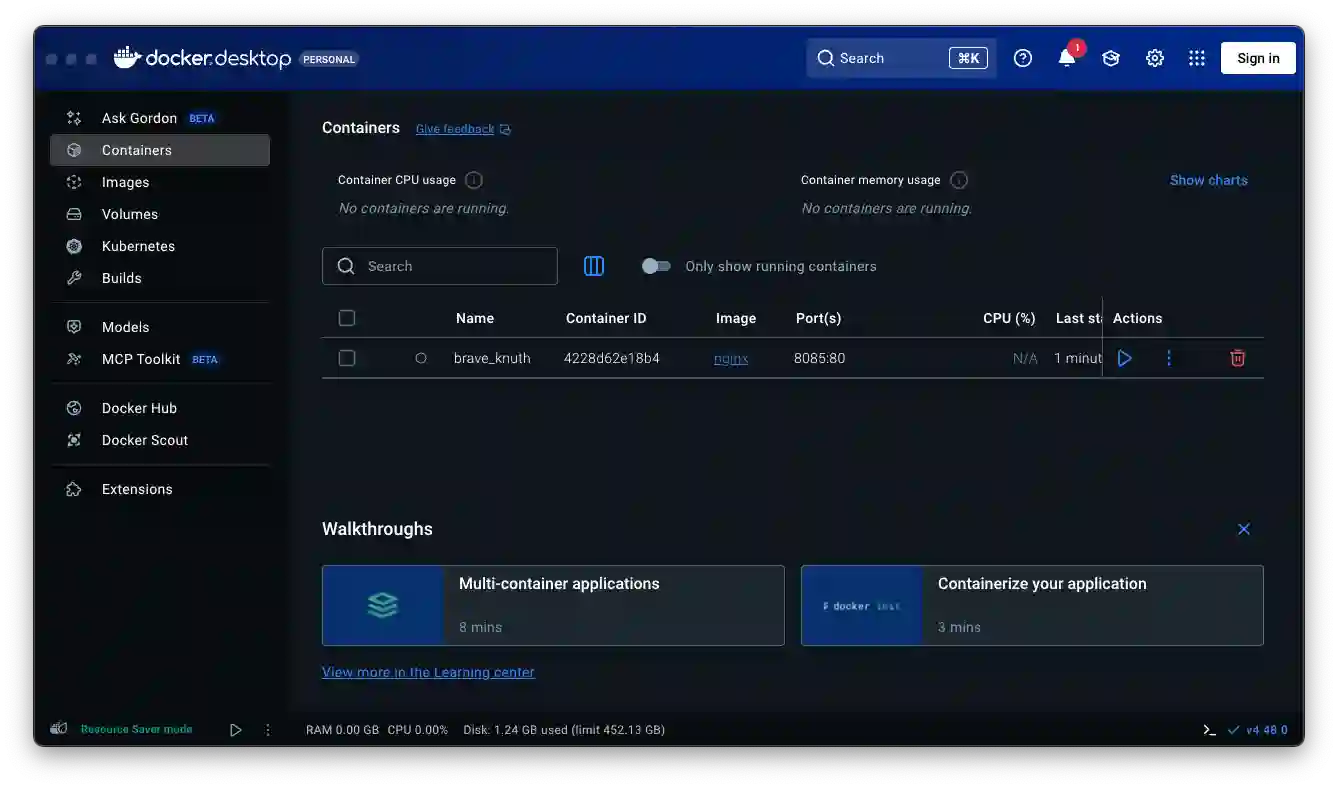
Installation Verification
Once the installation is complete, open Docker and you will see the graphical interface loading:
To verify the CLI installation, open any terminal and type:
$ dockerIf everything is correct, the list of available commands will be displayed, confirming that both components are installed and ready to use:
Usage:  docker [OPTIONS] COMMAND
A self-sufficient runtime for containers
Common Commands:
  run         Create and run a new container from an image
  exec        Execute a command in a running container
  ps          List containers
  build       Build an image from a Dockerfile
  bake        Build from a file
  pull        Download an image from a registry
  push        Upload an image to a registry
  images      List images
  login       Authenticate to a registry
  logout      Log out from a registry
  search      Search Docker Hub for images
  version     Show the Docker version information
  info        Display system-wide information
Essential Commands
In this list, you can see some actions we can perform in Docker, how to do it using the CLI and its equivalent in the UI:
- docker images: View images: docker images (Images Tab)
- docker run <ID / name>: Create container: docker run ( "Run" button on an image)
- docker ps -a: View containers: docker ps -a (Containers Tab)
- docker logs <Container ID>: View logs: docker logs <id> ("Logs" section)
- docker stop <ID / name> / docker rm <ID / name>: Stop/delete: docker stop/docker rm (Stop / Delete buttons)
- docker rmi <ID / name> deletes an image
- docker exec -it bash Enter an ACTIVE container in interactive mode (enables bash to launch commands)
- docker run -it <Container ID>(e.g., ubuntu) Creates the container and leaves it in interactive mode (enables bash to launch commands)
An essential command is the following:
$ docker run -d -p 8080:80 nginx- docker run → Creates and starts a new container.
- -d → Runs it in "detached" mode (in the background, it does not stay "stuck" in the terminal).
- -p 8080:80 → Exposes port 80 of the container on port 8080 of your PC.
- nginx → Uses the official Nginx image from Docker Hub.
Basic Functioning
From the previous command, removing technical aspects such as the detached mode or port configuration, we have two fundamental aspects in Docker: the image and the container:
- The downloaded images (like nginx)
- The containers it creates from those images
View Images
In functional terms, the following happens:
- It downloads the nginx image from Docker Hub (if you don't already have it; if you want to see the images, remember docker images).
- It creates a container in its own internal environment and NOT in a particular folder.
- It exposes port 80 of the container on port 8080 of your host (your Mac), thanks to the virtual network that Docker configures.
$ docker images
>> REPOSITORY   TAG       IMAGE ID       CREATED       SIZE
>> nginx        latest    3b7732505933   12 days ago   255MB
$ docker run 3b7732505933
O
$ docker run nginx
docker run nginx You are not telling it to stay active or which ports to expose, so it seems "nothing happened." In reality, it did run, but it closed immediately or remained running without exposing anything.
In the previous case, running the nginx image does NOT make sense because, for it to lift the process satisfactorily, the port options must be specified, as we did before:
$ docker run -d -p 8080:80 nginxOr using redis:
$ docker run -d redisRedis could work without exposing the port since, by default, it listens on port 6379 and therefore, for the previous implementation, it would only be accessible from other Docker containers, that is, internally and not from the PC itself (outside of Docker).
View Containers
If we wanted to see the Docker containers (from the UI, logically, the Containers tab):
Initially, we are going to run it without the -a parameter. For this example, you will surely also have something from your previous tests. I have a couple of containers from the tests we did with docker run, since, let's remember, when we execute docker run with or without parameters, some container is always created. So, I have at least two to work with
Shows ONLY the containers that are currently running:
$ docker ps
>> CONTAINER ID   IMAGE          COMMAND                  CREATED      STATUS                     PORTS     NAMES
>> e678f12698bf   nginx          "/docker-entrypoint.…"   3 days ago   Exited (0) 5 minutes ago             peaceful_mclaren
>> c880881a55f8   3b7732505933   "/docker-entrypoint.…"   3 days ago   Exited (0) 3 days ago                modest_northcutt
Notice that it returns information about the container or containers. Here something interesting appears, which supports what was commented before: containers are the execution piece of the images.
If you have nothing started, you will see absolutely nothing. But what happens if we add the -a parameter?
Shows ALL containers:
$ docker ps -aIn both cases:
>> CONTAINER ID IMAGE COMMAND CREATED STATUS PORTS NAMESNow the containers we have appear. The -a option returns all containers, regardless of whether they are started or not. On the other hand, docker ps without parameters shows only the containers that are currently running.
Viewing images:
$ docker images
>>> REPOSITORY   TAG       IMAGE ID       CREATED       SIZE
>>> nginx        latest    3b7732505933   12 days ago   255MBMB
In summary:
- docker ps -a → all containers (active or inactive).
- docker ps → only active containers.
Why is it called ps and not containers?
You are probably asking yourself: "If for images we use docker image (or docker images), why don't we use docker containers here?"
This is a Linux tradition: ps means process status. A container is, essentially, a started process.
The term containers is more modern and was incorporated around 2017, but the ps command is maintained as legacy, a historical Docker convention.
With these concepts, we can better understand the fundamentals of Docker: images as the base and containers as the key pieces for executing those processes.
Remove Images
As always, we can pass the ID or the name of the image we want to delete.
For example, if we have an image called nginx, we can write:
$ docker rmi nginx - rmi means remove image
What does RMI mean?
RMI stands for Remove Image, just as we had docker rm before, but this time the I indicates that it is an image. With this, its purpose is quite clear.
Stopping Containers
Docker Stop, as you might guess, stops a container. I wish it were called docker container stop, which would be a bit clearer, but that's how it's implemented. In the next class, we will see the equivalent command for deleting a container.
To stop a container, we simply have to pass it one of two things:
- The container identifier (ID).
- The container name.
Note that parameters like the name can be customized, but we will see that later.
Identifying Containers
Recall that we previously used docker ps, which returns information about running containers. There we can see both the ID and the name of the container, which allows us to easily copy and paste them for use with docker stop.
Stopping Containers
To stop a container, it must be running.
Using the name:
$ docker stop container_name
Result: successfully stopped.
Using the ID:
$ docker stop container_ID
Removing Containers
Removing a container is similar to stopping it, and the container must be stopped. We execute:
Using the name:
$ docker rm container_nameOr using the ID:
$ docker rm container_IDContainer Logs
Allows you to view a container's logs:
$ docker logs -f --tail 20 -t container- --tail = how many lines you want to see
- --tail 20 last 20 lines
- -t = (timestamp) adds the time to each line
- -f = (follow) keeps "listening," and shows you everything new that comes out live, without closing (the container must be running)
Interactive Bash Mode
The next command I want to mention is Docker Exec, which allows us to execute commands inside a container.
Prior Considerations
It is important to understand that the container must be enabled and running. Depending on the image, executing commands can be extremely useful:
- If we have an image like Ubuntu, we can interact directly with the operating system.
- If it is an Apache or Nginx, it will probably not be possible to execute commands interactively.
- Unless you want to modify files: docker exec -it
tail -f /var/log/apache2/error.log`
- Unless you want to modify files: docker exec -it
- In the case of databases, we can execute SQL commands directly.
In short, everything depends on the purpose of the image.
The interactive mode is simply enabling a terminal in which to execute commands; for this, the following modes are used:
- -i (interactive) Allows typing commands in the terminal
- -t (tty (terminal)) Gives you a "real" terminal
Examples:
$ docker run -it ubuntu
$ docker exec -it a1b2c3d4e5 bash #  a1b2c3d4e5 EXAMPLE of ID of a running container
Depending on the image, it may make sense to execute commands; for example, an interactive Ubuntu shell:
$ docker run -it ubuntuA bit more elaborate:
$ docker run -d --name my-ubuntu ubuntu sleep 1000- -d → runs it in the background (detached)
- --name my-ubuntu → gives it a name so you don't have to use the ID
- ubuntu → the base image
Enter the container with bash:
$ docker exec -it a1b2c3d4e5 bash
$ docker exec -it mi-ubuntu bash
Now you are inside the container.
You can execute commands as in any Linux:
$ ls $ pwd $ apt updateDifference with Docker Run -it
- Docker Run -it: starts a container and automatically opens an interactive terminal.
- Docker Exec -it: enters a container that is already active, allowing us to execute commands.
What is sleep 1000 for?
When you do:
docker run -d --name my-ubuntu ubuntu sleep 1000sleep 1000 is the command that runs inside the container.
It keeps the container active for 1000 seconds (about 16 minutes).
Since we use -d (detached / in the background), the container needs a process that keeps running, otherwise, Docker will stop it immediately.
What happens if you don't use sleep?
docker run -d --name mi-ubuntu ubuntuUbuntu does not have a default process that keeps running.
So the container starts up and stops instantly, because there is nothing to keep active.
If you then run docker ps, you won't see it in the list of active containers, only in docker ps -a as Exited.
✅ That's why we use sleep to keep it alive and be able to enter with docker exec -it
bash`.
The docker stats Command
Let's learn about the docker stats command, which is used to view resource usage statistics for containers (hence its name).
$ docker statsFor now, I don't have any running containers, so if I execute the command at the beginning, it won't show anything at all.
To have something to analyze, let's run an image, for example, the Nginx one.
The command would be something like this:
$ docker run -d --name my-nginx -p 8080:80 nginxHere you can see what is displayed:
- The total memory available on the computer (in this case, about 7.5 GB).
- The consumption of the Nginx container.
- The CPU usage assigned to the container.
Limiting Container Resources
Many times we want to limit the amount of resources we allocate to a container.
Recall that the container represents the execution part of an application, so it is good practice to set limits.
For example, we can use the --memory and --cpus options when creating the container:
$ docker run -d --name my-nginx --memory="50m" --cpus="0.5" nginxIf we execute docker stats again, we will see that the limit is no longer 7 GB, but 50 MB.
Testing Container Consumption
Finally, I am going to execute a command that is not directly related to Docker but will help us to generate load and see the consumption.
$ for i in {1..1000}; do curl -s http://localhost:8080 > /dev/null; doneBuilding Custom Images: Dockerfile
Recall that an image is like a single package that contains everything necessary to run a process, AND WE CAN CREATE OUR OWN, in our case, they would be our projects in PHP, Node, Python, etc.; custom images created by us will contain a Node/Python/PHP environment, and the code of the project itself. To create our own images, we must create a special file in our project called Dockerfile.
Basically, these are the fundamental pieces upon which we can create our containers to run applications. For now, everything may seem a bit static: we install operating system or server images, but... how do we interact with them?
Building Custom Images
To create our own images, we use the famous files called Dockerfile. With these files, we can define how our image is built.
Remember: an image can be anything: an operating system, a programming language, a server... or even your own project. In this case, we are going to create an image of our project in Flask.
To build a custom image:
- We create a Dockerfile in the root of our project.
- We define the necessary rules for the image to function correctly.
- We indicate, if necessary, what other images are required for our image to make sense. For example, our Flask project needs the Python image to run.
Dockerfile
A Dockerfile is simply a text file that contains all the necessary instructions to build a Docker image. The structure it will have depends on the project and what you want to do, but it usually follows these fundamental steps:
The Dockerfile is the seed, the fundamental piece that allows us to create our own images. That's why you'll find many pages and examples, because its operation is simple to understand: you just need to start from a base project, which can be practically anything.
1. Create the Instruction File
In the root of your project, create a file called exactly Dockerfile (with a capital D and no extension).
- This file is created in the root of the project, whether it's PHP, Laravel, CodeIgniter, Flask, FastAPI, Django, Node... whatever.
- From there, we define a set of rules. The structure changes depending on the project, but in most cases, it follows a similar pattern.
2. Define the Base Image (FROM)
Specify the starting point of your image using the FROM instruction. This determines the operating system and the initial environment. For example, for a Node.js project, you could use:
FROM node:lts-alpine- In our example, we use Python for Flask, or Node for Node projects.
- If your project needs SQL, for example, you can also indicate the MySQL image.
3. Set the Working Directory (WORKDIR)
With the WORKDIR directive, you define the folder inside the container where all subsequent commands will be executed and where your files will be copied. For example:
WORKDIR /appThis is the place where dependencies will be installed, the project will be copied, commands will be executed, and ports will be exposed.
By convention, /app is used, but you can name it whatever you want.
4. Copy Your Local Files (COPY)
Use the COPY instruction to transfer files from your local machine to inside the image. To take all the contents of the current directory (the context) to the container's working directory, you would do:
COPY . .- We generally copy all the content of our project to the working directory.
5. Execute Configuration Commands (RUN)
The RUN instruction executes commands during the image building process, ideal for installing dependencies or configuring the environment. For example, to install Node.js dependencies:
RUN yarn install --production6. Specify the Startup Command (CMD)
CMD indicates what the default command is that will be executed when a container is started from this image. To launch a Node.js application:
CMD ["node", "src/index.js"]- For server projects, this usually includes installing dependencies and starting the application.
- In Python, for example, python app.py starts the application.
- In Node, we would use npm install and then npm start.
7. Inform About Ports (EXPOSE)
If your application is configured to listen on a specific port (e.g., 3000), use EXPOSE. This notifies Docker which ports will be open for communication at runtime.
EXPOSE 3000Complete Dockerfile Example
Combining all these directives, a Dockerfile for a Node.js application would look like this:
Dockerfile
# syntax=docker/dockerfile:1
FROM node:lts-alpine
WORKDIR /app
COPY . .
RUN yarn install --production
CMD ["node", "src/index.js"]
EXPOSE 3000
In summary, the Dockerfile defines how your image is built, from the base to the execution commands and ports. Each project requires specific adaptations, but the general structure follows the steps we have described:
- Base image (FROM)
- Working directory (WORKDIR)
- Copy project files (COPY)
- Expose ports (EXPOSE)
- Execute commands (RUN or CMD)
- In the next class, we will see how to elaborate this Dockerfile step by step for our project and how to build the image ready to run it in a container.
The docker build Command
The docker build command builds a Docker image (our custom image) from the instructions contained in a Dockerfile and a specified context.
$ docker build -t app-flask-chat-01 .- -t: The -t (tag) flag is used, and the resulting image receives a name and a tag
- The dot at the end (.) means copy ALL the project from the current directory, which is the one that has:
Flask App
Thinking about the previous structure, let's see how we can create a Dockerfile to create a custom image of a Flask project:
https://github.com/libredesarrollo/01-jan-chat
We create the Dockerfile:
# Use an official Python base image, for example, version 3.12 but smaller than the full one, which is simply python
FROM python:3.12-slim
# Set the working directory inside the container; it can be any other, but by convention, it is app
WORKDIR /app # Copy the requirements file and install dependencies
# --no-cache-dir disables caching of downloaded and installed packages.
COPY requirements.txt .
RUN pip install --no-cache-dir -r requirements.txt
# Copy ALL the project content (including app.py) to the working directory COPY . .
# Expose the port on which Flask runs (default 5050)
# if __name__ == '__main__':
#    app.run(debug=True, host="0.0.0.0", port=5050) EXPOSE 5050
# Command to run the application # Use python app.py if you modified app.run(host='0.0.0.0') # or use a more robust command if you installed Gunicorn:
# CMD ["gunicorn", "--bind", "0.0.0.0:5000", "app:app"]
CMD ["python", "app.py"]
Step by Step: Building the Dockerfile
Now, let's start with the Dockerfile.
Remember that you can get inspiration by searching for base images on Docker Hub, the official library.
Since our project is in Python, we will start with a Python image.
1. Select the base image
We usually start from another base image. In this case, we choose a Python image, but to make it lighter, we will use the Python Slim version:
FROM python:3.12-slimThis version is lighter and more efficient, as it contains only the essentials to run Python.
2. Define the working directory
By convention, we use /app as the main directory:
WORKDIR /appAll the project will be copied there, and it will also be where the commands defined later will be executed.
3. Copy dependencies and install them
The next step is to copy the dependencies file and then install them:
COPY requirements.txt .
RUN pip install --no-cache-dir -r requirements.txt
This ensures that the environment inside the container has everything necessary.
The --no-cache-dir flag prevents caching, keeping the image lighter.
4. Copy the rest of the project
Now we copy the rest of the project files:
COPY . .This includes the code, templates, modules, etc.
5. Expose the port and run the project
We define the port (in my case, 5050) and how the application will be executed:
EXPOSE 5050 CMD ["python", "app.py"]Build and Run the Image
With the Dockerfile ready, the next step is to build the image.
We have the structure to create the image; we need to build the custom image of our application. For that:
$ docker build -t app-flask-chat-01 .- -t: The -t (tag) flag is used, and the resulting image receives a name and a tag
- The dot at the end (.) means copy ALL the project from the current directory, which has:
__pycache__ chat_routes.py llm_service.py templates
app.py Dockerfile requirements.txt test.py
This command creates the image, reading the instructions from the Dockerfile.
You can verify it in Docker Desktop or with:
$ docker imagesRun the Container
There you will see your newly generated image.
And to create the container from our custom image:
$ docker run -d -p 5050:5050 --name flask-app-contenedor app-flask-chat-01You can view the container log at any time:
$ docker logs flask-app-contenedor This is ideal if the project has errors, and you should see something like this:
 * Running on all addresses (0.0.0.0)
 * Running on http://127.0.0.1:5050
 * Running on http://172.17.0.2:5050
Press CTRL+C to quit
 * Restarting with stat
 * Debugger is active!
 * Debugger PIN: 148-371-654
With Gunicorn
If we want to deploy our application in production, this becomes a problem.
The fact that Flask indicates it is a development server means that it is not optimized for production environments, so we must use an appropriate server for this type of deployment.
In the case of applications developed with Flask, we need to use a production-oriented WSGI (Web Server Gateway Interface) server.
And precisely, one of the most used for this purpose is Uvicorn (Note: the original text mentions Gunicorn, but then discusses Uvicorn; let's stick to the common practice of using Gunicorn for Flask/Django).
Substituting the development server with Gunicorn
Until now, we have been using the development server, but we want to do it properly and simulate a production environment.
For this, we start by installing the Gunicorn package in our Flask project.
We add to requirements.txt:
$ pip install gunicornAnd
$ pip freeze > requirements.txtThe Dockerfile:
CMD ["gunicorn", "--workers", "4", "--bind", "0.0.0.0:5050", "app:app"]
gunicorn -b 0.0.0.0:$PORT run:app
Explaining the parameters:
- --workers 4: indicates the number of workers (processes) that will handle user requests.
You can adjust this value according to the server resources. - --bind 0.0.0.0:5050 (combining host and port): defines the address and port where the application will run inside the container (the equivalent of localhost).
- app:app: specifies the entry point: module app and variable app (the Flask application instance).
The rest of the Dockerfile file remains the same.
Then you rebuild the Docker image and start the server, just like we did before:
$ docker build -t gapp-flask-chat-01 .
$ docker run -d -p 5050:5050 --name gflask-app-contenedor gapp-flask-chat-01
Django App
Thinking about the previous structure, let's see how we can create a Dockerfile to create a custom image of a Django project:
https://github.com/libredesarrollo/coruse-book-django-store
We create the Dockerfile:
# Base image FROM python:3.12-slim
# Prevent Python from saving pyc and unbuffer stdout ENV PYTHONDONTWRITEBYTECODE=1 ENV PYTHONUNBUFFERED=1
# Working folder WORKDIR /app
# Copy dependencies first COPY requirements.txt .
# Install dependencies RUN pip install --no-cache-dir -r requirements.txt
# Copy all code COPY . .
# Expose Django port EXPOSE 8000
# Startup command (Gunicorn for production)
CMD ["gunicorn", "app.wsgi:application", "--bind", "0.0.0.0:8000"]
Where app is the name of the Django project; in the case of the previous project, it would be like this:
CMD ["gunicorn", "mystore.wsgi:application", "--bind", "0.0.0.0:8000"]This is where the files are located:
mystore/wsgi.py
And
mystore/asgi.py
Of your project.
We define a couple of additional environment variables:
ENV PYTHONDONTWRITEBYTECODE=1
Tells Python not to generate .pyc files (compiled bytecode).
Normally, Python creates .pyc files next to your .py files to speed up future executions.
In Docker, that makes no sense because every time you rebuild the image, everything is regenerated.
ENV PYTHONUNBUFFERED=1
Causes Python to write directly to standard output (stdout), without buffering.
Without this, logs can be "delayed" or not seen in real-time inside docker logs.With this, print() and the logs from Django or Flask appear immediately in the terminal or in docker logs -f.
These same environment variables can also be used in your other Python projects, including the Flask one we saw earlier, to optimize the images.
Finally, if you want to use the local server:
CMD ["python", "manage.py", "runserver", "0.0.0.0:8000"]And just like before, we generate the image and the container:
$ docker build -t app-django-01 . $ docker run -d -p 8000:8000 --name django-app-contenedor app-django-01Connecting Docker with the Local Machine: Practical Explanation: host.docker.internal
Let's learn about a mechanism we have in Docker that allows us, in short, to connect from a container to our local machine. That is, from an isolated environment (the container), we can access services running directly on our host.
The exercise is simple: I have a Django app with CORS configured running on my localhost (no Docker) and I want to connect a Flask app running in a container; to be able to connect to our host (our PC) from a container on Mac and Windows, we have the following DNS:
Trying with host.docker.internal
A special mechanism exists: host.docker.internal, an internal DNS that allows containers to communicate with the host.
So we regenerate the image by adding the following line when generating the image and the container:
--add-host=host.docker.internal:host-gateway
docker build -t app-flask-chat-01 .
docker run -d -p 5050:5050 --add-host=host.docker.internal:host-gateway app-flask-chat-01
Before this, from the Flask app, we connect to the Django app using:
# response = requests.get('http://127.0.0.1:8000/store/product')
response = requests.get('http://host.docker.internal:8000/store/product')
With this, we can now connect from a container to our host in a simple way
This enables communication with the host from inside the container.
After executing again, we see that the error changes: now we get a 403 (Forbidden) instead of the previous 500.
Volumes
The next logical evolution in this course is to learn about volumes. We no longer only work with images and containers, but also with a new tool: volumes.
What are Volumes?
A volume is a way to persist data outside the container. Until now, when we deleted a container, all the information it contained was lost. With volumes, that data is maintained regardless of the container's lifecycle.
- Basically, it works like a pendrive or external hard drive: the data is stored in a separate space, outside the container.
- This allows us to develop without having to constantly generate new images to maintain information.
Where We Start
For the moment, we have seen some basic concepts on how to work with Docker. The main thing has been learning about images, containers, and how we can manipulate them: the typical CRUD of creating, deleting, listing them, and so on.
We also saw how to take an image to run it in a container, configure it through ports, and other options. Basically, that's what we've done up to this point.
Besides that, we reviewed another section, since only that knowledge is not enough. Until now, we were "playing": we created an image, we lifted a container, but we were not really using anything in a practical way. For example, we lifted Nginx, but there was nothing running there.
Problems when working with Docker in development
So the question arises: how can we, as programmers, use Docker for our own solutions?
That is where this course comes in, which seeks to teach you how to set up your projects in Docker in a practical way. We saw a preamble in which, through the Dockerfile, we can have our own project. We reviewed examples such as a Flask application and a Django one, adding certain rules to start the application in Docker.
Everything is perfect up to here, but if you have experimented a bit with Docker, you will have noticed some problems:
- Docker can be used in both production and development.
- In production, it doesn't happen much: we simply lift a container on an already configured server (for example, Gunicorn).
- In development, it's different: every change we make to the application requires generating the image again (docker build) and lifting the container (docker run).
This makes development largely impractical: every change involves a laborious process: deleting previous containers, recreating them, checking for errors, and trying again.
Creation and Use of Volumes
Let's test it step by step:
We open the terminal and verify that Docker is running.
We review containers, images, and volumes. Everything is part of the Docker ecosystem.
We create a volume using:
$ docker volume create my_volumeNow we have an empty volume, like a newly created pendrive. We can list the volumes with:
$ docker volume lsMounting the volume in a container
For it to make sense, a volume must be used with a container. For example:
$ docker run -it --name c1 -v my_volume:/data ubuntu- -v my_volume:/data indicates that the volume my_volume will be mounted in the /data folder inside the container.
This creates a persistent space where files, application data, logs, etc. can be saved.
Inside the container:
$ cd /data
$ ls
$ echo "Hello from container" > archivo.txt
$ cat archivo.txt
If we delete the container and spin up a new one:
$ docker run -it -v mi_volumen:/data ubuntu bashWe'll see that the /data folder is still there with the same files, because the data is persisting in the volume, not in the container.
Docker Compose: What the hell is this and what happened with volumes?
What were we talking about earlier? Remember that the goal of this block, this section, is to be able to use Docker, but not as a production deployment tool, but to work perfectly with our applications during development.
The idea is that, for example, when we have changes in the code, these can be automatically reflected in the container and seen on screen. With what we've already seen about images, containers, and so on, it's not enough; those are just the basic tools, but we need more mechanisms.
Reminder: volumes
Earlier we saw a key piece: volumes. In short—and you saw it in the previous video—volumes allow data to persist, which is fundamental for what we are mentioning. But we still need another key piece: Docker Compose, which will internally extend the use of volumes to be able to inject the changes we are discussing.
What is Docker Compose?
Docker Compose is a tool that comes installed along with Docker (just like with pip when you install Python or npm when you install Node).
Basically, Compose allows employing multiple Docker containers within a single application.
For example, here we have a Flask application—the one we're going to build now—where we use one container for Flask (i.e., a Python image) and we also need Redis. Therefore, these are two containers that must communicate with each other.
And how do we communicate them?
That's what Compose is for: it allows this to be done very simply using a configuration file.
Compose lets us add all the dependencies our project needs: Redis, MySQL, PostgreSQL, etc. Everything you need as a container.
Summary of the definition
Docker Compose is a tool that allows defining and running applications with multiple containers.
Example: one container for Flask and another for Redis.
Basic use of Docker Compose
Compose has its typical commands, what would be a small "CRUD": commands to create, stop, view logs, and list.
In the official documentation you can see the main commands:
- compose up → spin up the application
- compose down → stop and tear down
- logs → view records/logs
- ps → view active processes/services
All the typical stuff.
In simple terms: Compose is a mechanism so that from a single project we can use multiple containers, which are ultimately the dependencies of our application.
The example project with Flask and Redis
This is the project we are going to set up as an exercise. It's a very simple example: a Flask application that connects to Redis.
In the repository you will find:
- Dependencies
- Dockerfile
- docker-compose.yml file
- Source code
- Additional configurations
https://github.com/libredesarrollo/flask-redis-docker
The project consists of a counter stored in Redis, so that every time we reload the page, Redis increments a value and Flask displays it. Redis is used here as a cache, although it also serves to store data temporarily, manage sessions, queues, etc.
The return from Flask simply displays the incremented value on screen.
Dockerfile and considerations
In the Dockerfile we have the usual:
- Base Python image (the "alpine" version, lighter).
- Working directory.
- Installation of dependencies (including Redis dependencies).
- Copy of the complete project to the container.
- Execution command.
Some project variants use flask run, which is recommended for development, but for now we will use the most basic form.
The docker-compose.yml file
Here comes the important part. To use Compose we need this specific file. It can be called docker-compose.yml or dockercompose.yml (with or without the underscore).
Services
In Compose, each configuration block represents a service, which is basically a container.
Example of the basic structure:
- web: main service (Flask).
- redis: service for Redis.
In web is defined:
- build: . → to build the image from the Dockerfile.
- Exposed ports.
- Dependencies.
In redis we simply define the image we are going to use (in this case, the alpine version of Redis).
Adding other services
If we wanted to use MySQL, we simply add:
mysql:
   image: mysql
   ...
Compose allows adding as many services as our project needs.
Spinning up the application
If we don't have previous containers, images, or volumes, Compose will generate them.
The main command:
$ docker compose upThis command:
- Reads the docker-compose.yml file.
- Builds the necessary images (if they don't exist).
- Creates the containers.
- Spins them up in the correct order.
The Compose file becomes the key piece of the project.
The Flask application spins up correctly and we can now access it. Each reload increments the counter stored in Redis.
Outstanding problem: change synchronization
For now, we make changes in the project and they don't synchronize with the container.
We solve this in the next class with the synchronization part (volumes and docker watch).
Important considerations
- First configure the Dockerfile.
If something fails there, Compose won't work either. - The base is always the application.
If the app doesn't spin up, the container built from the Dockerfile won't either, and Compose much less. - Compose is an upper layer.
If something fails below (app → Dockerfile → Compose), you must resolve the problem from the base up.
Docker Compose
Let's look at a fundamental aspect for being able to use Docker as developers, which is the synchronization or watch part (observer). In a nutshell, what we seek is that when we make changes in our project, they are automatically reflected in the application.
Currently, as we saw in the previous video, when modifying certain files (for example, a .py file), the changes are not reflected on the screen because we have not activated watch mode.
We use Docker Compose primarily for two crucial reasons:
- Container Communication: It allows different services in our application (such as the database container, the Redis container, and our Flask application container) to communicate with each other easily.
- Data Persistence: It uses internal volumes, which ensures that our application data persists even when we delete or stop the containers.
- This last point is key to finally being able to use Docker for development and not just in production, as was previously the case.
The Docker Layer Structure
Docker Compose sits at the top of the Docker toolset, building upon the existing foundation:
- Docker Base: Containers, Images, Volumes (the basics).
- Docker File: The way to access and build these images and containers.
- Docker Compose: A top layer that coordinates everything above to manage multiple interconnected services.
Initial Configuration
To activate watch in Docker, we follow the guide we are using. Remember that we previously spun up our services with Docker Compose, such as flask and redis. This also applies to traditional databases like MySQL.
The important detail is watch mode, which allows changes in the source code to be synchronized automatically. To activate it:
- We must add specific lines of code in the Dockerfile and modify the execution command.
- In projects like Laravel, we used to have a dev command and a watch command. In Flask, it is recommended to use flask run, although this may vary depending on the project configuration.
Difference between Watch Mode and No Watch Mode
- No Watch: Runs the application in normal mode, without automatic synchronization.
- Watch: Activates developer mode with real-time change synchronization from the working directory.
It's very important that the directory target exactly matches that of the Dockerfile, otherwise synchronization will not work.
Activating Watch in Docker Compose
Once configured:
compose.yaml
services:
  web:
    build: .
    ports:
      - "5050:5050"
    develop:
      watch: # Modo Watch
        - action: sync
          path: .
          target: /app # AQUI SYNC!!
  redis:
    image: "redis:alpine"
We can start Docker Compose with the watch option:
$ docker-compose up --watchOr also:
$ docker-compose watchBoth options work equivalently and allow synchronization to be activated. Before starting, it is advisable to delete previous containers and volumes to avoid conflicts:
$ docker-compose down -vThen, we spin up the services and verify that changes in the source code are reflected automatically.
Watch Verification
When we make changes in the source code, for example, in a .py or .js file, we should see that the changes are detected and reflected in the application in real time. If not:
- Check that the directory target matches the Dockerfile configuration:
- compose.yaml target: /app # HERE SYNC!!
- Dockerfile WORKDIR /app
- Ensure that the flask run command or equivalent is correctly configured for developer mode.
- Check that there are no container or environment variable conflicts.
Special Considerations
- In projects with Flash, watch mode may vary slightly, but the idea is the same: activate synchronization from the working directory.
- Correctly configure the environment variables inside the container, as Docker does not take those from the local terminal.
- Avoid having duplicate configurations that may interfere with watch mode.
Summary
With these configurations:
- We modify the docker-compose.yml file and Dockerfile.
- We activate watch mode for automatic synchronization.
- We delete previous containers and volumes.
- We execute Docker Compose with the watch option.
- We verify that code changes are reflected in the application in real time.
With this, we can now use Docker as an effective development environment, detecting changes instantly and working more efficiently.
Useful Commands (watch up down ps)
Below is a summary of the most useful commands for managing your services in a development environment:
- Command Function Description
- docker compose up Start Services Starts all services defined in docker-compose.yml.
- docker compose up -d Run in Background Starts services in Detached (background) mode, freeing up the terminal for other uses.
- docker compose ps Check Status Shows which containers are currently running (active) for the project.
- docker compose stop Stop Services Stops all running containers in a controlled manner.
- docker compose down Stop and Remove Stops containers and removes the associated network; the cleanest option upon completion.
- docker compose --help Help Displays all available commands (useful for exploring additional options).
Practical Example: If we run docker compose up -d and then docker compose ps, the terminal will indicate that Redis and our Flask project are running, allowing us to continue working:
NAME IMAGE COMMAND SERVICE CREATED STATUS PORTS
flaskredis-redis-1 redis:alpine "docker-entrypoint.s…" redis 3 days ago Up 2 seconds 6379/tcp
flaskredis-web-1 flaskredis-web "flask run" web 3 days ago Up 2 seconds
The Example Project with Django and MySQL
We're going to set up Docker Compose for a Django project that requires multiple services, in this case, MySQL.
Previously, when we used SQLite (an internal database), a simple docker build was enough.
However, when you need to integrate external services like Redis or MySQL, you're dealing with multiple containers.
- One service = docker build and docker run
- Multiple services = Docker Compose
1. Django and Dependency Configuration
To use MySQL in Django, we must first install the necessary dependencies and configure Django to connect to the database.
- Dependencies: Make sure to add the MySQL connector to your project's dependencies (e.g., mysqlclient).
- Database Configuration: In the Django configuration file, use environment variables for the connection. This is crucial, as these variables will be defined in Docker Compose.
# example settings.py
DATABASES = {
    'default': {
        'ENGINE': 'django.db.backends.mysql',
        'NAME': os.environ.get('MYSQL_DATABASE'),
        'USER': os.environ.get('MYSQL_USER'),
        'PASSWORD': os.environ.get('MYSQL_PASSWORD'),
        'HOST': 'db',  # Importante: 'db' es el nombre del servicio en Docker Compose
        'PORT': '3306',
    }
}
2. Creating the docker-compose.yml File
The docker-compose.yml file will define two services: the database (db) and the Django application (web).
A. MySQL Service (db)
The MySQL configuration requires defining the image, environment variables, ports, and, crucially, the volumes to ensure data persistence.
docker-compose.yml
version: "3.9"
services:
  db:
    image: mysql:8.0
    container_name: mysql_db
    restart: always # Docker intentará reiniciar el contenedor siempre que se detenga, independientemente de la razón (incluyendo cierres limpios, fallos de aplicación o reinicios del propio Docker Daemon/Servidor).
    environment:
      MYSQL_ROOT_PASSWORD: root
      MYSQL_DATABASE: django_db
      MYSQL_USER: django_user
      MYSQL_PASSWORD: django_pass
    ports:
      - "3306:3306"
    volumes:
      - mysql_data:/var/lib/mysql # es la carpeta de datos -nuestras tablas- es la que guardamos en un volumen para que no se pierdan los datos.
  web:
    ***
volumes: # En Docker Compose, el archivo se divide en secciones de nivel superior. La sección volumes: (al mismo nivel que services:) se utiliza para declarar y definir los volúmenes con nombre que Docker Compose debe gestionar.
mysql_data:- image: We use the official MySQL image.
- environment: We define key environment variables (user, password, database name) so that MySQL is configured upon startup. These values will be taken from the .env file.
- volumes: The /var/lib/mysql directory is where MySQL stores the data (tables, binaries). By mapping it to a volume named db_data, we ensure that data persists even if the container is stopped or removed.
- volumes (Final Directive): It is mandatory to declare the volumes at the end of the file at the same level as services.
B. Django Service (web)
The web service will contain the Django application.
docker-compose.yml
version: "3.9"
services:
  db:
    ***
  web:
    build: .
    container_name: django_app
    command: python manage.py runserver 0.0.0.0:8000
    # command: python app/manage.py runserver 0.0.0.0:8000 # ruta mala
    volumes:
      - .:/app # alternativa INmoderna al watch para que inyecte los cambios en desarrollo
    ports:
      - "8000:8000"
    depends_on:
      - db
    environment: # en settings esta establecido para leer os.environ.get('DB_NAME', 'django_db'),
      DB_HOST: db
      DB_PORT: 3306
      DB_NAME: django_db
      DB_USER: django_user
      DB_PASSWORD: django_pass
***- build: Uses the local Dockerfile to build the Django image.
- depends_on: db: Essential to ensure that the application container does not attempt to connect to MySQL before it is up and running.
- environment: Exports the necessary MySQL environment variables for the Django application to consume them.
- volumes: .:/app: Synchronizes the local code with the container, allowing changes to be injected (hot-reloading).
3. Startup and Command Execution
1. Bringing up the Services
To bring up both containers (Django and MySQL) in detach mode (background):
$ docker compose up -dWhen accessing the application in the browser, you will see an error indicating that the tables do not exist, which is correct, as the MySQL image is not magical.
2. Running Migrations (External Commands)
We need a way to execute commands inside a container. For this we use docker compose run web.
$ docker compose run web python manage.py migrate- docker compose run web: Executes a single command in a new container based on the specified service.
- docker compose run web: The service where we want to execute the command.
- python manage.py migrate: The Django command to execute.
After running the migrations, the application will work correctly, as the table structure has been created in the MySQL container.
⚠️ 4. Testing and Troubleshooting (Debugging)
You can perform tests by commenting out sections to understand their functionality and how Docker Compose handles errors.
- Commented Failure Effect on the Application Diagnosis
- Volumes (volumes: .:/app) Changes in the local code are not reflected in the application. Indicates that code synchronization is disabled.
- command: python app/manage.py (E.g. Syntax Error) The Django server does not start, you only see the MySQL trace in the console. Execution error in the command. The Django container dies when attempting to execute the failed command.
- environment (MySQL Variables) The application shows an "Access Denied" or "Can't connect" error. Database connection problems (credentials, host, or port).
You can uncomment/comment the code blocks in the docker-compose.yml to perform these tests; remember that you can view the container logs using:
$ docker compose logs -f <containerName>
$ docker compose logs -f django_app
$ docker compose logs -f mysql_db
Laravel Sail
Laravel Sail is the official way in Laravel to use Docker in Laravel, that is, to be able to Dockerize a Laravel application; this topic is covered in the article shared earlier.