
Content Index
Blender is a somewhat atypical application when it comes to its User Interface (UI); instead of using multiple window systems, Blender focuses on creating a single window and filling it with panels. While that might sound bad, it is actually a very comfortable way to work since you have everything within a click's reach; you have multiple view levels or layouts.
When entering Blender for the first time, we can see an interface somewhat loaded with buttons, menus, and options of all kinds; the first few times it can be a bit overwhelming and confusing, but take heart—with a little practice, it will prove to be extremely versatile. Blender's interface is designed for maximum productivity, versatility, speed of use, and of course, comfort; everything is always visible, windows do not overlap, and we have everything perfectly in sight. We can hide panels or change their size and position to best suit our needs.
Blender is the 3D software of the moment and basically allows us to create our models in 3D. It's that simple. You can start for completely free.
Download and installation
Simply go to Blender.org, to the downloads section, either from the main button or from the menu.
If you're too lazy to type the URL, you can search for "Blender" on Google and, usually, it is the first link that appears.
The installation is standard: there are versions for Linux, Windows, and Mac (in my case, I am using Mac). Once installed and launched, you will see an interface like the following.
Upon startup, Blender asks what type of project you want to create. Blender is useful for many things, but we usually focus on General, as it is the entry point for 3D modeling, which is what we normally look for when starting out.
Getting to know the interface
I want to talk to you mainly about what you are seeing on the screen.
The first thing you will notice is that Blender has an interface quite condensed with options, but don't be overwhelmed. Over time, you will appreciate that practically everything is within a single click's reach.
3D Viewport
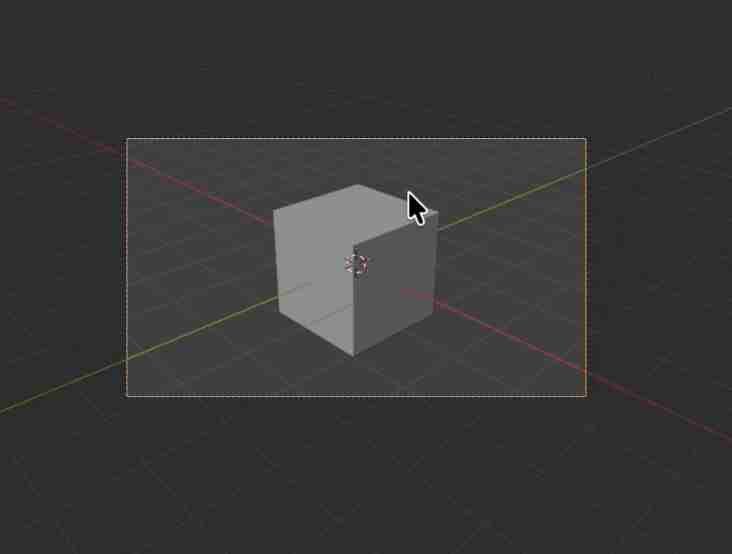
The main area is the 3D Viewport, which is the area where you see and manipulate your objects (green zone in the image below):
Here you can move around using the mouse wheel:
- Mouse wheel pressed: orbit around the object.
- Mouse wheel + Control: zoom in and zoom out.
- Mouse wheel + Shift (or Command): pan the view laterally.
Practice these combinations a bit, as they are fundamental for moving comfortably in 3D space.
Timeline, Properties, and Outliner
- At the bottom, you have the Timeline, which is mainly used for animations (pink zone in the image below).
- On the right, we find the Properties panel (purple zone in the image below), where you can customize objects, materials, and rendering options. If you hover your cursor over the icons, you will see small tooltips explaining what each one does.
At the top right, we have the Outliner (yellow zone in the image below), which shows all the objects in the scene. When selecting one, you will see how it is highlighted: the camera, the cube, and the light, which are the default elements.
If you press F12, Blender performs a render using the current camera:
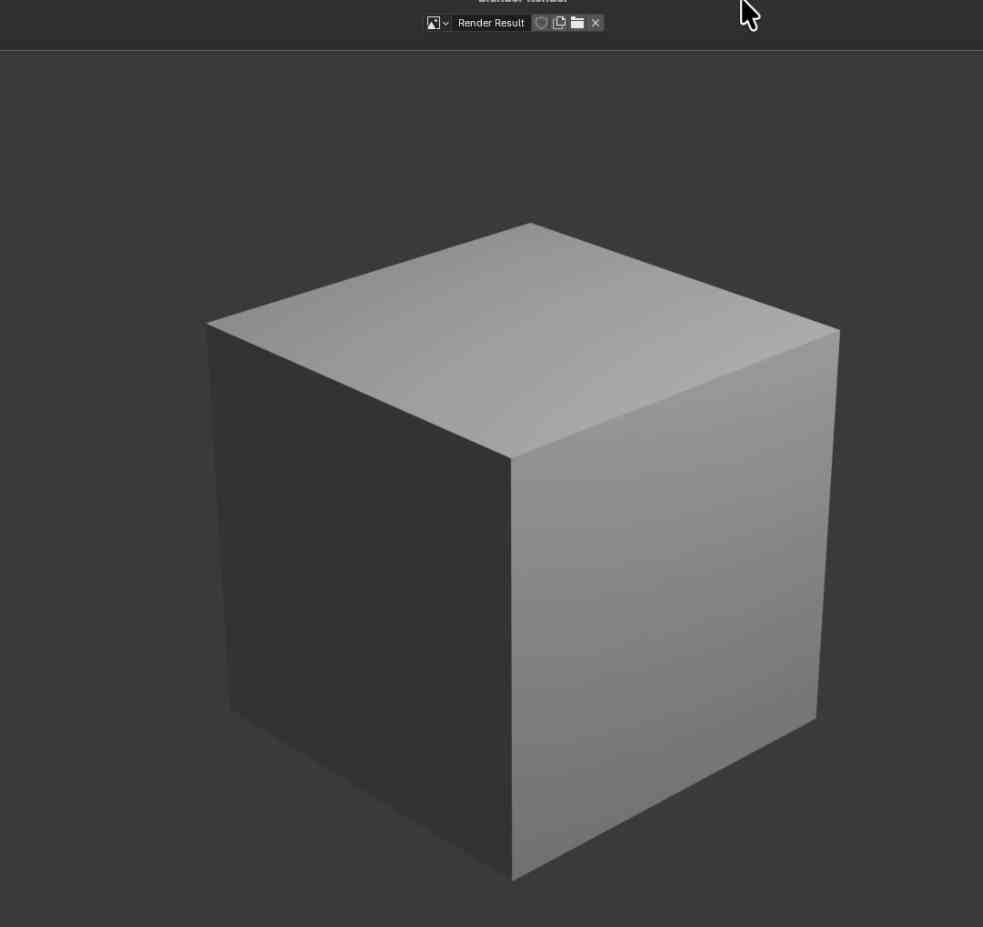
With the 0 key on the numeric keypad, you position yourself directly in the camera view.
Navigating 3D space in Blender: Numeric keypad and mouse
The numeric keypad is very important in Blender. For this, it is important to have the Numpad unlocked:
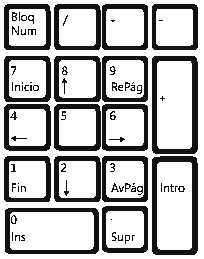
- Numpad 5: Allows switching between orthogonal and perspective views and vice versa.
- Numpad 2 and Numpad 8: Allows us to move through the scene vertically.
- Numpad 4 and Numpad 6: Allows us to move through the scene horizontally.
- Numpad + and Numpad -: Increases or decreases zoom in the scene; the behavior is equivalent if:
- 1: Front view
- 3: Side view
- 7: Top view
- 9: Inverts the current view
- Ctrl + 1 / Ctrl + 3 / Ctrl + 7: Opposite view
If you don't have a numeric keypad, you can use the axis gizmo that appears on the screen to orient yourself and change views:
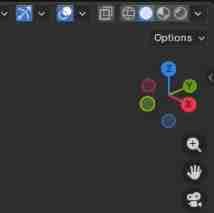
The colored lines represent the axes:
- Red: X axis
- Green: Y axis
- Blue/Purple: Z axis
- We rotate the mouse wheel (

- ).
- If you press control plus the mouse wheel and move the mouse (

- +
- ).
- Basically, with the following three keys, we can see the scene located from the X, Y, and Z axes:
- Numpad 1: View the scene from the front (View from the Y axis).
- Numpad 3: View the scene from the side (View from the X axis).
- Numpad 7: View the scene from the top (View from the Z axis).
- Numpad 0: Positions us on the camera view; that is, from where the camera is seeing (from where the camera is pointing).
If you hold down the mouse wheel and move the mouse, you can rotate the view of the scene.
If you press shift plus the mouse wheel and move the mouse, it allows you to translate (pan) the view of the scene (

+

).
These are keyboard shortcuts; to see the view options, you can go to View and you will see a menu like this:

If you don't have a numeric keypad, you can use the axis gizmo that appears on the screen to orient yourself and change views.
Simplifying the Blender interface
Now we are going to simplify the process of understanding the Blender interface a bit by explaining each of the panels that make up the Blender interface:

- 3D View: It is the main panel where object modeling and scene creation take place; additionally, here we find other elements as soon as we open the 3D editing software for the first time; we see a kind of rectangle which is our camera, a point with an aura and a line which is our lamp or light, and a cube which is our default 3D figure; besides this, we see a grid that makes up our workspace; each space is one Blender unit; this grid is common in other 3D editing programs like Unity and is very useful for positioning objects where we want them, as well as creating objects with a specific size.
- Outliner: It is a type of list that allows organizing in a kind of directory tree (where directories are objects—camera, lamps, geometric figures, etc.—of the scene) all the objects that make up the scene in Blender; we have several scenes as we can see in the lower panel and the elements present in them will vary depending on the scene we have.
- Timeline: Allows handling the control of movements of 3D objects in space; in other words, it allows creating, viewing, editing, and deleting parts of the scene animation in frames, just as it happens with Flash.
- Properties: Contains a large number of grouped functions that affect the behavior or shape of the elements that make up the scene and vary according to the selected element; among the most important we have:
- Rendering: This is for the visualization part of our 3D design; here other objects come into play, such as the lamp as a light source and the camera to view the scene.
- Materials: We can specify colors and textures for our 3D objects to make them more realistic or pleasant.
- Modifiers: These are operations that affect an object; we can specify that they have more faces, smooth, divide, or multiply our figure, mirror, etc.
- Physics: Where we can indicate that our object has mass, as well as define certain properties or characteristics such as indicating if it is water, if it has hair, particles, etc.
- Information Panel: Contains the following information:

- Options menu.
- Informative resources: This panel indicates how much memory is consumed according to the selected object; for example, an object with a higher number of vertices will have higher memory consumption.
- Current Screen: Allows selecting between different screens already pre-configured by Blender.
Each of the colored blocks has its corresponding explanation in each of the colored texts.
3D View
This panel presents all the elements that make up a scene; by default, it includes the following elements:
- Cube: it is nothing more than a 3D geometric figure; it is the default figure configured by Blender when creating a new document; although we are not limited to creating our figures from a cube, we have many other types of figures such as circles, spheres, cylinders, planes, and we even have a monkey face; all this to make the figures we want.

- Lamp: Light source that illuminates the objects present in a scene in various ways; we can indicate that it behaves like a sun, like a single point among many other options, as well as specify its strength or energy, or its color.

- Camera: Represents the viewpoint of a scene; it defines which parts of a scene are visible at a given time.

We can also see other elements that, although they are not part of the scene as such, have a meaning and it is important to know them:
3D Cursor: It serves many purposes; but among them, it allows us to select the creation site of a new element.

3D Transformation Manipulator: It offers us a visual aid for each of the axes (X, Y, Z).

Blender has fantastic features where every object is animatable, so we can change positions of our 3D objects, as well as animate cameras, lights—essentially every object in our Blender can be animated exactly to behave how we want; we can even vary the speed of animations.
Object Selection and Focus
You can select objects with left-click, either directly in the scene or from the Outliner.
If you hold Shift, you can select multiple objects at the same time.
By pressing the . (dot) key on the numeric keypad, the view centers on the selected object, which is very useful when you are modeling.
Panels and interface customization
Blender is based on panels, and nothing happens if you "break" something.
If you make a mistake, simply go to File → New → General and the interface will return to its original state.
- You can easily split and join panels:
- Dragging from the corners.
Using right-click and selecting options like Split Area or Join Areas.
This allows you to have, for example, two views of the same object from different angles, which is very useful when modeling.
Predefined Workspaces
At the top, you have workspaces already prepared by the Blender team (red zone in the previous image):
- Layout
- Modeling
- Sculpting
- UV Editing
- Shading
- Animation
To start, the most common is to work in Layout or Modeling. Each one adjusts the interface and tools according to the task you are performing.
Object Mode and Edit Mode
Depending on the mode you are in, you will see different options:
- Object Mode: you select and transform complete objects.
- Edit Mode: you work with vertices, edges, and faces.
Next step, learn about modeling, extrusion, transformations, and essential shortcuts in Blender.