
Content Index
- JavaScript Hooks
- Livewire and Alpine JS, the best allies
- What is Alpine.js?
- A first look
- Advantages of Alpine.js over Vue
- Integration with Livewire
- Showing and Hiding Elements with Alpine.js
- Why Alpine with Livewire?
- Livewire + Alpine: the real integration
- Our first Alpine component
- Applying classes reactively
- Conclusion
- Alpine JS and Laravel Livewire $wire object, entangle, and property synchronization
- The $wire object
- Initializing Alpine.js with Livewire
- Loading assets (external libraries) with @assets
- Interceptors: total control over requests
- How to verify the Livewire value in Alpine
- Limitation of initialization
- Solution: $wire.entangle()
- Advantages of $wire.entangle():
- Final result
- Alpine JS and Laravel Livewire: $wire object, entangle, and property synchronization
- The $wire Object
- Initializing Alpine.js with Livewire
- How to Verify the Livewire Value in Alpine
- Initialization Limitation
- Solution: $wire.entangle()
- Advantages of $wire.entangle():
- Final Result
- Inject Vanilla JavaScript into Laravel Livewire's wire:model
- Why combining native JavaScript and Livewire can be a challenge
- How to inject pure JavaScript inside a Livewire component
- Practical step-by-step example
- The secret is in the input event: synchronize Livewire with the DOM
- Alternatives: AlpineJS, $wire.set() and custom events
- Tips and best practices for integrating JavaScript into Livewire
- FAQs about JavaScript and Livewire
- Final conclusion
- Keyboard enter event: wire:keydown.enter
- Why we use $wire.count
- add Method in Livewire
- Race Condition Problem
- Why we don't use wire:model.lazy or automatic updates
- Logic Summary
- How requests work to synchronize properties and events in Laravel Livewire
One of the great features of Laravel Livewire is the integration of the client with the server; specifically in this context, PHP with Laravel with JavaScript; in this chapter we are going to explore these features further.
We previously saw one of these excellent integrations showing the process of upload that includes Drag and Drop in Laravel Livewire.
To use any Livewire JS like the $wire object or the hooks, we must use the following directive:
@script
<script>
   // JS Livewire
</script>
@endscript
Livewire's JavaScript is the one generated by the directive:
@livewireScriptsWhich comes auto-included in the layout starting from Livewire 4.
JavaScript Hooks
Hooks are nothing more than methods that are part of the component lifecycle, as we presented before, in JavaScript, we also have similar references:
Hooks
morph.updating
morph.updated
morph.removed
morph.removing
morph.added
morph.adding
To use any of these, we have to use the following function in JavaScript:
Livewire.hook(hookName, (...) => {})As shown in the previous list, with Livewire's JavaScript object, we have access to several listener-type methods that will be executed as part of the lifecycle; let's see some:
@script
       <script>
           Livewire.hook('morph.updating', ({
               el,
               component,
               toEl,
               skip,
               childrenOnly
           }) => {
                console.log('morph.updating')
                console.log(component)
           })
           Livewire.hook('morph.updated', ({
               el,
               component
           }) => {
               console.log('morph.updated')
               console.log(component)
               console.log(el)
           })
           Livewire.hook('morph.removing', ({
               el,
               component,
               skip
           }) => {
               console.log('morph.removing')
               console.log(component)
               console.log(el)
           })
           Livewire.hook('morph.removed', ({
               el,
               component
           }) => {
               console.log('morph.removed')
               console.log(component)
               console.log(el)
           })
           Livewire.hook('morph.adding', ({
               el,
               component
           }) => {
               console.log('morph.adding')
               console.log(component)
               console.log(el)
           })
           Livewire.hook('morph.added', ({
               el
           }) => {
               console.log('morph.added')
               console.log(el)
           })
       </script>
   @endscript
As a recommendation for the script above, comment out all the console.log() except the one for the hook you want to test.
Livewire and Alpine JS, the best allies
In Livewire, when compared to Blade, things get a bit more complicated. We have:
- Server: Laravel (same as in Inertia).
- Client: Dynamically rendered Blade.
When the HTML is returned to the client, Blade already generates all the content. However, Blade is primarily a server layer, and to leverage functionalities like Livewire's reactivity in component properties, we need an additional client-side framework.
It wouldn't make sense to use Vue here because:
- We are already using Blade.
- It would be redundant if the project doesn't require a full framework like Inertia.
For this reason, the Laravel team opted for a lightweight and non-invasive framework, such as Alpine.js. It's modular, simple, and easily integrates with Blade and Livewire.
What is Alpine.js?
Alpine is kind of like Vue, so to speak. It's a client-side framework that allows us to work with states, events, and reactivity, but in a very lightweight manner. It's a very light framework, very easy to integrate, and allows for operations such as, for example, click events to change states and so on.
It is a reactive framework, and that's what's interesting when combining it with Livewire. When we click on an element, the state changes automatically without us needing to perform that step manually.
A first look
When we start working with Alpine, you'll see the point of all this. This example introduces quite well what Alpine is and how it works.
With Alpine, we can —and this is a fundamental difference compared to Vue— optionally define the logic directly in the HTML.
For example, we can define:
- the data we are going to work with
- the scope of that data
- the methods or functions
- and the reactive properties
All this directly in the HTML itself, without the need for separate files.
Advantages of Alpine.js over Vue
Alpine.js allows you to:
- Have interactive components in specific HTML blocks.
- Mix normal HTML with Alpine.js reactive functionalities without the need to render the entire page with Vue.
- Greater flexibility: you can use Alpine.js in one component, and in another block use a different framework or pure HTML.
For example:
<html>
   <body>
       <div x-data="{ header: false }">
           Abrir un modal
       </div>
       <div x-data="{ fieldText: 'Pon tu nombre' }">
           Manejar un formulario
       </div>
       <div x-data="{ open: false }">
           Abrir un modal
       </div>
   </body>
</html>
In this example, each block can be an independent Alpine.js component, without affecting the rest of the page. This allows combining pure HTML, Blade, and Alpine.js on the same page with great flexibility.
In this other example we are seeing, we are defining the data inside the HTML, associated with a specific "component" or block.
In that scope —which in this case is the <span>— we can use the defined variable, for example: `enable`.
<span x-data="{ enabled: false }">
   <button @click.prevent="enabled = !enabled">Toggle</button>

   <template x-if="enabled">
       <span x-data="timer" x-text="counter"></span>
   </template>
</span>
That is, we define the logic right here and use it right here, which is very practical for small components and very common when working together with Livewire.
Integration with Livewire
When using Alpine.js together with Livewire:
- Reactivity is maintained in the component properties.
- Bidirectional communication between client and server is facilitated.
- We can synchronize changes from the client to the server and vice versa, leveraging Livewire's `wire:` layer.
In comparison, Inertia only returns a Vue component instead of a Blade page, but it does not allow automatic bidirectional communication between client and server like Livewire.
Showing and Hiding Elements with Alpine.js
In this case, Alpine.js is being used to show or hide a counter that we also have defined in the HTML. This is achieved using a conditional, which is quite expressive. For example, we are defining a click event that executes a toggle, meaning it inverts the state: if something is being shown, it hides it, and if it is hidden, it shows it. Little else to say.
You don't need to understand Alpine completely now; everything we implement, I will introduce to you little by little. But it is important that you are clear that Livewire comes with built-in integration with Alpine.
Why Alpine with Livewire?
If you review the official documentation, you will see that Livewire includes a specific section for Alpine, as both complement each other very well.
It makes perfect sense: Livewire, however practical it may be, is still a server-side technology.
So, what about the client?
What happens when we want to:
- hide HTML elements,
- apply animations,
- generate smooth transitions,
- manipulate the DOM directly
That's where Alpine comes in.
In Livewire, Alpine fulfills the same function on the client that Vue fulfills in Inertia. When using Livewire, we lack the "client side," and for that, we use Alpine, which comes perfectly integrated by default.
Livewire + Alpine: the real integration
Here is an important point: the documentation remains a bit abstract when it says "define your data like this," but in reality, it's not enough.
Because if we only define the data in Alpine, we end up with:
- Alpine on one side
- Livewire on the other
And we need both worlds to communicate, especially when we want to access properties exposed by the Livewire component from Alpine.
For example, in the course code, we are exposing a property called `state` (or `step`, depending on the example), which indicates which step should be shown. That is the data we need to read —or manipulate— from Alpine as well.
That's where the **$wire object** comes in, which is a bridge between Alpine and Livewire.
With $wire, we can:
- access properties,
- read values,
- call methods,
- execute asynchronous operations,
- emit events,
- among other things.
All of this is documented in the Livewire + Alpine section.
We will look at this calmly later because it is the core of what we are building.
Our first Alpine component
The perfect first candidate for using Alpine is the step selectors block, as we will need to:
- manipulate which step is active
- update classes
- reflect changes reactively
Here we already saw that the design changes according to the selected step, so we will control that very thing with Alpine.
Defining the component
The block we are going to work on is the `div` that contains the steps.
That will be our Alpine component.
And, as always in Alpine, the first thing we define is:
The data is the component's initial information.
In our case, it is simply the `active` value:
<div class="flex" x-data="{ active: 1 }">This value is local to the client. It has nothing to do with Livewire yet.
Later we will synchronize this value with the Livewire property (`state`), but for now, it is simply an Alpine variable.
Alpine is designed for scenarios like this: small, logical, non-intrusive components. For more complex things, we would use Vue or React.
Applying classes reactively
Now we dynamically evaluate the `active` class. The syntax is practically the same as in Vue:
<div class="step" :class="{ 'active': parseInt(active) == 1 }"> {{ __('STEP 1') }} </div>We repeat the same for each step:
<div class="step" :class="{ 'active': parseInt(active) == 2 }">
   {{ __('STEP 2') }}
</div>
<div class="step" :class="{ 'active': parseInt(active) == 3 }">
   {{ __('STEP 3') }}
</div>
If `active` is 3, only step 3 is activated.
If it is 1, the first one is activated.
And so on.
With pure JavaScript, this would be much more manual: locating the element, removing classes, finding the next one, etc. Alpine gives it to us practically for free.
Click event as a basic example
To introduce you a little more to Alpine, we can add a button inside the same `x-data`:
<button @click="active++">Increment</button>With this:
when the button is pressed,
we increase the value of `active`,
and Alpine automatically updates the reactive DOM.
If you put that button outside the `x-data`, it would fail because Alpine wouldn't find the variable in the corresponding "scope."
Conclusion
Alpine.js is:
- Lightweight, modular, and easy to learn.
- Perfect to complement Blade and Livewire.
- Ideal for adding interactivity in specific blocks without the need for heavy frameworks.
With this, I think it is clear where Alpine fits into this whole system.
In the next step, we will see how to connect:
- Alpine's initial value
- with the Livewire property (`state`)
Alpine JS and Laravel Livewire $wire object, entangle, and property synchronization
The first problem is that we need to have a reference to the step to be able to show the correct step according to the value defined in Livewire.
The second problem appears when we update the step value. Currently, we must click manually to update the state in Alpine.js. The idea is for Livewire to automatically update the state in Alpine.js through reactivity, avoiding the need for manual interactions.
In summary, right now we have two "walls":
- Alpine.js completely isolated from Livewire.
- Livewire, with its properties and events, not automatically reflecting changes in Alpine.
The $wire object is your JavaScript interface to the Livewire component. It provides access to the component's properties, methods, and utilities for interacting with the server. When you add <script> tags inside your component, you automatically have access to the $wire object without needing any additional imports.
The $wire object
To solve this, Livewire provides us with the **$wire object**, which allows interaction with the component's properties and methods from the client. Some of its functionalities are:
// Access a component property $wire.foo
// Call a component method $wire.someMethod(param)
// Use async/await to get results from a method let foo = await $wire.getFoo() /
/ Emit and listen to events $wire.emit('some-event', 'foo', 'bar')
$wire.on('some-event', (foo, bar) => {})
// Read and update properties
$wire.get('property')
$wire.set('property', value)
For our case, we only need to read and synchronize the `step` property with Alpine.js.
Initializing Alpine.js with Livewire
The basic way to initialize Alpine.js with the Livewire value is as follows:
<div class="flex" x-data="{ active: $wire.get('step') }">
  <div class="flex mx-auto flex-col sm:flex-row">
      <div class="step" :class="{ 'active': parseInt(active) == 1 }">
          {{ __('STEP 1') }}
      </div>
      <div class="step" :class="{ 'active': parseInt(active) == 2 }">
          {{ __('STEP 2') }}
      </div>
      <div class="step" :class="{ 'active': parseInt(active) == 3 }">
          {{ __('STEP 3') }}
      </div>
  </div>
</div>
⚠️ This initialization only runs once when the page loads. It does not maintain automatic synchronization with Livewire.
Loading assets (external libraries) with @assets
When you need to load a complete JavaScript or CSS library along with the component, Livewire 4.x offers the @assets directive. Unlike component scripts that execute for each instance, assets declared with @assets are loaded only once per page regardless of how many instances of the component exist.
Here is an example with Pikaday, a lightweight date picker:
<div>
    <input type="text" data-picker>
</div>
@assets
<script src="https://cdn.jsdelivr.net/npm/pikaday/pikaday.js" defer></script>
<link rel="stylesheet" type="text/css"
      href="https://cdn.jsdelivr.net/npm/pikaday/css/pikaday.css">
@endassets
<script>
    new Pikaday({
        field: $wire.$el.querySelector('[data-picker]')
    });
</script>
Livewire guarantees that assets are fully loaded before evaluating the component scripts, preventing undefined reference errors to the libraries.
Interceptors: total control over requests
One of the most powerful features of Livewire 4.x is the interceptor system, which allows you to intervene in the request lifecycle at three distinct levels: per action (the most granular), per message (per component), and per HTTP request (the most global).
// Action interceptors - execute for each method call
$wire.intercept(callback)                  // All actions of this component
$wire.intercept('save', callback)          // Only the 'save' action
Livewire.interceptAction(callback)         // Global (all components)
// Message interceptors - execute for each component update
$wire.interceptMessage(callback)           // Messages from this component
$wire.interceptMessage('save', callback)   // Only when the message contains 'save'
Livewire.interceptMessage(callback)        // Global (all components)
// Request interceptors - execute for each HTTP request
$wire.interceptRequest(callback)           // Requests from this component
$wire.interceptRequest('save', callback)   // Only when the request contains 'save'
Livewire.interceptRequest(callback)        // Global (all requests)
All interceptors return a cancellation function to remove them when they are no longer needed:
let unsubscribe = $wire.intercept(callback)
unsubscribe() // Remove the interceptor
For example, if we have a method in the component called delete, we can intercept it when calling from the blade:
@script
    <script>
        $wire.intercept('delete', ({ action }) => {
            if (!confirm('Are you sure?')) {
                action.cancel()
            }
        })
    </script>
@endscript
How to verify the Livewire value in Alpine
To inspect the `step` property from Alpine, we can use `x-text`:
<div x-text="$wire.step"></div> <div x-text="$wire.get('step')"></div>Both ways allow us to print the current value of `step` defined in Livewire.
Limitation of initialization
x-data="{ active: $wire.get('step') }" runs only once.Changing the Livewire value afterward will not automatically update Alpine.
This is similar to the `mount` event in Livewire, which only initializes values when the component loads.
Solution: $wire.entangle()
To achieve bidirectional synchronization between Alpine.js and Livewire, we use **$wire.entangle()**:
<div class="flex" x-data="{ active: $wire.entangle('step') }">
  <div class="flex mx-auto flex-col sm:flex-row">
      <div class="step" :class="{ 'active': parseInt(active) == 1 }">
          {{ __('STEP 1') }}
      </div>
      <div class="step" :class="{ 'active': parseInt(active) == 2 }">
          {{ __('STEP 2') }}
      </div>
      <div class="step" :class="{ 'active': parseInt(active) == 3 }">
          {{ __('STEP 3') }}
      </div>
  </div>
</div>
Advantages of $wire.entangle():
Initializes Alpine.js with the current Livewire value.
Maintains automatic synchronization: any change in Livewire is reflected in Alpine and vice versa.
Allows observation of the property step by step, achieving reactive and consistent behavior.
Final result
With $wire.entangle(), we achieve that:
- The active step is displayed correctly when the page loads.
- Any update of the `step` from Livewire is automatically reflected in Alpine.js.
- The integration between the client (Alpine.js) and the server (Livewire) works bidirectionally.
With this, the step by step works perfectly and the integration between Alpine.js and Livewire is concluded.
Alpine JS and Laravel Livewire: $wire object, entangle, and property synchronization
The first problem is that we need to have a reference to the step to be able to show the correct step according to the value defined in Livewire.
The second problem appears when we update the value of the step. Currently, we must manually click to update the state in Alpine.js. The idea is for Livewire to automatically update the state in Alpine.js through reactivity, avoiding the need for manual interactions.
In short, right now we have two "walls":
- Alpine.js completely isolated from Livewire.
- Livewire, with its properties and events, not automatically reflecting changes in Alpine.
The $wire Object
To solve this, Livewire provides us with the $wire object, which allows interaction with the component's properties and methods from the client. Some of its functionalities are:
// Access a component property $wire.foo
// Call a component method $wire.someMethod(param)
// Use async/await to get results from a method
let foo = await $wire.getFoo()
// Emit and listen for events $wire.emit('some-event', 'foo', 'bar')
$wire.on('some-event', (foo, bar) => {})
// Read and update properties $wire.get('property')
$wire.set('property', value)
For our case, we only need to read and synchronize the step property with Alpine.js.
Initializing Alpine.js with Livewire
The basic way to initialize Alpine.js with the Livewire value is as follows:
<div class="flex" x-data="{ active: $wire.get('step') }">
  <div class="flex mx-auto flex-col sm:flex-row">
      <div class="step" :class="{ 'active': parseInt(active) == 1 }">
          {{ __('STEP 1') }}
      </div>
      <div class="step" :class="{ 'active': parseInt(active) == 2 }">
          {{ __('STEP 2') }}
      </div>
      <div class="step" :class="{ 'active': parseInt(active) == 3 }">
          {{ __('STEP 3') }}
      </div>
  </div>
</div>
⚠️ This initialization only runs once when the page loads. It does not maintain automatic synchronization with Livewire.
How to Verify the Livewire Value in Alpine
To inspect the step property from Alpine, we can use x-text:
<div x-text="$wire.step"></div> <div x-text="$wire.get('step')"></div>Both ways allow us to print the current value of the step defined in Livewire.
Initialization Limitation
x-data="{ active: $wire.get('step') }" runs only once.Changing the Livewire value afterwards will not automatically update Alpine.
This is similar to the mount event in Livewire, which only initializes values when the component loads.
Solution: $wire.entangle()
To achieve bidirectional synchronization between Alpine.js and Livewire, we use $wire.entangle():
<div class="flex" x-data="{ active: $wire.entangle('step') }">
  <div class="flex mx-auto flex-col sm:flex-row">
      <div class="step" :class="{ 'active': parseInt(active) == 1 }">
          {{ __('STEP 1') }}
      </div>
      <div class="step" :class="{ 'active': parseInt(active) == 2 }">
          {{ __('STEP 2') }}
      </div>
      <div class="step" :class="{ 'active': parseInt(active) == 3 }">
          {{ __('STEP 3') }}
      </div>
  </div>
</div>
Advantages of $wire.entangle():
Initializes Alpine.js with the current Livewire value.
Maintains automatic synchronization: any change in Livewire is reflected in Alpine and vice versa.
Allows observing the property step by step, achieving reactive and consistent behavior.
Final Result
With $wire.entangle() we achieve that:
- The active step is displayed correctly when the page loads.
- Any update to the step from Livewire is automatically reflected in Alpine.js.
- The integration between the client (Alpine.js) and the server (Livewire) works bidirectionally.
With this, the step-by-step works perfectly and the integration between Alpine.js and Livewire is concluded.
Inject Vanilla JavaScript into Laravel Livewire's wire:model
Working with Livewire simplifies many tasks in Laravel, but when we want to use pure JavaScript (vanilla JS) inside a component, things get complicated. Livewire maintains its own reactivity system, and this means that changes made directly to the DOM are not always reflected in the component's properties.
Why combining native JavaScript and Livewire can be a challenge
The main conflict arises because Livewire and the DOM don't speak the same language. In Livewire, every field that uses wire:model is bound to a property in the component class. However, if the field's value is changed from pure JavaScript, Livewire does not automatically detect it.
When I tried to modify a field with `document.querySelector('#toc').value = 'vanilla JS';`, it seemed to work, but the property in the Livewire class still held its previous value. I realized that the visual change did not imply an update of the internal state.
In summary, there are two independent layers:
- The view: the visible field in the form.
- The class: the property that Livewire manages in the background.
Both only synchronize if the change occurs through the framework's internal mechanisms. Therefore, when modifying the DOM directly with JavaScript, the component does not react.
How to inject pure JavaScript inside a Livewire component
In this article, I explain how I managed to integrate native JavaScript code into a Livewire component, correctly synchronizing the value of a field using the input event. The result is a practical and clean way to combine both worlds without losing reactivity.
This, in essence, corresponds to a field in Livewire. As you can see, we have its component, its class, and everything else:
<input id="toc" class="block mt-1 w-full" wire:model="toc" />The problem arises when I want to execute a JavaScript X that generates something and use it in a particular field; but, from Livewire we CANNOT make this change directly, since it is a process that depends more on pure and traditional JavaScript.
My idea is to reference this field called toc of the index and dynamically set the corresponding value as soon as the page loads.
The analysis is simple. basically, I converted the tree into a JSON and wanted to save it in this field. At first glance it seems to work, but if we look closely, it is not:
document.querySelector('#toc').value == 'vanilla JS' Let's remember that we have two layers:
- The view: The field or input in the form.
- The class: The property defined in the class.
These do not automatically synchronize if we make the change using only vanilla JS, so it does not work directly.
Here the question arises: why use native JavaScript instead of relying on the JavaScript that Livewire brings?
The answer is that Livewire's JavaScript is very closed: everything must be executed locally within the Livewire component, which somewhat kills modularization and it is from there that we could reference Livewire's JS using $wire or this.
Practical step-by-step example
There are several alternatives. For example:
Use an AlpineJS component:
<input type="text" id="toc" x-data x-on:click="$wire.set('toc', 'aaa')">Define the value manually with more control.
This last option was the one I applied, because it allows me to generate the JSON, save it in the field, and then trigger a browser event:
const json = JSON.stringify(data, null, 2);
input = document.querySelector('#toc')
input.value = json;
input.dispatchEvent(new Event('input'));
The key: the input event
Once the change is made, what is missing is to trigger an event with:
`input.dispatchEvent(new Event("input"));`
That last instruction is what actually makes Livewire recognize the change. By manually firing the input event, the framework interprets that the user modified the field, and synchronizes the toc property in the corresponding class.
This small detail makes the difference: without that event, the change is only visual; with it, reactivity is maintained.
In my case, this was the only way to get Livewire to update the property without resorting to internal methods or additional dependencies.
In other words, it's like a small hack that allows us to force synchronization.
The secret is in the input event: synchronize Livewire with the DOM
Frameworks like Vue, React, and Livewire use browser events to detect changes. The input event is what indicates that the user wrote or modified the content of a field. By firing it manually, we trick (legitimately) the reactivity system into updating its state.
This approach has the advantage of maintaining total independence between native JavaScript and Livewire code. It is not necessary to access the component with $wire or use special references. Furthermore, it allows integrating external libraries or scripts that generate dynamic values (like an editor, a JSON generator, or a data tree) and sending them directly to Livewire.
Alternatives: AlpineJS, $wire.set() and custom events
Another option is to use AlpineJS, which is already integrated with Livewire and facilitates communication:
<input type="text" id="toc" x-data x-on:click="$wire.set('toc', 'aaa')">This approach works well, but it has less control over the data, especially when you need to modify dynamically generated values or handle complex objects. In my case, I preferred to do it with pure JavaScript, because it allowed me to manipulate the DOM directly and decide when to synchronize the state.
You could also fire custom events or use `window.dispatchEvent()` to notify more global changes, although it is usually unnecessary if the goal is simply to update a bound field.
Tips and best practices for integrating JavaScript into Livewire
- Avoid modifying the DOM without an associated event. Livewire will not detect it.
- Use `dispatchEvent(new Event('input'))` when you need to force synchronization.
- Maintain local control. Do not depend on Livewire's internal JavaScript if you are looking for modularity.
- Test with AlpineJS only if your change is trivial. For complex processes, vanilla JS offers more control.
- Verify the state from the console. Use $wire.get('property') to check that the synchronization was successful.
FAQs about JavaScript and Livewire
- Why doesn't Livewire detect changes made with JavaScript?
- Because Livewire listens for events, not direct DOM mutations. If you don't fire an event, the framework doesn't know there was a change.
- Can I use native JavaScript without AlpineJS?
- Yes. Just make sure to emit the input event after modifying the field value.
- What is the difference between $wire.set() and dispatchEvent('input')?
- $wire.set() communicates the change directly to Livewire, while dispatchEvent() maintains the natural logic of the DOM and can integrate better with external scripts.
- Does it also work with JSON or complex structures?
- Yes, as long as you convert the data to text (`JSON.stringify()`) before assigning it to the input.
Final conclusion
Integrating native JavaScript into Laravel Livewire is totally possible and, in many cases, recommended. The key is to understand how Livewire manages reactivity and what events it uses to detect changes. In my case, manually firing the input event was enough to synchronize a dynamic field generated from pure JavaScript.
With this technique, you can combine the power of Livewire with the flexibility of traditional JavaScript without losing control or breaking the framework's update cycle.
Keyboard enter event: wire:keydown.enter
The next implementation we must carry out consists of synchronizing the quantities of an input with the associated cart item. To do this, we will use the enter event, implemented as follows:
<!-- resources/views/livewire/shop/cart-item.blade.php -->
<div>
  <div class="box mb-3">
      @if ($item)
          <p>
              <input wire:keydown.enter='add({{ $item }},$wire.count)' wire:model='count' class="w-20"
                  type="number">
              {{ $item->title }}
          </p>
      @endif
  </div>
</div>
As can be seen, the same add() method that we use to add, update, or remove items is invoked.
Why we use $wire.count
In this case, we use $wire.count instead of:
<input wire:keydown.enter='add({{ $item }},{{ $count }})'>This is because the value in the input has not yet been updated on the server, so if we use $count, Livewire receives the previous value, making the correct update of the item quantity impossible.
Instead, $wire.count directly obtains the client value, which is the one we need to update.
add Method in Livewire
We can verify the received value on the server with:
// app/Livewire/Shop/CartItem.php
#[On('addItemToCart')]
function add(Post $post, int $count = 1) {
   dd($count);
rest of the logic... }
This allows us to evaluate and confirm that we are receiving the correct value from the client.
Race Condition Problem
There are two possible sources of updates:
- Automatic server update via wire:model or other Livewire properties.
- Manual update by pressing enter which triggers the add() method.
If both occur at the same time, we can have a race condition:
- Which one executes first: the change on the client or the automatic server synchronization?
- Normally, the enter event executes before the automatic update, which can generate inconsistencies.
- This explains why we cannot rely solely on the automatic update of wire:model in this case.
Why we don't use wire:model.lazy or automatic updates
- If we use wire:model.lazy, every change in the input would trigger an update to the server.
- This would be inefficient, especially if the user types several digits quickly (e.g., 10, then 100).
- The most efficient logic is to wait for the enter event, which indicates that the user has finished modifying the quantity.
Logic Summary
- Client-level changes: the user modifies the input, and the value remains on the client.
- Enter event: the add() method is triggered, passing $wire.count to send the updated value to the server.
- Automatic synchronization: Livewire detects the change and updates the quantity in the cart.
- In this way, we maintain synchronization between client and server, avoiding race conditions and ensuring that the final quantity reflects the value entered by the user.
How requests work to synchronize properties and events in Laravel Livewire
Now we will learn in detail how Livewire works; how it is possible for both sides (client and server) to communicate in a “direct”.
For this example temporarily place in your category form
<label for="">Title</label>
<input type="text" wire:model.live='title'>
With which every time we write and not only when we use an event the state of the title property will be updated
For this we are going to use the web developer console of the browser and place it in the Network section
Now we are going to work on the Savephp component and we are going to write slowly in any of the wiremodel text fields and we will see

If you correctly performed the slow typing exercise, you'll notice that a request is executed for each letter you type. These requests represent how Livewire keeps the properties defined in the component's class synchronized with the form fields that use the wire:model directive.
In other words, every time the user modifies a field on the client, Livewire sends a request to the server to update the corresponding value in the component's property. This is the basis of Livewire's responsiveness: maintaining an up-to-date relationship between the client and server through small, automatic requests.
The exact behavior—whether the requests occur for each letter, when the focus is lost, or only when Enter is pressed—depends on the type of directive being used (wire:model, wire:model.lazy, wire:model.debounce, etc.).
All these variations work thanks to the @livewireScripts decorator, which must be included whenever you want to use Livewire. This decorator loads the main Livewire script into the frontend and manages this synchronization system and controls client-to-server requests.
This decorator, along with the one from @livewireStyles, is defined by default in the layout of layout/app.blade.php:
<!DOCTYPE html>
<html lang="{{ str_replace('_', '-', app()->getLocale()) }}">
    <head>
        ***
        @livewireStyles
        ***
        @livewireScripts
    </body>
</html>
To test this remove the script decorator and try using any Livewire directive for example the submit one and you will see that it no longer works
The livewireScripts decorator allows you to initialize all scripts to allow working with Livewire from the client side and this includes sending wiremodel updates click events submits etc The livewireScripts renders something like
<script data-turbo-eval="false" data-turbolinks-eval="false" >
    if (window.livewire) {
    console.warn('Livewire: It looks like Livewire\'s @livewireScripts JavaScript assets have already been loaded. Make sure you aren\'t loading them twice.')
}

    window.livewire = new Livewire();
    window.livewire.devTools(true);
 // ***
</script>
It is important to note that with Livewire enabled you can use the wiremodel as if it were a reactive property in Vue we make this statement as a way to understand how Livewire works although it is important to clarify that Livewire is not reactive that is through the title property if we define it in the component view
<div>
    <form wire:submit.prevent="submit">
        <label for="">Título</label>
        <h3 class="text-xl">***{{$title}}***</h3>
        <input type="text" wire:model="title">
        <label for="">Texto</label>
        <input type="text" wire:model="text">
        <button type="submit">Enviar</button>
    </form>
</div>
Youll see when you write something in the wiremodel
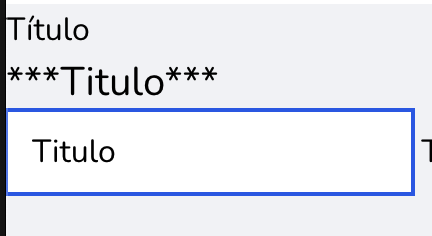
The content is reflected and in this way you can understand the basic operation of Livewire to keep the properties updated this automatic update feature that is every time we wrote in a field it was updated on the server based on a request was how Livewire worked until version 2 in version 3 this function was deactivated by default when too many unnecessary requests were made to the server since in most cases we are going to want to update the attributes when some event occurs such as a click or a form submission.
Next step, learn about Laravel Livewire custom events.