Create custom commands for php artisan in Laravel

Content Index
Artisan commands are a command line tool included in Laravel that are extremely useful for developing our applications in Laravel; the purpose of the commands in software development is quite general and we can use them for various tasks, such as creating controllers, components, generating models, test data, database migrations, either to create tables, or remove them or change the tables, run automated tests and a long etc; Even when we install certain packages for Laravel, additional commands can be added.
Artisan helpful commands
Some of the most used commands are:
- php artisan make:model: Create a new model.
- php artisan make:controller: Create a new controller.
- php artisan make:migration: Create a new database migration.
- php artisan migrate: Runs pending migrations.
With this, we can realize how powerful artisan is, instead of (for example) creating a file, with its class and imports for the models, we can execute a command instead and with this generate the corresponding file.
Which leads us to the process of creating our own custom commands for Laravel which results in a fairly simple process to perform; the creation of custom commands is essential to perform any type of operation that you want to automate through a command, commands such as those of make:controller are at your disposal to create any process: in this post, in a demonstrative way, we are going to create a user through a command custom artisan.
Create the class to execute our commands
We have an artisan command that allows us to create the file in which we can define the process of our command, that is, the logic: to do this:
php artisan make:command CreateUserCommandThis command will automatically create a new ready-to-use Artisan command file in the app/Console/Commands folder which, as you might guess, corresponds to a class with a structure that we need to follow.
Generate the logic of our command
Executed the previous command, it will generate a file consisting of 4 parts:
- The constructor of the class: which we can initialize some data
- The handle function: In which we define the logic of our command, in our case, create a user.
- The signature parameter: Which allows us to define the command
- The description parameter: In which we can define a description that appears in the console, to describe here what your command does...
Our file would look like this, with the call to the User class, the model to create the user:
<?php
namespace App\Console\Commands;
use App\Models\User;
use Illuminate\Support\Str;
use Illuminate\Console\Command;
class CreateUserCommand extends Command
{
/**
* The name and signature of the console command.
*
* @var string
*/
protected $signature = 'user:create';
/**
* The console command description.
*
* @var string
*/
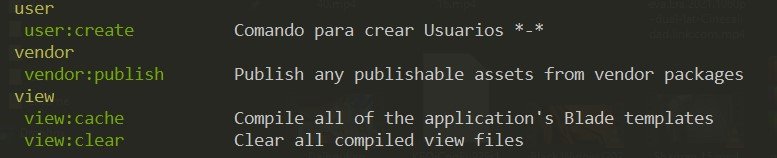
protected $description = 'Comando para crear usuarios *-*';
/**
* Create a new command instance.
*
* @return void
*/
public function __construct()
{
parent::__construct();
}
/**
* Execute the console command.
*
* @return int
*/
public function handle()
{
User::create([
'name' => Str::random(8),
'email' => Str::random(8).'@gmail.com',
'password' => Str::random(12),
]);
return 0;
}
}If we do a:
php artisan listYou will see our beautiful command:
And if we run it:
php artisan user:createIn the database we will see the result of our created user.
Optional parameters in commands
If you want, for example, the password to be optional, just indicate a ? in the parameter in question:
protected $signature = 'user:create {name} {password?}';Named parameters
You may be interested in placing the named parameters option; i.e. in something like this:
php artisan --name="andres"In this case, we can add to whether we want to verify the user or not; in the parameter options you have to indicate a -- followed by the name of the parameter and then an equal; if we have a verified parameter:
protected $signature = 'user:create {--verified=} {name} {password?}';In the end, our code gives as follows:
   protected $signature = 'user:create {--verified=} {name} {password?}';


      $name = $this->argument('name');
        $password = $this->argument('password');
        $email_verified_at = $this->option('verified') ? now() : null;
        User::create([
            'name' => $name ?? Str::random(8),
            'email' => Str::random(8).'@gmail.com',
            'password' => bcrypt($password  ??  Str::random(12)),
            'email_verified_at' => $email_verified_at,
        ]);
Conclusions
With this, we learned to create artisan commands manually and pass them the most common configuration options, such as the optional and named parameters; the creation of custom commands is a very useful tool that we can use to create processes of all kinds that we want to automate; quite useful when we generate a project and when we want to install, instead of generating the processes manually, we can execute them automatically through commands.
I agree to receive announcements of interest about this Blog.
You know that you can enhance the use of commands in Laravel by creating your own using artisan, passing parameters, named and optional; learn how!