 in Android Studio with Kotlin")
The Modern Approach: Room Persistence Library and Jetpack Compose
With the evolution of Android development, Google has introduced and promoted libraries that simplify and standardize common tasks. For local data persistence, the Room Persistence Library is now the de facto standard, offering an abstraction layer over SQLite that reduces boilerplate, verifies queries at compile time, and integrates perfectly with other Jetpack libraries, such as LiveData, Kotlin Flow, and, of course, Jetpack Compose for the UI.
Room facilitates database definition through Entities (which represent tables), DAOs (Data Access Objects, which define methods for interacting with the database), and the Database class that orchestrates everything.
Previously we saw how to generate QR codes in Android Studio
For Room installation, FOLLOW the official guide:
https://developer.android.com/training/data-storage/room?hl=es-419#kts
https://developer.android.com/kotlin/multiplatform/room?hl=es-419
NOTE that the last link is for Kotlin Multiplatform.
Load the ksp libraries (It is a tool (a plugin) that "reads" your Kotlin code before it is converted into an application and automatically generates code based on what it finds) and the Room package which is the "abstraction" to SQLite:
The installation is something like:
[versions]
room = "2.8.4"
sqlite = "2.6.2"
ksp = "<kotlinCompatibleKspVersion>"
[libraries]
androidx-sqlite-bundled = { module = "androidx.sqlite:sqlite-bundled", version.ref = "sqlite" }
androidx-room-runtime = { module = "androidx.room:room-runtime", version.ref = "room" }
androidx-room-compiler = { module = "androidx.room:room-compiler", version.ref = "room" }
# Optional SQLite Wrapper available in version 2.8.0 and higher
androidx-room-sqlite-wrapper = { module = "androidx.room:room-sqlite-wrapper", version.ref = "room" }
[plugins]
ksp = { id = "com.google.devtools.ksp", version.ref = "ksp" }
androidx-room = { id = "androidx.room", version.ref = "room" }
As you can see in the annotation above (enclosed by []) these are the versions, libraries, and finally the plugin used.
To get the exact version to use in ksp = “<kotlinCompatibleKspVersion>”, search the repository:
https://github.com/google/ksp/releases
2.2.21-2.0.5
The first part corresponds to the compatible Kotlin version:
2.2.21-2.0.5
The other part is the Room version:
2.2.21-2.0.5
With this configured, you can move on to the next section where you will see the structure you must follow to use the Room plugins.
Defining an Entity (Table) with Room
An Entity is a data class that represents a table in our database.
import androidx.room.ColumnInfo
import androidx.room.Entity
import androidx.room.PrimaryKey
@Entity(tableName = "notifications")
data class Notification(
    @PrimaryKey(autoGenerate = true) val id: Int = 0,
    @ColumnInfo(name = "notification_id") val notificationId: Int,
    @ColumnInfo(name = "created_at") val createdAt: String,
    val proccess: String,
    val text: String,
    val operation: String,
    @ColumnInfo(name = "operation_id") val operationId: Int,
    @ColumnInfo(name = "user_id") val userId: Int,
    val avatar: String,
    @ColumnInfo(name = "user_name") val userName: String,
    @ColumnInfo(name = "user_surname") val userSurname: String,
    val username: String,
    @ColumnInfo(name = "paid_id") val paidId: String,
    @ColumnInfo(name = "product_id") val productId: String,
    val singer: String,
    @ColumnInfo(name = "dedit_from") val deditFrom: String,
    @ColumnInfo(name = "dedit_to") val deditTo: String,
    val cost: String
)
Defining a DAO (Data Access Object) with Room
The DAO is an interface where methods for interacting with the database are declared (insert, update, delete, query). Room automatically generates the necessary SQL code at compile time.
NotificationDao.kt (at the same level as MainActivity.kt)
import androidx.room.Dao
import androidx.room.Insert
import androidx.room.Query
import androidx.room.Update
import androidx.room.Delete
import kotlinx.coroutines.flow.Flow
@Dao
interface NotificationDao {
    @Query("SELECT * FROM notifications ORDER BY created_at DESC")
    fun getAllNotifications(): Flow<List<Notification>>
    @Query("SELECT * FROM notifications WHERE notification_id = :notificationId")
    suspend fun getNotificationById(notificationId: Int): Notification?
    @Insert
    suspend fun insertNotification(notification: Notification)
    @Update
    suspend fun updateNotification(notification: Notification)
    @Delete
    suspend fun deleteNotification(notification: Notification)
}
Setting up the Room Database
The main database class inherits from RoomDatabase and connects Entities with DAOs. Additionally, Room allows pre-populating the database from an existing SQLite file in your project's assets folder, similar to how it was done with SQLiteAssetHelper, but in a more integrated and secure way.
AppDatabase.kt (at the same level as MainActivity.kt)
import android.content.Context
import androidx.room.Database
import androidx.room.Room
import androidx.room.RoomDatabase
@Database(entities = [Notification::class], version = 1, exportSchema = false)
abstract class AppDatabase : RoomDatabase() {
    abstract fun notificationDao(): NotificationDao
    companion object {
        @Volatile
        private var INSTANCE: AppDatabase? = null
        fun getDatabase(context: Context): AppDatabase {
            return INSTANCE ?: synchronized(this) {
                val instance = Room.databaseBuilder(
                    context.applicationContext,
                    AppDatabase::class.java,
                    "my_database.db" // Your SQLite database name
                )
                    // For pre-populated databases from assets
                    .createFromAsset("database/my_prepopulated_database.db")
                    .build()
                INSTANCE = instance
                instance
            }
        }
    }
}
Integration with Jetpack Compose
In a modern application with Jetpack Compose, a ViewModel is commonly used to expose DAO data to the UI reactively. The Flow emitted by the DAO are collected, and the UI updates automatically.
NotificationViewModel.kt (at the same level as MainActivity.kt)
import androidx.lifecycle.ViewModel
import androidx.lifecycle.viewModelScope
import kotlinx.coroutines.flow.SharingStarted
import kotlinx.coroutines.flow.StateFlow
import kotlinx.coroutines.flow.map
import kotlinx.coroutines.flow.stateIn
import kotlinx.coroutines.launch
class NotificationViewModel(private val notificationDao: NotificationDao) : ViewModel() {
    val allNotifications: StateFlow<List<Notification>> =
        notificationDao.getAllNotifications().stateIn(
            scope = viewModelScope,
            started = SharingStarted.WhileSubscribed(5000),
            initialValue = emptyList()
        )
    fun addNotification(notification: Notification) {
        viewModelScope.launch {
            notificationDao.insertNotification(notification)
        }
    }
    // Other methods to update, delete, etc.
}
In your Composable, you could observe this data as follows:
import androidx.compose.foundation.lazy.LazyColumn
import androidx.compose.foundation.lazy.items
import androidx.compose.material3.Text
import androidx.compose.runtime.Composable
import androidx.compose.runtime.collectAsState
import androidx.compose.runtime.getValue
import androidx.lifecycle.viewmodel.compose.viewModel
@Composable
fun NotificationScreen(viewModel: NotificationViewModel = viewModel()) {
    val notifications by viewModel.allNotifications.collectAsState()
    LazyColumn {
        items(notifications) { notification ->
            Text(text = notification.text)
        }
    }
}
Databases are a fundamental tool for keeping user and application data well-protected, organized, and accessible at all times. This last point is crucial: being able to access saved data at all times. In modern times, we have seen how all applications today connect to an external API, server, or in essence an external agent to retrieve data and present it to the user in an organized manner. Of course, for this, an Internet connection is necessary, or at least an Intranet connection. If this connection is lost, the application would become unusable as it would not be able to retrieve and present the information to the user.
Databases in Android: From Legacy to Jetpack Compose with Room
Local database management in Android has evolved significantly over the years. What was previously handled directly with Android SDK classes like SQLiteOpenHelper, is now simplified and improved with persistence libraries like Room, part of Android Jetpack. Furthermore, the modern user interface is built with Jetpack Compose, which integrates fluidly with these new persistence tools to create reactive and efficient applications.
What is an SQLite database?
SQLite is a lightweight and open-source database engine, whose main appeal is that we can easily and securely maintain user or application data in a very small file. It differs from other systems like MySQL in that it does not require server support, port configuration, and so on. Instead, everything is stored in a single, simple file that is our database. It is open-source, so you will see it in many applications that are not just Android with Android Studio or similar IDEs.
Using SQLite database to save data locally (Legacy Approach)
This is where databases come into play for storing information locally on Android. Currently, the database supported by Android is called SQLite, and in essence, it's a small file containing all of our application's data—the data we record, to be precise. We can perform queries as if it were a relational database, because it is a fully-fledged database. In this entry, we will discuss how to use this database in our Android applications.
Examples of creating an SQLite database in Android (Legacy)
The first thing we must do is logically create our database. For this, a Helper class is used in which we define the structure of our database; tables, data types, and primary keys are defined in this Helper, implemented in Kotlin as the programming language:
import android.content.Context
import android.database.sqlite.SQLiteDatabase
import android.database.sqlite.SQLiteOpenHelper
class ListSQLiteHelper(
    context: Context, name: String,
    factory: SQLiteDatabase.CursorFactory?, version: Int
) :
    SQLiteOpenHelper(context, name, factory, version) {
    private val TABLE_NOTIFICATIONS =
        "CREATE TABLE notifications(id INTEGER PRIMARY KEY, notification_id INTEGER, created_at TEXT, proccess TEXT, text TEXT, operation TEXT, operation_id INT, user_id INT, avatar TEXT, user_name TEXT, user_surname TEXT, username TEXT, paid_id TEXT, product_id TEXT, singer TEXT, dedit_from TEXT, dedit_to TEXT, cost TEXT)"
    private val TABLE_OPERATIONS =
        "CREATE TABLE operations(id INTEGER PRIMARY KEY, operation_id INTEGER, province TEXT, location TEXT, province_id INTEGER, location_id INTEGER, place TEXT, created_at TEXT, proccess TEXT, day TEXT, user_id INT, user_name TEXT, user_surname TEXT, username TEXT, avatar TEXT, amount_to_paid TEXT, active TEXT)"
    override fun onCreate(db: SQLiteDatabase) {
        // the necessary tables are created
        db.execSQL(TABLE_NOTIFICATIONS)
        db.execSQL(TABLE_OPERATIONS)
    }
    override fun onUpgrade(db: SQLiteDatabase, arg1: Int, arg2: Int) {
        // The previous version of the DB is deleted
        db.execSQL("DROP TABLE IF EXISTS notifications")
        db.execSQL("DROP TABLE IF EXISTS operations")
        // the necessary tables are created
        db.execSQL(TABLE_NOTIFICATIONS)
        db.execSQL(TABLE_OPERATIONS)
    }
}
In Java, we use the same logic to create our database; in this code snippet, we see that we extend the same class, which has the same definition but with a different syntax:
import android.content.Context;
import android.database.sqlite.SQLiteDatabase;
import android.database.sqlite.SQLiteOpenHelper;
public class ListSQLiteHelper extends SQLiteOpenHelper {
   final private String TABLE_PEDIDO = "CREATE TABLE pedido(pedido_id INTEGER PRIMARY KEY, creado DATETIME DEFAULT CURRENT_TIMESTAMP, procesado DATETIME, cliente_id INTEGER, establecimiento_id INTEGER, mesas_establecimiento_id INTEGER, token TEXT)";
   public ListSQLiteHelper(Context context, String name,
                           SQLiteDatabase.CursorFactory factory, int version) {
       super(context, name, factory, version);
   }
   @Override
   public void onCreate(SQLiteDatabase db) {
       // the necessary tables are created
       db.execSQL(TABLE_PEDIDO);
   }
   @Override
   public void onUpgrade(SQLiteDatabase db, int arg1, int arg2) {
       // The previous version of the DB is deleted
       db.execSQL("DROP TABLE IF EXISTS pedido");
       // the necessary tables are created
       db.execSQL(TABLE_PEDIDO);
   }
}
As you can see, these are the same methods, and therefore the same logic applies: the onCreate method to create the database and the onUpgrade method which is executed when we are going to delete the database.
To insert a record; in this case, it's a static method, meaning we can instantiate the method without needing to create a new instance each time we want to use the method. In Kotlin, we use a companion object that offers similar behavior to Java's static methods:
public static Pedido getById(int pedido_id, Context context) {
   Pedido pedido = null;
   ListSQLiteHelper taskSQL = new ListSQLiteHelper(context, TABLE_NAME,
           null, 1);
   SQLiteDatabase db = taskSQL.getReadableDatabase();
   Cursor cursor = db.rawQuery("SELECT " + selectData + " WHERE "
           + ID_NAME + " = " + pedido_id, null);
   if (cursor.moveToFirst()) {
       pedido = new Pedido();
       pedido.setPedido_id(cursor.getInt(0));
       try {
           if (cursor.getString(1) != null)
               pedido.setCreado(dateFormat.parse(cursor.getString(1)));
       } catch (ParseException e) {
           e.printStackTrace();
       }
       try {
           if (cursor.getString(2) != null)
               pedido.setProcesado(dateFormat.parse(cursor.getString(2)));
       } catch (ParseException e) {
           e.printStackTrace();
       }
       pedido.setCliente_id(cursor.getString(3));
       pedido.setEstablecimiento_id(cursor.getInt(4));
       pedido.setMesas_establecimiento_id(cursor.getInt(5));
       pedido.setToken(cursor.getString(6));
   }
   cursor.close();
   db.close();
   return pedido;
}
From this Helper file, we will have all the tables of our application, which for this example are two tables. As we see, the first section is responsible for defining the table structure, such as the number of columns, data types, and the primary key. This is created in the onCreate method, which executes when the database is created; that is, it only runs once (unless for some reason you need to delete the database from the Android app you are developing). Then we have the onUpgrade method, which is responsible for performing queries to update our database, execute statements, etc.; in this case, we simply delete the tables.
Defining the Data Access Layer (DAO) (Legacy)
With our database already created, the next thing we need to do is define a layer, which in practice is another file that allows the database to be used. That is, all our queries, record updates, insertions, and deletions are done through a file, which in this case would be Notifications. This layer allows us to abstract ourselves from all the SQL queries we need to perform. In practice, it is the way we can access the data. Of course, we can apply all these rules from our activity, fragment, adapter, or other component, but it's a good idea to centralize everything we can centralize; and this is an example of some queries you can perform; in general, it's the typical stuff: queries to delete, get record(s), insert, and update; the typical things we do in other web systems, but on Android:
import android.content.ContentValues
import android.content.Context
import android.database.Cursor
import android.database.sqlite.SQLiteDatabase
import java.text.ParseException
import java.text.SimpleDateFormat
import java.util.*
import kotlin.collections.ArrayList
class NotificationDao {
   companion object {
       val TABLE_NAME = "notifications"
       val ID = "notification_id"
       val TEXT = "text"
       val CREATED_AT = "created_at"
       val OPERATION = "operation"
       val OPERATION_ID = "operation_id"
       val USERNAME = "username"
       val USER_NAME = "user_name"
       val USER_SURNAME = "user_surname"
       val USER_ID = "user_id"
       val AVATAR = "avatar"
       val PROCCESS = "proccess"
       var PAID_ID = "paid_id"
       var PRODUCT_ID = "product_id"
       var COST = "cost"
       var SINGER = "singer"
       var FROM = "dedit_from"
       var TO = "dedit_to"
       internal var dateFormat = SimpleDateFormat(
           "yyyy-MM-dd HH:mm:ss", Locale.getDefault()
       )
       private val selectData = (ID + ", " + TEXT + ", "
               + CREATED_AT + ", " + PROCCESS + ", " + USERNAME + ", " + OPERATION + ", " + OPERATION_ID + ", " + USER_ID + ", " + AVATAR + ", "
               + USER_NAME + ", " + USER_SURNAME + ", " + PAID_ID + ", " + PRODUCT_ID + ", " + COST + ", " + SINGER + ", " + FROM + ", " + TO + " FROM " + TABLE_NAME)
       fun getAllByOperationId(context: Context, id: Long): ArrayList<NotificationUser> {
           var notification: NotificationUser
           val notifications = ArrayList<NotificationUser>()
           val taskSQL = ListSQLiteHelper(
               context, TABLE_NAME,
               null, 1
           )
           // retrieve data from DB
           val db = taskSQL.getReadableDatabase()
           val cursor = db.rawQuery("SELECT $selectData WHERE $OPERATION_ID = $id", null)
           // save data in an ArrayList
           if (cursor.moveToFirst()) {
               do {
                   var i = 0
                   notification = packOperation(cursor)
                   notifications.add(notification)
               } while (cursor.moveToNext())
           }
           cursor.close()
           db.close()
           return notifications
       }
       fun getAll(context: Context): ArrayList<NotificationUser> {
           var notification: NotificationUser
           val notifications = ArrayList<NotificationUser>()
           val taskSQL = ListSQLiteHelper(
               context, TABLE_NAME,
               null, 1
           )
           // retrieve data from DB
           val db = taskSQL.getReadableDatabase()
           val cursor = db.rawQuery("SELECT $selectData", null)
           // save data in an ArrayList
           if (cursor.moveToFirst()) {
               do {
                   var i = 0
                   notification = packOperation(cursor)
                   notifications.add(notification)
               } while (cursor.moveToNext())
           }
           cursor.close()
           db.close()
           return notifications
       }
       fun getByID(context: Context, id: Long): NotificationUser? {
           var notification: NotificationUser? = null
           val taskSQL = ListSQLiteHelper(
               context, TABLE_NAME,
               null, 1
           )
           // retrieve data from DB
           val db = taskSQL.getReadableDatabase()
           val cursor = db.rawQuery("SELECT $selectData WHERE $ID = $id", null)
           // save data in an ArrayList
           if (cursor.moveToFirst()) {
               notification = packOperation(cursor)
           }
           cursor.close()
           db.close()
           return notification
       }
       fun update(
           contentValues: ContentValues, id: Int,
           context: Context
       ): Long {
           // open the 'tour' database in write mode
           val sqlHelper = ListSQLiteHelper(
               context, NotificationDao.TABLE_NAME,
               null, 1
           )
           val db = sqlHelper.writableDatabase
           return db.update(
               NotificationDao.TABLE_NAME, contentValues, NotificationDao.ID + "=?",
               arrayOf(id.toString())
           ).toLong()
       }
       fun deleteAll(
           context: Context
       ) {
           // open the 'tour' database in write mode
           val sqlHelper = ListSQLiteHelper(
               context, NotificationDao.TABLE_NAME,
               null, 1
           )
           val db = sqlHelper.writableDatabase
           db.delete(
               NotificationDao.TABLE_NAME, "1",
               arrayOf()
           )
       }
       fun insert(contentValues: ContentValues, context: Context): Long {
           // open the database in write mode
           val sqlHelper = ListSQLiteHelper(context, TABLE_NAME, NULL, 1)
           val db = sqlHelper.writableDatabase
           return db.insert(TABLE_NAME, null, contentValues)
       }
       fun packOperation(cursor: Cursor): NotificationUser {
           var i = 0
           var notification = NotificationUser()
           notification.notification_id = cursor.getInt(i)
           notification.text = cursor.getString(++i)
           notification.created_at = cursor.getString(++i)
           notification.proccess = cursor.getString(++i)
           notification.username = cursor.getString(++i)
           notification.operation = cursor.getString(++i)
           notification.operation_id = cursor.getInt(++i)
           notification.user_id = cursor.getString(++i)
           notification.avatar = cursor.getString(++i)
           notification.user_name = cursor.getString(++i)
           notification.user_surname = cursor.getString(++i)
           notification.paid_id = cursor.getString(++i)
           notification.product_id = cursor.getString(++i)
           notification.cost = cursor.getString(++i)
           notification.singer = cursor.getString(++i)
           notification.dedit_from = cursor.getString(++i)
           notification.dedit_to = cursor.getString(++i)
           return notification
       }
       fun populateContentValue(notification: NotificationUser): ContentValues {
           var contentValues = ContentValues()
           contentValues.put(ID, notification.notification_id)
           contentValues.put(CREATED_AT, notification.created_at)
           contentValues.put(TEXT, notification.text)
           contentValues.put(USERNAME, notification.username)
           contentValues.put(OPERATION, notification.operation)
           contentValues.put(OPERATION_ID, notification.operation_id)
           contentValues.put(USER_NAME, notification.user_name)
           contentValues.put(USER_SURNAME, notification.user_surname)
           contentValues.put(USER_ID, notification.user_id)
           contentValues.put(AVATAR, notification.avatar)
           contentValues.put(PROCCESS, notification.proccess)
           contentValues.put(PAID_ID, notification.paid_id)
           contentValues.put(PRODUCT_ID, notification.product_id)
           contentValues.put(SINGER, notification.singer)
           contentValues.put(FROM, notification.dedit_from)
           contentValues.put(TO, notification.dedit_to)
           return contentValues
       }
   }
}
Analyzing the previous code: SQLite database queries: Cursors
In the case of queries, as we do in the getAll(), getById(), and similar methods, we use cursors in Android. Cursors are pointers to the values obtained from a query, as you can see in the previous code, and we simply navigate through them with the moveToNext() method, which returns true if there is more data and false otherwise.
Analyzing the previous code: insert and update in SQLite database: Cursor
The code is practically self-explanatory; generally, we access the database sqlHelper = ListSQLiteHelper(context, TABLE_NAME, null, 1), indicate that we want to write to it with sqlHelper.writableDatabase, and then apply the queries, insert, delete, etc. In the case of inserts, we use ContentValues.
To perform an insertion or update of records, we must use ContentValues; this type of object allows defining pairs of values, like Kotlin's Pairs, but it is used in this scenario to define the database column we want to affect and its value. ContentValues are used for both insertion and updating, as we can see in the following code:
Insert a record into an SQLite database:
var id = NotificationDao.insert(
   NotificationDao.populateContentValue(notification),
   this@NotificationActivity
)
Update a record in an SQLite database:
var contentValues = ContentValues()
contentValues.put(NotificationDao.AVATAR, noti.avatar)
contentValues.put(NotificationDao.PROCCESS, noti.proccess)
contentValues.put(NotificationDao.COST, noti.cost)
contentValues.put(NotificationDao.PAID_ID, noti.paid_id)
contentValues.put(NotificationDao.PRODUCT_ID, noti.product_id)
NotificationDao.update(contentValues, noti.notification_id, this@NotificationActivity)
And that's all for our database access layer. In general, all queries should be in this layer, and activities and other components should only call this layer. That's why the best idea you can apply is to create these classes as Singletons, which we do in Java by applying static and in Kotlin with companion objects.
Using an external SQLite database in Android (Legacy Approach)
In this section, we will explain how to use an external SQLite database. As you well know, SQLite is not an Android invention; it is a technology that you can freely use in other types of applications, including our web applications. As we mentioned before, an SQLite database consists of a simple file, so we can take this file, which is the product of another application, and use it in Android 100% securely and equally practically, and that is what we will see in this other section.
As we have mentioned, SQLite is the main medium par excellence for persistence in Android. Generally, when we work with Android, we think that the database must be internal to the Android application itself, and this is due to how an Android app is composed, which in essence is all integrated. However, it does not have to be that way. One of the most interesting things that identifies SQLite is its portability; that is, an SQLite database is very small and consists of a single file that contains all our database along with its structure, and therefore we can export it (copy and paste) into our project and connect to it.
SQLite not only in Android or Android Studio
There are many applications that use SQLite databases, from PHP itself to client-side applications with JavaScript (First steps with SQLite in JavaScript: the openDatabase, executeSql and executeSql methods). Therefore, it is very likely that at some point we decide to export all this structure from a web application or another type to an Android application created in Android Studio or other technology.
Using our SQLite database in Android with Android Studio (Legacy)
If we decide to import an SQLite database from another application (whether Android or not), we might initially think that it is necessary to perform a complex process of reading the file, creating the database within the Android application, and reading table by table, record by record, and copying it into a database in our Android application. This is not necessary; it is simply enough to copy our SQLite database file to a specific location in our Android Studio IDE:
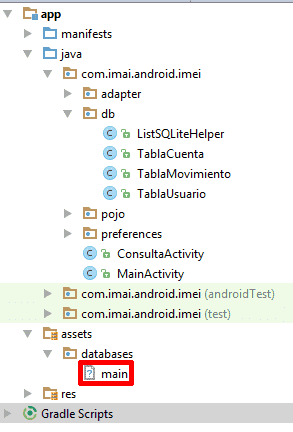
The database should be copied to the assets/databases directory of our project.
Now we create a class like the following:
public class ListSQLiteHelper extends SQLiteAssetHelper {
    private static final String DATABASE_NAME = "main";
    private static final int DATABASE_VERSION = 1;
    public ListSQLiteHelper(Context context, String name,
                            SQLiteDatabase.CursorFactory factory, int version) {
        super(context, DATABASE_NAME, context.getExternalFilesDir(null).getAbsolutePath(), null, DATABASE_VERSION);
        //super(context, name, factory, version);
    }
}
Important note: Although SQLiteAssetHelper is a useful tool for pre-existing databases in "Legacy" Android projects, in modern development it is strongly recommended to use the .createFromAsset() functionality of the Room Persistence Library, as shown in the "Modern approach" section, as it offers more robust integration and is part of the Jetpack architecture.
As you may notice, we use the SQLiteAssetHelper method instead of the SQLiteOpenHelper method, which does not require us to override the onCreate(SQLiteDatabase db) and onUpgrade(SQLiteDatabase db, int arg1, int arg2) methods that are used for database creation and updating, which would apply if the database were generated from Android itself.
The DATABASE_NAME variable contains the name of our database.
With this, our database connection is ready, and we can perform queries on it as if it were a natively integrated Android database.
You can consult the official documentation at the following link: Android SQLiteAssetHelper.
Next step, learn how to configure Google Maps with Android Studio Compose.