Content Index
- Modern Method with Jetpack Compose
- Initial configuration and variables
- Listener Implementation and Reactivity
- Resource Management with DisposableEffect
- Precision Levels
- Creating the Interface and the “Visual Trick”
- Optimization with Remember
- Final Consideration
- How to test it?
- Getting started with the SensorManager class in Android (Legacy Method)
- Requesting access to the accelerometer
- Obtaining the system accelerometer
- Registering the accelerometer "Listener" event
- Registering the "Listener" event
In this post, we will look at one of the fundamental components that can be found in any relatively recent Android device: a sensor that allows measuring the device's acceleration, the accelerometer.
Previously, we saw how to use the MediaPlayer to play audio in Android Studio.
The accelerometer in Android is measured based on the three known axes (X, Y, and Z); each of them can be accessed through the SensorManager class.
Modern Method with Jetpack Compose
With the arrival of Jetpack Compose, the way we build user interfaces in Android has changed significantly. Although the logic for accessing the accelerometer sensor remains the same (using SensorManager), the way we manage state and update the UI is different.
It is no longer necessary to implement SensorEventListener directly in an Activity. Instead, we can create a composable responsible for registering and listening to sensor changes.
We are going to learn how to use the accelerometer, which serves to determine the device's placement (meaning its orientation). It is widely used, for example, in pool games to get the ball into the hole.
To begin, we are going to create another Composable. As we have done in the rest of the exercises, we will place it in our onCreate within the Scaffold, so there is no mystery here:
class MainActivity : ComponentActivity() {
    @OptIn(ExperimentalMaterial3Api::class)
    override fun onCreate(savedInstanceState: Bundle?) {
        super.onCreate(savedInstanceState)
        enableEdgeToEdge()
        setContent {
            MyProyectAndroidTheme {
                Scaffold(modifier = Modifier.fillMaxSize(),

                ) { innerPadding ->
                    Column() {
                        Greeting(
                            name = "Android",
                            modifier = Modifier.padding(innerPadding)
                        )
                        SensorDataScreen()
                    }
                }
            }
        }

    }
}
Initial configuration and variables
We will start the implementation by obtaining the context to access activity information. We will declare three main variables; the accelerometer gives us the position on the 3D axis (X, Y, and Z), so we define one for each to be able to visualize them when rotating the device.
Subsequently, we need the SensorManager. This is the global element to access all device sensors (light, humidity, etc.). Specifically, we will declare another variable for the accelerometer by performing the corresponding cast:
@Composable
fun SensorDataScreen() {
    val context = LocalContext.current
    // Estados para guardar los ejes X, Y, Z
    var x by remember { mutableFloatStateOf(0f) }
    var y by remember { mutableFloatStateOf(0f) }
    var z by remember { mutableFloatStateOf(0f) }
}
Listener Implementation and Reactivity
To detect movements, we declare a SensorEventListener. This is a generic sensor listener, so inside the onSensorChanged function, we must use a conditional to ask if the sensor that changed is the accelerometer type.
When the event detects a change, we get the X, Y, and Z values and update our MutableState variables. These are reactive variables (as in Flutter) that will cause the entire interface to reload automatically when their values change.
@Composable
fun SensorDataScreen() {
    // Estados para guardar los ejes X, Y, Z
    ***

    // 2. Gestionamos el ciclo de vida del sensor
    DisposableEffect(Unit) {
        val listener = object : SensorEventListener {
            override fun onSensorChanged(event: SensorEvent?) {
                if (event?.sensor?.type == Sensor.TYPE_ACCELEROMETER) {
                    // Actualizamos los estados con los valores del sensor
                    x = event.values[0]
                    y = event.values[1]
                    z = event.values[2]
                }
            }

            override fun onAccuracyChanged(sensor: Sensor?, accuracy: Int) {}
        }

        // Registramos el sensor al iniciar
        sensorManager.registerListener(listener, accelerometer, SensorManager.SENSOR_DELAY_UI)

        // IMPORTANTE: Al salir, liberamos el sensor para ahorrar batería
        onDispose {
            sensorManager.unregisterListener(listener)
        }
    }

}
Resource Management with DisposableEffect
It is fundamental to use DisposableEffect to clean up resources and avoid memory leaks. When the activity is no longer in use, we must release the accelerometer using unregisterListener. If we do not release the resource, the application's performance will be affected.
Precision Levels
When registering the listener, we can choose different levels of precision (and battery consumption):
- SENSOR_DELAY_NORMAL: Slow, ideal for power saving.
- SENSOR_DELAY_UI: Ideal for user interfaces.
- SENSOR_DELAY_GAME: Designed for games.
- SENSOR_DELAY_FASTEST: The fastest possible, but with higher consumption.
Creating the Interface and the “Visual Trick”
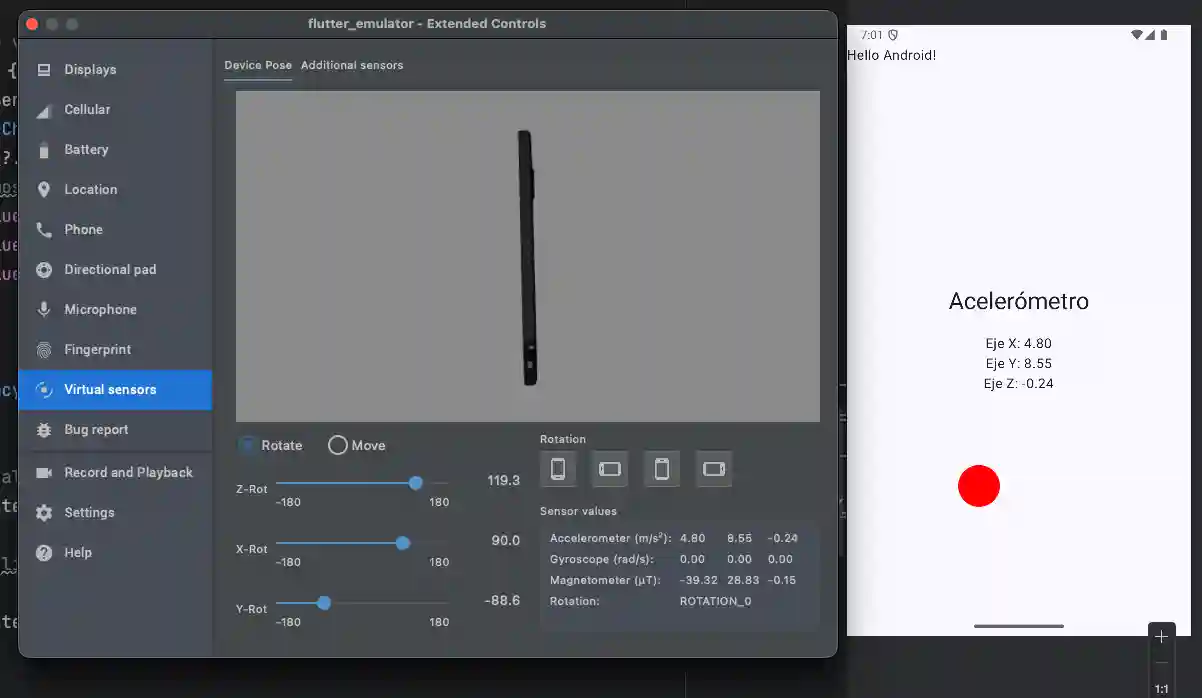
In the visual part, we assemble a Column with text showing the values of the axes and a Box that simulates a ball. We use the offset modifier to change its position in X and Y based on the accelerometer data. We give it a size of 50, red color, and a circular shape.
To test this in the emulator, you can go to the three dots, enter Virtual Sensors, look for Device Pose, and manually vary the orientation:
@Composable
fun SensorDataScreen() {
    val context = LocalContext.current
    // Estados para guardar los ejes X, Y, Z
    ***

    // 2. Gestionamos el ciclo de vida del sensor
    ***

    // 3. UI para mostrar los datos
    Column(
        modifier = Modifier.fillMaxSize(),
        verticalArrangement = Arrangement.Center,
        horizontalAlignment = Alignment.CenterHorizontally
    ) {
        Text(text = "Acelerómetro", style = MaterialTheme.typography.headlineMedium)
        Spacer(modifier = Modifier.height(20.dp))
        Text(text = "Eje X: ${"%.2f".format(x)}")
        Text(text = "Eje Y: ${"%.2f".format(y)}")
        Text(text = "Eje Z: ${"%.2f".format(z)}")

        // Un pequeño truco visual: una caja que se mueve según el sensor
        Box(
            Modifier
                .offset(x = (-x * 10).dp, y = (y * 10).dp)
                .size(50.dp)
                .background(Color.Red, CircleShape)
        )
    }
}
Optimization with Remember
Why do we use remember? Compose, like Flutter, redraws the screen many times per second. If we declare variables directly without remember, the system would redeclare them 30 or 50 times per second, which is inefficient.
Remember tells Compose to save the value and avoid redeclaring the variable in each update.
This is especially important when requesting access to hardware (sensors), as it is an expensive process:
// 1. Obtenemos el SensorManager y el acelerometro (faltaria verificar si NO es null, dispositivos baratos pueden NO traer acelerometro
//    val sensorManager = context.getSystemService(Context.SENSOR_SERVICE) as SensorManager
//    val accelerometer = sensorManager.getDefaultSensor(Sensor.TYPE_ACCELEROMETER)

    // mas eficiente, para evitar que cada vez que se recarga la pagina se cree el sensor
    val sensorManager = remember {
        context.getSystemService(Context.SENSOR_SERVICE) as SensorManager
    }
    val accelerometer = remember {
        sensorManager.getDefaultSensor(Sensor.TYPE_ACCELEROMETER)
    }
Final Consideration
Keep in mind that on budget devices the accelerometer might not exist, which would return a null value. In real projects, you should always check that the sensor is not null before trying to register it to avoid application errors.
val accelerometer = sensorManager.getDefaultSensor(Sensor.TYPE_ACCELEROMETER)Full code:
@Composable
fun SensorDataScreen() {
    val context = LocalContext.current
    // Estados para guardar los ejes X, Y, Z
    var x by remember { mutableFloatStateOf(0f) }
    var y by remember { mutableFloatStateOf(0f) }
    var z by remember { mutableFloatStateOf(0f) }

    // 1. Obtenemos el SensorManager y el acelerometro (faltaria verificar si NO es null, dispositivos baratos pueden NO traer acelerometro
//    val sensorManager = context.getSystemService(Context.SENSOR_SERVICE) as SensorManager
//    val accelerometer = sensorManager.getDefaultSensor(Sensor.TYPE_ACCELEROMETER)

    // mas eficiente, para evitar que cada vez que se recarga la pagina se cree el sensor
    val sensorManager = remember {
        context.getSystemService(Context.SENSOR_SERVICE) as SensorManager
    }
    val accelerometer = remember {
        sensorManager.getDefaultSensor(Sensor.TYPE_ACCELEROMETER)
    }

    // 2. Gestionamos el ciclo de vida del sensor
    DisposableEffect(Unit) {
        val listener = object : SensorEventListener {
            override fun onSensorChanged(event: SensorEvent?) {
                if (event?.sensor?.type == Sensor.TYPE_ACCELEROMETER) {
                    // Actualizamos los estados con los valores del sensor
                    x = event.values[0]
                    y = event.values[1]
                    z = event.values[2]
                }
            }

            override fun onAccuracyChanged(sensor: Sensor?, accuracy: Int) {}
        }

        // Registramos el sensor al iniciar
        sensorManager.registerListener(listener, accelerometer, SensorManager.SENSOR_DELAY_UI)

        // IMPORTANTE: Al salir, liberamos el sensor para ahorrar batería
        onDispose {
            sensorManager.unregisterListener(listener)
        }
    }

    // 3. UI para mostrar los datos
    Column(
        modifier = Modifier.fillMaxSize(),
        verticalArrangement = Arrangement.Center,
        horizontalAlignment = Alignment.CenterHorizontally
    ) {
        Text(text = "Acelerómetro", style = MaterialTheme.typography.headlineMedium)
        Spacer(modifier = Modifier.height(20.dp))
        Text(text = "Eje X: ${"%.2f".format(x)}")
        Text(text = "Eje Y: ${"%.2f".format(y)}")
        Text(text = "Eje Z: ${"%.2f".format(z)}")

        // Un pequeño truco visual: una caja que se mueve según el sensor
        Box(
            Modifier
                .offset(x = (-x * 10).dp, y = (y * 10).dp)
                .size(50.dp)
                .background(Color.Red, CircleShape)
        )
    }
}
This approach is more declarative and integrates better with the lifecycle of Compose components, representing the modern way to work with sensors in Android.
How to test it?
Real Device: This is best. Just move the phone and you will see the numbers change.
Emulator: In the emulator's three dots (...), go to the Virtual Sensors section. There you can move a virtual phone with the mouse, and the emulator will send that data to your code.
Note on the Legacy approach
The following method describes the traditional (Legacy) way of interacting with the accelerometer in Android using Views (XML and Activities). If you are starting a new project, we recommend using Jetpack Compose, the modern UI framework for Android, described above.
Getting started with the SensorManager class in Android (Legacy Method)
We must implement the SensorEventListener class in our activity:
public class MainActivity extends Activity implements SensorEventListenerOnce we implement the interface above, we must override the methods:
@Override public void onSensorChanged(SensorEvent event) { } @Override public void onAccuracyChanged(Sensor sensor, int accuracy) { }Requesting access to the accelerometer
The next thing we must do is request access to the device's accelerometer; and we do this through the SensorManager object in the following way:
SensorManager sensorManager = (SensorManager) getSystemService(Context.SENSOR_SERVICE);We obtain the system service through the getSystemService object, passing the name of the service we want to access as a parameter.
Obtaining the system accelerometer
From the list of sensors returned in the previous query, we check if there is any sensor of type accelerometer available; for this, the following line of code is used:
sensorManager.getSensorList(Sensor.TYPE_ACCELEROMETER).size()Registering the accelerometer "Listener" event
Once we have verified that the device has at least one accelerometer-type sensor, we can register the listener event:
sensorManager.registerListener(this, accelerometer, SensorManager.SENSOR_DELAY_FASTEST)
We pass as parameters an instance of the activity, the accelerometer, and the refresh rate, which can be:
- SENSOR_DELAY_FASTEST
- SENSOR_DELAY_NORMAL
- SENSOR_DELAY_GAME
- SENSOR_DELAY_UI
The only thing that varies between them is the refresh rate of the accelerometer.
Registering the "Listener" event
The onSensorChanged method is activated every time the system detects a change in the device's acceleration:
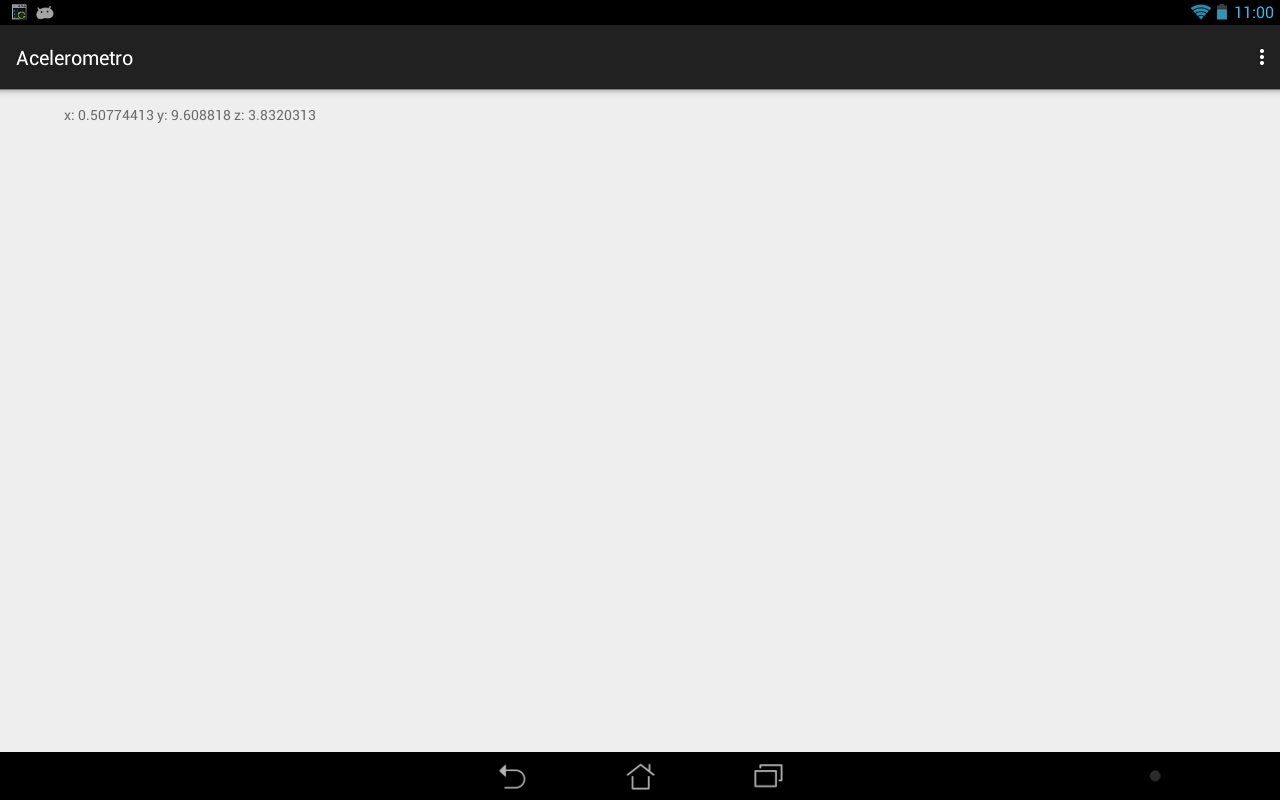
@Override public void onSensorChanged(SensorEvent event) { sensor = ""; sensor = "x: " + event.values[0] + " y: " + event.values[1] + " z: " + event.values[2]; }With the SensorEvent parameter, we can obtain, among various data, the coordinates that the system uses in rotations through the X, Y, and Z axes as we saw in the previous code.
Application screenshot:
Next step, how to embed a YouTube video in Android