Content Index
- Creating a Simple Audio Player in Android
- 1. Resource Preparation
- 2. Composable Implementation
- 3. Technical Explanation and Memory Management
- The R Class (Resources)
- The use of DisposableEffect
- 4. Lifecycle in Jetpack Compose vs. Legacy
- Playing from a URL (Streaming)
- The Modern Approach: Jetpack Compose and Media3 (ExoPlayer)
- 1. Add dependencies
- 2. Create and manage ExoPlayer in a Composable
- Modern Code Explanation:
- The Legacy Approach: MediaPlayer
- Asynchronously Loaded Audio
- prepareAsync to prepare audio asynchronously
- Practical Case: Making a small player
- Conclusion
Multimedia playback, such as audio and video, is a fundamental feature in many Android applications. Over the years, the tools and APIs for this task have evolved significantly. In this article, we will explore both the traditional (Legacy) approach using the MediaPlayer class and the modern, recommended approach with Jetpack Compose and the Media3 (ExoPlayer) library.
Previously, we saw how to use LinearProgressIndicator and CircularProgressIndicator in Android Studio | Jetpack Compose
Creating a Simple Audio Player in Android
We are going to learn how to play audio to create our own player. Below, I present a demonstration of what we are going to develop: a pair of buttons (Play and Pause) that control playback. For this, we will use the MediaPlayer class.
1. Resource Preparation
The first thing we must do is prepare our audio file:
- Go to the res (Resources) folder.
- Create a subfolder called raw (although the name is optional, it is the recommended standard for multimedia files).
- Copy any audio file you have (for example, music.mp3). I suggest using a simple name to facilitate access to the resource.
2. Composable Implementation
In our onCreate method, we are going to create a new Composable called ReproductorSimple. Here is where we will need the Context, which represents the scope of our activity.
@Composable
fun ReproductorSimple() {
    val context = LocalContext.current

    // 1. Creamos y recordamos el MediaPlayer
    val mediaPlayer = remember {
        MediaPlayer.create(context, R.raw.music)
    }

    // 2. Controlamos la limpieza al salir de la pantalla
    DisposableEffect(Unit) {

        onDispose {
            mediaPlayer.stop()
            mediaPlayer.release() // Libera la memoria
        }
    }

    Column(
        modifier = Modifier.fillMaxSize(),
        horizontalAlignment = Alignment.CenterHorizontally,
        verticalArrangement = Arrangement.Center
    ) {
        Row {
            Button(onClick = { mediaPlayer.start() }) {
                Icon(Icons.Default.PlayArrow, contentDescription = null)
                Text("Play")
            }
            Spacer(Modifier.width(8.dp))
            Button(onClick = { if (mediaPlayer.isPlaying) mediaPlayer.pause() }) {
                Text("Pause")
            }
        }
    }
}
3. Technical Explanation and Memory Management
The R Class (Resources)
This is the first time we use the R class. It is a special class in Android that allows us to access project resources easily (for example, R.raw.music), avoiding having to load files via text paths or complex external libraries.
The use of DisposableEffect
This is a key point to avoid memory leaks. In Android, if we close the Activity (the current page) but do not release the audio, it could remain loaded in the device's memory.
DisposableEffect is a Jetpack Compose mechanism to manage side effects that must be cleaned up when the Composable is no longer displayed.
Inside the onDispose block, we stop (stop()) and release (release()) the MediaPlayer.
4. Lifecycle in Jetpack Compose vs. Legacy
Previously (in the XML-based or Legacy scheme), we used global activity methods such as onPause, onStop, or onDestroy to release resources.
However, Jetpack Compose (the modern UI framework for Android announced in 2019) allows handling this locally. With DisposableEffect, we don't need to clutter the global activity methods; we can manage the cleanup of resources (like players or observers) directly where they are used.
Playing from a URL (Streaming)
When the audio comes from the internet, the process is asynchronous because we don't know how long it will take to download.
@Composable
fun ReproductorOnline(url: String) {
   val context = LocalContext.current
   val mediaPlayer = remember { MediaPlayer() }
   var isReady by remember { mutableStateOf(false) }
   LaunchedEffect(url) {
       mediaPlayer.apply {
           setAudioAttributes(
               AudioAttributes.Builder()
                   .setContentType(AudioAttributes.CONTENT_TYPE_MUSIC)
                   .setUsage(AudioAttributes.USAGE_MEDIA)
                   .build()
           )
           setDataSource(url)
           // Usamos prepareAsync para no bloquear la interfaz
           prepareAsync()
           setOnPreparedListener {
               isReady = true
           }
       }
   }
   Button(
       onClick = { mediaPlayer.start() },
       enabled = isReady // El botón se activa solo cuando cargó
   ) {
       Text(if (isReady) "Reproducir Online" else "Cargando...")
   }
}
"Pro" Tips for MediaPlayer:
- Wake Lock: If you are going to play long music with the screen off, you need special permissions so the processor doesn't go to sleep.
- Audio Focus: It is good practice to stop your music if a call comes in or if the user opens YouTube.
- Memory: Never forget mediaPlayer.release()! If you create many without releasing them, your app will run out of memory quickly.
The Modern Approach: Jetpack Compose and Media3 (ExoPlayer)
With the arrival of Jetpack Compose and AndroidX libraries, the recommended way to work with multimedia is through Jetpack Media3. This is a collection of support libraries that includes ExoPlayer, an application-level media player that is much more robust, flexible, and easier to use than the old MediaPlayer.
1. Add dependencies
First, make sure you have the androidx.media3 dependencies in your module's (app) build.gradle file.
dependencies {
    // ... otras dependencias
    def media3_version = "1.3.1"

    implementation "androidx.media3:media3-exoplayer:$media3_version"
    // Opcional: para componentes de UI
    implementation "androidx.media3:media3-ui:$media3_version"
    // Opcional: para reproducción en segundo plano y notificaciones
    implementation "androidx.media3:media3-session:$media3_version"
}
2. Create and manage ExoPlayer in a Composable
The idiomatic way to use ExoPlayer in Jetpack Compose is to create and manage it within a Composable function, handling its lifecycle with remember and DisposableEffect.
import android.net.Uri
import androidx.compose.runtime.Composable
import androidx.compose.runtime.DisposableEffect
import androidx.compose.runtime.remember
import androidx.compose.ui.platform.LocalContext
import androidx.lifecycle.LifecycleOwner
import androidx.media3.common.MediaItem
import androidx.media3.exoplayer.ExoPlayer

@Composable
fun AudioPlayerComposable(
    audioUrl: String,
    lifecycleOwner: LifecycleOwner = LocalLifecycleOwner.current
) {
    val context = LocalContext.current

    // 1. Inicializamos ExoPlayer
    val exoPlayer = remember {
        ExoPlayer.Builder(context).build().apply {
            // 2. Creamos un MediaItem desde la URL
            val mediaItem = MediaItem.fromUri(Uri.parse(audioUrl))
            setMediaItem(mediaItem)

            // 3. Preparamos el reproductor
            prepare()

            // Inicia la reproducción automáticamente cuando esté listo
            playWhenReady = true
        }
    }

    // 4. Gestionamos el ciclo de vida del reproductor
    DisposableEffect(lifecycleOwner) {
        onDispose {
            // Liberamos el reproductor cuando el Composable se va
            exoPlayer.release()
        }
    }

    // Aquí podrías añadir controles de UI (Play/Pause, Seekbar)
    // que interactúen con la instancia de `exoPlayer`.
}
Modern Code Explanation:
- remember { ... }: Ensures that the
ExoPlayerinstance is created only once and is preserved through Composable recompositions. - ExoPlayer.Builder(context).build(): This is the current way to build an instance of
ExoPlayer. - MediaItem.fromUri(...):
Media3usesMediaItemto represent multimedia content. It is more flexible than the oldsetDataSource. - prepare(): Just like before, it prepares the player.
ExoPlayerhandles preparation asynchronously by default, so there is no risk of blocking the main thread. - DisposableEffect: Crucial for cleanup. The
onDisposeblock runs when the Composable is removed from the composition tree, ensuring we releaseExoPlayerresources to avoid memory leaks.
The Legacy Approach: MediaPlayer
As the name suggests, MediaPlayer is used to play and control the playback of audio and/or video in Android. Although its use has been replaced by more modern libraries, it is important to understand how it works, as it is still found in a lot of existing code.
To play an audio, we must first create a MediaPlayer object:
player = new MediaPlayer();Now we must indicate the data source, which can be internal, i.e., located on the Android device itself, or on a web page, and we access it via a URL like the following:
player.setDataSource("http://example.net/uploads/fuente/" + cancion.getFuente());Android takes care of downloading the audio; once the source is established, we prepare the audio and start playback:
player.prepare();
player.start();
Finally, our code looks like this:
try {
    player.setDataSource("http://example.net/uploads/fuente/"
    + cancion.getFuente());
    player.prepare();
    player.start();
} catch (Exception e) {
    e.printStackTrace();
}
Asynchronously Loaded Audio
Depending on the purpose of your application, the code shown above may give you some problems. The reason is that until the audio is completely prepared prepare() for playback, the application may "hang" depending on which thread we invoke that method in, which is usually the main thread, and the famous "Not Responding" window may appear:
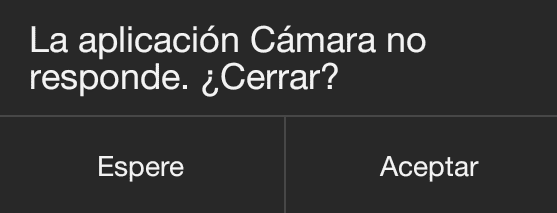
This indicates that the application is not responding and asks if you want to close it; which is not positive for the user's experience with our application.
prepareAsync to prepare audio asynchronously
The problem becomes greater if, for example, all the audios are brought from the Internet and the application consists of a list of audios, and if the user starts selecting several of them, the hanging of our application becomes imminent...
The solution is really simple and we don't have to create services, threads, etc., and place all the processing inside them or anything like that; we simply have to use the prepareAsync method and change a few small things from the previous code and add others.
First, the prepareAsync method allows preparing the audio just like the prepare method but does it asynchronously. Therefore, the audio must be played (depending on the action we want to perform on it) once the audio is ready or prepared; for that, we use an onPrepared listener event and inside it, we move our play() method:
try {
    player.setDataSource("http://example.net/uploads/fuente/"
    + cancion.getFuente());
    player.setOnPreparedListener(this);
    player.prepareAsync();
} catch (Exception e) {
    e.printStackTrace();
}
And we define our listener event as follows:
@Override
public void onPrepared(MediaPlayer mediaPlayer) {
    if (mediaPlayer.isPlaying()) {
        mediaPlayer.pause();
    }
    mediaPlayer.start();
}
And with this, goodbye hang (at least those caused by the prepare method); as we see, with the prepareAsync method, which does not need to be defined in a separate thread or process, Android is the one in charge of the heavy lifting of managing the necessary background processes.
Practical Case: Making a small player
One approach that allows us to use MediaPlayer for the parallel playback of multimedia resources such as audio and/or video is to define a separate class that extends from services. In this way, we can have a parent class that will be our activity that invokes (and controls according to needs) the service. In addition, the service will allow a series of functionalities to be performed through predefined methods or methods already defined in other classes that make up the API, and this is done by implementing these classes (OnPreparedListener, OnErrorListener, and OnCompletionListener).
We will create a class that for this example we will call MusicService:
public class MusicService extends Service implements MediaPlayer.OnPreparedListener, MediaPlayer.OnErrorListener, MediaPlayer.OnCompletionListener { }Now we define some global variables that will allow us to operate a list of songs; we also override the corresponding methods according to the inherited and implemented classes:
public class MusicService  extends Service implements
MediaPlayer.OnPreparedListener, MediaPlayer.OnErrorListener,
MediaPlayer.OnCompletionListener {

    //media player
    private MediaPlayer player;
    //song list
    private ArrayList<Cancion> canciones;
    private Cancion cancion;
    //current position
    private int songPosn;

    private final IBinder musicBind = new MusicBinder();

    @Override
    public void onCreate() {
        super.onCreate();
        initMusicPlayer();
    }

    @Override
    public IBinder onBind(Intent intent) {
        return musicBind;
    }

    @Override
    public int onStartCommand(Intent intent, int flags, int startId) {

        Bundle extras = intent.getExtras();
        int accion = 0;
        if (extras != NULL) {
            accion = extras.getInt("accion");
        }

        return START_NOT_STICKY;
    }

    @Override
    public boolean onUnbind(Intent intent) {
        try {
            player.stop();
            player.release();
        } catch (Exception e) {
            Log.e("ERROR", e.toString());
        }
        return false;
    }

    @Override
    public boolean onError(MediaPlayer mp, int what, int extra) {
        mp.reset();
        return false;
    }

    @Override
    public void onCompletion(MediaPlayer mp) {
        mp.reset();
    }

    @Override
    public void onPrepared(MediaPlayer mediaPlayer) {
        if(mediaPlayer.isPlaying()) {
            mediaPlayer.pause();
        }

        mediaPlayer.start();
    }
}
As we see, we override several methods that are executed in the lifecycle of a video or audio, such as if an error occurs in playback through the onError method, when the music playback is completed through the onCompletion method, or when the video or music is ready for playback through the onPrepared method.
We also have some service methods such as onUnbind which is invoked when the client connects to the service or the onStartCommand method which is invoked when the activity starts the service; with this we define other methods that will allow us to automate the playback of our music that we use in the methods overridden by the previous implemented classes:
public class MusicService  extends Service implements
MediaPlayer.OnPreparedListener, MediaPlayer.OnErrorListener,
MediaPlayer.OnCompletionListener {

    //media player
    private MediaPlayer player;
    //song list
    private ArrayList<Cancion> canciones;
    private Cancion cancion;
    //current position
    private int songPosn;

    private final IBinder musicBind = new MusicBinder();

    @Override
    public void onCreate() {
        super.onCreate();
        initMusicPlayer();
    }

    @Override
    public IBinder onBind(Intent intent) {
        return musicBind;
    }

    @Override
    public int onStartCommand(Intent intent, int flags, int startId) {

        Bundle extras = intent.getExtras();
        int accion = 0;
        if (extras != NULL) {
            accion = extras.getInt("accion");
        }

        return START_NOT_STICKY;
    }

    @Override
    public boolean onUnbind(Intent intent) {
        try {
            player.stop();
            player.release();
        } catch (Exception e) {
            Log.e("ERROR", e.toString());
        }
        return false;
    }

    @Override
    public boolean onError(MediaPlayer mp, int what, int extra) {
        mp.reset();
        return false;
    }

    @Override
    public void onCompletion(MediaPlayer mp) {
        mp.reset();
    }

    @Override
    public void onPrepared(MediaPlayer mediaPlayer) {
        if(mediaPlayer.isPlaying()) {
            mediaPlayer.pause();
        }

        mediaPlayer.start();
    }
}
With this we would have the complete service; some methods were created that allow verifying the status of the audio playback, passing to the next music, starting playback, pausing, etc.
Now, as we indicated at the beginning, the service is started from another component which in this case represents an activity; to start the previous service from an activity we have:
public MusicService musicSrv;
public boolean musicBound = false;

private ServiceConnection musicConnection = new ServiceConnection() {

    @Override
    public void onServiceConnected(ComponentName name, IBinder service) {
        MusicService.MusicBinder binder = (MusicService.MusicBinder) service;
        //get service
        musicSrv = binder.getService();
        //pass list
        musicSrv.setList(canciones);
        musicBound = true;

        current = 0;
        try {
            songPicked(NULL);
        } catch (Exception e) {
            Log.e("ERROR SERVICE", e.toString());
        }

    }

    @Override
    public void onServiceDisconnected(ComponentName name) {
        musicBound = false;
        Log.i("onServiceDisconnected", "Desconectado");
    }
};
To send if we want to play, pause, or skip to the next audio from the activity that invoked the service or any other communication that must occur between the activity and the service, we have:
private void playNext() {
    musicSrv.playNext();
    current++;
    songPicked();
}

private void playPrev() {
    musicSrv.playPrev();
    current--;
    songPicked();
}
All that remains is to associate those functions to the buttons or another element for their action.
Songs is a model class with the following structure:
public class Cancion {

    int cancion_id;
    String fuente;
    String titulo;
    String anombre;
    String imagen_url;

    public String getAnombre() {
        return anombre;
    }

    public void setAnombre(String anombre) {
        this.anombre = anombre;
    }
    public int getCancion_id() {
        return cancion_id;
    }

    public void setCancion_id(int cancion_id) {
        this.cancion_id = cancion_id;
    }

    public String getFuente() {
        return fuente;
    }

    public void setFuente(String fuente) {
        this.fuente = fuente;
    }

    public String getTitulo() {
        return titulo;
    }

    public void setTitulo(String titulo) {
        this.titulo = titulo;
    }

    public String getImagen_url() {
        return imagen_url;
    }

    public void setImagen_url(String imagen_url) {
        this.imagen_url = imagen_url;
    }
}
Conclusion
Although MediaPlayer was the basis for multimedia playback in Android for years, the ecosystem has evolved. Jetpack Media3 and ExoPlayer offer a more powerful, flexible, and easier-to-maintain API, especially when combined with the declarative nature of Jetpack Compose. For new developments, this is undoubtedly the way to go.
The next step is to learn how to use the Accelerometer in Android Studio.