Wikitude is no longer available; it is a deprecated technology, and this article is for informational purposes only.
To talk about Wikitude, we must first understand some basic concepts such as augmented reality; augmented reality is nothing more than an endowment to the user so that he can combine virtual elements with his physical environment to create an interactive mixed reality, in other words it adds a virtual layer to the real elements:
Augmented reality is the incorporation of data in a real environment through other techniques used such as image recognition.
Wikitude, a fundamental tool to create Augmented Reality content
Before continuing talking about Wikitude and all its virtues and facilities that it brings us to work with Augmented Reality without the need to invest a dollar or euro; let's talk a little about this resource that allows us to easily create content for Augmented Reality and Augmented Reality as such.
What is augmented reality?
Augmented Reality is a powerful resource that can be used for different purposes, ranging from recreational purposes, such as games to educational purposes, they are used by museums, living museums that we can interact digitally with all the resources, sculptures and everything that is in the museum through a simple tablet as we can see in this small museum in Mexico:
And in games like Pokemon Go, which could be considered the biggest success Augmented Reality has had in games.
Ok, but what is Augmented Reality?
All this that we have introduced is done with the purpose of indicating that it is Augmented Reality that we can simply define as the enrichment, the addition of digital content to a real environment, as simple as that, this digital content is added through a screen of a device that runs an Operating System that allows such a feat, such as Android and/or iOS, this added content is not added randomly, there are different ways to recognize your environment and act accordingly, one of the most interesting and most used is the image recognition, which allows us to detect basic patterns, compare them with a data repository in our application and "do something" this something is to display more information, either through videos, texts, links, images, etc. Actually, once recognized we can do whatever we want; we are going to introduce this in the next section in a more technical way with real resources.
Augmented Reality consists of enriching the user experience through images and other content through the screen and camera of the device.
Why develop applications in augmented reality: Uses
As we indicated before, this is a technology that has not yet been exploited as it should be, an example of success is Niantic with its Pokemon Go, but you can also create your applications in augmented reality for the following reasons:
- Promote your products in a unique way: Like all life, the unique, the different, the innovative, people like what is out of the ordinary, what is attractive, see how you can implement this technology in your business; For example, Ikea and its great application to place furniture in your living room:
- Greater visualization: This is a way of calling another audience, mainly young people who love these things, bringing Augmented Reality closer to your business could attract more young people and Increase your sales.
- Differentiate yourself from the competition This can be a summary of all the above, one of the virtues is to differentiate yourself from the competition and mark your own path, without always doing the same if not something different.
Knowing Wikitude
At this point you probably already have a clearer idea of Augmented Reality, how to create applications, how it works and what you want to do, so if you are motivated to make your application, the next section is for you. ; In this section we will look at some of Wikitude's features and see how to get started with Wikitude:
Wikitude is not a software to create augmented reality on PC or Mac, it is a library that has a great API that allows us to create rich content as we talked about before for Android, iOS and other very important platforms as you can see on the official site.
Wikitude Licensing
Wikitude is a free SDK for non-commercial projects (you pay otherwise) that allows the creation of Augmented Reality applications with Android and/or IOS as the main technologies and also through an extension in Cordova, Unity among others, which you can consult in the official technology documentation.
Wikitude Features for Augmented Reality
The Wikitude SDK supports other technologies such as geolocation, image recognition, cloud recognition, etc; you can see the rest of the features in: Powerful Features.
But what makes this SDK truly special is that it allows us to use web technologies (HTML, javaScript, CSS) to develop our Augmented Reality applications and the SDK was updated in the latest versions to provide Native support for Android and/or IOS although its main strength is in web technologies as mentioned above; which means that we don't have to handle complex events from Android but something more intuitive like client-side web technologies.
Fundamental terms to be able to work and understand Wikitude
Continuing with the basic terminology of Wikitude, we already talked about AR by the acronym of augmented reality, now we will talk a little about some terms which are essential to develop on this platform, whether on Android or IOS:
- Target: It is nothing more than a data set extracted from an image that is used by the tracker or tracker when recognizing an image and performing some action such as displaying layers of information, etc.
- Target Collection: As its name indicates, it is a collection of targets or objectives that associates the data of a set of targets that is used by the tracker to recognize real-world images detected by the device's camera; the extension of the Target Collection is from wtc and it is a file that we generate from the Wikitude portal.
- ClientTracker: It is the tracker or crawler that analyzes the live camera, and obtains the 2D images, analyzes the Target Collection associated with the project and looks for matches with the image obtained through the device's camera.
Types of Augmented Reality
In this section we will explain the types of augmented reality Wikitude uses when building our Android applications; in general, we can decide to work with an API or web platform, which gives us all the benefits of web development or native, which gives us a more professional appearance in our Augmented Reality application.
JavaScript API (web) for building AR applications with Android
As we mentioned at the beginning, there are two ways in which we can work with Wikitude on Android, the first is through web technologies, which basically consists of calling the architectView in our project and it will notify you about the life cycle of all events. that may occur; the architectView creates a sort of magic lens or surface on the camera where events are handled; To include the architectView in our project we must add the following tag inside a FrameLayout in our layout:
<com.wikitude.architect.ArchitectView android:id="@+id/architectView"
   android:layout_width="fill_parent" android:layout_height="fill_parent"/>
Then we must create pages written in HTML located in the asset folder; that use the ARchitect API from that directory; said file must include:
<script src="architect://architect.js"></script>In order to use this API we only need to make HTML pages that use this Augmented Reality API (architect) that is made in JavaScript to make our applications work; this way of creating applications with augmented reality is known as (at least that's what they call it in the official documentation) ARchitect worlds; you can check the official documentation on Android JavaScript API.
Native API to create AR applications with Android
The other way that we have is using native code or java code without the need to incorporate web code; This API is somewhat small but quite interesting depending on what we want to do since all the processing of recognized images is resolved in the same Activity or Fragment where we have specified the image recognition or tracking and we can easily perform multiple actions within our activity; you can check the official documentation at Android Native API
Supported Devices to work with Wikitude
Android 4.3 or higher with high pixel density (hdpi) and of course; the equipment must have a rear camera.
Developing Augmented Reality applications with Wikitude
At this point we will give you some resources that you cannot miss if you want to get started, we will give a brief introduction to each one so that you have a clearer idea; the first thing you should do is start from the basics, as we indicated before, the most popular resource (or one of the most popular) with augmented reality is Image Recognition, which means that the device's camera can recognize objects in the world real, but how do you recognize these objects...
1. Building our collection of targets to recognize real-world images
This is done through a collection of targets, what is data about the images and you must supply this through an application on the official Wikidute portal, you must supply it, and in this way Wikitude internally recognizes the images and activates a trigger or an event, whatever you want to call it, so the first thing you need to understand is how to create this package with information from the images and in this post all this is explained:
2. Recognizing the images and acting accordingly: RA
Well, at this point you have your collection of objectives ready, which is generated by Wikitude with the images you supplied, now you must start coding, and work, the first thing you must do is recognize an image; This process is carried out using the device's camera, it begins to analyze its environment in search of matches, something like the QR code which scans your environment for a QR code, here is the same thing only the matches it looks for are based on the images supplied in the previous step from which Wikitude generates a data and then it is used to find matches; for that, we bring you these great resources that go from the images to be used to the complete coding of the experiment:
As you can see, Wikitude uses web technologies, so it will be very easy for you in this way to bring rich content that we use in all the webs, videos, images, texts, make Ajax calls and use jQuery if you wish.
Geographic location and acting accordingly: RA
The other way that we have to work is with the geographic positioning, the famous points of interest or POIs for its acronym in English, this is another great way of working, although you must bear in mind that the points of interest or POIs must be wide It is not a good idea to use POIs for closed points, because this technology works through GPS and it is not infallible, it tends to vary by at least a few meters, so if your idea is to position points in specific centimeters or meters, it may not be great idea, but for everything else you can use the POIs as we explained in this post:
Augmented Reality without web technologies: native Apps
For some time now Wikitude has allowed working with Augmented Reality using web technologies, and yes, the matter is a bit more complex but here we give you the introduction; With this you will be able to do many things as before, but using all the benefits that a native application brings us, a complete integration in our Augmented Reality applications:
Content Index
- Wikitude, a fundamental tool to create Augmented Reality content
- What is augmented reality?
- Ok, but what is Augmented Reality?
- Why develop applications in augmented reality: Uses
- Knowing Wikitude
- Wikitude Licensing
- Wikitude Features for Augmented Reality
- Fundamental terms to be able to work and understand Wikitude
- Types of Augmented Reality
- JavaScript API (web) for building AR applications with Android
- Native API to create AR applications with Android
- Supported Devices to work with Wikitude
- Developing Augmented Reality applications with Wikitude
- 1. Building our collection of targets to recognize real-world images
- 2. Recognizing the images and acting accordingly: RA
- Geographic location and acting accordingly: RA
- Augmented Reality without web technologies: native Apps
- Conclusions
- Developing Augmented Reality applications with Wikitude (part 1)
- Import Wikitude SDK into our Android project
- Setting up our Android project
- Basic structure of Wikitude in our Android project
- Conclusions
- How to create a Target collection in Wikitude
- What is the Target Collection?
- Creating our first Target Collection
- Star range
- General tips for images
- Developing Augmented Reality applications with Wikitude (part 2)
- Image Recognition through Wikitude
- Creating the Wikitude Target collection
- Referencing Wikitude's Target collection
- Writing our ARchitect World (JavaScript)
- Adding the ARchitectView (native code) to our project:
- Running the application based on Augmented Reality and Image Recognition
- SDUs measures at Wikitude
- Target Collection and the ARchitect World in the cloud with Wikitude
- Splitting the app in two
- Specifically...
- What should we do?
- Conclusions
- Developing Augmented Reality applications with Wikitude (part 3)
- What exactly do we mean by "layers of information"?
- Project Changes
- Defining the new ARchitect worlds (JavaScript)
- Explaining the new JavaScript
- Testing our app
- Points of Interest (POI) with Augmented Reality at Wikitude
- But what is a POI or Point of Interest?
- Parameters of the GeoLocation class
- Example of the GeoLocation class
- The class GeoObject
- Parameters of the GeoLocation class
- Example of the GeoLocation object, Drawable and GeoObject
- Summary
- Conclusions
- Links of interest
- Developing Augmented Reality applications with Wikitude (part 3.2)
- Differences between this installment and the previous one
- Conclusions
- How to recognize multiple Targets with the Tracker in Wikitude?
- Image Recognition and Augmented Reality in three steps...
- 1. Declare and initialize the Tracker
- 2. Creating the Drawables
- Augmented Reality for Target One
- Augmented Reality for Target two
- Augmented Reality for Target three
- 3. Linking the Targets in the Target Collection with the Drawables
- Conclusions
- Printscreen
- Creating a Point of Interest with Augmented Reality in Wikitude Part 1
- What is a Point of Interest?
- Considerations for location providers in Android
- Wikitude Points of Interest Considerations
- First steps with the Wikitude API to define a Point of Interest in the ARchitect worlds
- The locationChangedFn method to get the position of the device
- The loadPoisFromJsonData method to build and display the Point of Interest using Augmented Reality
- Analyzing the previous function...
- Creating a Point of Interest with Augmented Reality in Wikitude Part 2
- Creation of the cross platform to show Points of Interest
- The native code (Java)
- The Architect World (JavaScript code)
- Architect World possibilities (JavaScript code) to get nearby Points of Interest given the position of the device
- Developing the native code (Java) of the application
- Defining the listener event in our activity
- Continued use of POIs with Wikitude
- Getting Started with Wikitude for Android: Installing the SDK and Getting Started with Image Recognition
- The native SDK and the web/JavaScript SDK
- Installing the native SDK
- Getting Started with WIkitude Image Recognition
- Creando el TargetCollection
- onCreate method
- GLRenderer class
- How does Wikitude communicate with this GLSurfaceView.Renderer interface
- CustomSurfaceView class: builds the view to embed in the activity
- StrokedRectangle class: Paint frame of recognized target
And the second part:
Now with these great resources that we bring you, you can start creating your applications with Augmented Reality; We also bring you the latest videos we have on the blog:
Conclusions
In this post we welcome you to the world of Augmented Reality, from what it consists of, to some examples for you to focus better, we give you motivation to use it in your business and we teach you how to create your own Augmented Reality applications. Because AR is here to stay and will be with us much longer, over the years we will see how AR gets more and more polished until it becomes smarter and smarter with better performance.
Developing Augmented Reality applications with Wikitude (part 1)
In this first installment we will see how to configure our Android project to start using this augmented reality library, for this we will use Eclipse with the ADT plugin.
Import Wikitude SDK into our Android project
First we need to download the Wikitude SDK; We can do it by clicking here, clicking on the download button; after that we must basically follow the same steps explained in the article How to import a library (jar) in Android? to import our library.
After we have correctly imported our library to the project we must carry out the following configuration in eclipse:
Preferences - Android - Build and make sure that the Force error when external jars contain native libraries option is unchecked.
Setting up our Android project
The following configuration will be at the level of our project, specifically in our androidmanifest.xml; We will add the following permissions necessary for the proper functioning of the Wikitude SDK:
<uses-permission android:name="android.permission.INTERNET" />
<uses-permission android:name="android.permission.ACCESS_COARSE_LOCATION" />
<uses-permission android:name="android.permission.ACCESS_FINE_LOCATION" />
<uses-permission android:name="android.permission.ACCESS_NETWORK_STATE" />
<uses-permission android:name="android.permission.ACCESS_WIFI_STATE" />
<uses-permission android:name="android.permission.ACCESS_GPS" />
<uses-permission android:name="android.permission.CAMERA" />
<uses-permission android:name="android.permission.WRITE_EXTERNAL_STORAGE" />
<uses-feature android:name="android.hardware.camera" android:required="true" />
<uses-feature android:name="android.hardware.location" android:required="true" />
<uses-feature android:name="android.hardware.sensor.accelerometer" android:required="true" />
<uses-feature android:name="android.hardware.sensor.compass" android:required="true" />
<uses-feature android:glEsVersion="0x00020000" android:required="true" />
The activity (activity) that is going to handle the Augmented Reality must add the following attribute in the androidmanifest.xml:
<activity android:name="com.yourcompany.yourapp.youractivity"
   android:configChanges="screenSize|orientation"/>
The layout of the activity that the Augmented Reality will handle must be the following; and it must be contained within a FrameLayout:
<com.wikitude.architect.ArchitectView android:id="@+id/architectView"
   android:layout_width="fill_parent" android:layout_height="fill_parent"/>
Basic structure of Wikitude in our Android project
Finally we will create the base structure inside the asset folder and thus have the structure of our ARchitect worlds ready; remaining as follows:
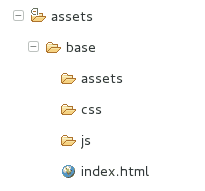
Remember that within our HTML document a reference to the ARchitect API must be included; leaving our index.html as follows:
<!DOCTYPE HTML>
<html>
<head>
	<meta http-equiv="Content-Type" content="text/html; charset=UTF-8" />
	<title></title>
	<script src="architect://architect.js"></script>
</head>
<body>
</body>
</html>
Conclusions
In this first installment we have only configured the base environment to use this library; if you run the project with the explained configurations; you will see that nothing very exciting will appear on the screen; (a black screen probably); but do not despair, in the next installment we will see how to work with Augmented Reality with this incredible API; you can find the complete example in our Android/WikitudeParteUno github repository or by clicking here.
How to create a Target collection in Wikitude
In this post we will explain how to create a Target collection in Wikitude.
What is the Target Collection?
A Target collection is nothing more than a collection of Targets; a Target is the destination image that will be used by the Tracker to recognize an image.
Creating our first Target Collection
Now let's proceed to create our Target collection; for that we go to the following link:
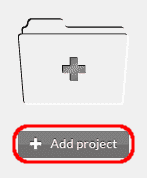
- Click on the Add project option.
- We give our project a name and press the Create button.

- Click on our project.
- Now we drag (drag and drop) the images to our project; which must be PNG (without transparent pixels) or JPG.

- We created our Target collection; for that we clicked the images that formed the same.

- We give it a name and click on Generate target collection.

- It will show us a message like the following; click on the Go to overview option and download our target collection.

Star range
In point 6 we see that Wikitude classifies the images that we have uploaded according to a range; let's see what it means:
- 0 stars: Not suitable for tracking and therefore this image cannot be tracked.
- 1 Stars: Image provides limited tracking ability.
- 2 and 3 stars: They offer a good tracking capacity.
General tips for images
- Preferably use images with various textures with a high level of contrast; you can also increase the contrast to the image with some image editor like gimp.
- Avoid images with large sections of solid colors or soft color transitions or repeating patterns.
Developing Augmented Reality applications with Wikitude (part 2)
In this second installment we will create our first functional application that uses Augmented Reality and Image Recognition as key technologies in the development of the application; this entry is the continuation of Developing Augmented Reality Applications with Wikitude (part 1) where we explain how to integrate the Wikitude API with an Android project.
Image Recognition through Wikitude
In this first part we will explain how we can recognize several images using the Image Recognition that Wikitude SDK offers us; but first let's see a series of basic concepts:
- Target: It is nothing more than the destination image that will be used by the Tracker to recognize an image.
- Target collection: It is a special file that stores within itself a collection of Targets to be recognized by the Tracker.
- Tracker: Analyzes the camera image and detects the Targets stored in the Target collection.
Creating the Wikitude Target collection
In the last article we explained how to create a Target collection to be able to use it in our project.
Referencing Wikitude's Target collection
After we have created our Target collection, the next step will be to save it within our android project, although it can also be hosted within a server and be referenced via HTTP as we explained in the following post:
<OurProject>/assets/base/assets/<targetcollection.wtc>In our example we will use the following image in the Target collection:

Writing our ARchitect World (JavaScript)
var World = {
	loaded: false,
	init: function initFn() {
		this.createOverlays();
	},
	createOverlays: function createOverlaysFn() {
		// inicializamos el Tracker con el Target collection
		this.tracker = new AR.Tracker("assets/targetcollection.wtc", {
			onLoaded: this.worldLoaded
		});
		// creamos un overlay
		var javaDeitel = new AR.ImageResource("assets/javaDeitel.jpg");
		var overlay = new AR.ImageDrawable(javaDeitel, 0.2, {
			offsetX: -0.15,
			offsetY: 0
		});
 // indicamos el nombre del Target en el Tracker
		var javaLibro = new AR.Trackable2DObject(this.tracker, "javaLibro", {
			drawables: {
				cam: overlay
			}
		});
	}
};
// principal
World.init();
First we create the Tracker by calling the AR.Tracker method passing as a parameter the Target collection that we created in the previous step.
The next thing will be to indicate the image that it will show when the Tracker recognizes the Target in question; by calling the AR.ImageResource method.
The image to display is:
Finally we combine the two previous steps creating the Trackable object by calling the Trackable2DObject method, the parameters they receive are:
- The Tracker.
- The name of the Target in the Tracker.
- Other options.
Adding the ARchitectView (native code) to our project:
We must notify the ArchitectView about the life cycle in our activity; for that we can do something like the following:
ArchitectView architectView;
	@Override
	protected void onCreate(Bundle savedInstanceState) {
		super.onCreate(savedInstanceState);
		setContentView(R.layout.activity_main);
		// la ruta del architectView en nuestro XML
		this.architectView = (ArchitectView) this
				.findViewById(R.id.architectView);
		final ArchitectConfig config = new ArchitectConfig("" /* license key */);
		this.architectView.onCreate(config);

	}

	/*
	 * Ciclo de vida en nuestra actividad
	 */

	@Override
	protected void onResume() {
		super.onResume();
		if ( this.architectView != NULL ) {
			this.architectView.onResume();
		}
	}
	@Override
	protected void onPause() {
		super.onPause();
		if ( this.architectView != NULL ) {
			this.architectView.onPause();
		}
	}

	@Override
	protected void onStop() {
		super.onStop();
	}
	@Override
	protected void onDestroy() {
		super.onDestroy();
		if ( this.architectView != NULL ) {
			this.architectView.onDestroy();
		}
	}
	@Override
	public void onLowMemory() {
		super.onLowMemory();
		if ( this.architectView != NULL ) {
			this.architectView.onLowMemory();
		}
	}
	@Override
	protected void onPostCreate( final Bundle savedInstanceState ) {
		super.onPostCreate( savedInstanceState );

		// IMPORTANTE cargamos el ARchitect worlds (codigo web: HTML CSS javaScript)
		this.architectView.onPostCreate();
		try {
			this.architectView.load("base/index.html");
			this.architectView.onResume();
		} catch (IOException e) {

			// TODO Auto-generated catch block
			e.printStackTrace();
		}
	}
	@Override
	public boolean onCreateOptionsMenu(Menu menu) {
		// Inflate the menu; this adds items to the action bar if it is present.
		getMenuInflater().inflate(R.menu.main, menu);
		return true;
	}
Running the application based on Augmented Reality and Image Recognition
Now we will run our example on some supported device; after we "roll the camera" over the following image (or the book cover if you have it):
We will see something like the following.

What happened?
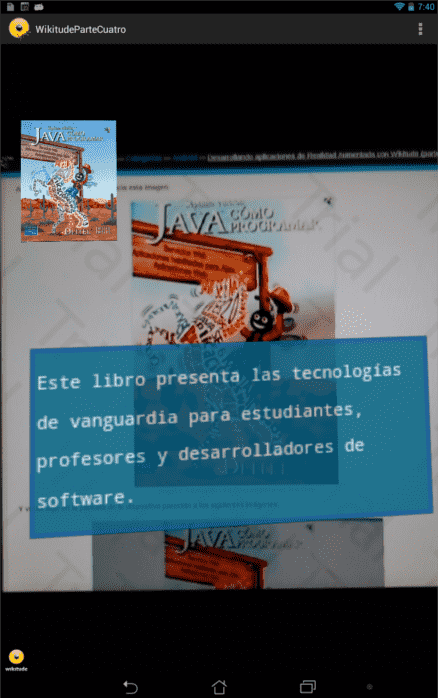
It has simply recognized the image and "done something", in this case displaying an overlay; for this entry the overlay is nothing more than an image of the title page of the recognized book:
You can find the complete application in our github repository Android/WikitudePartTwo or by clicking here.
SDUs measures at Wikitude
According to Wikitude Developer, in Augmented Reality applications, an object cannot be defined in pixels or similar measurements; the size of the object depends on the distance at which the observer "looks" at the object in the real world; Wikitude's architecture uses Scaled Distance Units (SDUs). SDUs define the relationship between the size of the actual object and the distance at which it is observed.
Let's go to something a little more practical:
- 1 SDU defines that the size of an object is exactly one meter in height and is located 10 meters away.
- 5 SDU defines that the object is exactly 5 meters high and 10 meters away.
Another important point is that as the distance between the object of the physical world and the observer varies, the object defined in SDU can vary its size (smaller the further away the observer is and larger if contrary) and even disappear.
All this can be a bit confusing, what we recommend is to use different values of the SDUs in order to define the size that we consider to be the most appropriate according to the effect that you want to achieve.
You can get the official documentation by clicking here.
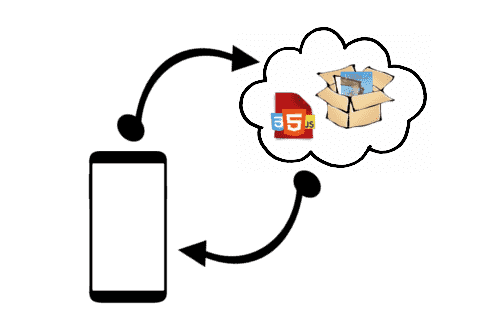
Target Collection and the ARchitect World in the cloud with Wikitude
One of the things that makes the Wikitude SDK great is the possibility that the Target Collection and part of the ARchitect World (JavaScript, CSS and HTML) are located on some server on the Internet (in the cloud). , instead of being installed in the assets folder of the Android project; what good would it do us if the Target Collection and part of the ARchitect World are located on a separate server instead of being inside the apk? let's see:
Splitting the app in two
It is possible to make a more flexible administration of the application: How is this? I mean that we can divide the application into two:
- The apk: It is the installer for Android. Our project in Eclipse has been in the development phase, the native code of the application, in addition to the index.html, which is the one that references the JavaScript; which (the JavaScript) is what generates the content that will be displayed as Augmented Reality layers.
- The ARchitect World together with the Target Collection: Representing the point of interest for an administrator user and the ones that will have the most modifications throughout the application's life cycle.
Specifically...
Let's see it another way, let's imagine that our client asks us for an administrative module in which they want to be able to manage the images of the Target Collection and perhaps configure the interface (CSS) to a certain degree (colors, typography, opacity, etc.), but We must remember that this administrator user is probably not a programmer and therefore we are not going to force him to have to compile the project to generate the apk and upload it to Google Play by adding a couple of images and perhaps wanting to change a color; steps he should take if he had to modify the contents of the assets folder, which is where the Target Collection and part of the ARchitect World are installed in the past examples; Android does NOT allow you to modify the contents of the assets folder once the apk has been installed on the device, besides this process can be a bit cumbersome for a user who is not a programmer (or who is not interested in anything in the area).
What should we do?
Let the administrator make his modifications in the Target Collection (add, delete and update images) and in the ARchitect World (modify the CSS) in a separate section that we will call the administrative module; Being part of the ARchitect World and the Target Collection on a server and NOT installed on the device, the changes made by the administrator will have an immediate effect and without the need to update the apk.
Target Collection and part of the ARchitect World in the cloud; the application refers to these elements in order to be able to recognize images and obtain the content to be displayed as Augmented Reality layers.
Sounds perfect, right? The downside is that the application will need continuous Internet access to work (to "pull" the JavaScript and CSS that are on a remote server), but if Internet access is not a problem this it should not be considered as a great inconvenience; besides this; it is necessary to regenerate the JavaScript every time there is a modification in the application; let's remember that JavaScript is responsible for recognizing the Target Collection Images and creating the Augmented Reality layers (among other things); This would be our administration module which will be the subject of another article and which is basically responsible for automatically regenerating the JavaScript so that the new images are recognized by the Tracker.
Let's see the configurations that we should make in the Android project so that it connects to a server to consult the Target Collection and part of the ARchitect World, the JavaScript belonging to the ARchitect World called "ra.js" will be referenced in the following way in the index. html; which will be located in <OurProject>/assets/base/assets/index.html):
<script type="text/javascript" src="http://www.desarrollolibre.net/public/page/wikitude/ra.js"></script>Items of interest:
1
The Target Collection, located on a server and NOT installed in the application together with the index.html:
		this.tracker = new AR.Tracker("http://www.desarrollolibre.net/public/page/wikitude/targetcollection.wtc", {
			onLoaded: this.worldLoaded
		});
2
The other resources, the Drawables, which are used to represent objects through Augmented Reality; the resources (images and web pages) to create a Drawable object, will be on a server and NOT installed in the application:
	var cuadroInformativo = new AR.HtmlDrawable({
	   uri:"http://www.desarrollolibre.net/public/page/wikitude/90/WIkitudeParte3DescripcionLibroComoProgramarEnJavaDeitel.html"
	}, 1,{offsetX : -1,rotation:90,opacity : 0.8,scale : 2});
	var javaDeitel = new AR.ImageResource("http://www.desarrollolibre.net/public/page/wikitude/90/javaDeitel.png");
	var overlay = new AR.ImageDrawable(javaDeitel, 0.2, {
		offsetX: -0.15,
		offsetY: 0
	});
Conclusions
Well, that's all, the important thing about this article is to know a great functionality that the Wikitude SDK offers us that can go unnoticed, which is to be able to connect to a server to recognize the images, generate and obtain the content through display to the user through the screen of their device.
You can find the complete application in our Android/WikitudeParteCuatro github repository or by clicking here.
Some screens:
Developing Augmented Reality applications with Wikitude (part 3)
Continuing with the articles on the development of applications based on Augmented Reality and Image Recognition with Android and Wikitude SDK; in this article we will see how to add layers of information when the Targets are recognized by the Tracker, if you do not recognize these two terms (Targets and Tracker) we recommend you read the last article: Developing augmented reality applications with Wikitude (part 2).
What exactly do we mean by "layers of information"?
Simply an informative box (rather a rectangle) about a particular Item, this layer of information will not be more than a web page that we reference from the ARchitect World (JavaScript); something like this will serve as an information table:
<html>
    <head>
        <meta http-equiv='Content-Type' content='Type=text/html; charset=utf-8'/>
        <style>
            pre {
                font-size:42px;
                color:#FFF;
                text-align: justify;
            }
            .descripcion{
                background: #068;
                border: 10px solid #059;
                border-radius: 5px;
                padding: 5px;
                height: auto;
            }
        </style>
    </head>
    <body>
        <div class="descripcion">
            <pre>Este libro presenta las tecnologías </pre>
            <pre>de vanguardia para estudiantes, </pre>
            <pre>profesores y desarrolladores de </pre>
            <pre>software.</pre>

        </div>
    </body>
</html>
Project Changes
The rest of the project structure...
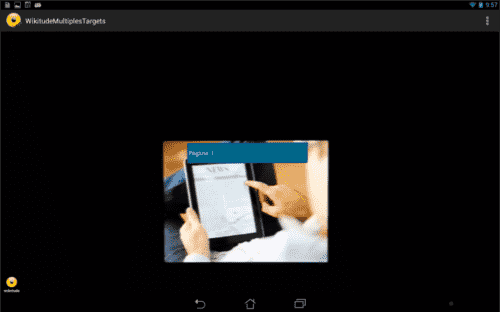
- Target collection (Target collection, specifically our images, if you remember the previous installment, it was an image of the cover of the book "How to program in Java") see Image 1.
- ARchitectView (Native Java Code).
...It will be exactly the one we used in the previous installment, the only thing we will modify will be our ARchitect World (JavaScript), whose content is found in the assets folder of our project:
<NuestroProyecto>/assets/base/The JavaScript called "ra.js" is located at:
<NuestroProyecto>/assets/base/jsDefining the new ARchitect worlds (JavaScript)
We will modify the content of the JavaScript "ra.js" with the following:
var World = {
    loaded: false,
    init: function initFn() {
        this.createOverlays();
    },
    createOverlays: function createOverlaysFn() {
	// creamos un objeto de la clase HtmlDrawable
	htmlDrawable = new AR.HtmlDrawable({
	   uri:"http://www.desarrollolibre.net/public/page/wikitude/WIkitudeParte3DescripcionLibroComoProgramarEnJavaDeitel.html"
	}, 1,{offsetX : -1,rotation:90,opacity : 0.8,scale : 2});
        // inicializamos el Tracker con el Target collection (nuestra caratula del libro Deitel)
        this.tracker = new AR.Tracker("assets/targetcollection.wtc", {
            onLoaded: this.worldLoaded
        });
 	// indicamos el nombre del Target en el Tracker, basicamente al momento de que el Target sea rastreado por el Tracker el objeto htmlDrawable sera renderizado en la pantalla del dispositivo
        var javaLibro = new AR.Trackable2DObject(this.tracker, "javaLibro", {
            drawables: {
                cam: htmlDrawable
            }
        });
    }
};
// principal
World.init();
Explaining the new JavaScript
The HtmlDrawable class is used to represent objects through Augmented Reality, with objects we refer to HTML elements, such as divs, texts, images, etc.
- The HtmlDrawable class receives the following parameters:
- HtmlDrawable( content , width , options )
Un objeto JSON que representa el contenido HTML, el cual puede ser:
- HTML: a string with all the HTML content: HTML:"<div>My Div</div>"
- URI: a link to a page with HTML content: URI: "http://www.desarrollolibre.net/public/page/wikitude/WIkitudeParte3DescripcionLibroComoProgramarEnJavaDeitel.html"<br> width: The width of the object, which is a floating point number in SDUs.<br> options: A JSON object representing optional settings to customize the object; Among the main ones we have:
- offsetX: Floating point measurements given in SDUs, if its value is positive it will cause the object to move to the right, otherwise it will move to the left.
- offsetY: Floating point measurements given in SDUs if its value is positive it will cause the object to move up, otherwise it will move down.
- rotation: Defines the rotation of the object in degrees 0-360.
- scale: Floating point measures that allow scaling the object; where 1.0 represents the size of the original object.
- opacity: Opacity of the object, where the largest value is 1.0 (object fully visible) and the smallest is 0.0 (object invisible).
- opacity: Opacity of the object, where the largest value is 1.0 (object fully visible) and the smallest is 0.0 (object invisible). The full list can be found at oficial documentation
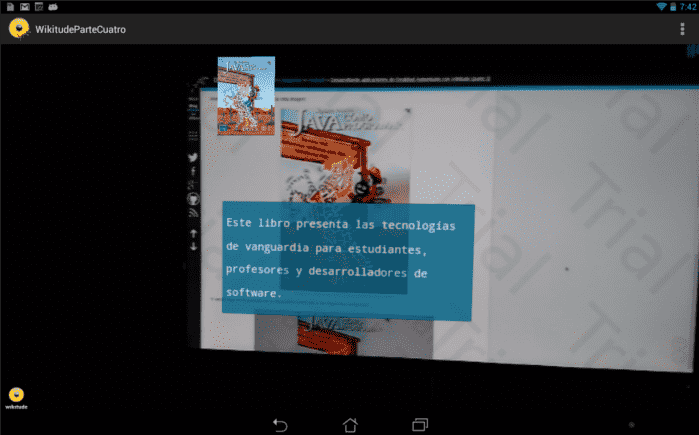
Testing our app
Now cast the app onto this image:
Image 1: Cover of the Book How to program in Java Deitel.
And you will see something on the screen of your device similar to the following images:

Image 2: Screenshot of the information layer superimposed on the Target.

Image 3: Screenshot of the information layer superimposed on the Target.
You can find the complete application in our Android/WikitudePartTres github repository or by clicking here.
Points of Interest (POI) with Augmented Reality at Wikitude
In this article we will see how to mark (show the Drawables) a site through Points of Interest (POI); In other words, recognize an area by its geographical position through the so-called Points of Interest (POI) instead of using Image Recognition.
But what is a POI or Point of Interest?
A POI is nothing more than a specific location or point; basically it's an interesting place a Point of Interest listed by someone; maps and GPS contain many of these points called POIs.
POIs in Wikitude are managed by a class called GeoLocation, which represents a location on earth in your 3D space; as you can imagine, it receives three parameters:
Parameters of the GeoLocation class
- Latitude: Latitude of the location given in decimals.
- Longitude: Longitude of the location given in decimals.
- Altitude (optional): The altitude of the given location in meters.
The third component makes it possible to locate a POI in 3D space.
Example of the GeoLocation class
var location3D = new AR.GeoLocation(47.77317, 13.069929, 320.0); // latitude, longitude, altitude
var location2D = new AR.GeoLocation(47.77317, 13.069929); // latitude, longitude
We already know how to create a Point of Interest or POI in Wikitude, now we must create the Drawable object to mark the site; remembering past articles; this is nothing more than the content that you want to show when recognition occurs either through Image Recognition or by location (our case) through POIs:
htmlDrawable = new AR.HtmlDrawable({uri:"pagina.html"}, 1);
We already have the Point of Interest POI and the content to display. What entity is in charge of locating and analyzing the area where the user is located and thus displaying the resources established in the Drawable (if and only if the user is within a POI)?; in other words; How do we show the Drawables according to the position of the user?
The class GeoObject
This class allows you to specify at least one POI (GeoLocation class objects) or location and the Drawable resources to display:
Parameters of the GeoLocation class
- POI: Reference to the GeoLocation object.
- Options (optional): Other parameters to customize the object; allows you to define what you want to do after the user is inside a POI:
- enabled: Boolean that indicates whether or not the GeoObject is active.
- renderingOrder (default 0): Number that defines the order of priority among various objects of the GeoObject class.
- onEnterFieldOfVision: Function that is executed when the user enters a POI.
- onExitFieldOfVision: Function that is executed when the user leaves a POI.
- onClick: Function that is executed when clicking (touching the device screen) on a Drawable object.
- drawables.cam: These are Drawable objects that will be displayed on the device's screen.
- drawables.radar: Radar for the user to locate other POIs of interest near their position:
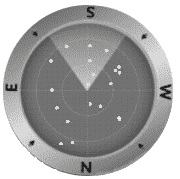
- drawables.indicator: They are Drawable objects (such as an arrow) that are drawn on the edge of the screen to visualize the position of other objects outside the camera.
Example of the GeoLocation object, Drawable and GeoObject
var location3D = new AR.GeoLocation(47.77317, 13.069929, 320.0); // latitude, longitude, altitude
//recurso Drawable
htmlDrawable = new AR.HtmlDrawable({uri:"pagina.html"}, 1);
//construimos el objeto GeoLocation
var geoObject  = new AR.GeoLocation(location3D,htmlDrawable); // POI -GeoLocation-, opciones
Summary
We can summarize what we have seen so far as follows:
- Define the POI.
- Define the Drawable object or what we are interested in showing when the user is located at the POI.
- The object that handles the previous two; locate and analyze the area where the user is located and if it matches the established POI(s), display the established resources (Drawable). It has been something like the Tracker in Image Recognition.
Conclusions
The use of POIs is something that is appreciated when other technologies such as Image Recognition fail or you do not want to use it for various reasons; it counts with greater precision than Image Recognition (since it is Geographic and there is no margin of error); however, we can use both technologies (POIs and Image Recognition) together as we will see in future articles.
Links of interest
- GeoObject.
- GeoLocation.
- Poi.
Developing Augmented Reality applications with Wikitude (part 3.2)
One last detail that I forgot to explain in the previous installment: Developing Augmented Reality applications with Wikitude (part 3), is the use of the HTML attribute within the HtmlDrawable class, in this article we will make an application for Android with the same characteristics of the application created in the last article: Developing Augmented Reality Applications with Wikitude (part 3), but this time, we'll use the HTML attribute instead of the URI attribute.
Differences between this installment and the previous one
What would be the difference between creating an infobox with the HTML attribute instead of the URI attribute? the difference is that all the content (HTML) will be inside the "ra.js" instead of being in a separate file, and I say separate file instead of a web-hosted file because URIs can reference so many elements within the apk:
uri:"<NuestroProyecto>/assets/base/WIkitudeParte3DescripcionLibroComoProgramarEnJavaDeitel.html"Or:
uri:"http://www.desarrollolibre.net/public/page/wikitude/WIkitudeParte3DescripcionLibroComoProgramarEnJavaDeitel.html"Our "ra.js" file will look like this:
<html>
var World = {
    loaded: false,
    init: function initFn() {
        this.createOverlays();
    },
    createOverlays: function createOverlaysFn() {
	// creamos un objeto de la clase HtmlDrawable
	htmlDrawable = new AR.HtmlDrawable({
	   html:"<div style='font-size:42px;color:#FFF;background: #068;border: 10px solid #059;border-radius: 5px;padding: 5px;height: auto;'><pre>Este libro presenta las tecnologías </pre><pre>de vanguardia para estudiantes, </pre><pre>profesores y desarrolladores de </pre><pre>software.</pre></div>"
	}, 1,{offsetX : -1,rotation:90,opacity : 0.8,scale : 2});
        // inicializamos el Tracker con el Target collection (nuestra caratula del libro Deitel)
        this.tracker = new AR.Tracker("assets/targetcollection.wtc", {
            onLoaded: this.worldLoaded
        });
	// indicamos el nombre del Target en el Tracker, basicamente al momento de que el Target sea rastreado por el Tracker el objeto htmlDrawable sera renderizado en la pantalla del dispositivo
        var javaLibro = new AR.Trackable2DObject(this.tracker, "javaLibro", {
            drawables: {
                cam: htmlDrawable
            }
        });
    }
};
// principal
World.init();
As we can see, both the HTML and the CSS are contained within the div:
html:"<div style='font-size:42px;color:#FFF;background: #068;border: 10px solid #059;border-radius: 5px;padding: 5px;height: auto;'><pre>Este libro presenta las tecnologías </pre><pre>de vanguardia para estudiantes, </pre><pre>profesores y desarrolladores de </pre><pre>software.</pre></div>"Esto resulta en algo bastante molesto y poco práctico, podríamos pensar que es posible colocar el CSS en un archivo aparte, como por ejemplo dentro de un .css:
/WikitudeParteTresDos/assets/base/css/style.css
Or in the index.html:
/WikitudeParteTresDos/assets/base/index.html
But if you do this, Wikitude doesn't look up the styles on these sites and therefore the elements won't get the style.
Conclusions
So, which of the two attributes do we use the HTML or the URI?; it depends on what we want to do, if we are going to have a static content that we are not going to update and it is quite small maybe you consider using HTML, it could be quite useful if we don't want to have so many .html; but if there is a lot of content and styles that we want to update frequently, the URI might be a better option for us.
You can find the complete application in our github repository Android/WikitudeParteTresTwo or by clicking here.
How to recognize multiple Targets with the Tracker in Wikitude?
In this article we will see how to recognize multiple Targets stored in the Target Collection with the Tracker; to do this, it is necessary to follow three basic steps:
Image Recognition and Augmented Reality in three steps...
- Declare and initialize the Tracker.
- Create the Drawables.
- Linking the Targets in the Target Collection with the Drawables.
1. Declare and initialize the Tracker
In the next section of code we declare the Tracker; remembering past items; the Tracker represents the Target Collection (which is the binary with a .wtc extension; see how to create the Target Collection); scans the camera for Targets stored in the Target Collection; in other words; matches what you are "seeing" through the camera with what is stored in the Target Collection; the Target Collection can be local to the device or on a server on the Internet.
We initialize the Tracker by passing the Target Collection as the first parameter and the options as the second parameter (without options for this example):
	  // inicializamos el Tracker con el Target collection
        this.tracker = new AR.Tracker("assets/Targetcollection.wtc", {});
The images stored in the Tracker look like this:
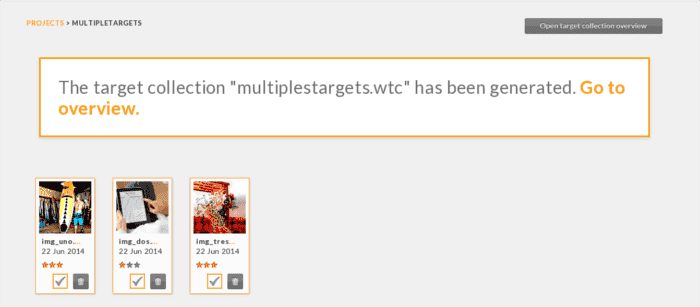
Important to note the name of the images (Targets) later to link the Target with a Drawables:
- img_uno.png
- img_dos.png
- img_tres.png
2. Creating the Drawables
The next step after creating the Tracker is to create the resources; graphics such as images, texts, geometric figures, web pages, buttons, etc.; which are known by the name of Drawables:
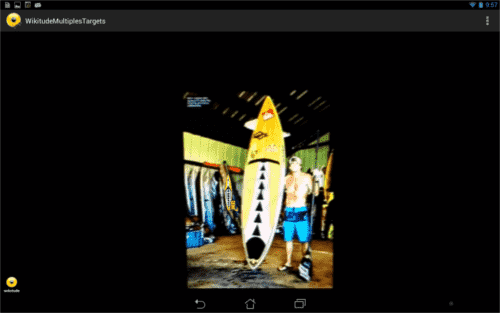
Augmented Reality for Target One
For the first Target we will use an image:
		// indicamos la imagen recurso
        var imgUno = new AR.ImageResource("assets/img_uno.png");
	// creamos el Drawable usando el recurso
        var drawableImage = new AR.ImageDrawable(imgUno, 0.2, {
            offsetX: -0.15,
            offsetY: 0
        });
Augmented Reality for Target two
For the following Target we will use a web page:
		// creamos el Drawable usando una uri
        drawablePageWeb = new AR.HtmlDrawable({
            uri: "assets/pagina1.html"
        }, 1, {});
Augmented Reality for Target three
For the last Target we will use an image and a web page:
		// creamos el Drawable usando una uri
        drawablePageWebDos = new AR.HtmlDrawable({
            uri: "assets/pagina2.html"
        }, 1, {});
        // indicamos la imagen recurso
        var imgDos = new AR.ImageResource("assets/img_dos.png");
	// creamos el Drawable usando el recurso
        var drawableImageDos = new AR.ImageDrawable(imgDos, 0.2, {
            offsetX: -0.15,
            offsetY: 0
        });
Note: The image stored in the path assets/img_uno.png or assets/img_dos.png is NOT the same one used to create the Target Collection; I use the same name to have a convention.
Note: Drawables were created indicating a resource.
3. Linking the Targets in the Target Collection with the Drawables
Now, how do we indicate to the Tracker which Drawables are going to link with the Targets stored in the Target Collection?; The following section of code takes care of that:
	 // indicamos el nombre del Target en el Tracker
        var TrackableUno = new AR.Trackable2DObject(this.tracker, "img_uno", {
            drawables: {
                cam: drawableImage
            }
        });
        var TrackableDos = new AR.Trackable2DObject(this.tracker, "img_dos", {
            drawables: {
                cam: drawablePageWeb
            }
        });
        var TrackableTres = new AR.Trackable2DObject(this.tracker, "img_tres", {
            drawables: {
                cam: [drawablePageWebDos,drawableImageDos]
            }
        });
Now we use the Tracker declared in step 1 to reference a specific Target within the Target Collection (a Trackable2DObject) and with this (the referenced Target) we associate one or more virtual objects created in step 2 (the Augmented Reality layer represented by a Drawables) to the Target; in other words, the Trackable2DObject links a Target in a Target Collection to a Drawables.
In practice we create a Trackable2DObject with the Tracker (first parameter, choosing one Target at a time within the Target Collection (second parameter), the Target to be tracked by the Tracker through the camera and the Drawables or the one that represents the object of the real world (third parameter), it will be projected onto the target as soon as the target is visible and detected in the scene.
Note: We indicate a Drawable and a Target at a time.
Conclusions
Although this is already a bit of a tired topic; since we've talked about it throughout the articles written about Android using the Wikitude SDK:
- Desarrollando aplicaciones de Realidad Aumentada con Wikitude (parte 2)
- Desarrollando aplicaciones de Realidad Aumentada con Wikitude (parte 3)
- Desarrollando aplicaciones de Realidad Aumentada con Wikitude (parte 3.2)
It is important to know what the basic process is like to enter this fascinating world of Augmented Reality; In addition to the fact that in all the previously mentioned articles we only use a Trackable2DObject; sometimes creating the doubt as to references to several Targets in the Target Collection and linking them with some Drawable resource.
Printscreen
- (1)
- (2)

- (3)
- (1)
- (2)
- (3)
CODE ON GitHub
Creating a Point of Interest with Augmented Reality in Wikitude Part 1
In the following blog posts that I will write on this subject, they will be oriented to explain and show through examples how to show Points of Interest (POI) through Augmented Reality with Wikitude?; this first entry is dedicated to introducing some key concepts and considerations about the use of location providers in Android and POIs in Wikitude.
What is a Point of Interest?
A Point of Interest is a specific place that can be registered through geographic coordinates (latitude, longitude and altitude) that is considered interesting by someone: restaurants, hotels, buildings, etc. are examples of places of interest; To create a Point of Interest (POI) in Wikitude you need at least latitude and longitude to locate a site in 2D space, but it is also possible to locate a site in 3D space using altitude.
Considerations for location providers in Android
Generally, all Android devices have at least two types of location providers:
- The well-known GPS: Which determines the location of the device through satellites.
- By mobile network and WiFi: Which locates the device through mobile phone antennas or through Wi-Fi access points.
- These services that allow obtaining the location of the device, in reality, do not return the current position of the device, but the last valid position that they have registered.
- You must enable at least one of them to be able to work with Points of Interest, go to Settings >> Access to your location, on your Android device:
- In all data providers there are margins of error, in other words; the precision varies in meters and even kilometers and this can be due to many factors, cloudy skies, a physical obstruction between the device and the satellites etc; therefore it is not a good idea if you want to locate a site that requires precision meters.
Wikitude Points of Interest Considerations
- The API that allows working with Points of Interest in Wikitude is made to be constantly updated according to the position of the device; In other words, we must constantly be loading POIs close to the position of the device, since it is possible that it moves a certain number of meters every so often, the application that we are going to design must constantly ask for the position of the device and bring the Points of Interest close to the position of the device; we will discuss this topic in greater detail in the next entry.
First steps with the Wikitude API to define a Point of Interest in the ARchitect worlds
In this section we create and display a simple POI from Wikitude's ARchitect worlds; it is not necessary to have any of the location providers enabled, as we will load dummy sites close to the device's position (which is zero if there is no valid position).
The locationChangedFn method to get the position of the device
This method is called every time there is an update on the device's position; as you can imagine, it receives four parameters:
- Latitude of the location.
- Location longitude.
- Location altitude.
- Location accuracy.
locationChanged: function locationChangedFn(lat, lon, alt, acc) {}From there, it is possible to create all the Points of Interest that we want; consulting through Web Services, HTTP, etc; for the purpose of this article we will simply create a Point of Interest close to the position of the device:
	var poiData = {
       "id": 1,
       "longitude": (lon + (Math.random() / 5 - 0.1)),
       "latitude": (lat + (Math.random() / 5 - 0.1)),
       "altitude": 100.0
    };
It may be the case that we want to load the Points of Interest only once and that it is not updated regardless of the time or distance elapsed, for this, we use a flag:
World.initiallyLoadedData
Which we will set to false once the first (and only) query to the device position is made; our code would be as follows:
locationChanged: function locationChangedFn(lat, lon, alt, acc) {
    // valido que es la primera vez que estoy recibiendo datos (lat, lon, alt, acc)
    if (!World.initiallyLoadedData) {
        var poiData = {
            "id": 1,
            "longitude": (lon + (Math.random() / 5 - 0.1)),
            "latitude": (lat + (Math.random() / 5 - 0.1)),
            "altitude": 100.0
        };
        World.loadPoisFromJsonData(poiData);
        World.initiallyLoadedData = true;// recibi datos, no me interesa actualizar los datos segun la posicion del dispositivo
    }
}
The loadPoisFromJsonData method to build and display the Point of Interest using Augmented Reality
The loadPoisFromJsonData function is used to create GeoObject objects, or Augmented Reality based objects based on position:
	loadPoisFromJsonData: function loadPoisFromJsonDataFn(poiData) {
		World.markerDrawable = new AR.ImageResource("img/marker.png");
		var markerLocation = new AR.GeoLocation(poiData.latitude, poiData.longitude, poiData.altitude);
		var markerImageDrawable = new AR.ImageDrawable(World.markerDrawable, 2.5, {
			zOrder: 0,
			opacity: 1.0
		});
		// create GeoObject
		var markerObject = new AR.GeoObject(markerLocation, {
			drawables: {
				cam: [markerImageDrawable]
			}
		});
	}
Analyzing the previous function...
We indicate the image that will work as a marker or Point of Interest:
World.markerDrawable = new AR.ImageResource("img/marker.png");We create an object with a 3D location in space based on coordinates:
var markerLocation = new AR.GeoLocation(poiData.latitude, poiData.longitude, poiData.altitude);We encapsulate the image and apply certain operations to it:
		var markerImageDrawable = new AR.ImageDrawable(World.markerDrawable, 2.5, {
			zOrder: 0,
			opacity: 1.0
		});
We create a virtual object whose position is specified via the markerLocation object:
		// create GeoObject
		var markerObject = new AR.GeoObject(markerLocation, {
			drawables: {
				cam: [markerImageDrawable]
			}
		});
More info Wikitude SDK API Reference.
Complete code:
var World = {
	initiallyLoadedData: false,
	markerDrawable: NULL,
	loadPoisFromJsonData: function loadPoisFromJsonDataFn(poiData) {
		World.markerDrawable = new AR.ImageResource("img/marker.png");
		var markerLocation = new AR.GeoLocation(poiData.latitude, poiData.longitude, poiData.altitude);
		var markerImageDrawable = new AR.ImageDrawable(World.markerDrawable, 2.5, {
			zOrder: 0,
			opacity: 1.0
		});
		var markerObject = new AR.GeoObject(markerLocation, {
			drawables: {
				cam: [markerImageDrawable]
			}
		});
	},
	locationChanged: function locationChangedFn(lat, lon, alt, acc) {
		if (!World.initiallyLoadedData) {
			var poiData = {
				"id": 1,
				"longitude": (lon + (Math.random() / 5 - 0.1)),
				"latitude": (lat + (Math.random() / 5 - 0.1)),
				"altitude": 100.0
			};
			World.loadPoisFromJsonData(poiData);
			World.initiallyLoadedData = true;
		}
	},
};
AR.context.onLocationChanged = World.locationChanged;
In the next entry we will see how to perform the first data load by obtaining the location of the device from the native Java code and calling the JavaScript (locationChangedFn) from the native Java code with Android.
Creating a Point of Interest with Augmented Reality in Wikitude Part 2
Download
This entry corresponds to the continuation of the article Creating a Point of Interest with Augmented Reality in Wikitude Part 1; in which we define what a Point of Interest or POI is, some considerations about the use of GPS on an Android device and we define part of the Architect World (JavaScript code) used to manage Points of Interest based on the location of the device.
Creation of the cross platform to show Points of Interest
Already introducing this entry, we will see how to link our Architect World (JavaScript code) with the native code (Java code) of the application to obtain and constantly update the Points of Interest according to the position of the device:
The native code (Java)
Our activity in Android will be in charge of obtaining the position of the device when a certain time has elapsed or when it has moved a certain distance; once the device's position is obtained, the activity will call a JavaScript method called locationChangedFn(lat, lon, alt, acc) that receives the user's location (latitude, longitude, altitude, and precision) as parameters.
The Architect World (JavaScript code)
Once the locationChangedFn(lat, lon, alt, acc) method is invoked, it will be in charge of invoking the necessary functions to obtain the nearby Points of Interest based on the position (longitude, latitude and altitude) of the device and rendering them on the device screen.
Architect World possibilities (JavaScript code) to get nearby Points of Interest given the position of the device
Al ser código web, existen múltiples formas en la que podemos obtener los Puntos de Interés que hayamos definidos según la posición del usuario:
We can call the architectView.callJavaScript() method to pass data models from our Java code to the JavaScript; This method allows you to create a cross platform (communicate the native code of an application -for example, the one provided in an Android activity- with the Architect World -JavaScript code-) between the native code and the web code: this.architectView.callJavascript( "newData('" +array.toString() + "');" );
function newData(jsonData){
  jsonObject = JSON.parse(jsonData);
  for(var i = 0; i < jsonObject.length; i++){
    // use jsonObject[i] data to create the AR objects for each POI
  }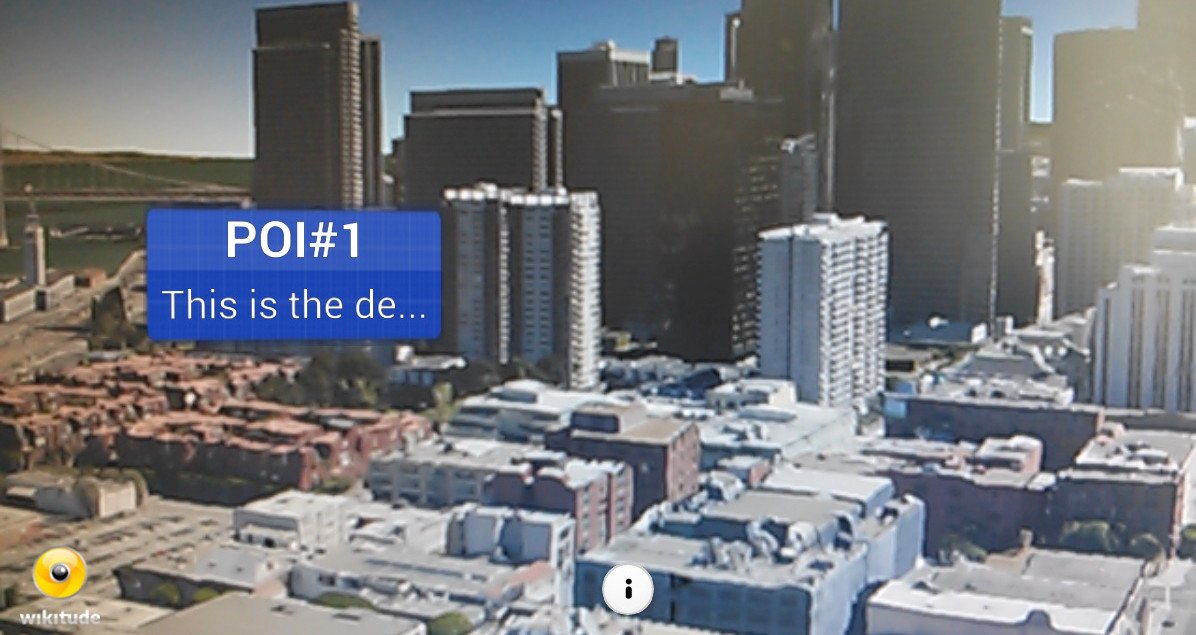
}- We can also load POIs from a local resource as a separate file or some data structure like an Array: var myJsonData = [{ "id": "1", "longitude": "13.0833", "latitude": " 47.75", "description": "This is the description of POI#1", "altitude": "100.0", "name": "POI#1"}, {...}];
- Or using the Web Services following a format like the following: var ServerInformation = { // sample service returning dummy POIs POIDATA_SERVER: "http://example.wikitude.com/GetSamplePois/", POIDATA_SERVER_ARG_LAT: "lat", POIDATA_SERVER_ARG_LON: "lon ", POIDATA_SERVER_ARG_NR_POIS: "nrPois" };
- Of course we can use any other technology such as AJAX to obtain the Points of Interest or even generate fictitious Points of Interest close to the position obtained from the device for test cases; this last case is the one that we will use in our experiment in the next section to obtain the Points of Interest.
For more information, you can consult the official documentation RETRIEVING POI DATA
Developing the native code (Java) of the application
Now that we've cleared up some key concepts about how Wikitude works cross-platform for Points of Interest, let's start getting the location of the device.
As has been commented throughout this entry, the native code (Java) is responsible for obtaining the position of the device using GPS, the telephone network, Wi-Fi access points or some associated technology; In order to obtain the user's location, we must request the following permissions in the AndroidManifest:
<uses-permission android:name="android.permission.ACCESS_COARSE_LOCATION" />
<uses-permission android:name="android.permission.ACCESS_FINE_LOCATION" />
Once requested, we can get the last valid location of the user using the method:
getLastKnownLocation(String provider)An important point is that Android does not return the current position of the device but the last one registered; In other words, the method called getLastKnownLocation(String provider) does not return the current position, it only returns the last position that was obtained through the provider that is indicated as a parameter and this position could be obtained seconds, minutes, hours ago , days, months, etc.
Although it is possible to use a "listener event" that allows obtaining the real position of the user that can be updated according to the values of the supplier parameters through the requestLocationUpdates() method that allows obtaining the user's position updated over time; said method receives:
- Name of the location provider.
- Minimum time between given updates in milliseconds.
- Minimum distance between given updates in meter.
- Instance of a LocationListener object which will define the actions to perform when the position is updated.
Defining the listener event in our activity
The following code snippet will be used within our activity to update the user's position:
		LocationListener locationListener = new LocationListener() {
			@Override
			public void onLocationChanged(Location location) {
				if (location != NULL) {
					latitude = location.getLatitude();
					longitude = location.getLongitude();
				}
				architectView.setLocation(latitude, longitude, 1f);
			}
//*** otras validaciones del evento escuchador
Once the "listener event" has been instantiated, we indicate which location services we will use; GPS:
locationManager.isProviderEnabled(LocationManager.GPS_PROVIDER)And the telephone network with Wi-Fi access points:
locationManager.isProviderEnabled(LocationManager.NETWORK_PROVIDER)At the same time, we indicate how often and how often we want the position to be updated:
		locationManager.requestLocationUpdates(
					LocationManager.NETWORK_PROVIDER, 80000, 0,
					locationListener);
Finally, we return the position:
Location location = locationManager .getLastKnownLocation(LocationManager.NETWORK_PROVIDER); if (location != NULL) { latitude = location.getLatitude(); longitude = location.getLongitude(); }The versatility of this technology is that we can load only the Points of Interest close to the position of the device based on a range; Points of Interest could be updated according to the position of the device.
The rest of the body of the activity is exactly the same used in previous posts about Wikitude; as for the Architect World or JavaScript code, it is exactly the same as explained in detail in part one of the previous entry.
When executing the application you will be able to realize that it paints a simple POI:

Continued use of POIs with Wikitude
In the following entries we will see how to paint multiple Points of Interest and interact with them; you can download the complete code of the application in our GitHub repository.
First steps with Wikitude on Android (part 1)
Getting Started with Wikitude for Android: Installing the SDK and Getting Started with Image Recognition
Github
It explains how to create an application for image recognition together with augmented reality using the Wikitude native SDK for Android

Getting Started with Wikitude for Android: Installing the SDK and Getting Started with Image Recognition
Continuar leyendo

First steps with Wikitude on Android (part 1)
Continuar leyendo

Creating a Point of Interest with Augmented Reality in Wikitude Part 2
Continuar leyendo
Creating a Point of Interest with Augmented Reality in Wikitude Part 1
Continuar leyendo

How to recognize multiple Targets with the Tracker in Wikitude?
Continuar leyendo
Developing Augmented Reality applications with Wikitude (part 3.2)
Continuar leyendo
Points of Interest (POI) with Augmented Reality at Wikitude
Continuar leyendo
Developing Augmented Reality applications with Wikitude (part 3)
Continuar leyendo
Target Collection and the ARchitect World in the cloud with Wikitude
Continuar leyendo

SDUs measures at Wikitude
Continuar leyendo
And the entry before this; in this post we will see how to create an application that uses the Wikitude naiva SDK for Android and uses image recognition to (excuse the redundancy) recognize an image and display a frame around it.
In those days when there was the famous Eclipse with the ADT plugin, since then several things have changed, many versions of Android have passed, several of the Wikitude SDK up to version 8, which is the current one, and they have even extended their SDK to create a native one for Android.
The native SDK and the web/JavaScript SDK
Let's remember that for previous versions only a kind of hybrid SDK was available where part of the SDK was native (the use of the camera and initial configuration), but the strength of image recognition, use of POIs or Points of Interest, interaction with the user, connecting to other APIs to fetch or send data, and more, was done using JavaScript; In my humble opinion, this scheme seems excellent since it greatly facilitates the app creation process, we can work largely with libraries and other web functionalities that from Android would make us spend more work because of how it is prepared.
However, the Achilles heel of this functionality is that the interfaces, being webs, are not up to the standard of native Android development; for this, Wikitude created a native version for Android parallel to the JavaScript one that we can use according to our needs:
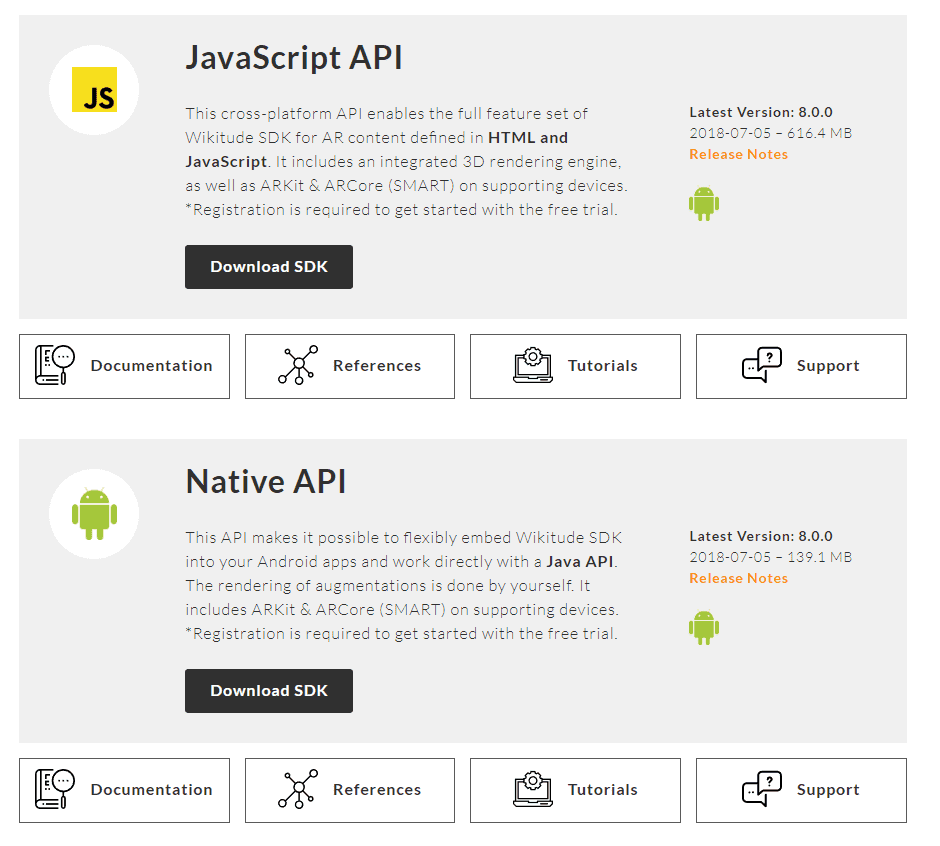
The Wikitude SDKs for Android and others can be downloaded from the following official link:
Wikitude SDK para Of course, developing with the native SDK can be more complex than with the web SDK, but it all depends on the advantages that we see between one and the other when carrying out a project.
In this post, we will focus on taking the first steps with the development of a simple application for image recognition, for this we will make use of the official examples almost in their entirety, but the idea of this post is to narrate how I developed and tested these examples in a cleaner way, explain how it works and how we can help each other with the documentation.Android
Installing the native SDK
The first thing to do is download the native Wikitude SDK for Android; for this you can download it from the download section:
Wikitude SDK para Android
You probably have to register, accept some conditions etc; once downloaded, you unzip them and we will have in the path:
WikitudeSDK_NativeAPI_Android_8-X-X_XXXX-XX-XX_XX-XX-XX\Library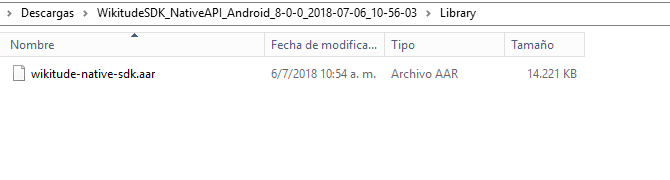
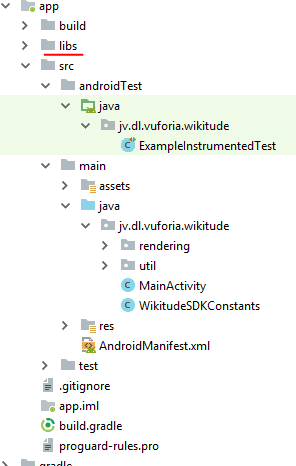
This Wikitude library or SDK that we will install in our Android Studio; the process consists of copying the library in the Android libs folder:
And then follow the steps that are narrated in the official documentation:
Setup Guide Android
It basically consists of adding the dependencies in our Android Gradle:
android {
    ...
}
dependencies {
    implementation fileTree(dir: 'libs', include: ['*.jar'])
    implementation (name: 'wikitude-native-sdk', ext:'aar')
    implementation "com.google.ar:core:1.1.0"
    ...
}
repositories {
    flatDir{
        dirs 'libs'
    }
}
And in requesting the permissions in our Android Manifest:
<uses-permission android:name="android.permission.CAMERA" />
<uses-permission android:name="android.permission.WRITE_EXTERNAL_STORAGE" />
<uses-permission android:name="android.permission.INTERNET" />
<uses-feature android:glEsVersion="0x00020000" android:required="true" />
<uses-feature android:name="android.hardware.camera" android:required="true" />
Place these attributes in the activity that uses augmented reality, which in our example is our MainActivity:
android:configChanges="orientation|keyboardHidden|screenSize"Remaining our MainActivity which is the one that will show the augmented reality through the camera and the screen of the device in the following way:
<activity
   android:name=".MainActivity"
   android:configChanges="orientation|keyboardHidden|screenSize">
Once this is done, our project should compile without a problem, even though we haven't developed anything yet.
Getting Started with WIkitude Image Recognition
As we mentioned before, we are going to make use of the examples that Wikitude offers, and that come in the zip that we downloaded and unzipped before:
WikitudeSDK_NativeAPI_Android_8-X-X_XXXX-XX-XX_XX-XX-XX\Library\app\src\main\java\com\wikitude\samples\tracking\image\SimpleImageTrackingActivity.java
In the official documentation we can be guided by these links that explain a step by step to a certain point:
Simple Image Tracking Android
He tells us a few steps that consist of implementing some classes of the Wikitude SDK:
public class MainActivity extends Activity implements ImageTrackerListener, ExternalRendering {...}It tells us that in our OnCreate, which is the initial method in our life cycle of an Android application, we make the application configurations, creating the WikitudeSDK object with which we make the configurations to indicate the license that we downloaded from the previous point, the camera that we are going to use, if the front or the back, the resolution, and then we create an instance of the Wikitude SDK with the configured parameters:
wikitudeSDK.onCreate(getApplicationContext(), this, startupConfiguration);Creando el TargetCollection
The next step is to create the TargetCollection that we have already talked about in a previous post:
Target Collection y el ARchitect World en la nube con Wikitude
Using the native Wikitude API, to reference the TargetCollection we do:
targetCollectionResource = wikitudeSDK.getTrackerManager().createTargetCollectionResource("file:///android_asset/magazine.wtc");The android_asset path refers to the assets directory of our project that we can create from Android Studio:
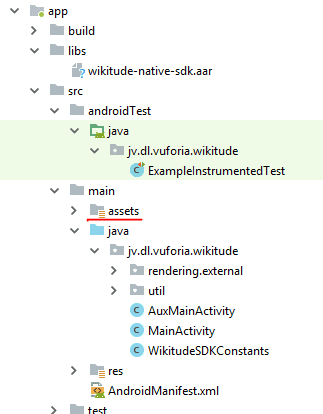
We also add or rather override some of the methods of the class that we are implementing:
@Override
public void onTargetsLoaded(ImageTracker tracker) {
    Log.v(TAG, "Image tracker loaded");
}
@Override
public void onErrorLoadingTargets(ImageTracker tracker, WikitudeError error) {
    Log.v(TAG, "Unable to load image tracker. Reason: " + error.getMessage());
}
@Override
public void onImageRecognized(ImageTracker tracker, final ImageTarget target) {
    Log.v(TAG, "Recognized target " + target.getName());
    StrokedRectangle strokedRectangle = new StrokedRectangle(StrokedRectangle.Type.STANDARD);
    glRenderer.setRenderablesForKey(target.getName() + target.getUniqueId(), strokedRectangle, NULL);
}
@Override
public void onImageTracked(ImageTracker tracker, final ImageTarget target) {
    StrokedRectangle strokedRectangle = (StrokedRectangle)glRenderer.getRenderableForKey(target.getName() + target.getUniqueId());
    if (strokedRectangle != NULL) {
        strokedRectangle.projectionMatrix = target.getProjectionMatrix();
        strokedRectangle.viewMatrix = target.getViewMatrix();
        strokedRectangle.setXScale(target.getTargetScale().getX());
        strokedRectangle.setYScale(target.getTargetScale().getY());
    }
}
@Override
public void onImageLost(ImageTracker tracker, final ImageTarget target) {
    Log.v(TAG, "Lost target " + target.getName());
    glRenderer.removeRenderablesForKey(target.getName() + target.getUniqueId());
}
And the next method, which is very important, allows you to mirror the content of the camera on the screen; in other words: render the camera content on the screen and enable Augmented Reality:
@Override
public void onRenderExtensionCreated(final RenderExtension renderExtension) {
    glRenderer = new GLRenderer(renderExtension);
    view = new CustomSurfaceView(getApplicationContext(), glRenderer);
    driver = new Driver(view, 30);
    setContentView(view);
}
Here, as we can see, things get a bit complicated since we make use of other classes and methods that suddenly appeared in the documentation; The most important thing here is to keep in mind the methods autogenerated by the Wikitude API that are practically self-explanatory with their name, but even so, we are going to define them a bit below:
Now with this help, the best we can do is go through method by method and analyze what it is doing.
onCreate method
In the onCreate method, the next thing we do is request permission to use the camera, and this is typical of Android since version 6, if the request is rejected, then there is nothing to do, since the augmented reality of Wikitude and less recognize images.
Next step these lines of code that are optional:
dropDownAlert = new DropDownAlert(this);
dropDownAlert.setText("Scan Target #1 (surfer):");
dropDownAlert.addImages("surfer.png");
dropDownAlert.setTextWeight(0.5f);
dropDownAlert.show();
What you do is paint a rectangle at the top of the screen:

In the onResume, onPause and onDestroy methods, what we do is control the life cycle of the application and some components that are essential for it to work and not give us an unexpected error when the application goes from one state to another and can be destroyed correctly. .
Types of rendering: External and Internal
We have two types of rendering, the internal and the external and this is what paints enables the camera on the screen (note that now we do not use a special layout that functioned as a mirror between the camera and the screen as it is done in the web version) .
The onRenderExtensionCreated method is defined with the external rendering since we are passing our OpenGL parameter at 30 frames per second.
And at this point is where the magic happens, where Wikitude shows or mirrors the content of the camera on the device screen and enables all the Wikitude SDK at our disposal (Image Recognition, Points of Interest, and augmented reality in general).
GLRenderer class
In general, we don't have to analyze these classes much, knowing that it is the one that builds the view surface or SurfaceView is enough for us to work with it; it is responsible for building the view according to the size of the screen.
GLRenderer implements a couple of classes, the first of which is GLSurfaceView.Renderer that uses the OpenGL library that allows for 2D and 3D graphics and interfaces; Now with this you can assume that these graphics in Wikitude refer to the lens (the screen) that reflects the content sent by the device's camera.
How does Wikitude communicate with this GLSurfaceView.Renderer interface
Well, for that, Wikitude has its own interface called RenderExtension which is initialized in the GLRenderer method as a parameter generated in the overridden method in the main activity called onRenderExtensionCreated; It's that easy, even if it sounds a bit complicated; This RenderExtension interface was created specifically for external rendering of the Wikitude SDK.
The useSeparatedRenderAndLogicUpdates method works in conjunction with the onDrawFrame method to allow the rendering of the application to be updated.
The onSurfaceCreated, onSurfaceChanged and onDrawFrame methods are methods provided by the same GLRenderer interface that are responsible for making changes to the screen and drawing each frame, making changes every time there is an update, etc; With this you see that it is important to make the corresponding calls in the onPause and onDestroy of the activity.
The GLES20 class together with the methods it invokes is simply in charge of cleaning up the buffer; since this is something quite internal to OpenGL that again it is not necessary to work with it to exploit the basic functionalities of the core of the Wikitude SDK.
The rest we see is simply how the Wikitude SDK communicates with the methods provided in OpenGL and works correctly; without any of this, it will not be possible for Wikitude to render the camera frames on the screen, in other words, we would have a blank, black screen or simply the app does not work; it defines through CameraManager.FovChangedListener the onFovChanged method that we see at the end of the code.
The CameraManager interface is provided by Wikitude and allows you to control the camera, which is the input of augmented reality that makes it possible for everything else to work correctly.
Here are some interesting links to the official documentation:
- GLSurfaceView.Renderer
- Wikitude: Rendering
CustomSurfaceView class: builds the view to embed in the activity
The other class that we use in the onRenderExtensionCreated method is the CustomSurfaceView that we pass an instance of the glRenderer class that we explained in the previous section; This CustomSurfaceView class extends the GLSurfaceView class that provides a surface to display an OpenGl rendering (which is what we generated in the previous point), that is, in a class the glRenderer generates the rendering that we want to show through OpenGL and WIkitude and in this class we simply generate the surface with this content and embed it in the activity as if it were a view:
customSurfaceView = new CustomSurfaceView(getApplicationContext(), glRenderer);
***
setContentView(customSurfaceView);
This class in short, what you do is create a context to render and on this a surface to draw using the "EGL rendering context"; already here are two big factors at play that do everything for us OpenGL-Android and Wikitude.
- GLSurfaceView
- What is a rendering context? what is EGL?
Here in these last points we see the Achilles heel of the native Wikitude API for Android, and that is that some components are more complex like the ones we saw, something that we don't have to deal with in the Wikitude web or JavaScript API for Android .
StrokedRectangle class: Paint frame of recognized target
This class is called from the MainActivity of our activity through the onImageTracked method that obtains the dimensions and position of the recognized object and in the onImageRecognize method that draws the corresponding rectangle on the recognized image (besides this method allows us to obtain the name of the target recognized via target.getName()).
This class draws the rectangle in the onDrawFrame() function of that class; all this is using the OpenGL API which is not the point of interest of this post.
- Interface ImageTarget
You can consult the complete code in the download links located at the beginning and end of this augmented reality tutorial with Wikitude native SDK and Android; Remember to copy the rendering directory into your application package with its content:
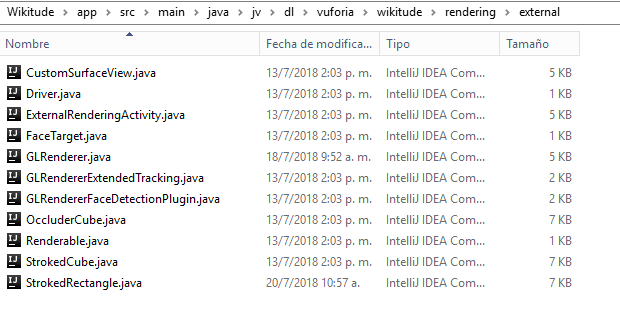
Finally, when running the application and positioning the camera on the next photo; We see that the Wikitude SDK recognizes this image and places a rectangle around it:
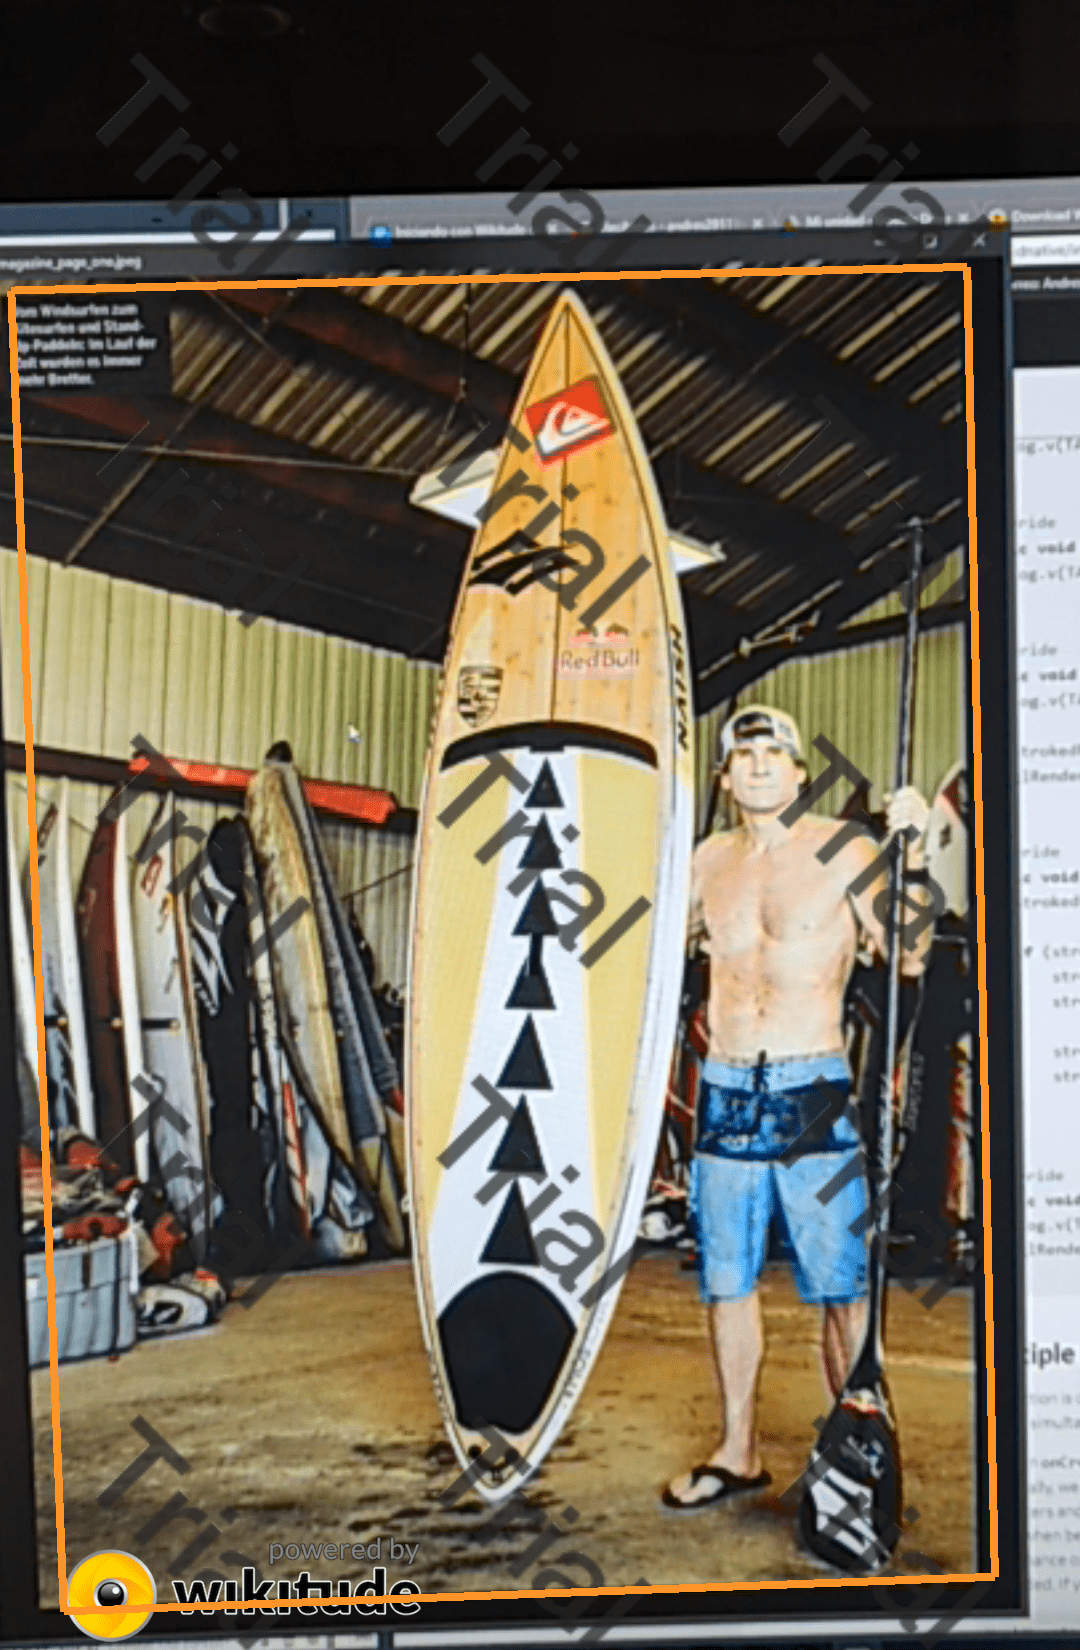
Github