Content Index
This setup implements classic platformer game behavior: when an enemy hits the player, the player is pushed back a short distance. In Unreal Engine 5, this is achieved using the Launch Character node inside a Blueprint, and the result is immediate both in terms of gameplay and the feel of impact.
1. Why Do You Need Knockback?
Player knockback —known in the industry as knockback— is not just a nice visual effect, but a fundamental gameplay mechanic with a solid design rationale behind it:
- Avoid constant damage: The push immediately removes the player from the enemy's attack area. Without this knockback, if damage is applied by simple contact or overlap, the player could keep taking continuous hits and die in a fraction of a second, even if you have a brief period of invulnerability (iframes) active.
- Prevent getting stuck: A common issue in physics engines is that upon collision, the player's and enemy's meshes can overlap or become "interlocked" within each other, preventing the player from moving. Knockback ensures that both objects separate correctly after impact.
2. Temporary Disabling of Collisions
To prevent the meshes from getting trapped inside each other, there is a critical preliminary step you must execute before applying the force:
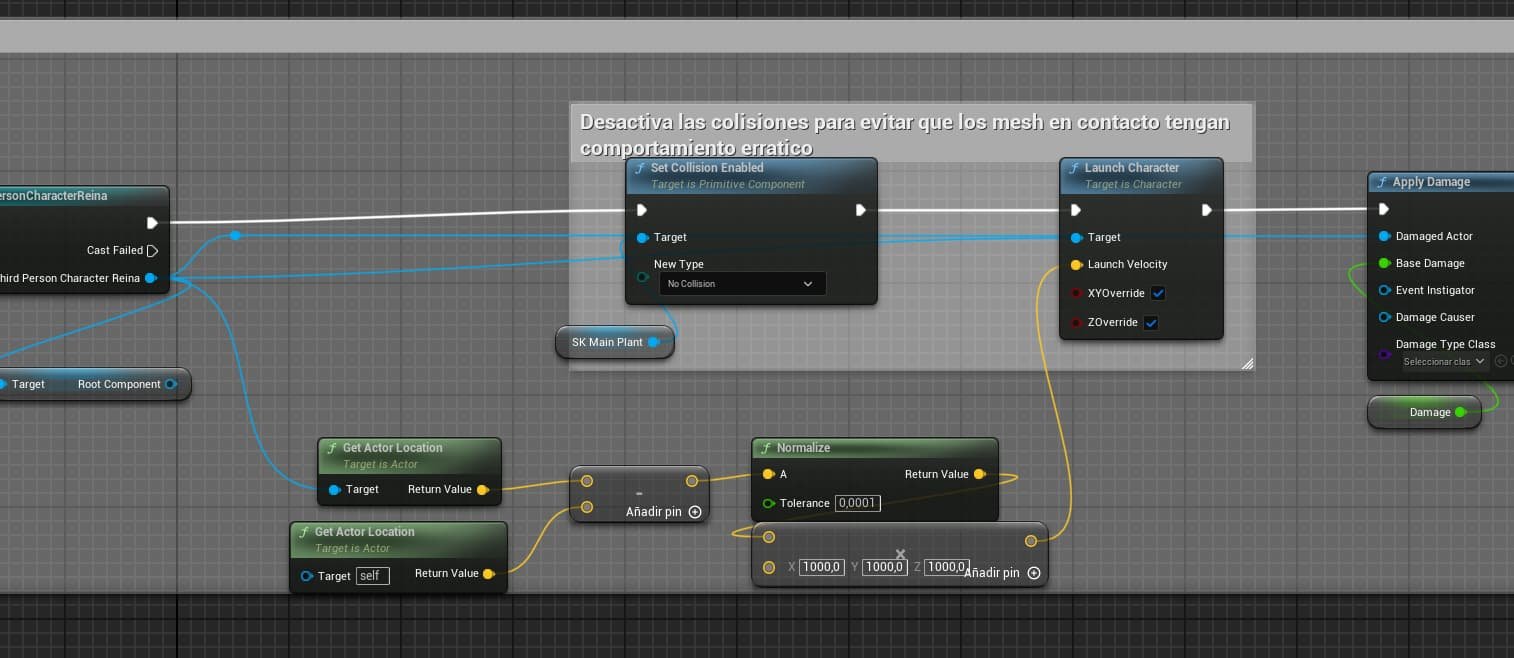
- Action: Disable collisions for the enemy's
Mesh(in this case, the plant) at the exact moment the hit is detected. - How to do it: Look for the
Collisionproperty in the enemy'sStatic MeshorSkeletal Meshcomponent and set the preset toNo Collision. This makes the plant "transparent" at the physics level during the instant of impact, allowing the player to be pushed without any object getting trapped. - Important: Remember to re-enable the enemy's collisions once the attack animation has finished, or after a brief
Delayin the Blueprint, so that the enemy becomes solid again for future interactions.
3. Calculating the Knockback Vector
The most important part of the logic is calculating the exact direction of the push. The rule is simple: the player should be launched in the opposite direction of the enemy that hit them.
a. Getting the Direction Vector
- Positions: Using the
Get Actor Locationnodes, we obtain both the player's position and the enemy's (the plant's) position in the 3D world. - Vector Subtraction: We subtract the plant's position vector from the player's position vector using the vector subtraction node (
Vector - Vector):DirectionVector = PlayerPosition - PlantPosition
- The resulting vector has three components
(X, Y, Z)and points from the enemy toward the player, which is precisely the direction we want to launch them.
b. Normalization and Applying the Push
Here is the technical detail that makes all the difference. The magnitude (or length) of the resulting vector varies depending on the distance between the two actors: if the plant is farther away, the vector will be longer and the resulting launch would be unintentionally larger. This makes the behavior inconsistent and unpredictable.
- Normalization: Connect the resulting vector to the
Normalizenode. This converts the vector to a fixed length of1, preserving only the pure direction information and discarding the original magnitude.- With a normalized vector, the distance or scale of the enemy's
Meshno longer affects the result.
- With a normalized vector, the distance or scale of the enemy's
- Final Calculation: Multiply the normalized vector by a launch magnitude controlled by a
floatvariable. This defines the final strength of the knockback:FinalPush = NormalizedVector * PushMagnitude
Why is normalization critical? Without normalization, the launch force varies undesirably depending on the relative positions of the actors. By normalizing, you always work with a vector of magnitude 1 and can control the push precisely and reproducibly. For example, a value of 1800 for the vertical Z component and a lower value for horizontal knockback produce a visually convincing backward and upward jump.
4. The Launch Character Node
Once the push vector is calculated, the final step is to apply it to the player using the Launch Character node. This node is available when you have a reference to the player's Character and accepts a Launch Velocity of type Vector.
- Connect your
FinalPushto theLaunch Velocitypin of theLaunch Characternode. - The
XY Overrideparameter allows you to decide whether the push overrides the player's current horizontal movement or adds to it. In most knockback scenarios, you will want to enable it (true) for consistent results. - The
Z Overrideparameter controls the same for the vertical axis. If you want the player to jump when taking damage, enable it alongside a positive value inZ.
5. ✅ Summary: Complete Blueprint Flow
To summarize everything, the flow in your enemy's Blueprint would look like this:
- Collision or overlap with the player is detected.
- The enemy
Mesh'sCollisionis disabled →No Collisionpreset. - Both actor positions are retrieved using
Get Actor Location. - The direction vector is calculated:
PlayerPosition - PlantPosition. - The vector is normalized using the
Normalizenode. - It is multiplied by the desired magnitude:
NormalizedVector * PushMagnitude. - The result is connected to the
Launch Velocitypin of theLaunch Characternode. - After a
Delay, the enemy's collisions are re-enabled.
By following this flow, the player's launch will always maintain the same force, regardless of the exact distance or scale of the enemy. The behavior is predictable, controllable, and easy to adjust simply by tweaking the value of PushMagnitude.
And always remember to disable enemy collisions during the attack to prevent visual or physics bugs upon contact. It is a small step that saves a lot of headaches.