
Content Index
- The decision to migrate and first impressions
- Fundamental Concepts: The Beginner's Glossary
- Part 1: Environment Preparation — Before Installing
- Step 1: Create the Installation Media (Bootable USB with Rufus)
- Why is DD Mode mandatory?
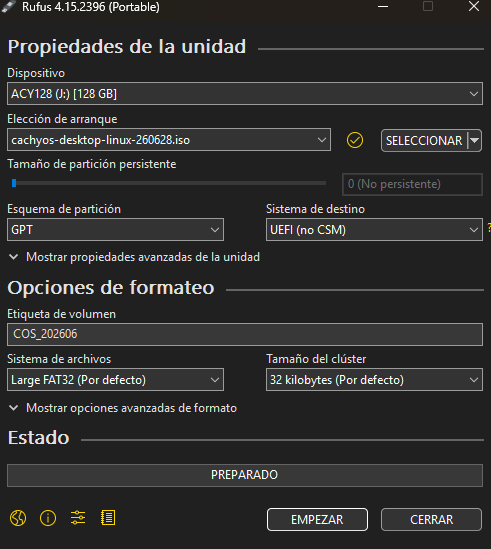
- Recommended settings in Rufus
- Step 2: Preparation from Windows — Disable Fast Startup
- How to disable Fast Startup in Windows
- Step 3: BIOS/UEFI Setup
- Step 4: Separate disk
- Step 4.5: Free up Disk Space from Windows
- Part 2: The Installation Process with Calamari
- Selecting the Bootloader
- Hide the GRUB Boot Menu
- Manual Partitioning: The Recommended Partition Table
- Storage Strategy: Primary Disk and Secondary Disk
- Part 3: Problems During Installation and Their Solutions
- Problem 1: Boost.Python Error in Calamares (SIGPIPE: 13)
- Solution: Manual disk wipe from terminal
- Problem 2: Kernel Panic when Switching from Windows to Linux (Warm Reboot)
- Why it happens
- Definitive solution: Deactivation in Windows and BIOS
- Problem 3: Authentication Failures after Installation (Password Reset)
- Step-by-step recovery protocol
- Problem 4: Corrupted GRUB
- Issue 5: SDDM (KDE Plasma Login Manager) Error with NVIDEA
- How to revive the screen right now (Without forcibly turning off)
- Part 4: Software Management — Pacman and Paru
- The Official Manager: Pacman
- The Community Assistant: Paru
- The Restaurant Analogy
- Quick Comparison Table
- Anatomy of Pacman Commands: Flags and Modifiers
- The Sync Modifier (-S)
- Update system and packages
- 404 in Arch/CachyOS
- Other Main Operations
- Common Commands Table: Ubuntu vs. CachyOS
- Part 5: Automount partitions
- 1. Identify partitions
- 2. Create the mount points
- 3. The mount instruction in /etc/fstab
- 4. Detailed explanation of the instruction
- Part 6: Essential Software Guide for Developers
- General Development Tools and Games
- Execution Environments and Languages
- Databases
- Installing and Configuring PostgreSQL with pgvector
- 1. Server Installation and Vector Extension
- 2. Data Cluster Initialization
- 3. Service Management with systemd
- 4. Creating the Environment and Credentials
- 5. Enabling the pgvector Extension
- Containers and Virtualization
- Network Tools and APIs
- Terminal and Shell
- Browsers and Communication
- Local Artificial Intelligence
- Part 7: DaVinci Resolve on CachyOS
- Option A: Native Installation with Pacman and Paru (NVIDIA Hardware)
- Problem: No audio or audio loop in DaVinci Resolve
- Special case: MP4 files with AAC audio without sound
- Option B: Installation with Distrobox (Recommended for maximum stability)
- Step 1: Create the base container
- Step 2: Resolve dependencies within the container
- Step 3: Correct binary permissions
- Step 4: NVIDIA GPU Integration (CUDA/OpenCL Acceleration)
- Silent video in Davinci on Linux
- Steps to integrate it into your system:
- How to use it?
- Other useful commands for videos
- Aspects to improve and positive points
- User experience and environment customization
- Fix libavcodec.so error in WiVRn (Arch / CachyOS)
- Why does this issue occur?
- Compiling from repository (AUR / Source)
- Steps with paru (wivrn-full-git):
- Why is compiling from source better?
- WiVRn on Meta Quest
- Gaming Performance and Development Tools
- My Reasons for Switching to Linux (CachyOS)
- Background in Using Linux
- Motivation for the Change
- Recent Problems on Windows
- The Transition Process: CachyOS and Disk Management
- Replacing Recording and Editing Software
- Hardware and Peripheral Support
- Virtual Reality (VR) and Video Codecs
- Conclusion
This article documents my experience installing and configuring CachyOS in a dual boot environment with Windows. Here you will find a step-by-step installation guide, the real problems I encountered in the process, how I solved them, the fundamental concepts and commands that every user should know, and a selection of recommended software for developers.
After a month using CachyOS as the main operating system, I want to share what I liked, what I didn't, what applications I installed, what problems I had and, fundamentally, why I decided to switch. Before this I used Windows, and I even recorded a video explaining the reasons. Many years ago I used Linux for university - going through Linux Mint, Fedora and Ubuntu - but when I installed a dedicated graphics card with the intention of gaming, Linux was not ready for the gaming sector at that time, so I stayed on Windows due to lack of time to migrate.
If you come from the world of Windows or more friendly distributions like Ubuntu, this guide is designed to make the path much shorter for you and especially if you are a developer like me and/or who likes to upload content to social networks.
I consider that the operating system is a necessary evil: what is relevant is the work applications and using the environment where they run best. Although Windows worked for me for a long time, with its latest updates it began to give me persistent problems. Sometimes the copy and paste keyboard shortcuts would suddenly stop working and require a restart. Some games on Unreal Engine began to crash and certain system-level settings, such as Flutter, became corrupted. In addition to this, the development experience with JavaScript, Node.js and PHP on Windows often presents blocks and compatibility issues.
The decision to migrate and first impressions
When evaluating migration options, I considered distributions such as Pop!_OS and Garuda Linux, but ultimately settled on CachyOS as it is one of the most recognized and optimized distributions based on Arch Linux. My main computer has a 14th generation Intel i7 processor and an NVIDIA RTX 5070 graphics card. An immediate detail after the change was thermal and acoustic management: in Windows, the CPU fan activated frequently during demanding tasks, while in CachyOS the computer remains silent most of the time.
For the transition I kept a configuration of dual boot installing CachyOS on a separate 512GB M.2 NVMe drive for the base system, reserving a secondary 2TB drive for games and models. This structure avoids the need to resize partitions or alter the Windows disk. The initial configuration of the work environment took about six hours, a time similar to that required when formatting Windows, with the difference that the installations are carried out mainly from the terminal.
Fundamental Concepts: The Beginner's Glossary
Before getting into the subject, it is important that you know the meaning of the terms that will appear throughout this article. Understanding them will save you many Google searches.
- CachyOS: An Arch Linux-based distribution highly optimized for performance. Its main differential is custom kernels and package builds optimized for specific processor architectures (x86-64-v3, v4), which results in a system noticeably faster than a standard Arch installation.
- Dual Boot: The coexistence of two operating systems—in our case, Windows and CachyOS—on the same computer. When you turn on the computer, a bootloader presents a menu to choose which system you want to boot with.
- Bootloader: The program that runs before the operating system and controls which of the installed systems will load the hardware. The most popular are GRUB and systemd-boot.
- UEFI/BIOS: The low-level motherboard firmware that initializes the hardware before the operating system. UEFI is the modern and more capable version of the old BIOS.
- EFI Partition (ESP): A small partition in FAT32 format that stores the bootloader files. In a Dual Boot, it is shared between operating systems.
- Btrfs: A modern file system for Linux with native support for transparent compression, snapshots, and data checksums. It is the default file system in CachyOS and the recommended option.
- Distrobox: A tool that allows you to create containers based on any Linux distribution within your current system, transparently. Containers share the graphics server, user folders, and hardware resources (including the GPU), making them ideal for running software designed for other distributions, such as DaVinci Resolve.
- Polkit (PolicyKit): System component responsible for managing global privileges in Unix-like systems. It is the one who controls, for example, whether a user needs to enter the password to mount an internal disk.
- AUR (Arch User Repository): The Arch Linux community repository. Contains thousands of unofficial packages—such as Google Chrome, Android Studio, or DaVinci Resolve—submitted and maintained by community users.
- Rolling Release: A distribution model where software is continually updated without fixed operating system versions. Instead of upgrading from Ubuntu 22 to 24, in Arch/CachyOS you simply upgrade whenever you want with
pacman -Syu.
Part 1: Environment Preparation — Before Installing
A successful installation of Linux in Dual Boot depends almost entirely on the previous steps. This section covers everything you need to do before from even connecting the USB.
Step 1: Create the Installation Media (Bootable USB with Rufus)
When preparing the installation USB for CachyOS with the tool Rufus, there is a critical setting that, if skipped, will result in the computer freezing on a black screen or the BIOS not recognizing the device.
Once you load the CachyOS ISO file into Rufus and press "Begin", the application will display a pop-up window asking for the writing method. This is where you must select the DD Mode (Disk/Drive Image):
  [ ] Escribir en modo Imagen ISO (Recomendado)
  [x] Escribir en modo Imagen DD
Why is DD Mode mandatory?
Arch Linux-based distributions use a hybrid file system and a very specific partitioning scheme in their installers. If traditional ISO mode is used, Rufus will attempt to decompress and interpret the boot files to fit its own structure, corrupting the native paths that the installer needs to work.
He DD mode it deactivates any alteration by Rufus and turns it into a pure cloner: it makes a bit-by-bit copy of the ISO directly on the USB memory, guaranteeing:
- Absolute data integrity: Without risk of alteration in the critical paths of the boot system.
- Real UEFI Compatibility: The boot partition designed by the CachyOS team is carried over intact, ensuring that it is detected correctly by the motherboard.
- Guaranteed boot: Incorrect loading loops and read errors on modern systems are completely eliminated.
Recommended settings in Rufus
- Device: Select the destination USB drive (minimum 8 GB capacity).
- Boot choice: Point to the official CachyOS ISO file.
- Partition scheme: Select GPT — mandatory requirement for modern motherboards and Dual Boot environments.
- Target system: Set the option to UEFI (not CSM).
- File system: You can leave it at FAT32; DD mode will restructure the format internally.
Alternatives to Rufus: If the USB device has inconsistencies or if you are on Mac/Linux, you can use BalenaEtcher either Ventoy. Both tools operate under direct copy logic and eliminate operational incompatibilities.
Step 2: Preparation from Windows — Disable Fast Startup
This is the step that most users skip and that causes the most problems in the long term in Dual Boot environments. When the characteristic of Quick Start is enabled, Windows does not perform a complete hardware shutdown. Instead, it freezes the system's kernel state and locks storage volumes in a hibernate file to speed up the next power-on.
This hibernation state locks the disks under a usage marker (known as "dirty bit"). When Linux attempts to access or write to the disks during installation or on future boots, it will block access in read-only mode or prevent mounting of the drives altogether. This can lead to data loss and Kernel Panics when changing systems.
How to disable Fast Startup in Windows
- Access the start menu, search Control Panel and open it.
- Navigate to Hardware and sound → Power options.
- In the left side panel, click "Choose the behavior of the power buttons".
- Advanced parameters are protected. Click on the link with the security shield: "Change settings currently not available".
- In the section Shutdown Settings, uncheck the box "Enable fast startup (recommended)".
- Click Save changes and shut down the system completely (don't reboot, shut down).
Step 3: BIOS/UEFI Setup
Before booting from USB, you need to configure some parameters in the motherboard firmware. Access the BIOS when you turn on the computer by pressing the corresponding key (on motherboards ASUS it usually is Supr either F2; in MSI, Supr; in Gigabyte, F2 either Supr).
- Disable Secure Boot: Some custom CachyOS kernels are not digitally signed under the Microsoft standard, so Secure Boot will reject them. Find the option in the "Boot" or "Security" tab and change it to Disabled.
- Disable Fast Boot in BIOS: In addition to disabling it in Windows, you must also do it at the firmware level. Look for the option Fast Boot in the boot tab and put it on Disabled. This ensures that the hardware is initialized cleanly on each boot, avoiding conflicts with the Linux kernel.
- Ensure AHCI mode: Verify that the storage controller mode is set to AHCI and not in RAID or IDE mode.
- Set boot order: Set USB as the first boot option to start the installer.
Step 4: Separate disk
The recommended way so that you do NOT complicate the installation is to have a SEPARATE disk on which to have available to install CachyOS or your Linux distro, it MUST be clean or at least keep in mind that this data is going to be lost, so you must make a backup copy of the files.
Step 4.5: Free up Disk Space from Windows
To install CachyOS alongside Windows, you need unallocated space on your drive. The safest way to create it is using the native Windows tool:
- Right click on the Windows icon → Disk management.
- Right click on your main partition (usually
C:) and select "Reduce volume...". - Enter the amount of MB you want to free up. A minimum of 50,000 MB (50 GB), with 100 GB or more being ideal for a development system.
- Confirm the operation. The freed space will appear as "Unallocated" in black.
You can skip this step if you have already completed Step 4.
Part 2: The Installation Process with Calamari
Once you have prepared everything in the previous section, connect the USB and turn on the device. The system will boot directly into the CachyOS live desktop. From here, launch the installation wizard by clicking CachyOS Hello → "Run installer".
Selecting the Bootloader
One of the first decisions the wizard will ask you is to choose the bootloader. You have two main options:
- GRUB (Grand Unified Bootloader): It is the classic industry standard. Its great advantage for Dual Boot is the tool
os-prober, which automatically detects Windows installations on other volumes and generates a clean selection menu every time you turn on your computer. It is the recommended option for beginners and for setups with multiple operating systems. - systemd-boot: The modern and minimalist alternative. It boots the system a few seconds faster as it lacks complex scripts, but requires more detailed manual configuration for Dual Boot environments. Recommended for advanced users with pure UEFI installations.
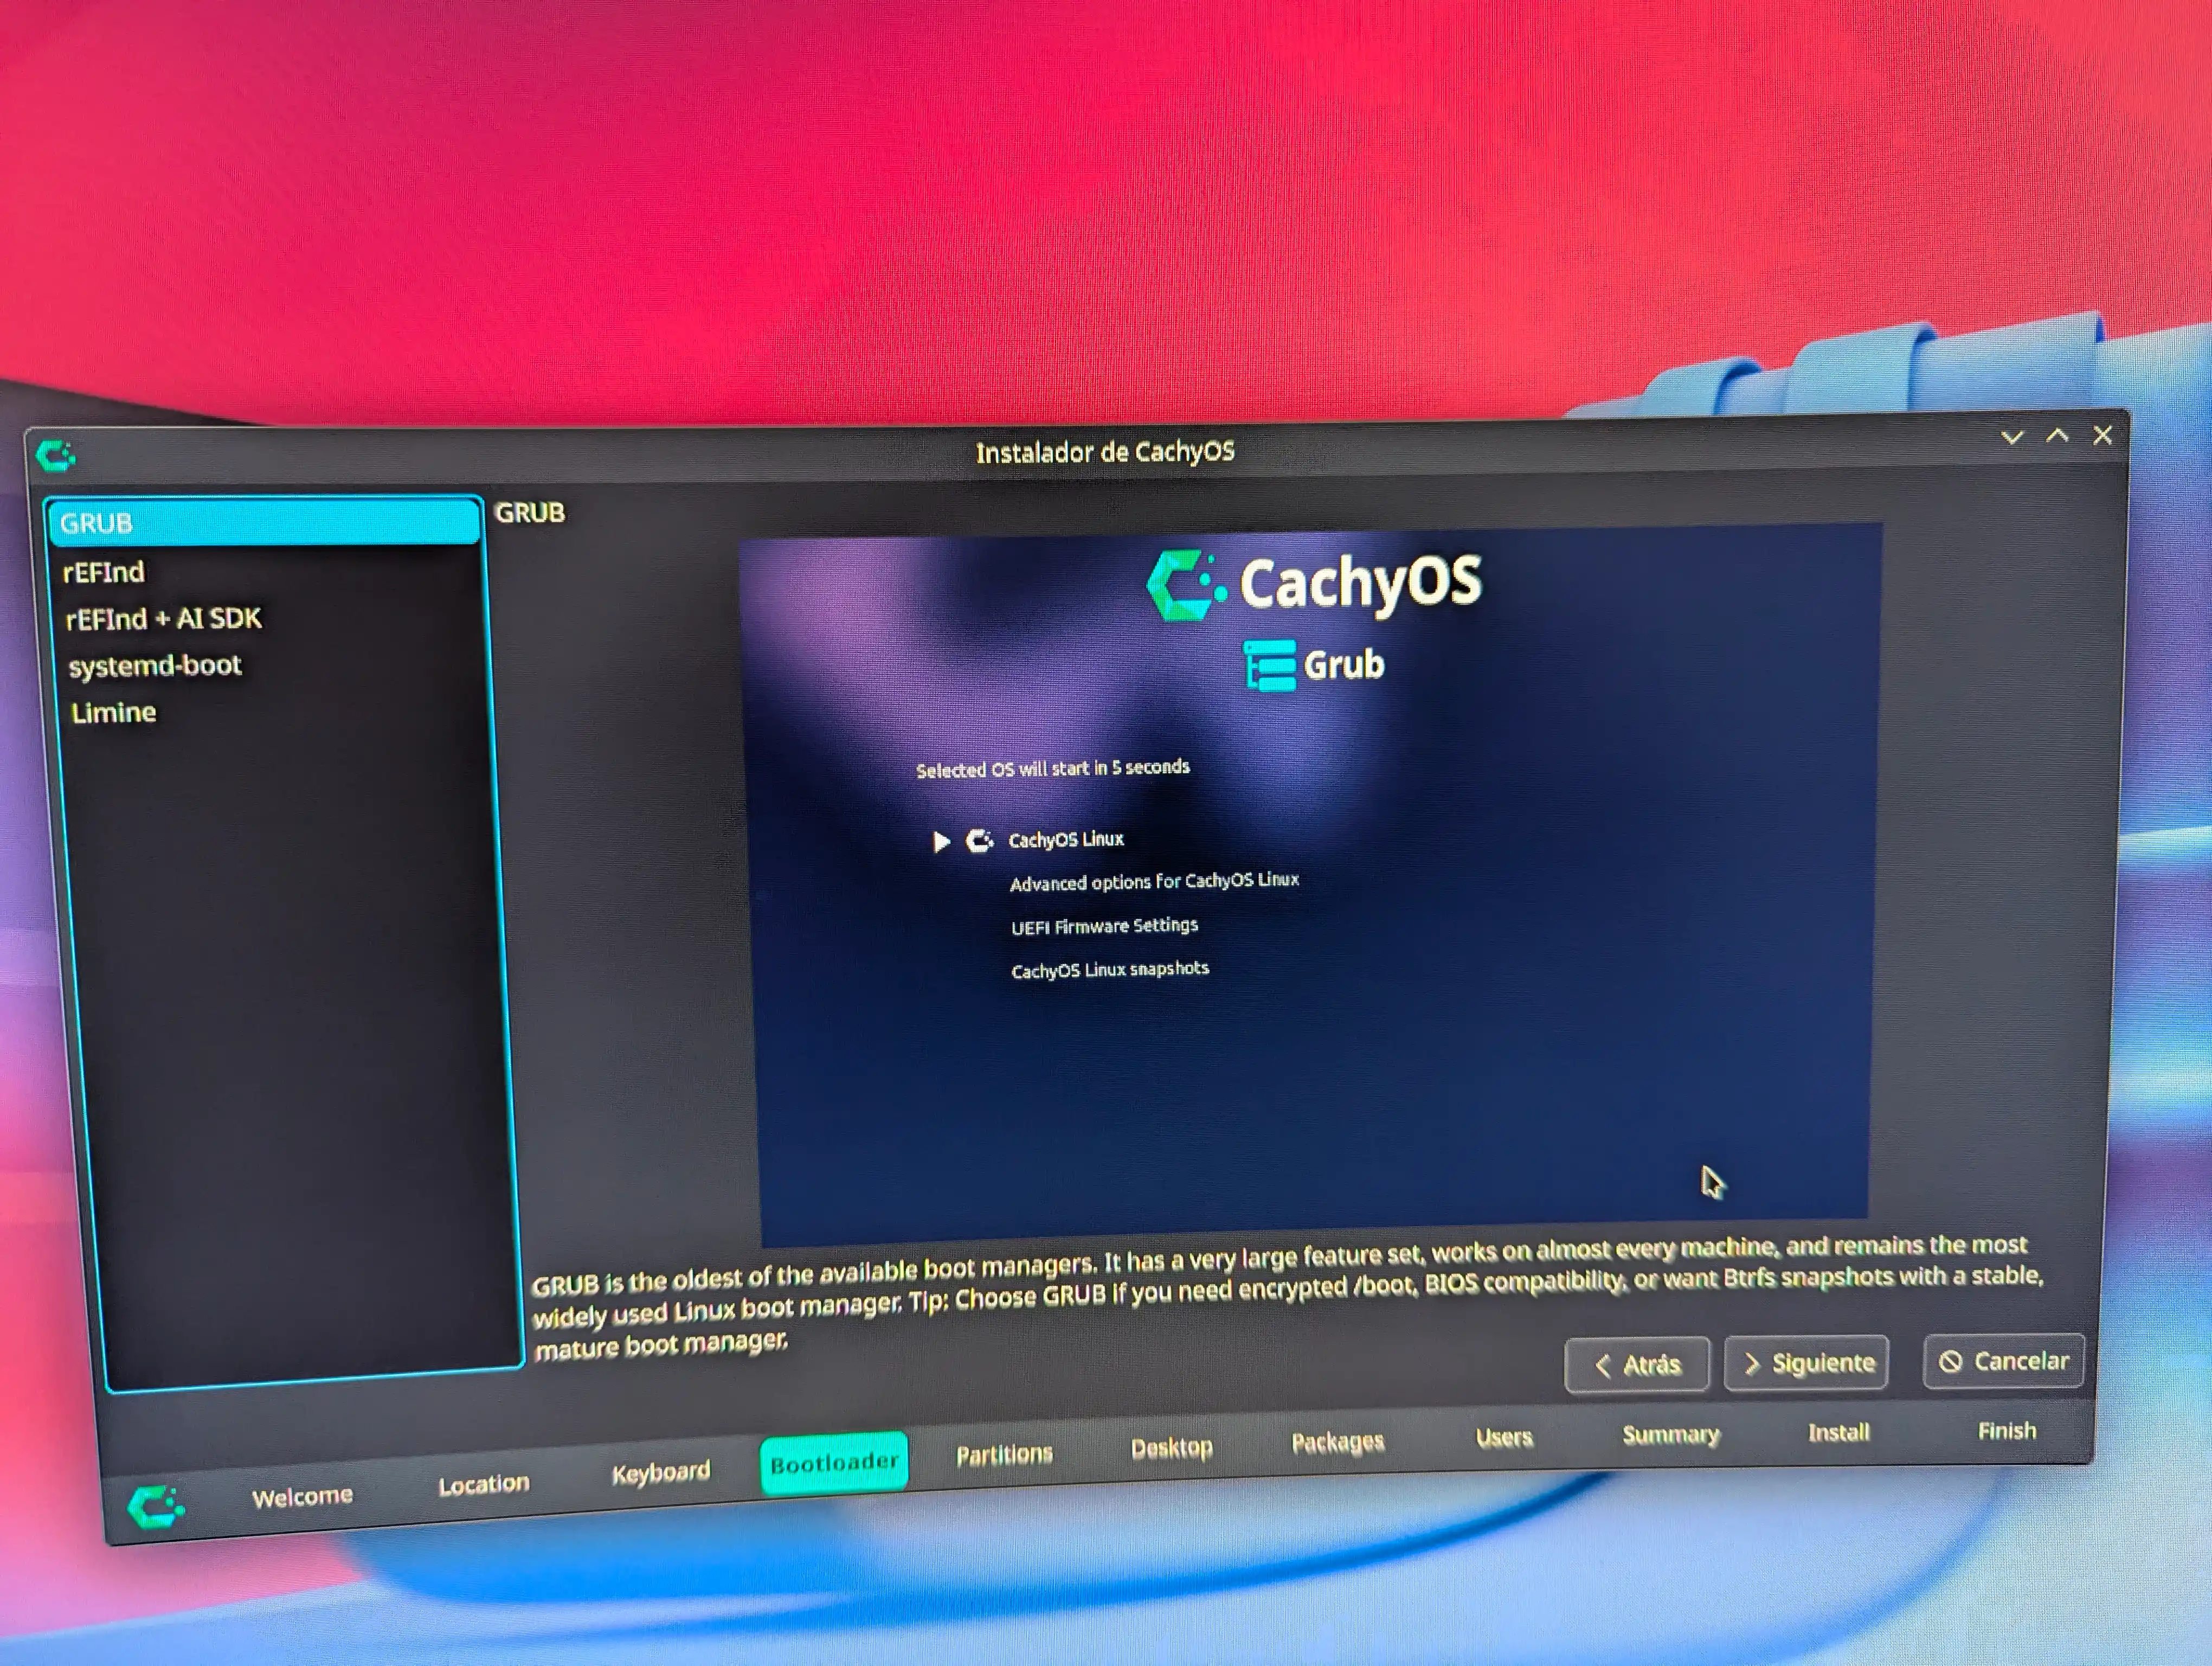
Recommendation: If this is your first time installing Linux alongside Windows, keep the selection on GRUB. It will save you a lot of headaches.
Hide the GRUB Boot Menu
In my case, I left Windows IN CASE I NEED IT, since, at least in my case, I can do EVERYTHING I did in Windows in CachyOS, therefore, if at some point you get bored and DO NOT want to use GRUB anymore, you can safely disable it as follows:
To hide the GRUB menu, simply set the following options as indicated in the Wiki:
/etc/default/grub
GRUB_TIMEOUT='0'
GRUB_TIMEOUT_STYLE=hidden
Press ESC to access the GRUB terminal. From here, run normal or exit to return to the familiar GRUB boot menu.
And of course, what you are doing is hiding it and at any time you can reset it, in the same way, you can enter Windows from the BIOS, selecting the Windows disk to boot.
Manual Partitioning: The Recommended Partition Table
In the partitioning section of the Calamares installer, select the option Manual Partitioning to have full control, although, IT IS RECOMMENDED THAT YOU INSTALL IT ON AN EXCLUSIVE DISK FOR LINUX AND LEAVE THE DEFAULT CONFIGURATION. The recommended scheme is the following:
| Mounting Point | File System | Recommended Size | Indicators (Flags) | Grades |
|---|---|---|---|---|
/boot/efi | FAT32 | Use existing Windows EFI partition (DO NOT format!) | boot, esp | If installing to a completely new disk, create a 512 MB to 1 GB disk. |
/ (Root) | Btrfs (recommended) or XFS | Minimum 50 GB. Use all available unallocated space. | root | Btrfs is the default for CachyOS and offers transparent compression and snapshots. |
Critical warning about EFI partition: If your computer already has Windows installed, there will be an EFI partition (usually 100 MB to 512 MB). You must select it as mount point
/boot/efiwithout checking the formatting box. If you format it, you will erase the Windows bootloader and will need to repair it manually.
Storage Strategy: Primary Disk and Secondary Disk
If your computer has multiple storage units, the most efficient strategy is to assign differentiated functions to maximize performance:
| Storage Unit | Recommended Function |
|---|---|
| Primary NVMe SSD (e.g. 512GB) | CachyOS base system: system binaries, kernel libraries, critical applications. High-speed NVMe access ensures ultra-fast startups and smooth applications. |
| Secondary SSD/HDD (e.g. 2TB) | Mass storage: development projects, local Git repositories, Artificial Intelligence models (Ollama), multimedia files for editing, Steam video game library. |
Important safety note: Do not configure the secondary drive during the installation wizard. Complete the base installation on your primary disk first. Once you have the CachyOS desktop running, format and configure the secondary disk from the graphical environment or terminal in a controlled and safe way.
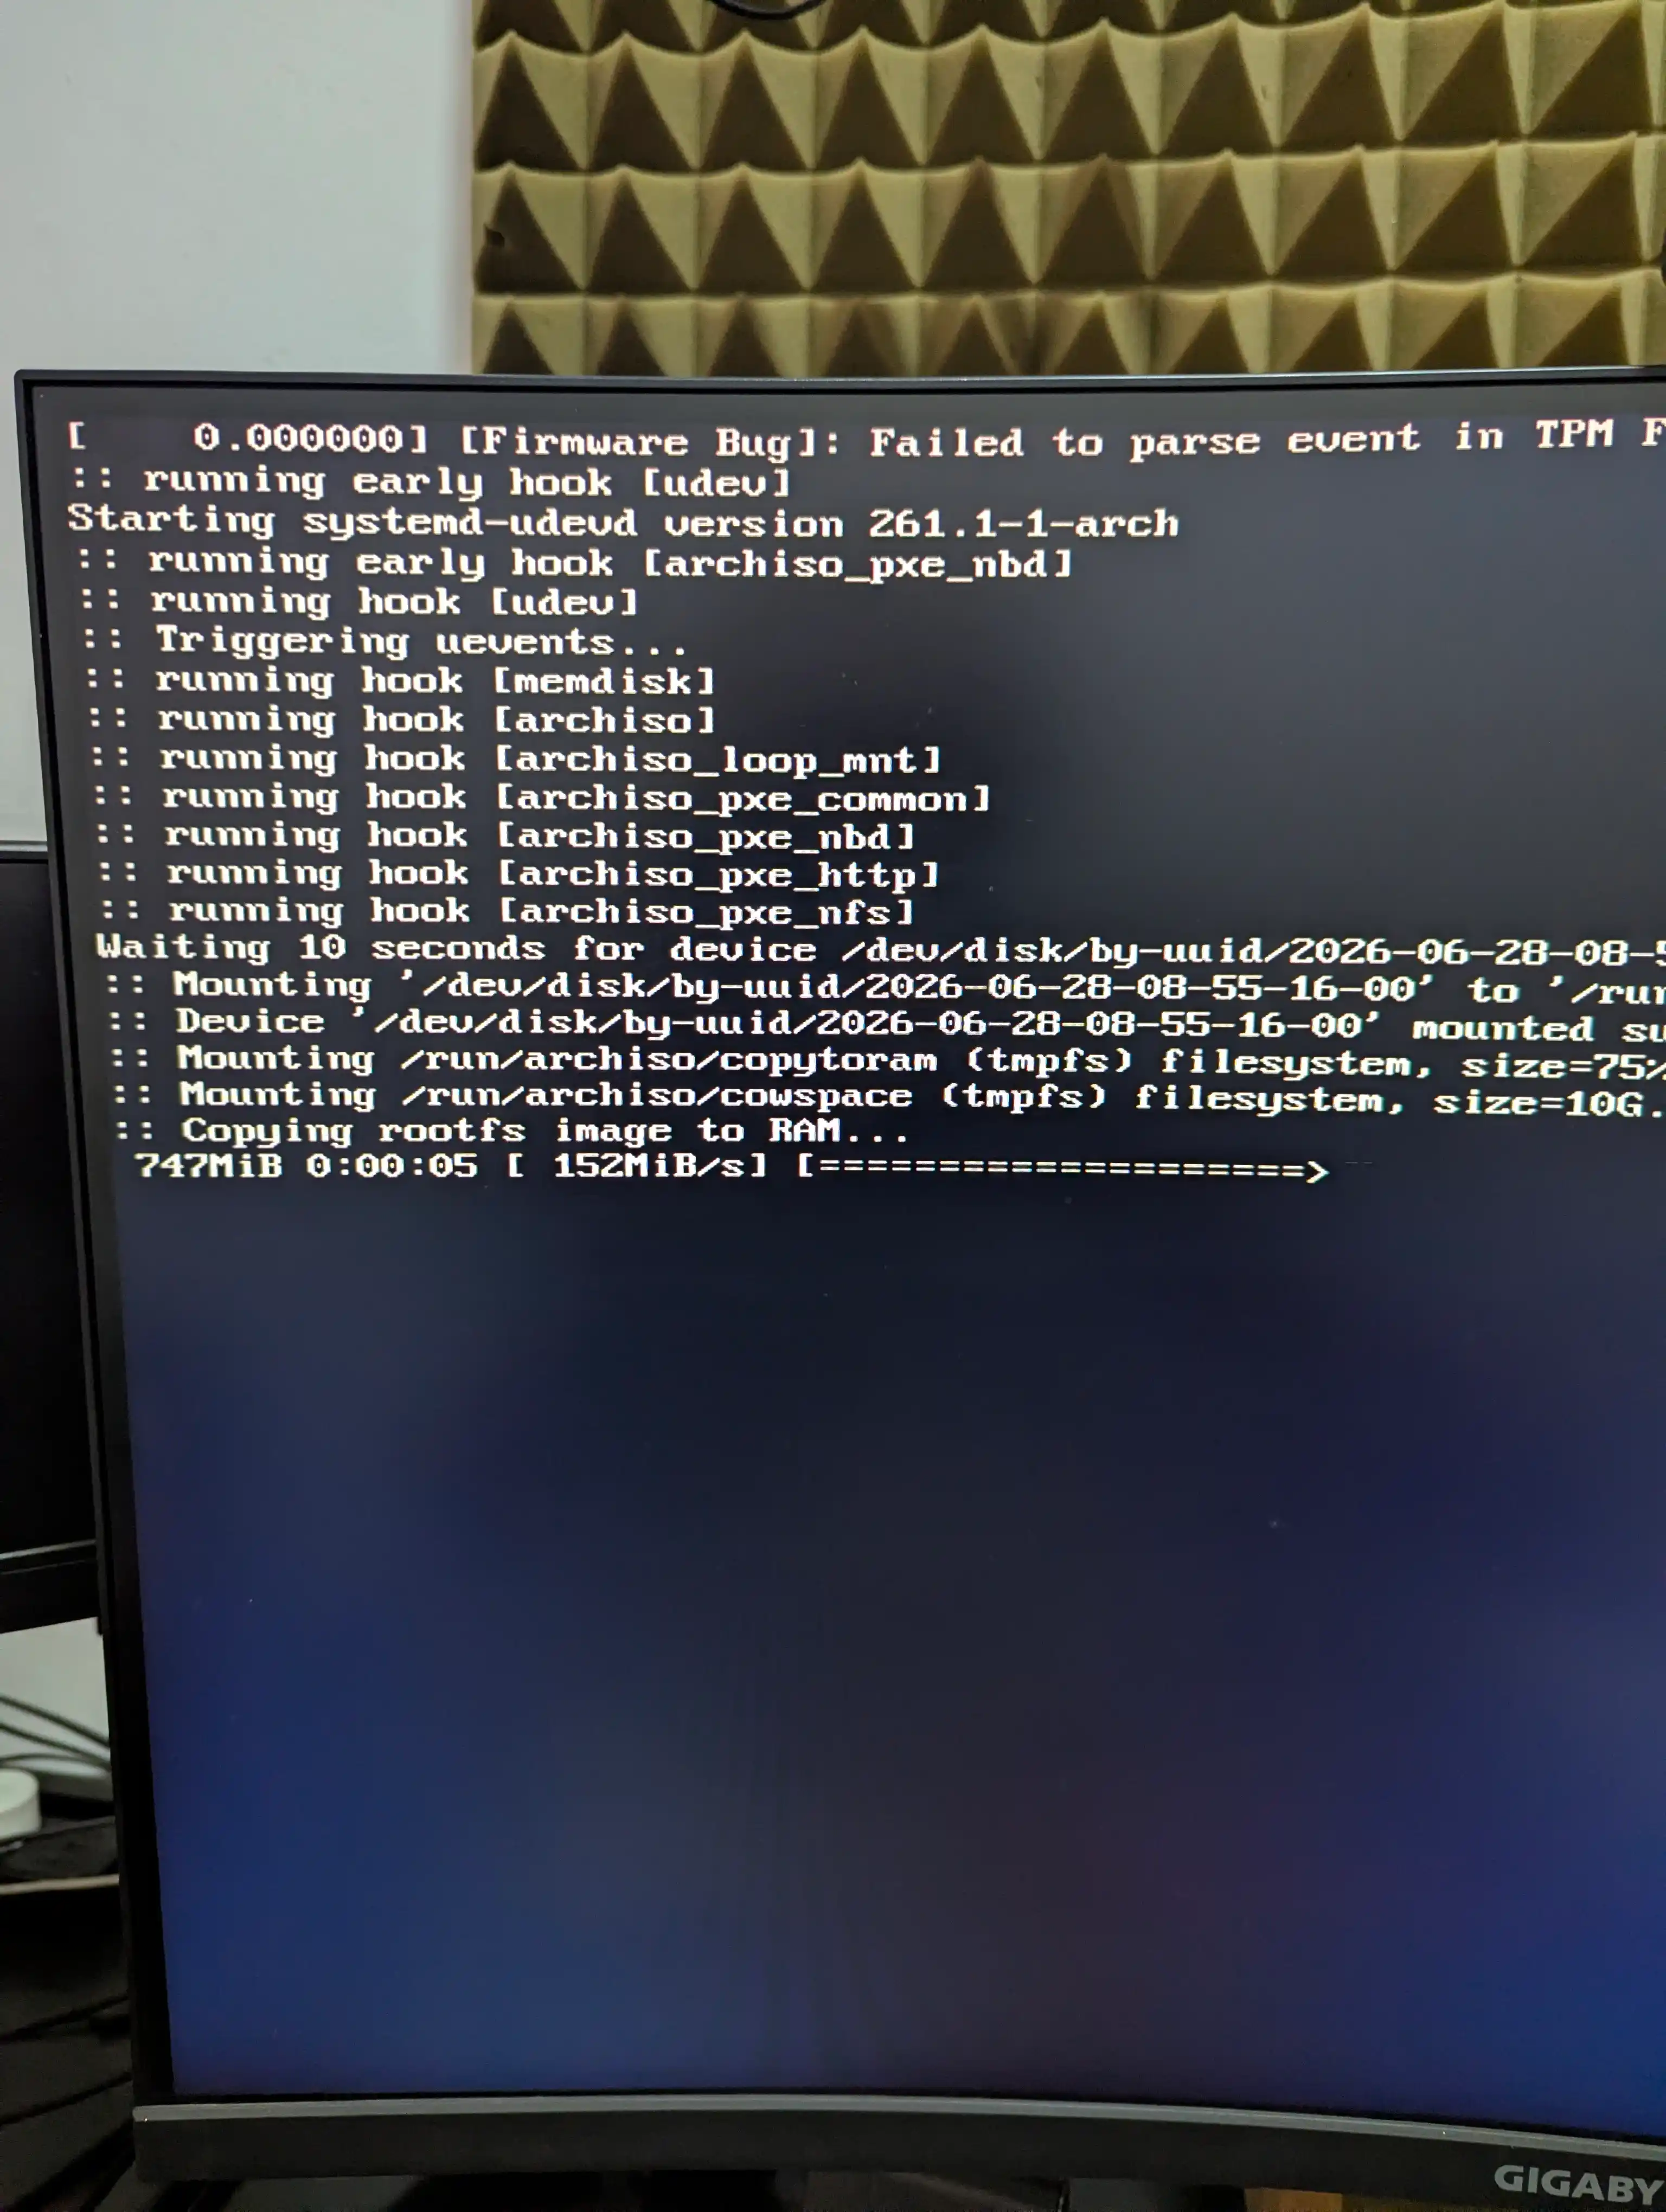
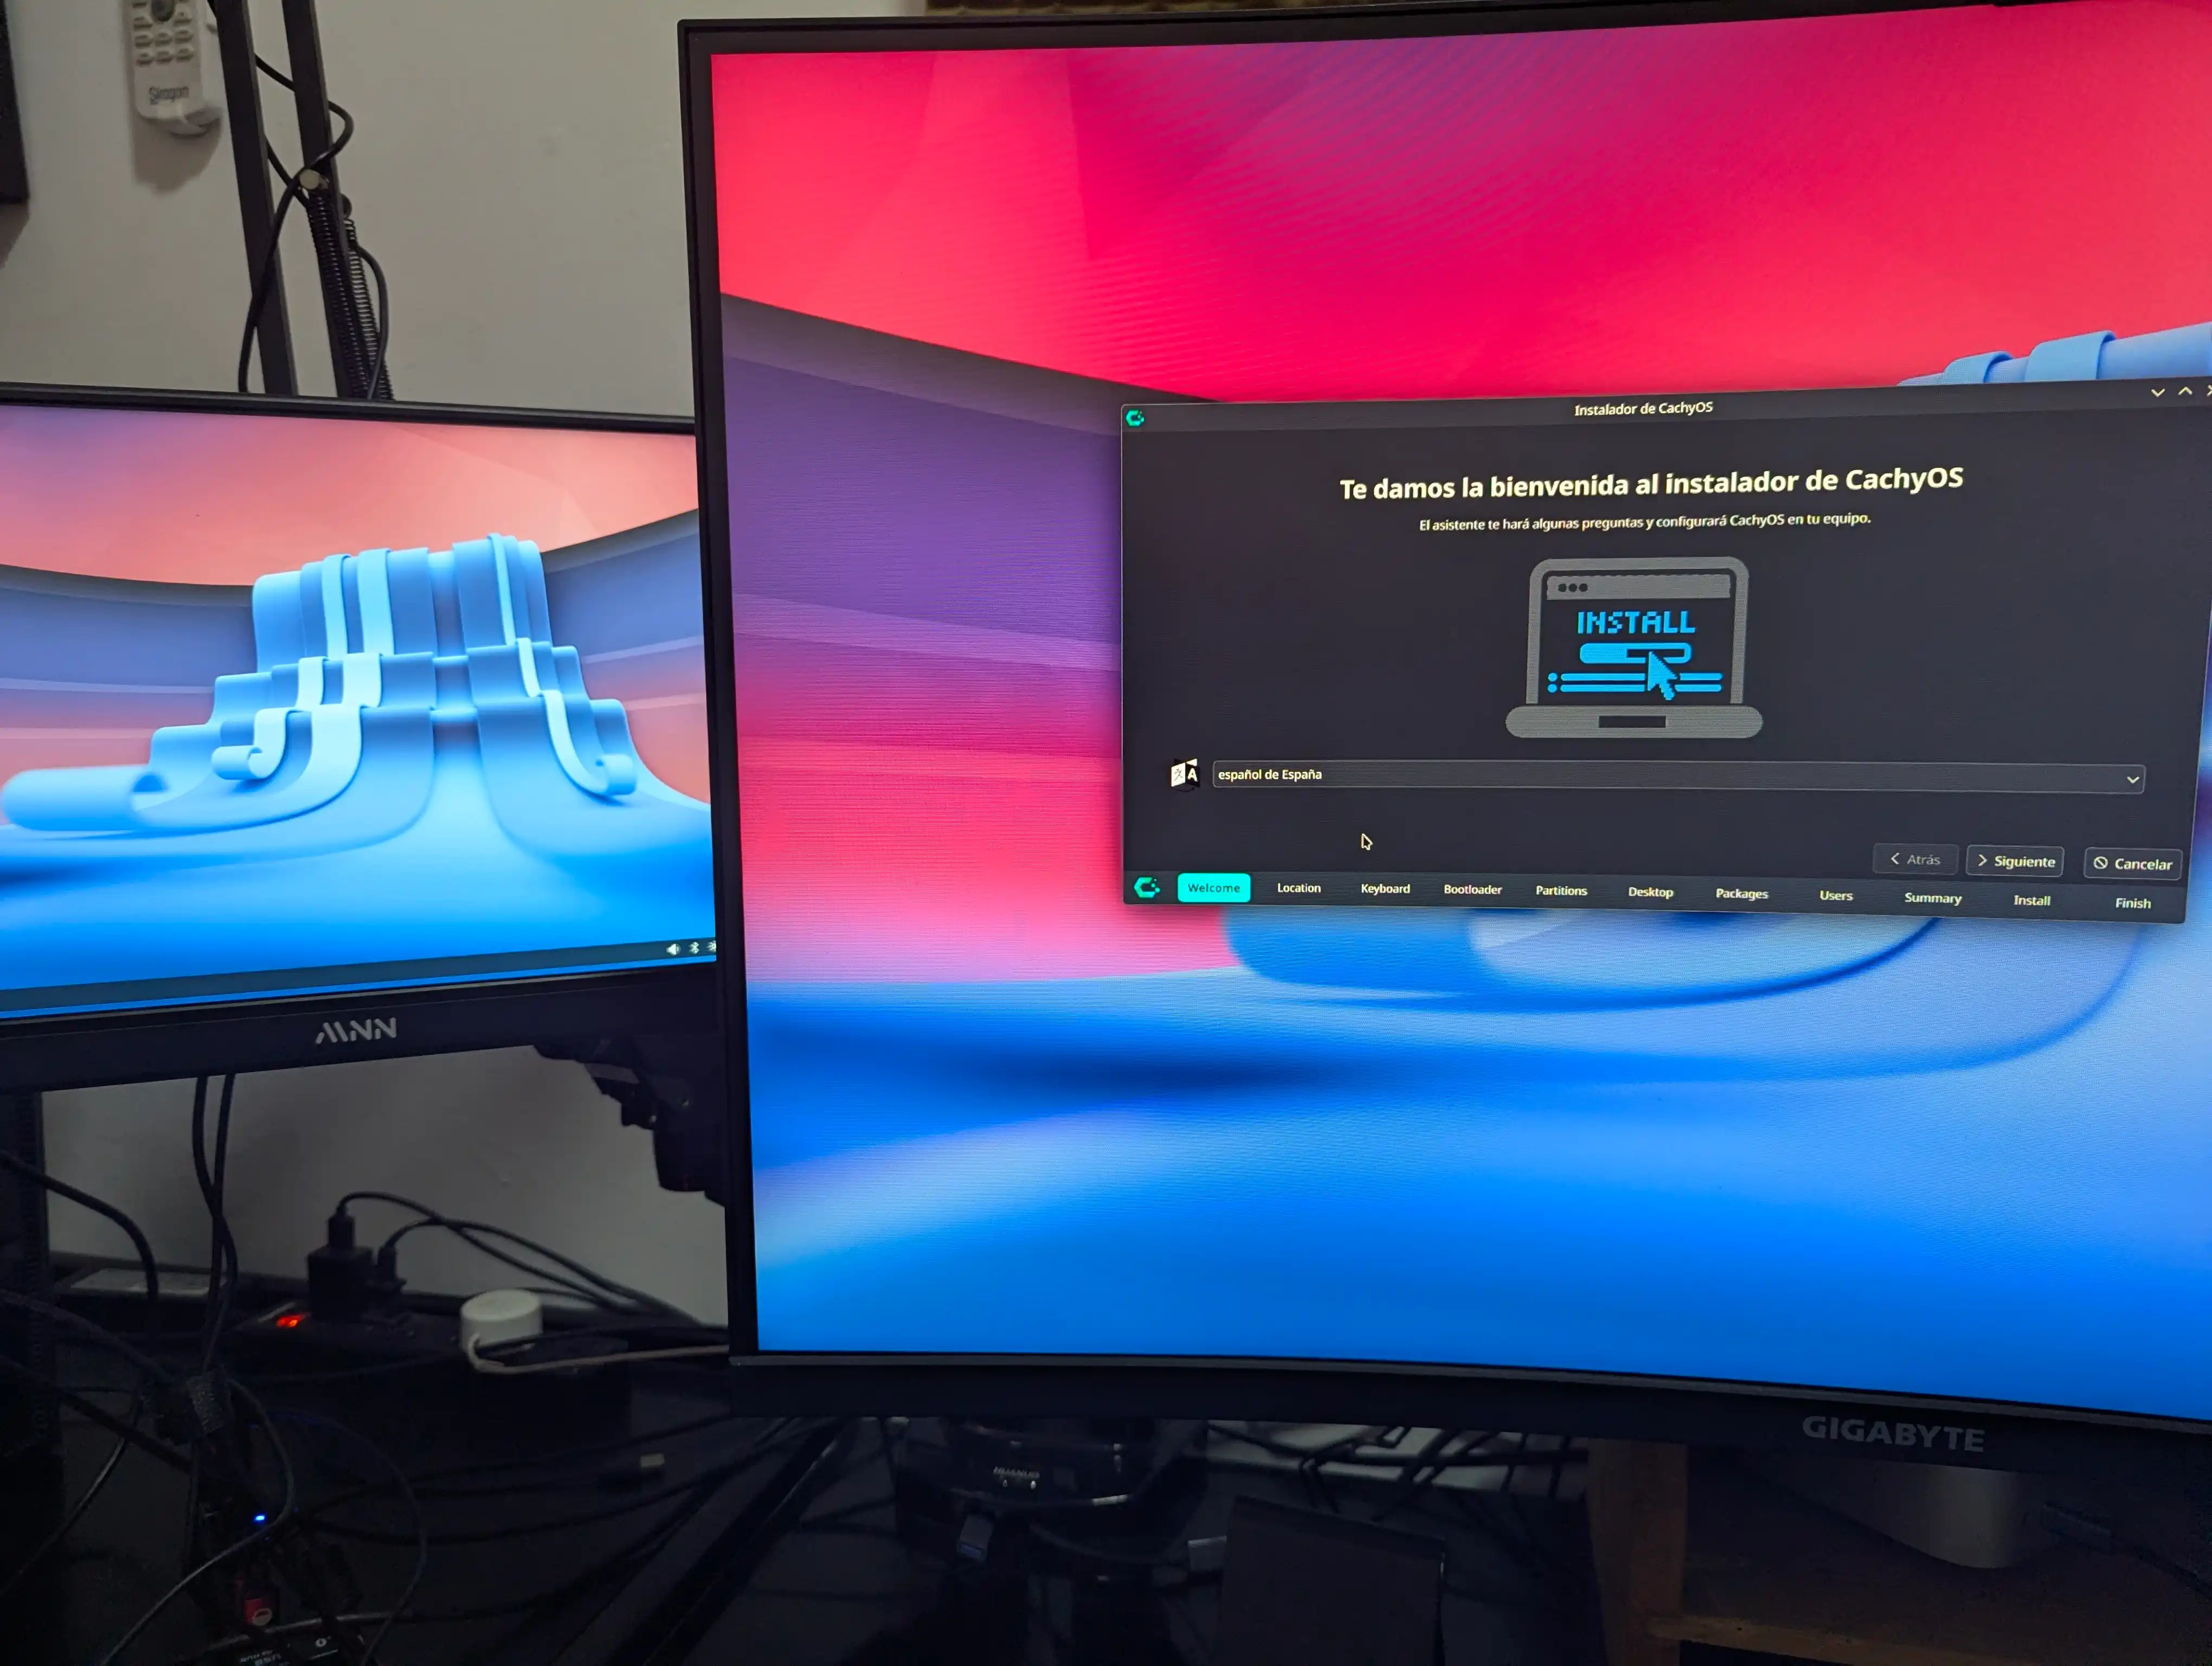
I attach some images of the installation process:

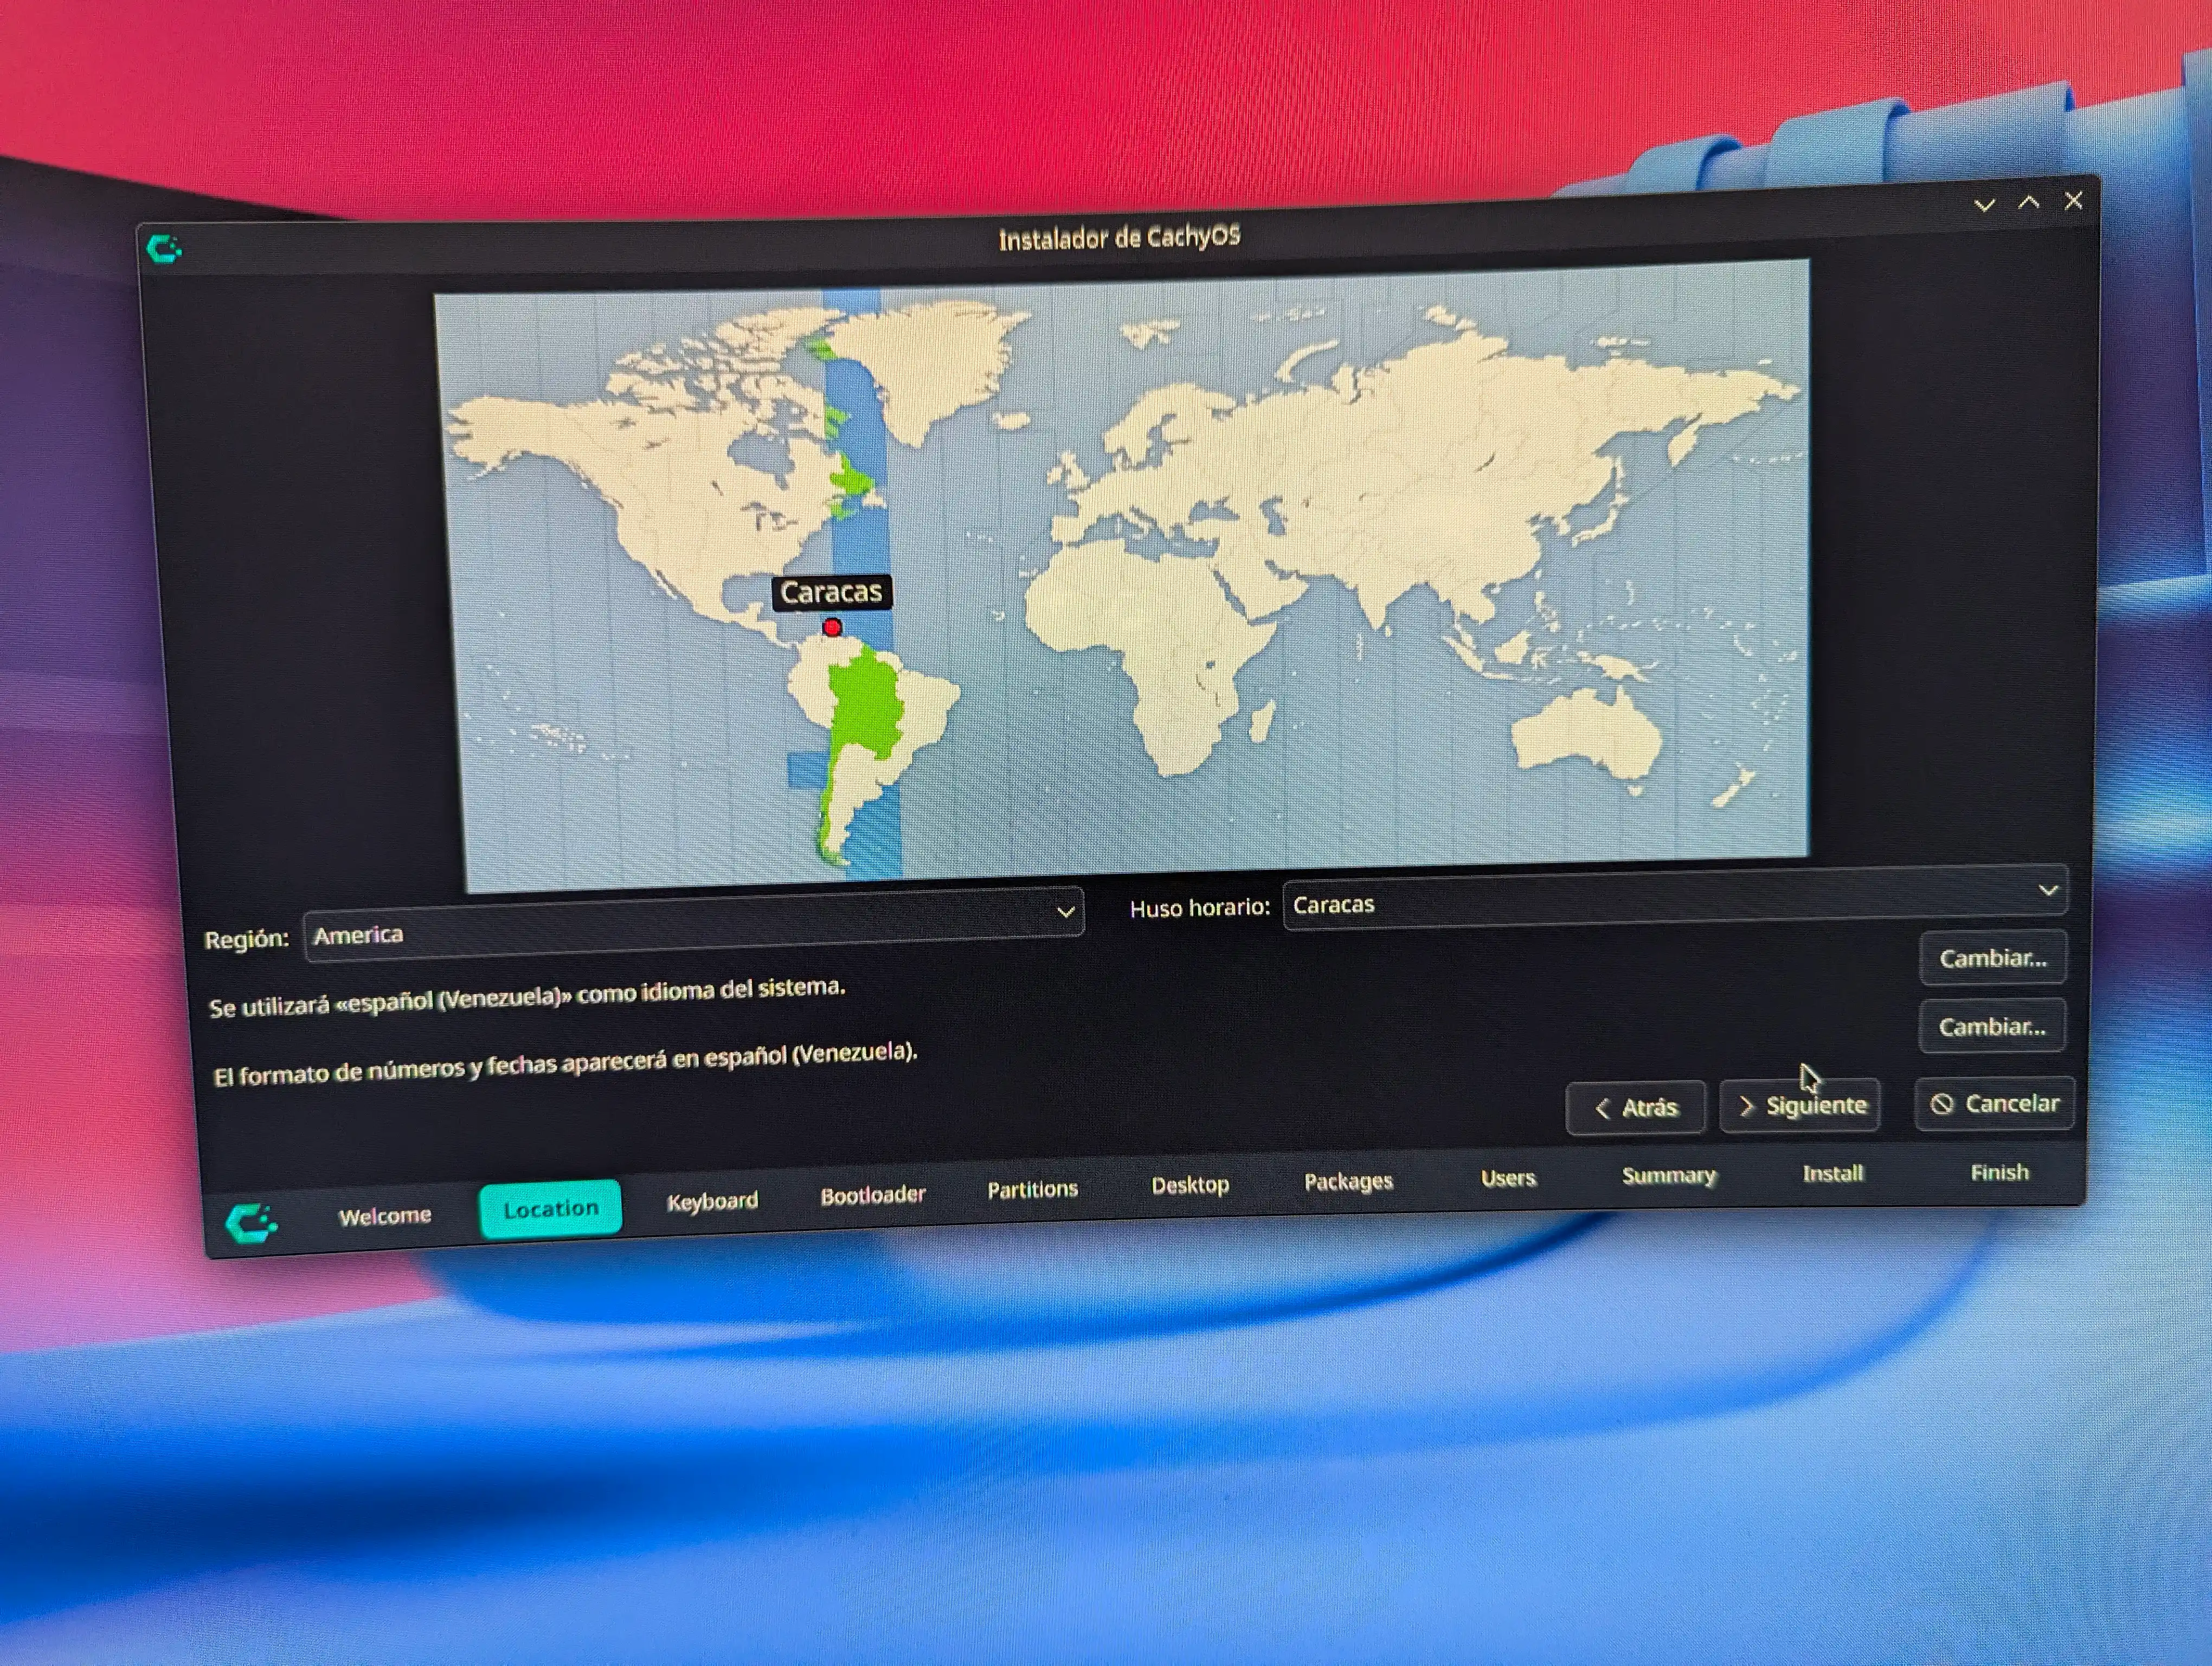
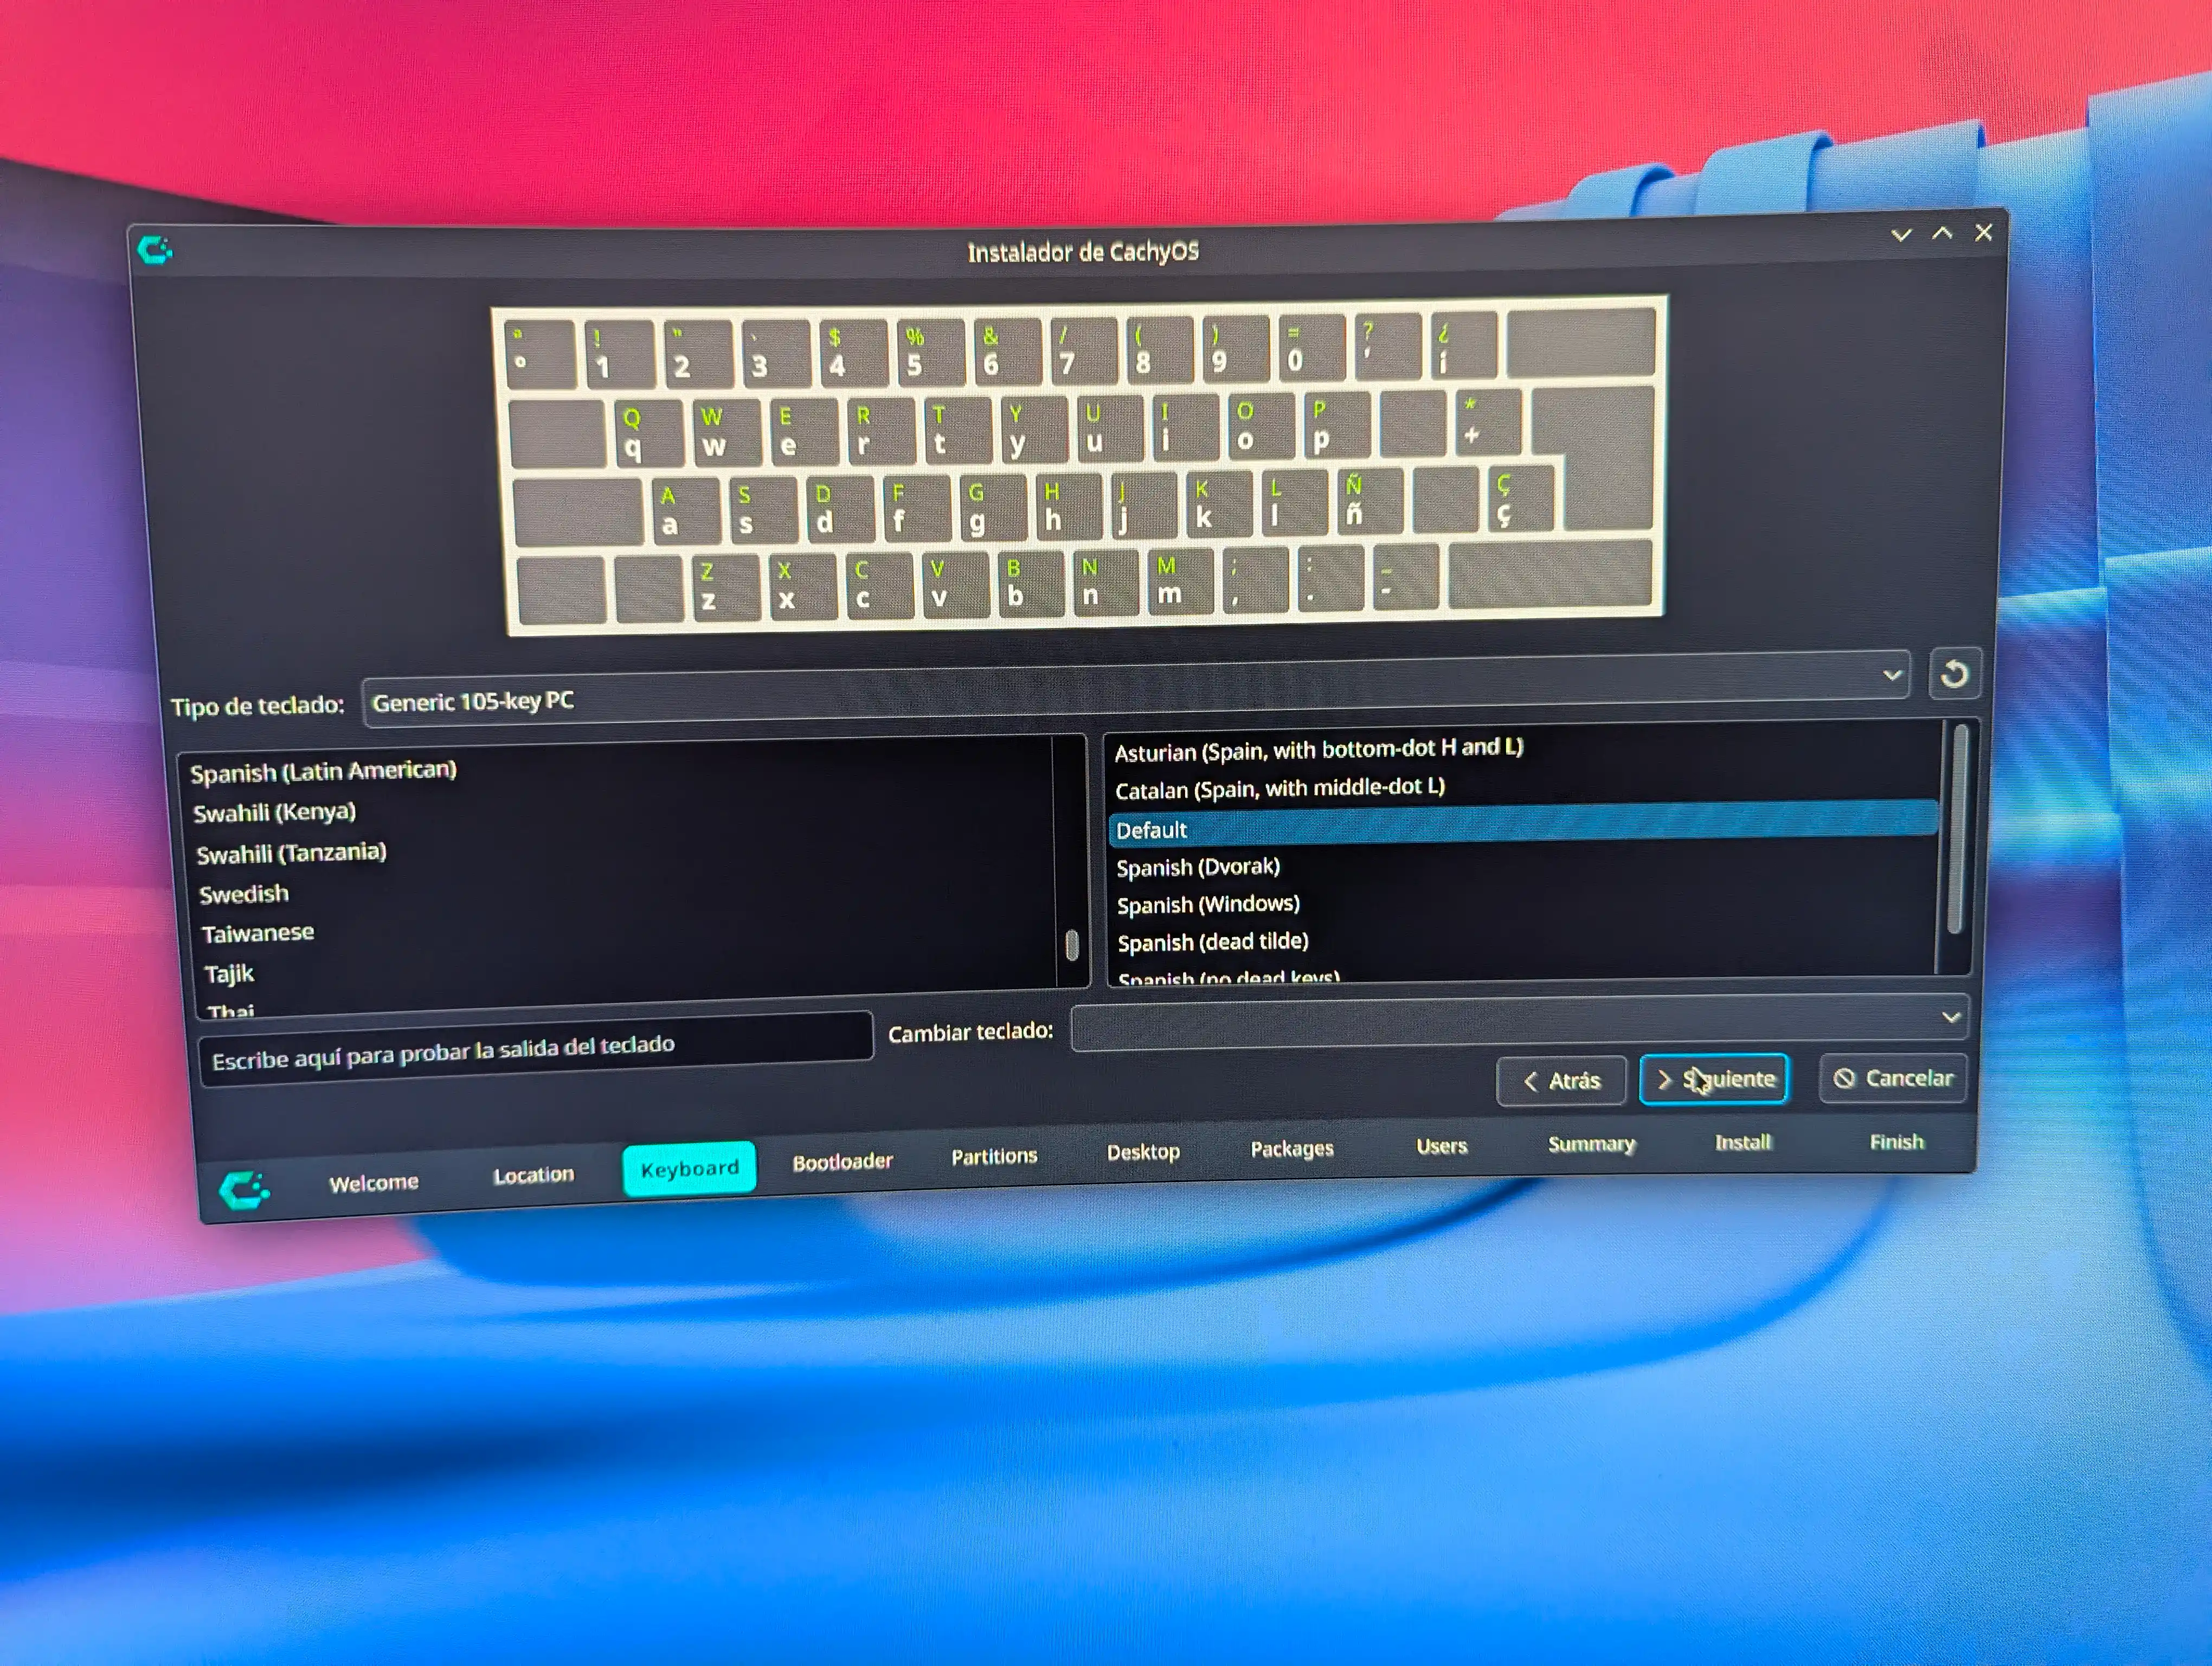

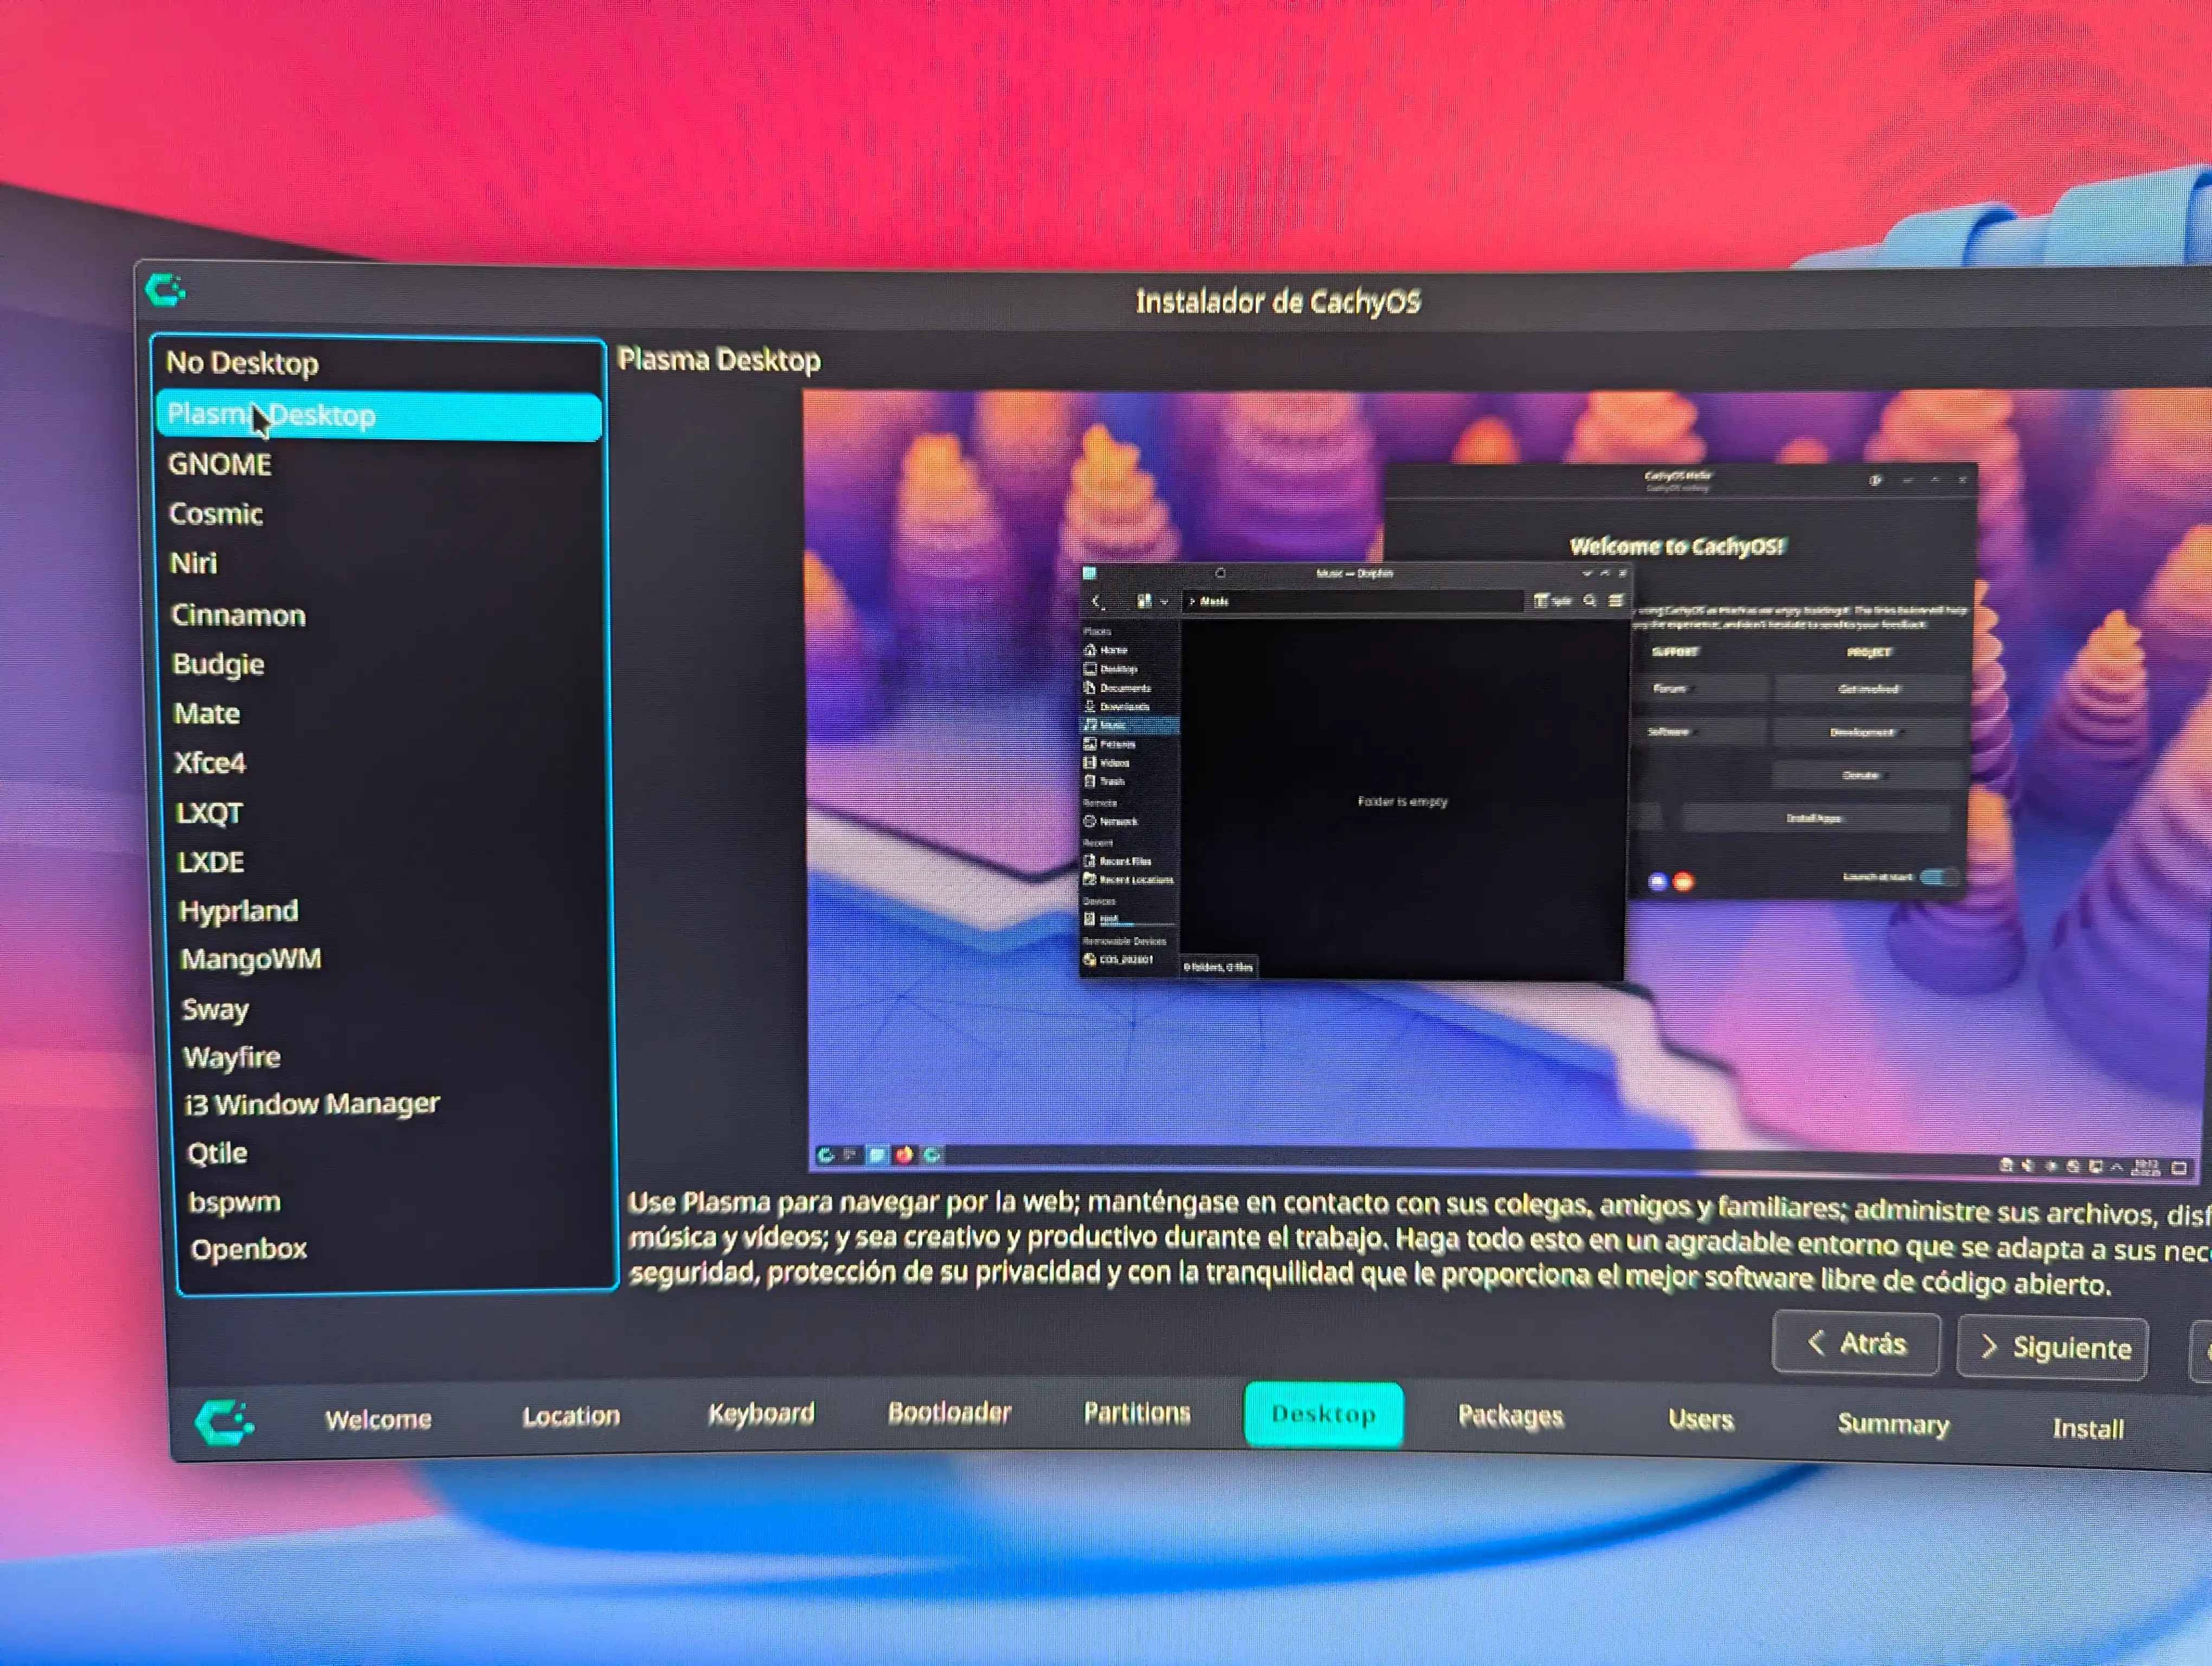
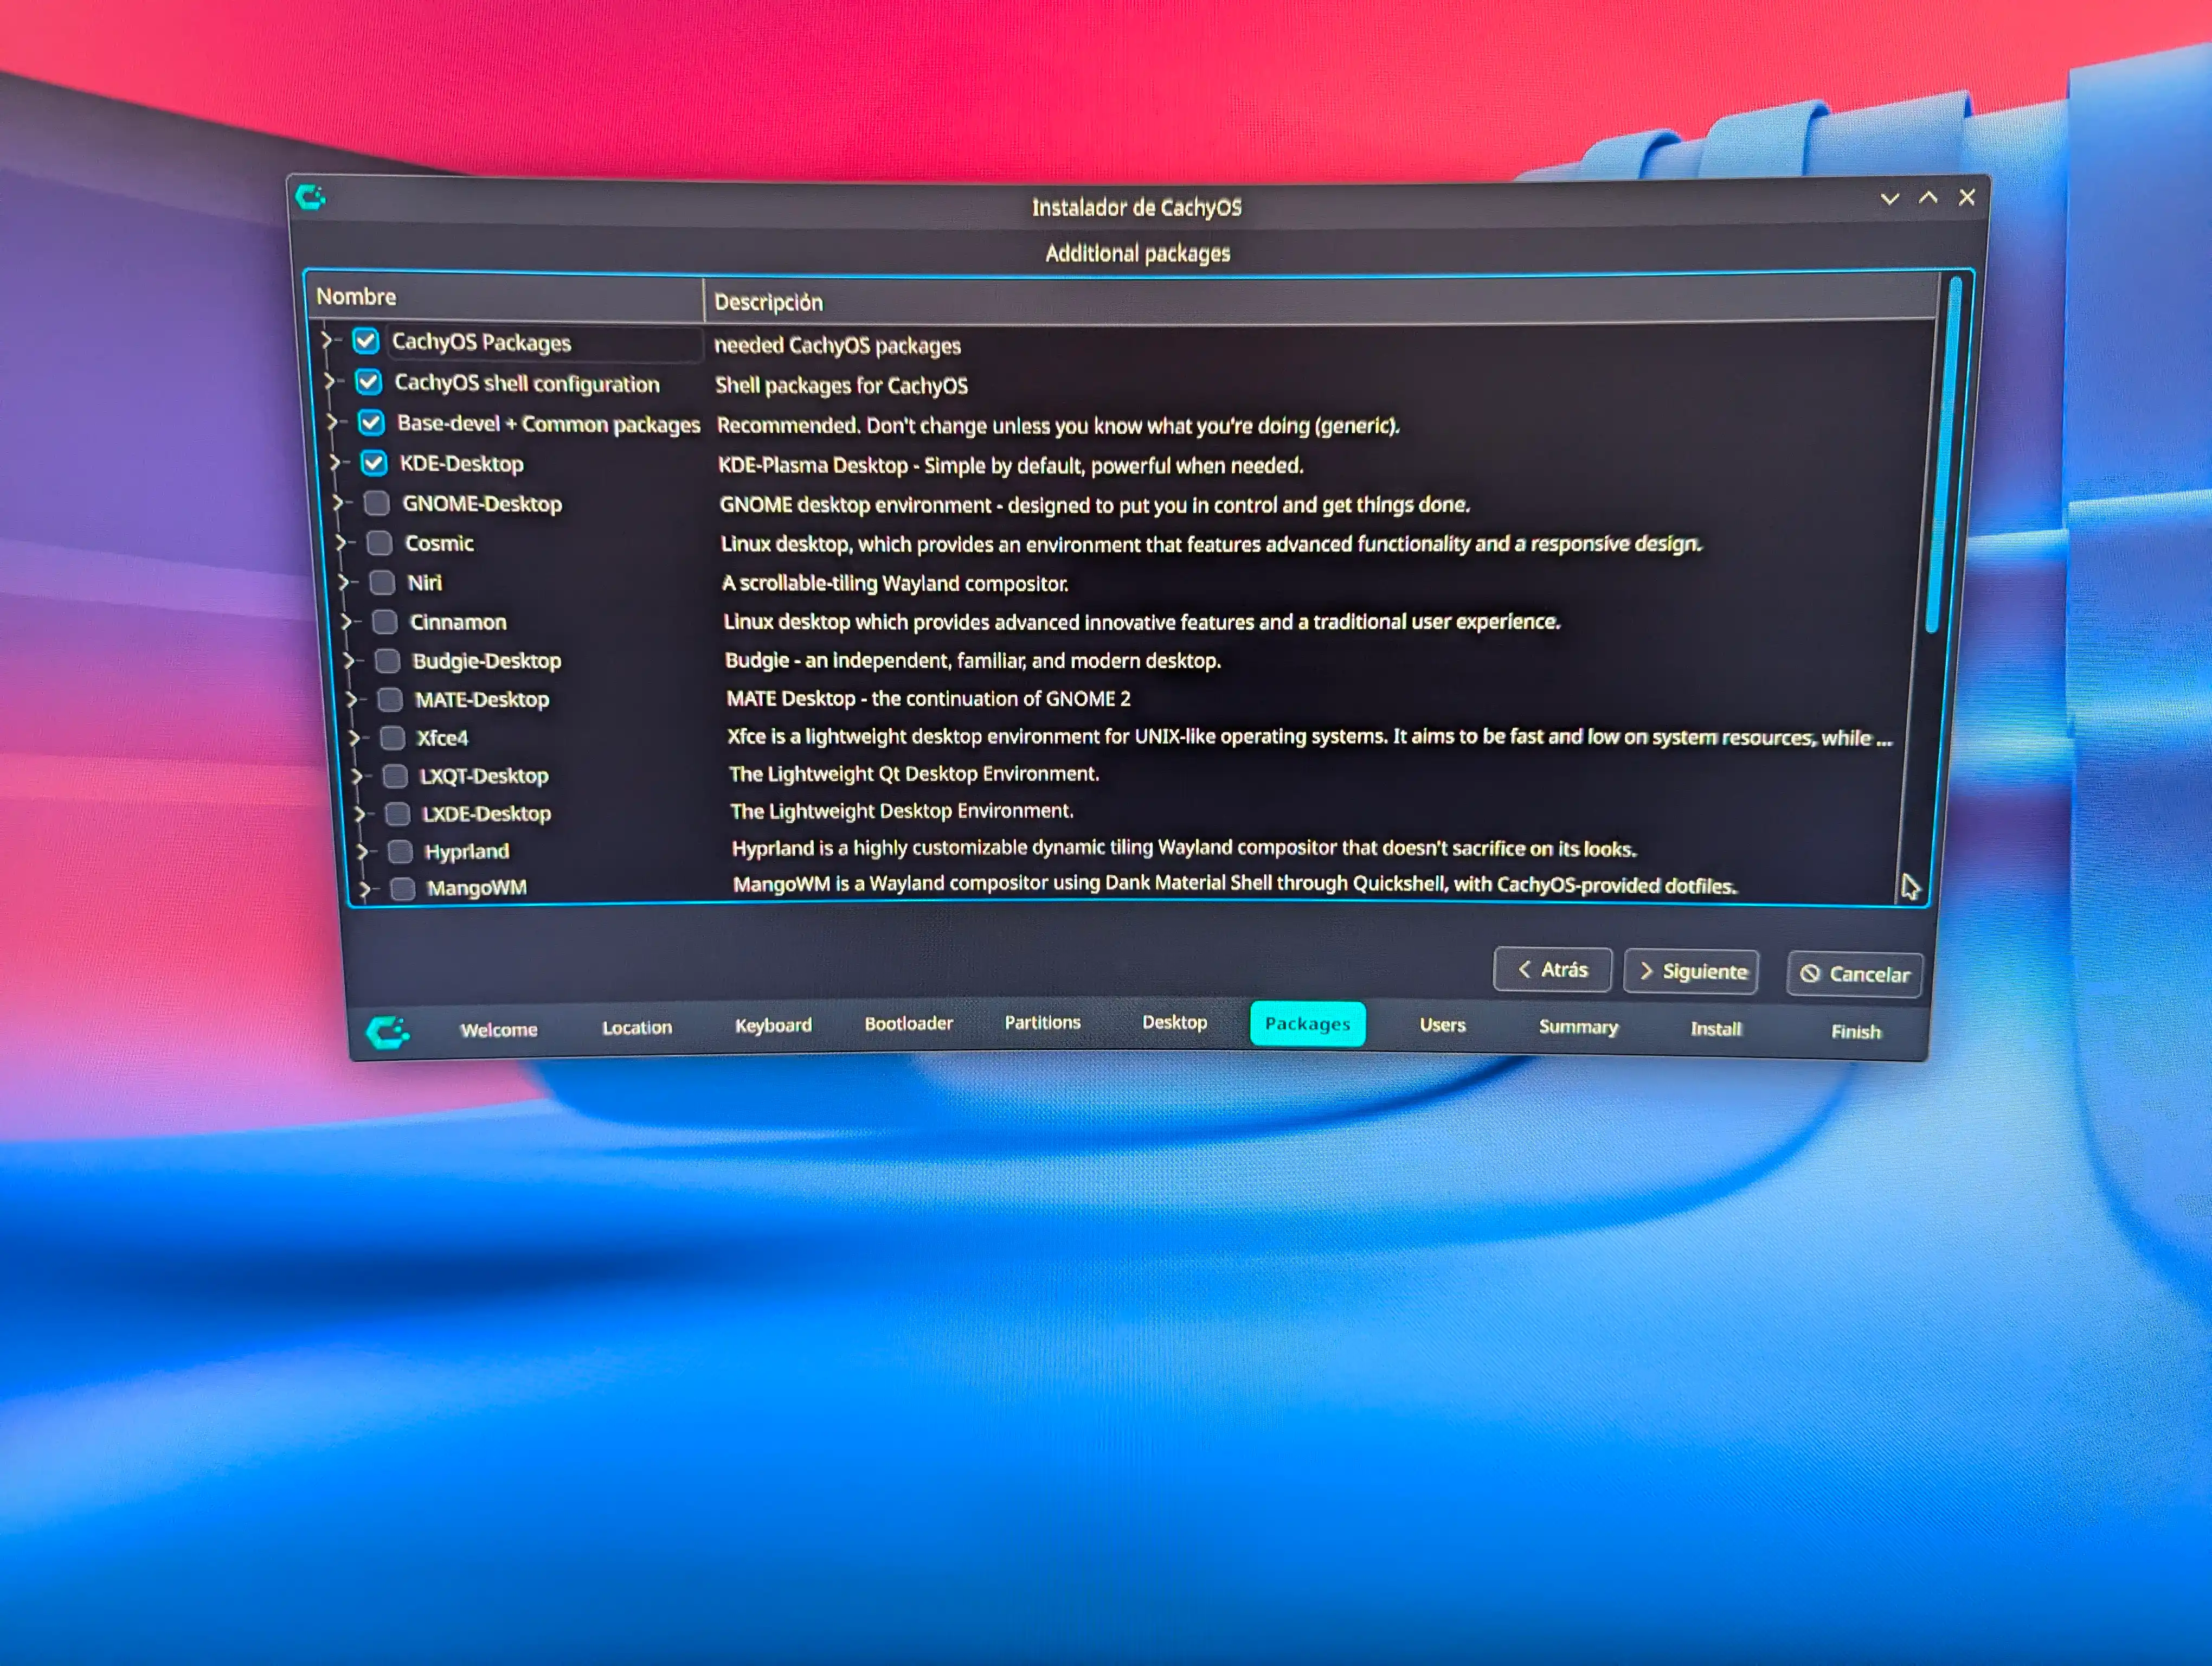
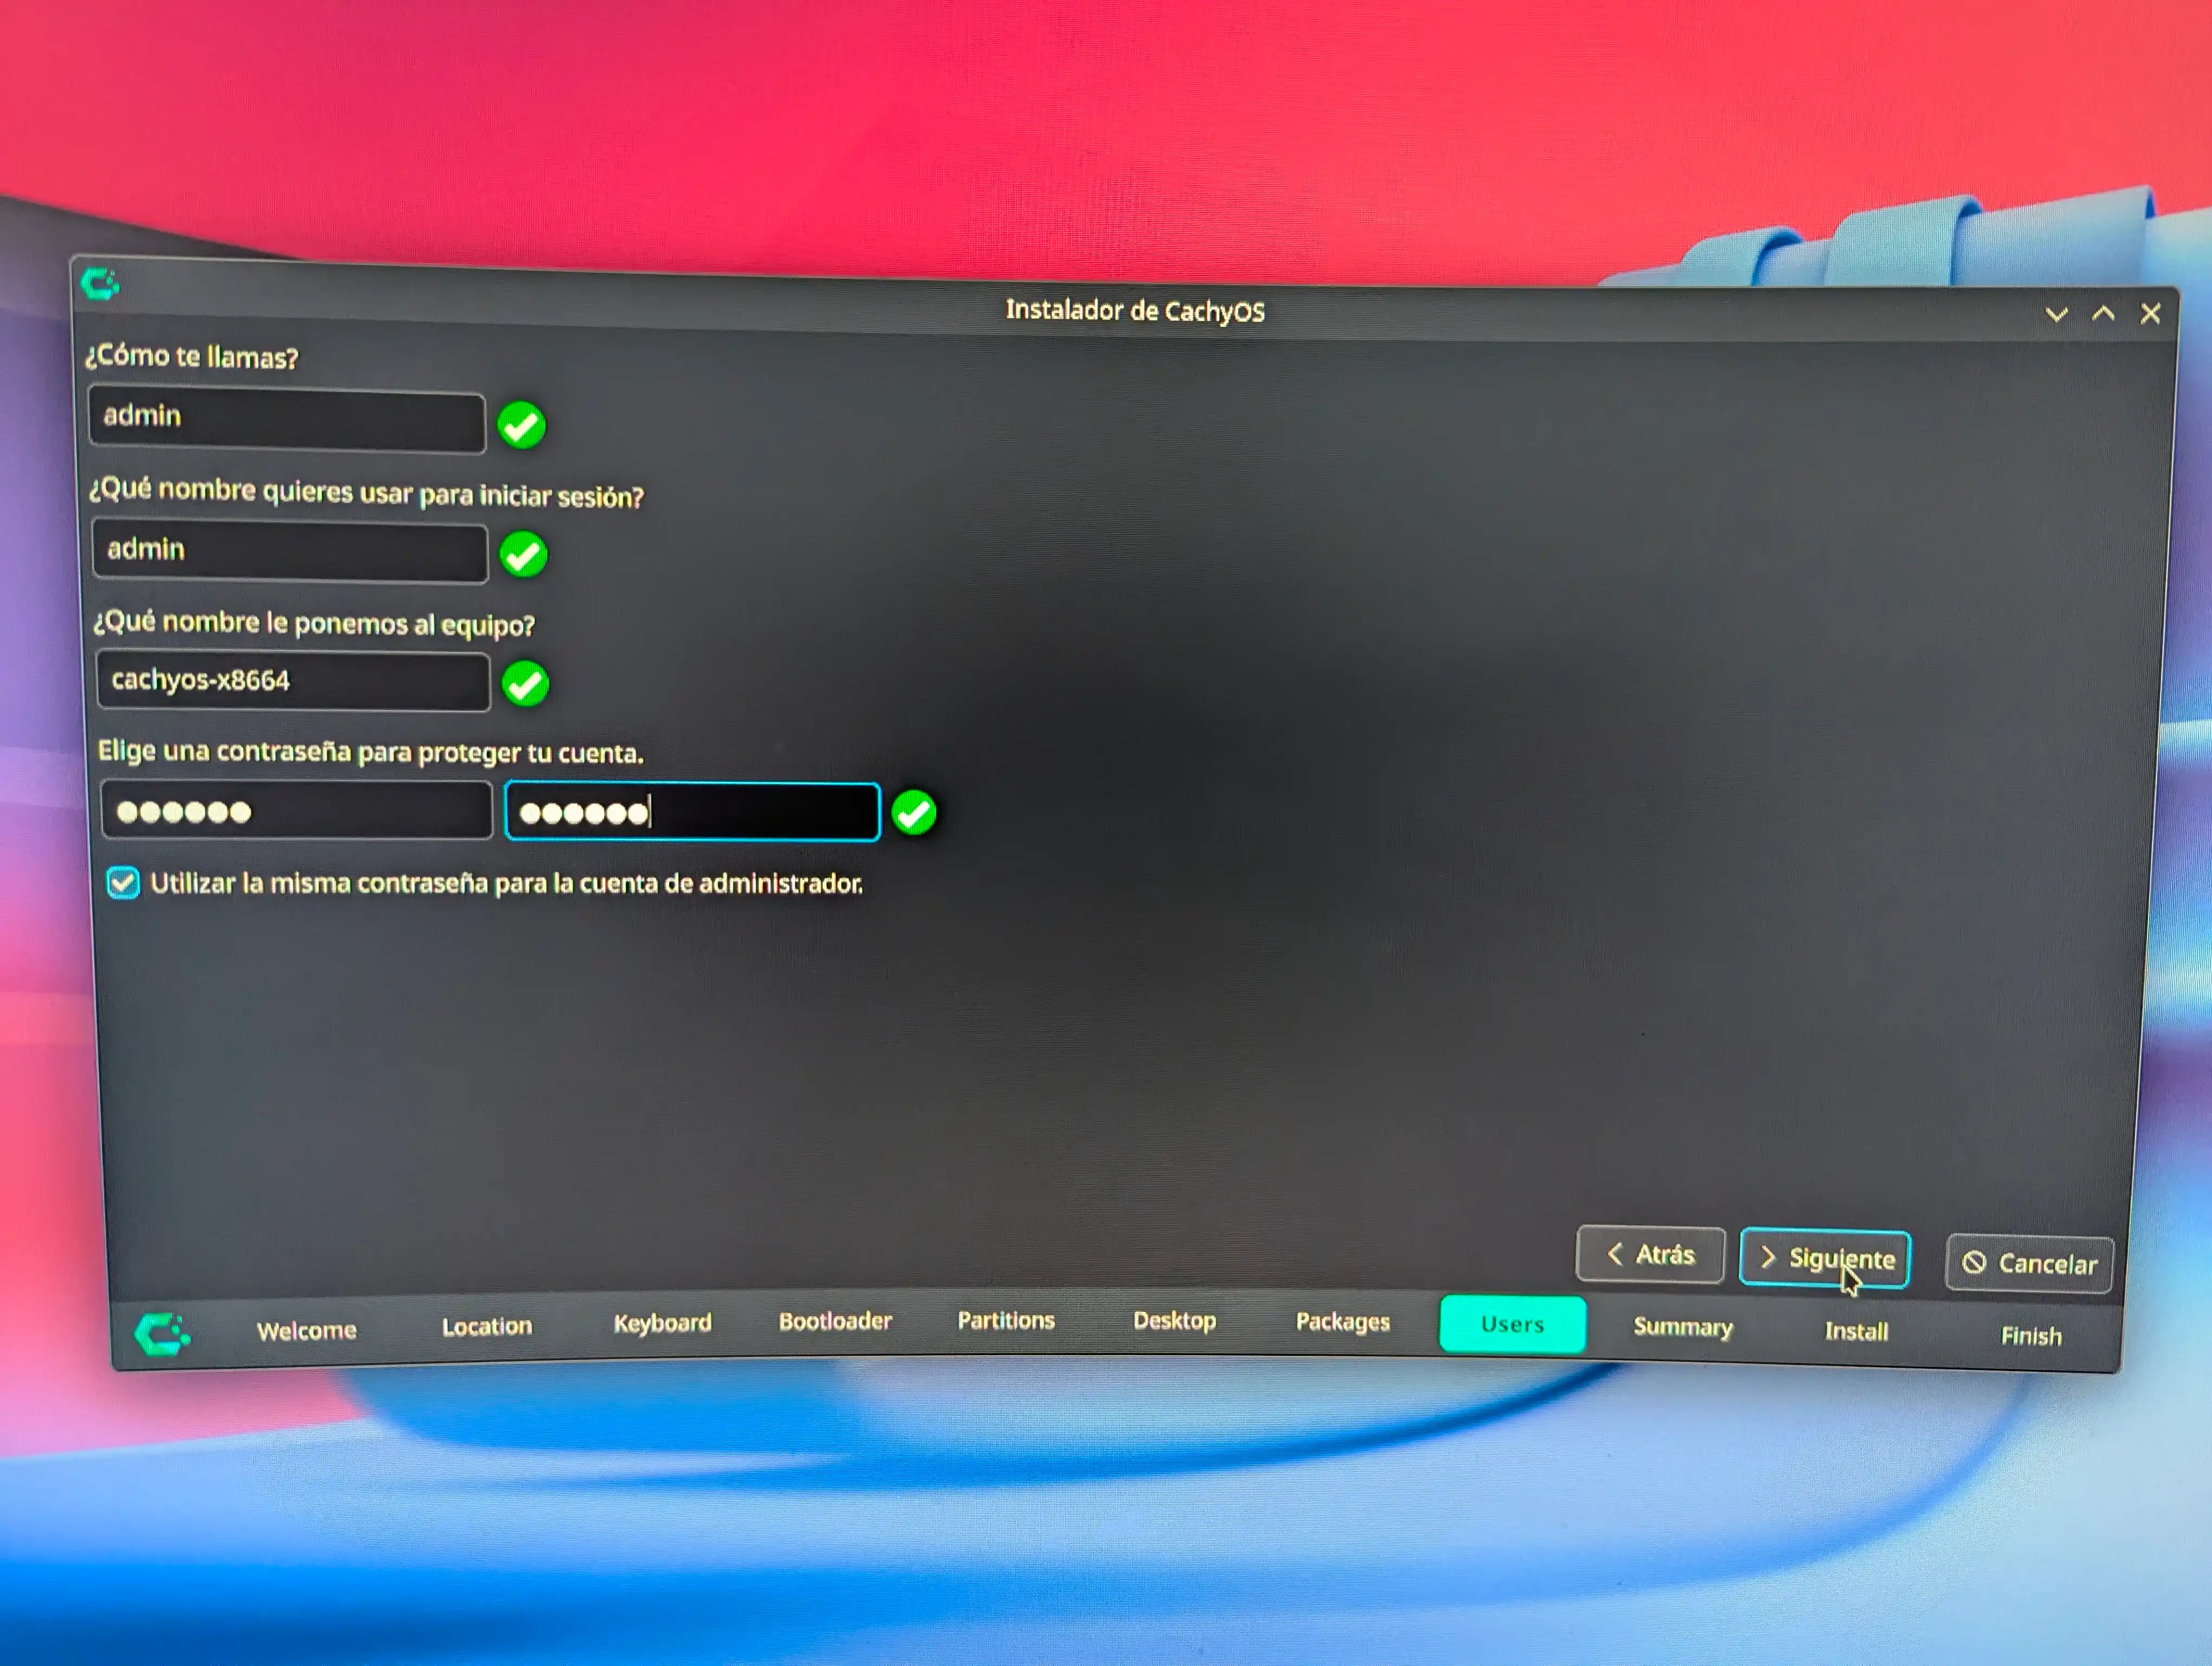
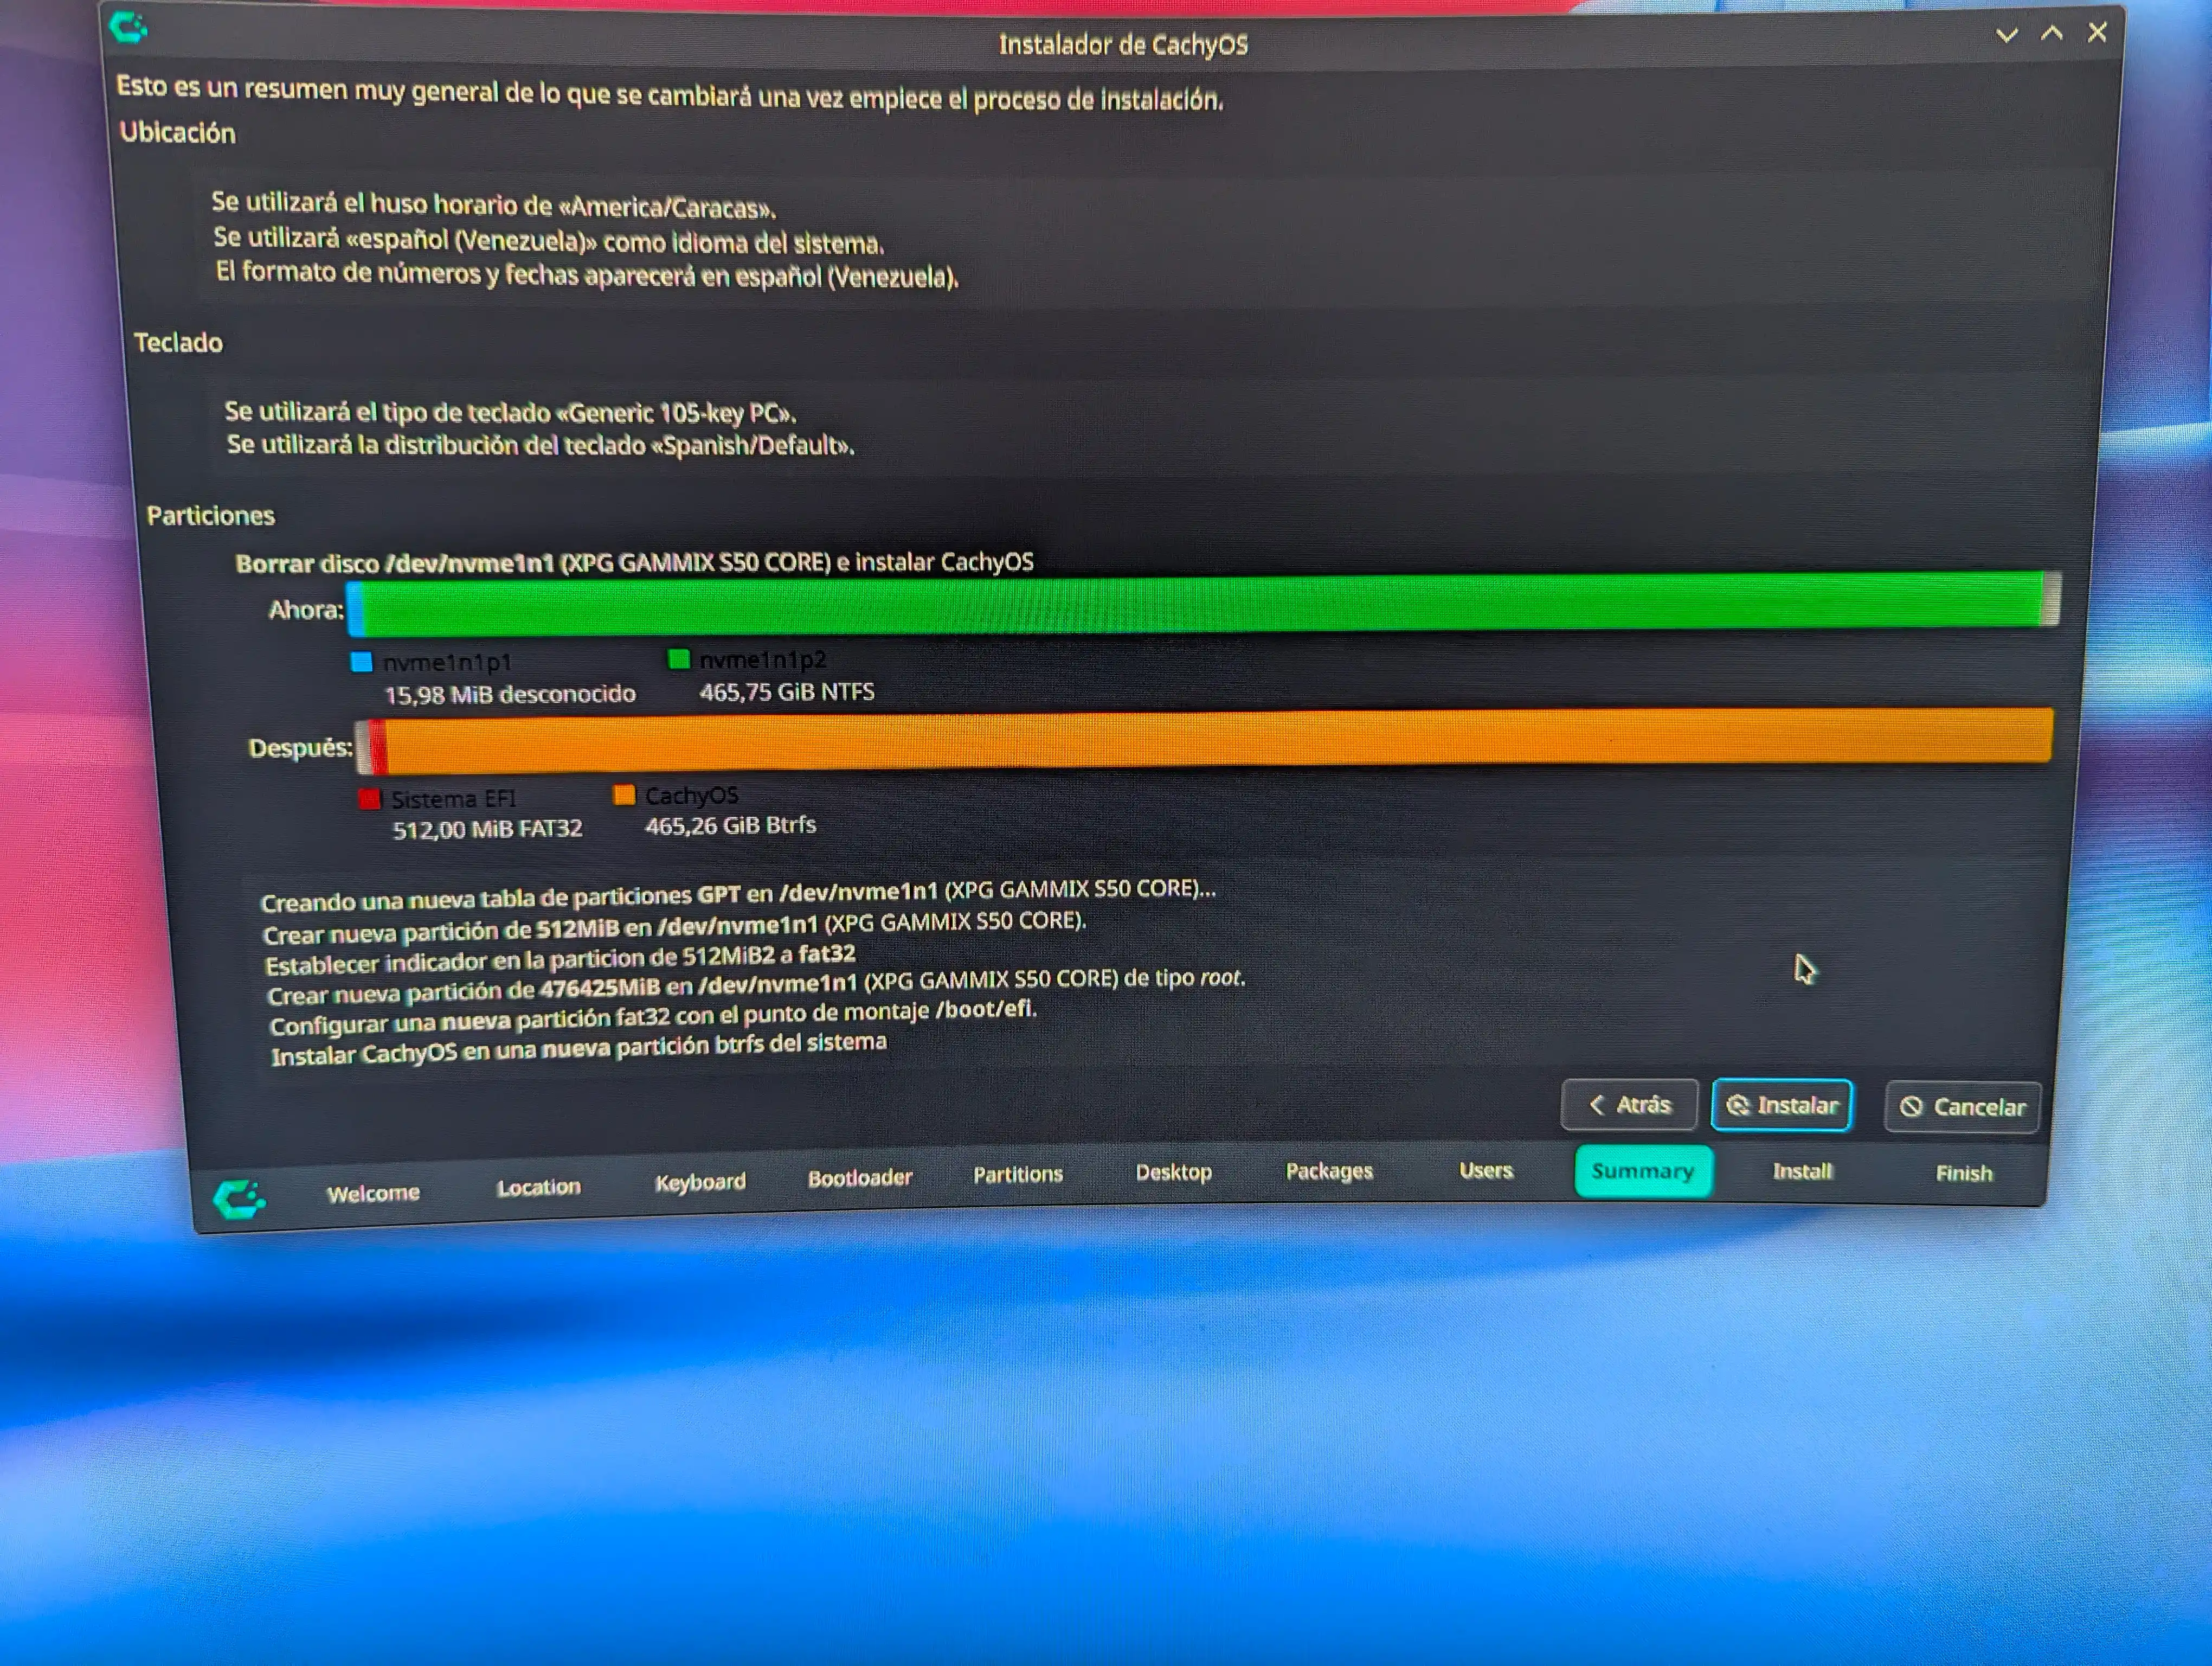
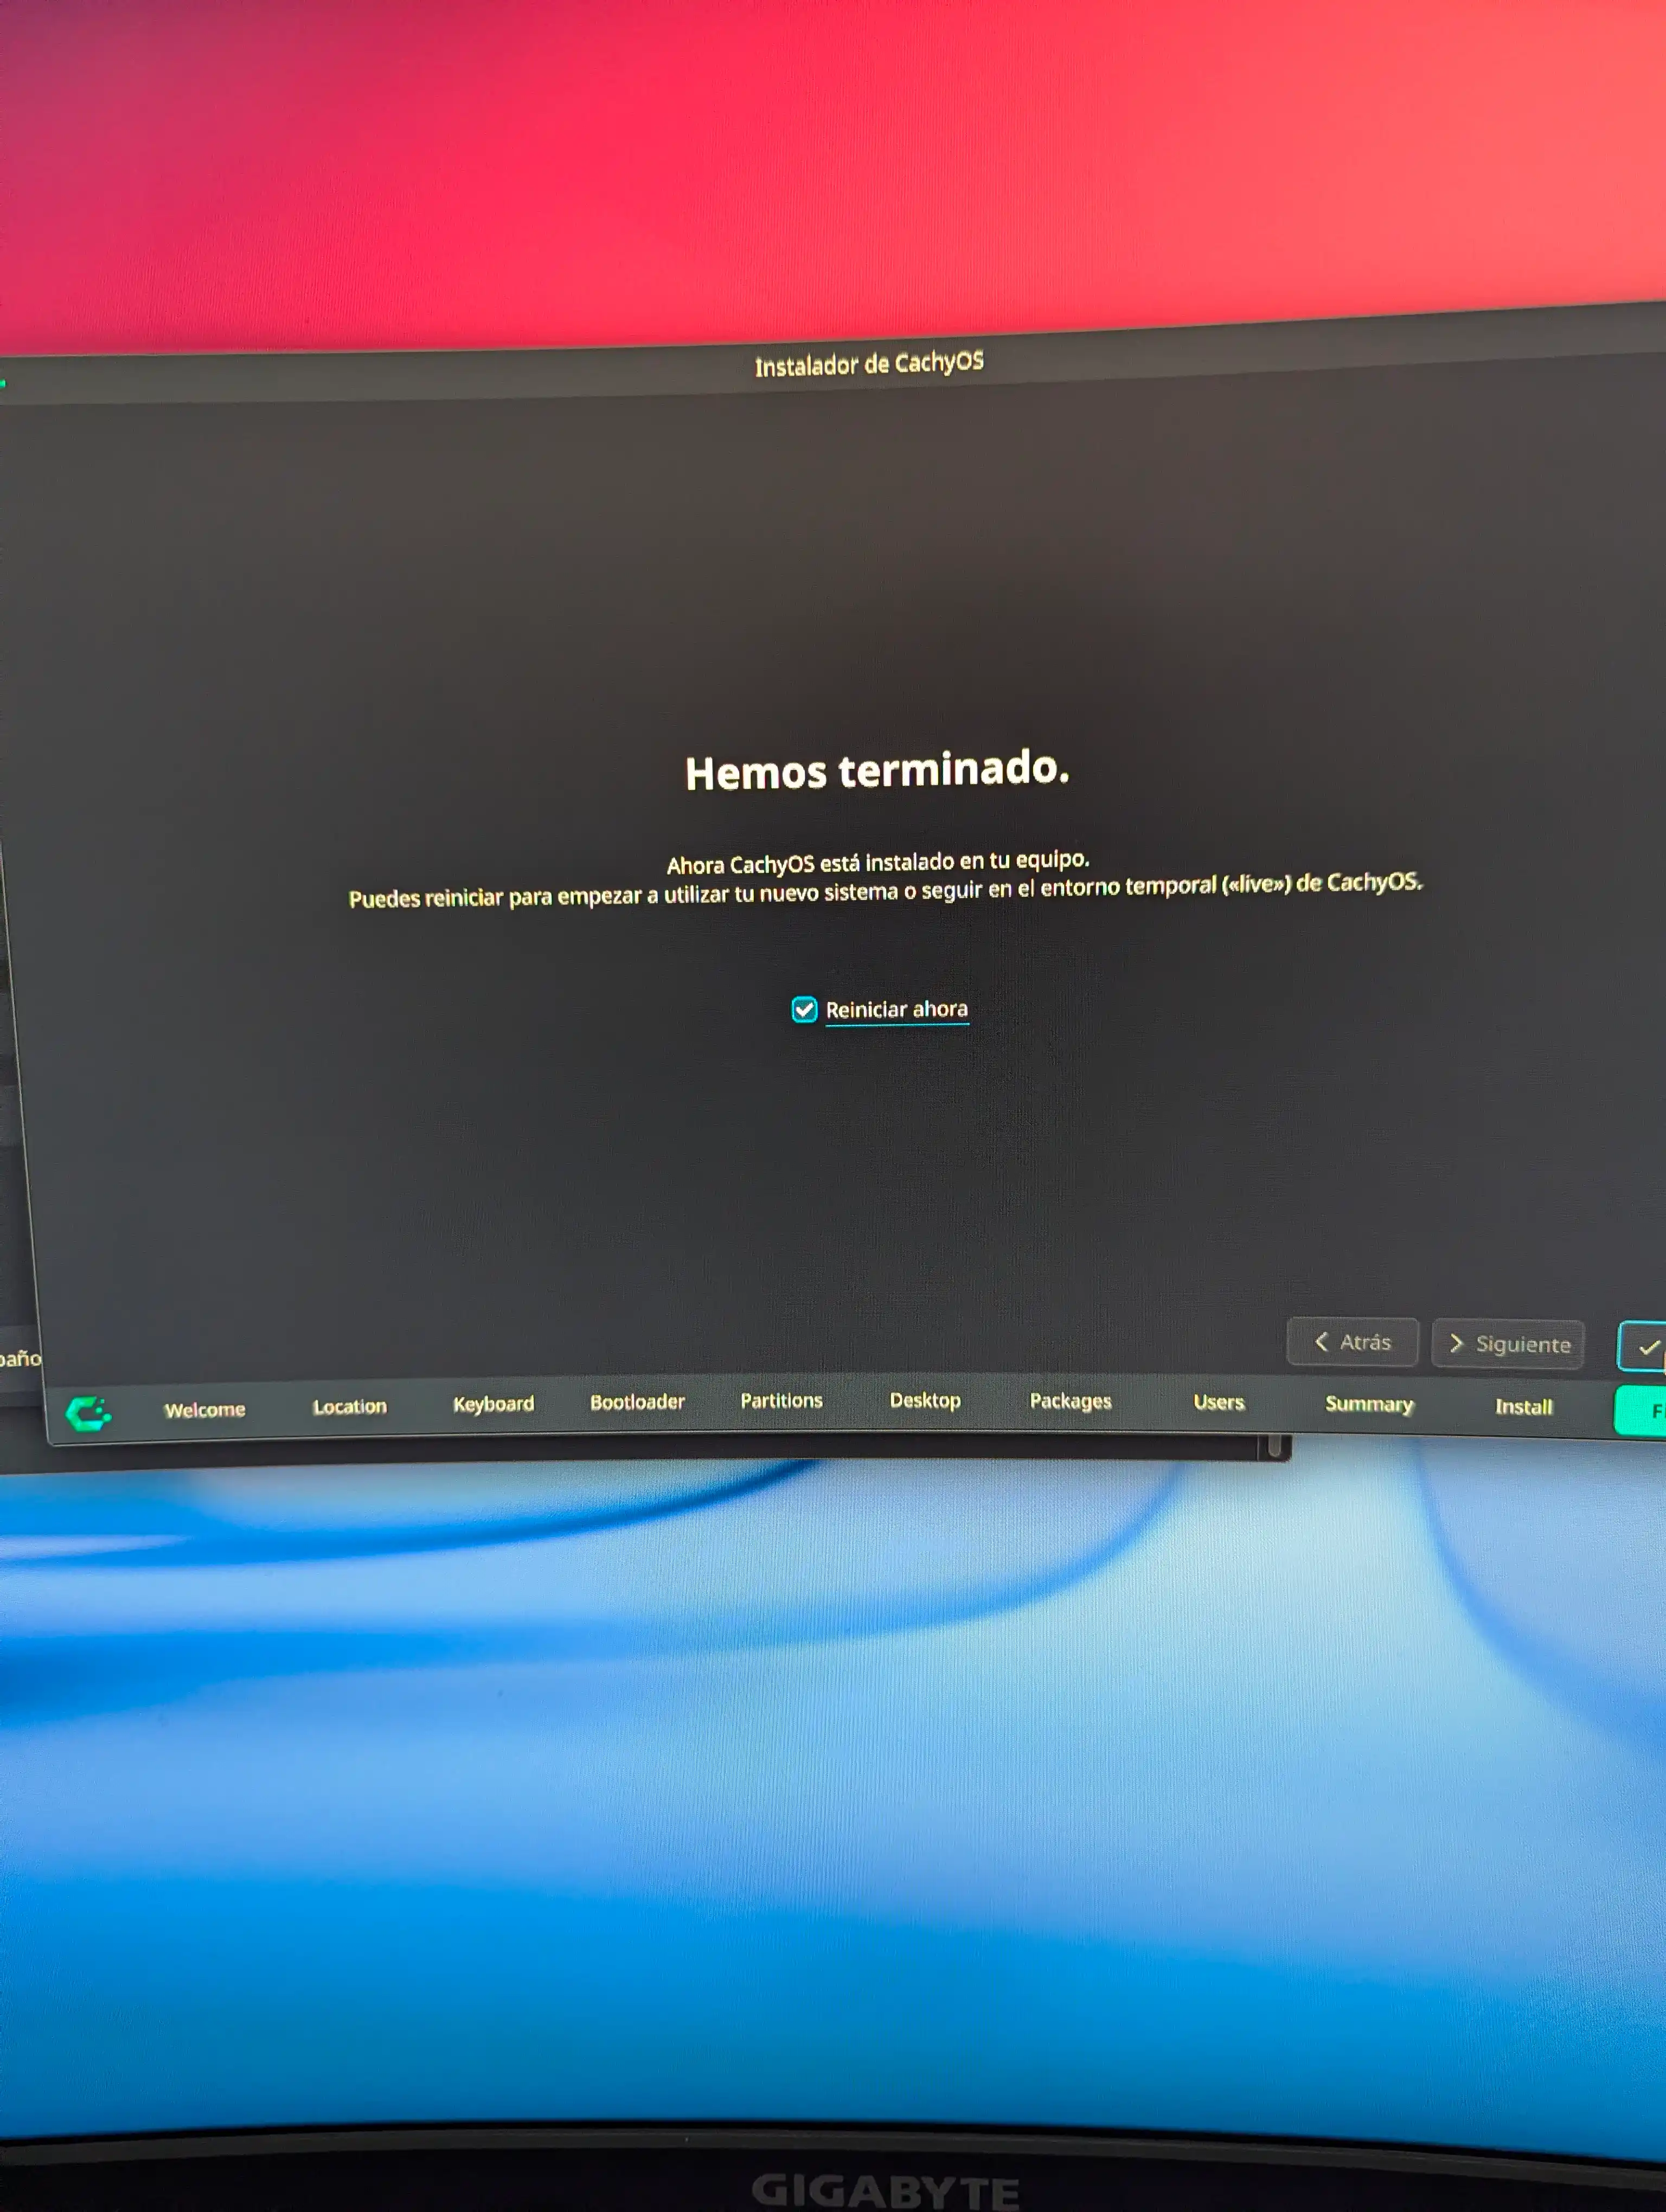
Once installed, you can consult the ENTIRE CachyOS Wiki to understand the system; Among the most relevant for this step, what you can do AFTER installing:
https://wiki.cachyos.org/es/configuration/post_install_setup/
Part 3: Problems During Installation and Their Solutions
Installing Linux is rarely perfect the first time, especially on modern hardware. Here are the problems I encountered and how I solved them.
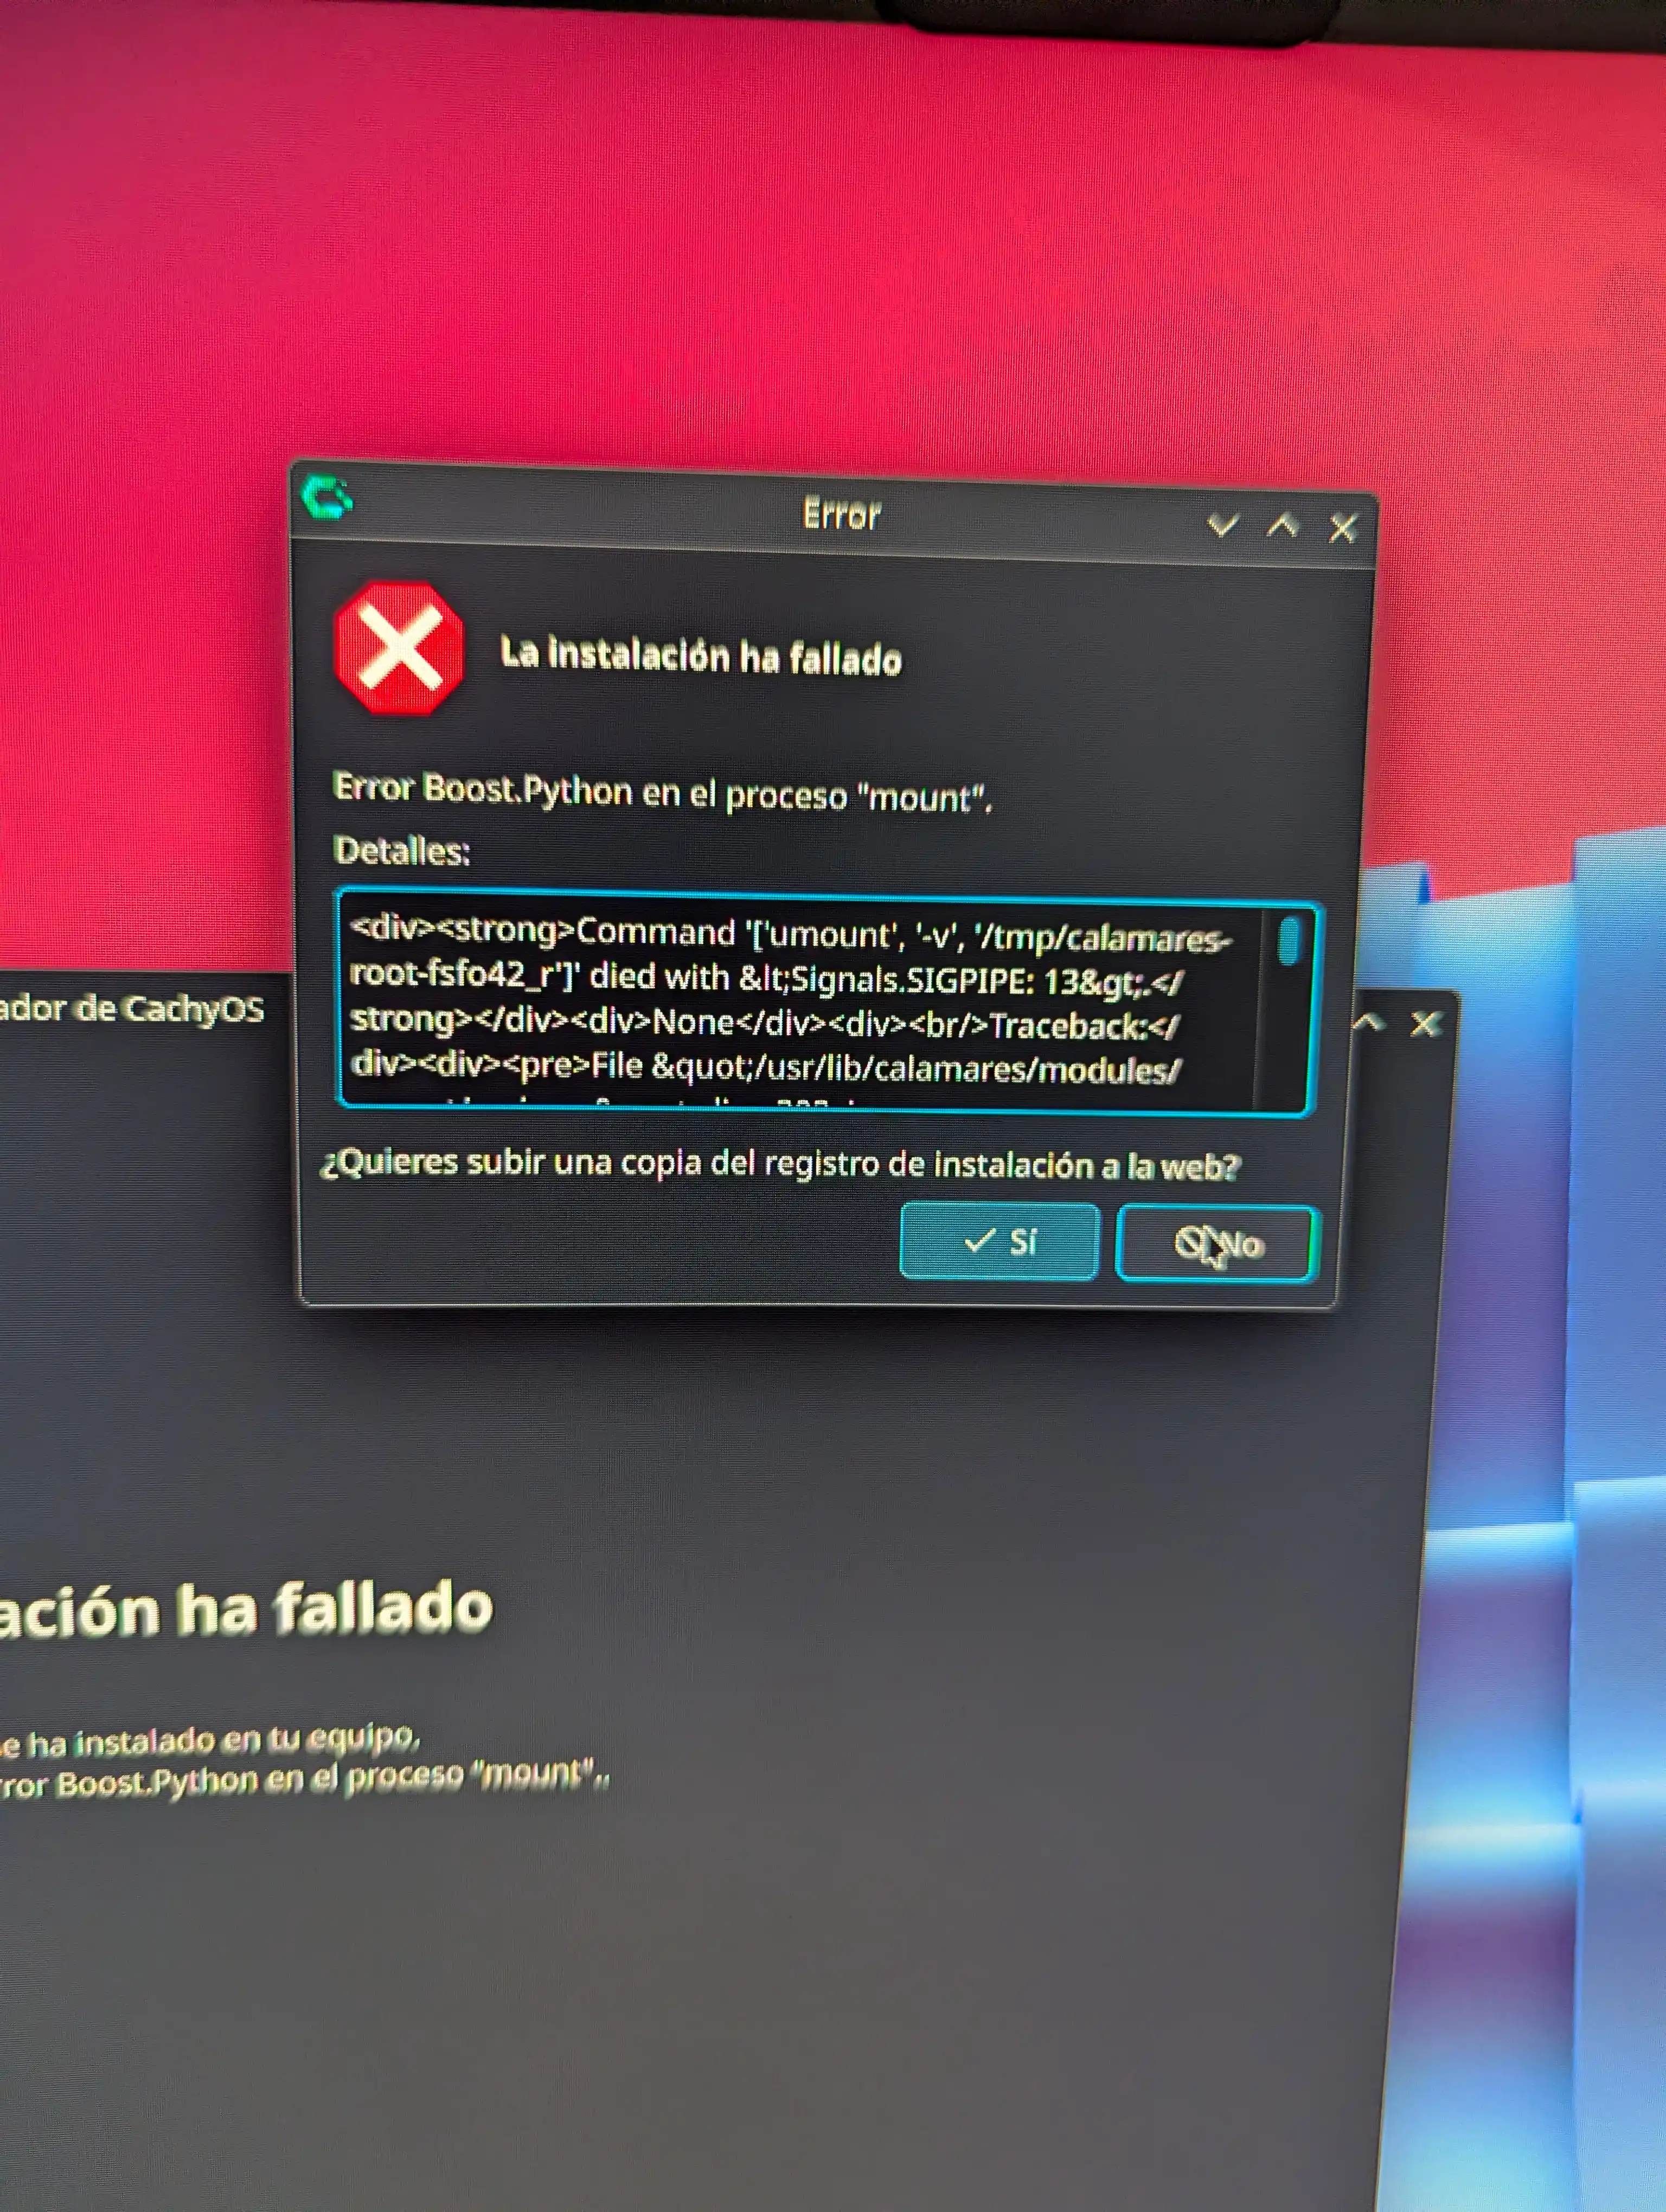
Problem 1: Boost.Python Error in Calamares (SIGPIPE: 13)
During installation with the Calamares graphical wizard, the error may appear Error Boost.Python en el proceso "mount" (SIGPIPE: 13). This error does not indicate a physical fault on your NVMe drive.
The problem occurs when the installer attempts to partition, format, or unmount the target drive, but the USB live operating system keeps the partition held in the background by some ghost process, generating a hardware lock conflict (known as "drive busy").
Solution: Manual disk wipe from terminal
- Close the error window and completely close the Calamares installer.
- Open a terminal (Konsole) in the live environment.
- Force unmount any locked volumes and wipe the disk partition tables:
sudo umount -l /dev/nvme1n1* 2>/dev/null
sudo sgdisk --zap-all /dev/nvme1n1
Note: The flag --zap-all destroys corrupted or locked GPT/MBR structures, leaving the drive in a completely virgin state. Replaces nvme1n1 by the correct identifier of your disk (you can verify it with the command lsblk).
- Start the wizard again from CachyOS Hello → "Run installer".
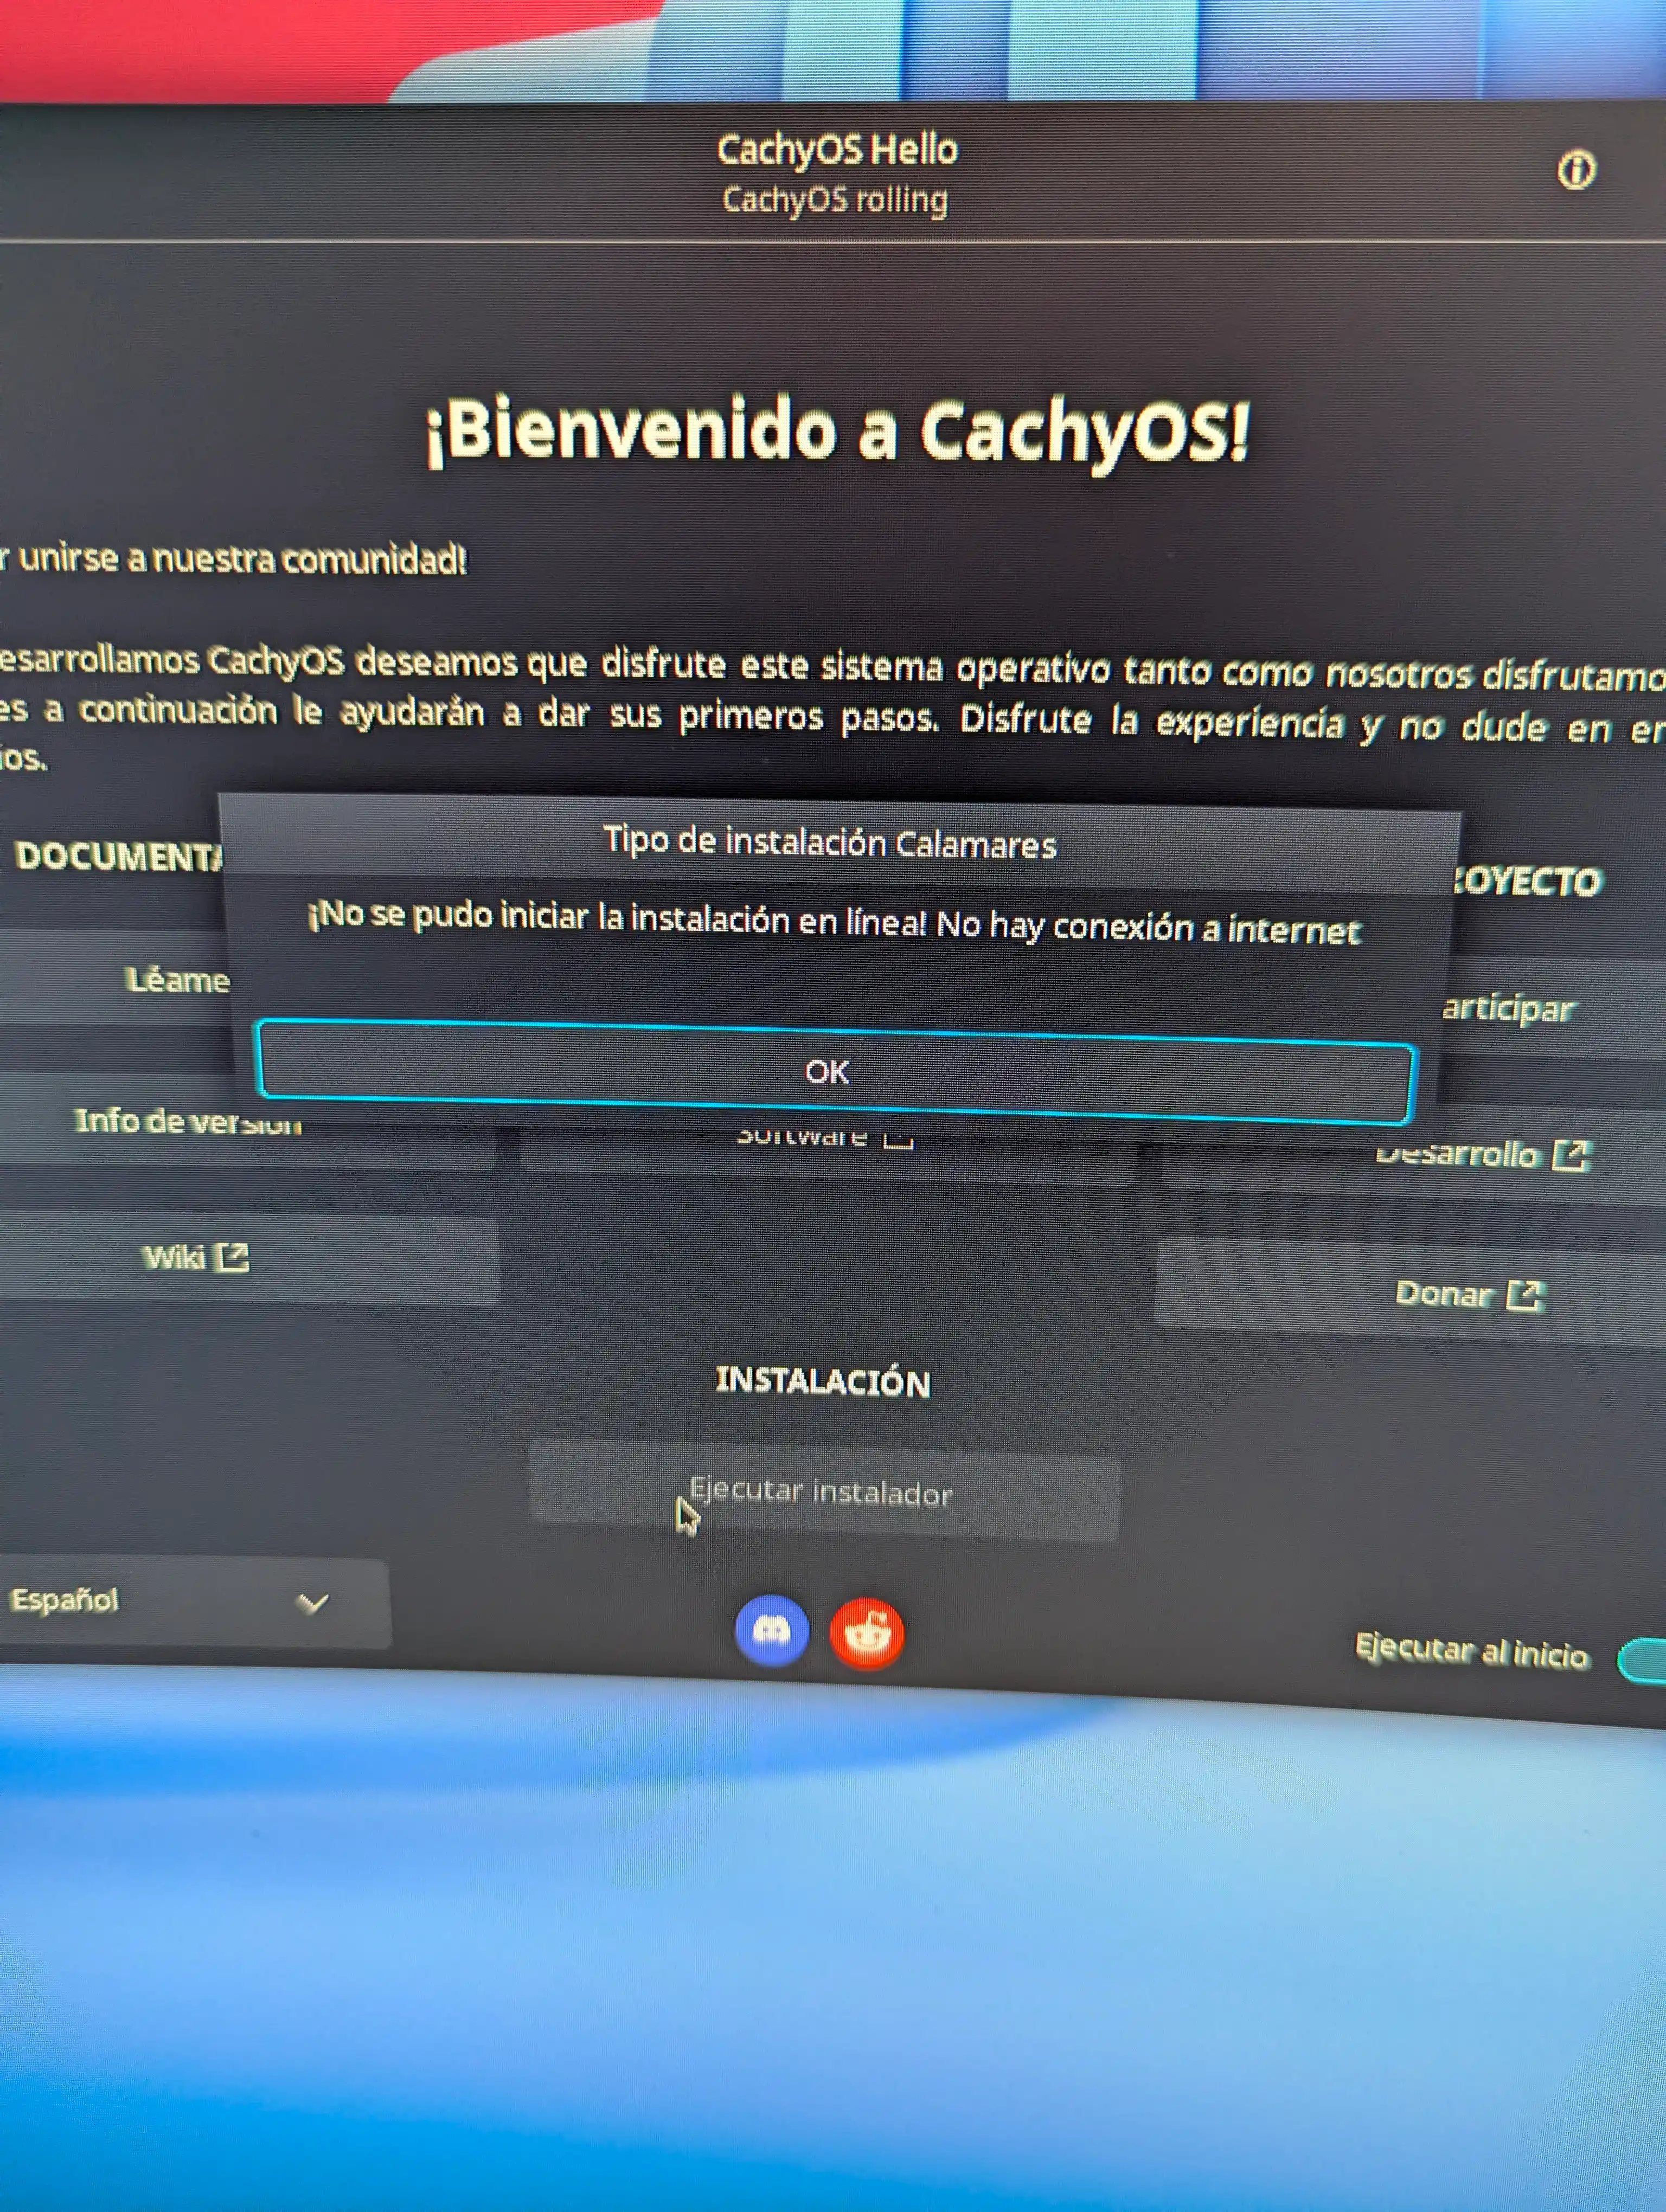
- Make sure you have an active internet connection.
- Proceed with the previous configuration (GRUB, disk erase, Btrfs format). Having released the phantom mounts, the installation process will complete without interruptions.
Problem 2: Kernel Panic when Switching from Windows to Linux (Warm Reboot)
A critical symptom in Dual Boot environments with modern motherboards is the following: if you perform a "Reboot" from Windows to enter Linux, you get a Kernel Panic immediately (inability to read the NVMe) or you lose the digital audio outputs (DisplayPort/HDMI). However, if you completely turn off the machine and turn it on from scratch, both systems work absolutely normally.
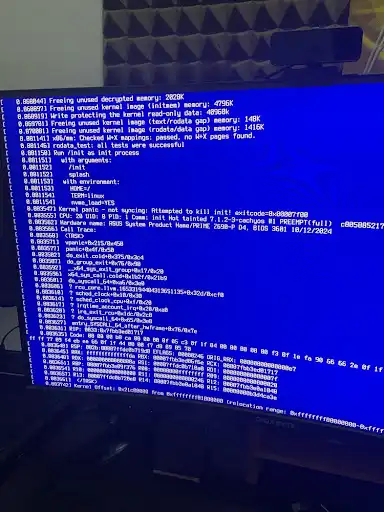
Why it happens
This behavior is a direct consequence of the function Fast Startup of Windows. When you command a reboot with this feature active, Windows doesn't genuinely shut down the system: it dumps the state of the kernel and hardware drivers into a hybrid hibernation, keeping the audio controllers and NVMe interfaces locked under a dedicated power state—a true "hardware hijack."
By immediately taking control, the Linux kernel cannot initialize those components because they do not respond to its clean boot requests, triggering a system crash.
Definitive solution: Deactivation in Windows and BIOS
The solution is twofold. First, disable Fast Startup in Windows by following the steps described in the Part 1, Step 2 of this guide. Second, also disable it in the firmware:
- Reboot and access your BIOS (key
SupreitherF2on ASUS boards). - Go to the advanced tab Boot.
- Locate the parameter Fast Boot and put it in Disabled.
- Save changes and exit.
With this dual configuration, Windows will release the data and power buses strictly every cycle, allowing Linux to recognize the hardware without conflicts.
Problem 3: Authentication Failures after Installation (Password Reset)
If after completing the installation the system rejects your password—even when you try to log in from a plain text console (TTY) with Ctrl + Alt + F3—, the system presents a credential inconsistency. This is usually caused by incorrect keyboard mapping during installation (for example, if your keyboard is Spanish and the installer assumed English, the password you typed has different characters).
This scenario does not require complete formatting. You can rewrite the password by exploiting recovery utilities from the original Live ISO using an environment Chroot (root change).
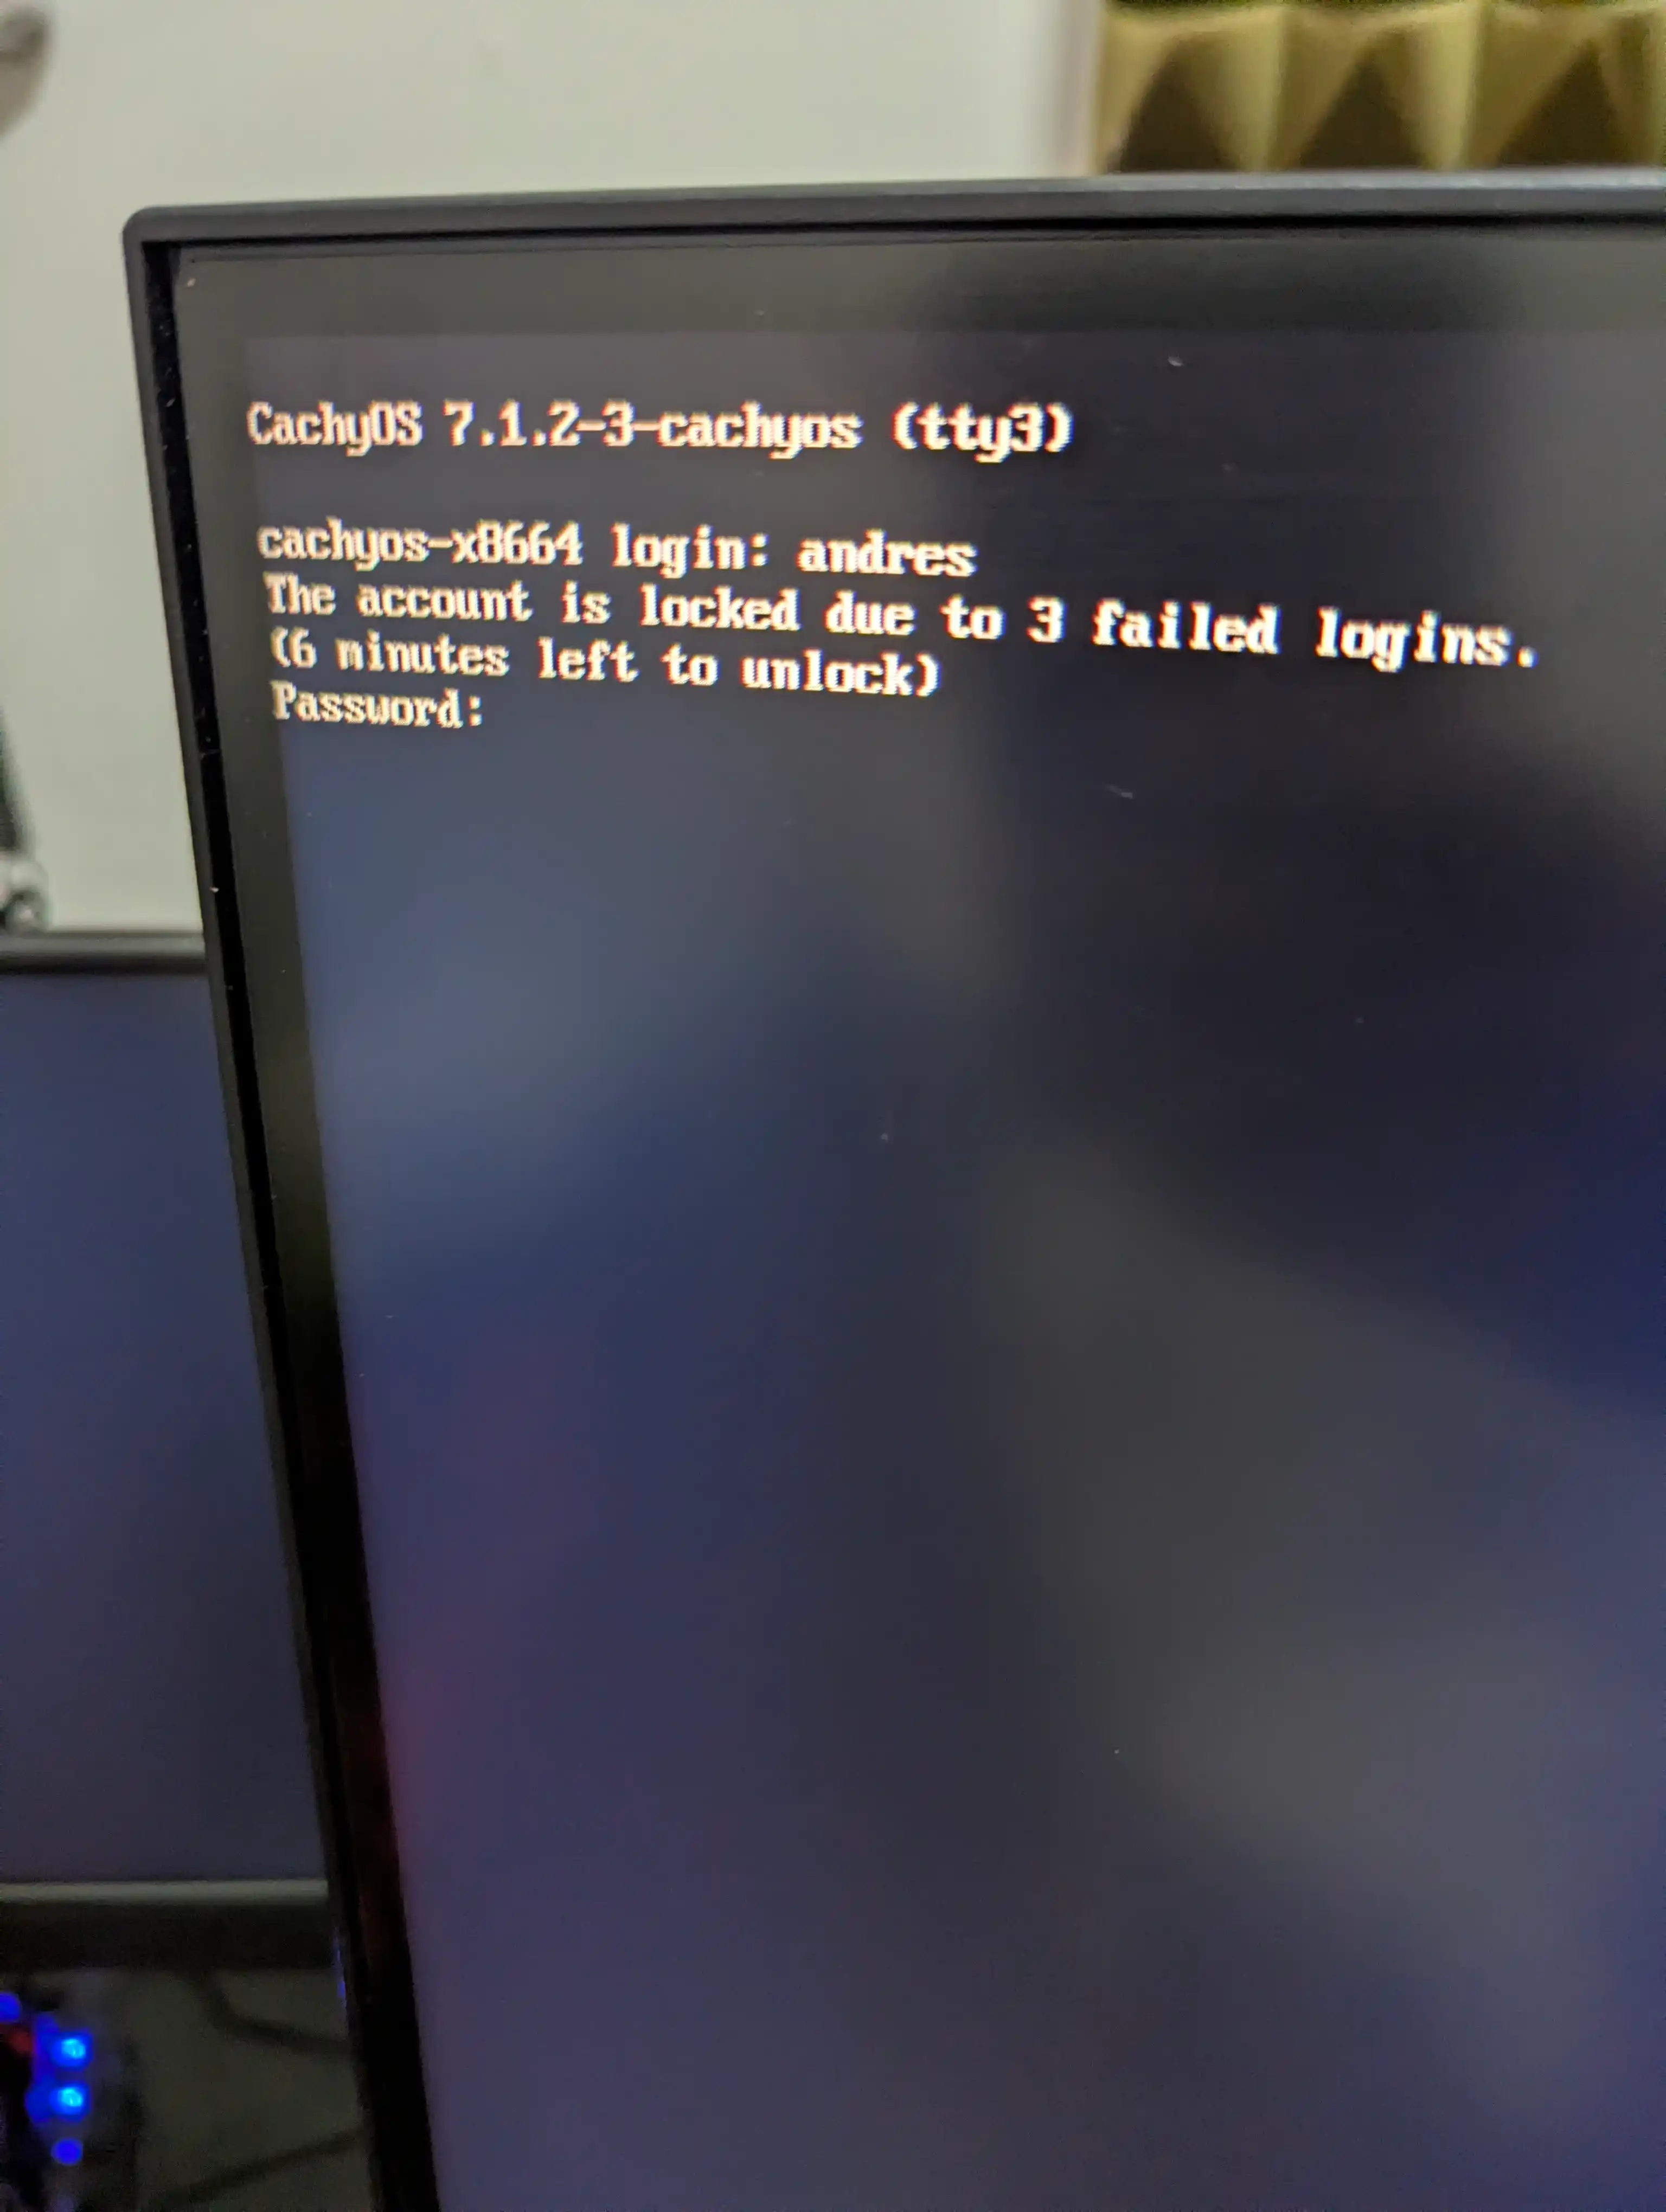
In which, you can see that if you have authentication problems more than 3 times, they block you for 8 minutes.
Step-by-step recovery protocol
- Boot your computer from the CachyOS installation USB to access the live desktop.
- Open a terminal and identify your root partition:
lsblkFind the formatted drive in btrfs (identifiable by its size). For this example, we will assume that it is /dev/nvme1n1p2.
- Mounts the root subvolume (
@) of the file system in the temporary directory:
sudo mount -o subvol=@ /dev/nvme1n1p2 /mnt- Perform the root change (chroot). This command transfers the execution of the terminal inside the system installed on your SSD, using its own binaries and environment variables:
sudo arch-chroot /mnt- Reassign a new password for your user (replace
tunombredeusuariofor yours):
passwd tunombredeusuarioTip: Enter the new password calmly. On pure consoles, use the top number row of the keyboard instead of the number pad to avoid mapping variations.
- Once the terminal confirms "password updated successfully", close chroot, unmount and reboot:
exit
sudo umount /mnt
sudo reboot
Another problem is that I had a double monitor connected and the desktop with the options was loaded on it, from there, you can select the Wi-Fi for the Internet or place a network cable:
Problem 4: Corrupted GRUB
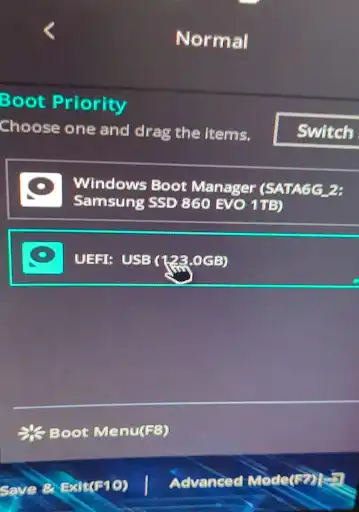
For some reason, GRUB never worked and I should have repaired it to be able to enter Windows from it, but, DON'T PANIC, you can also enter from the BIOS, simply boot from it.
Issue 5: SDDM (KDE Plasma Login Manager) Error with NVIDEA
There are times when I log in and the screen appears black, the background image does not appear and the options do not work, neither log in nor restart, and I have to restart manually:
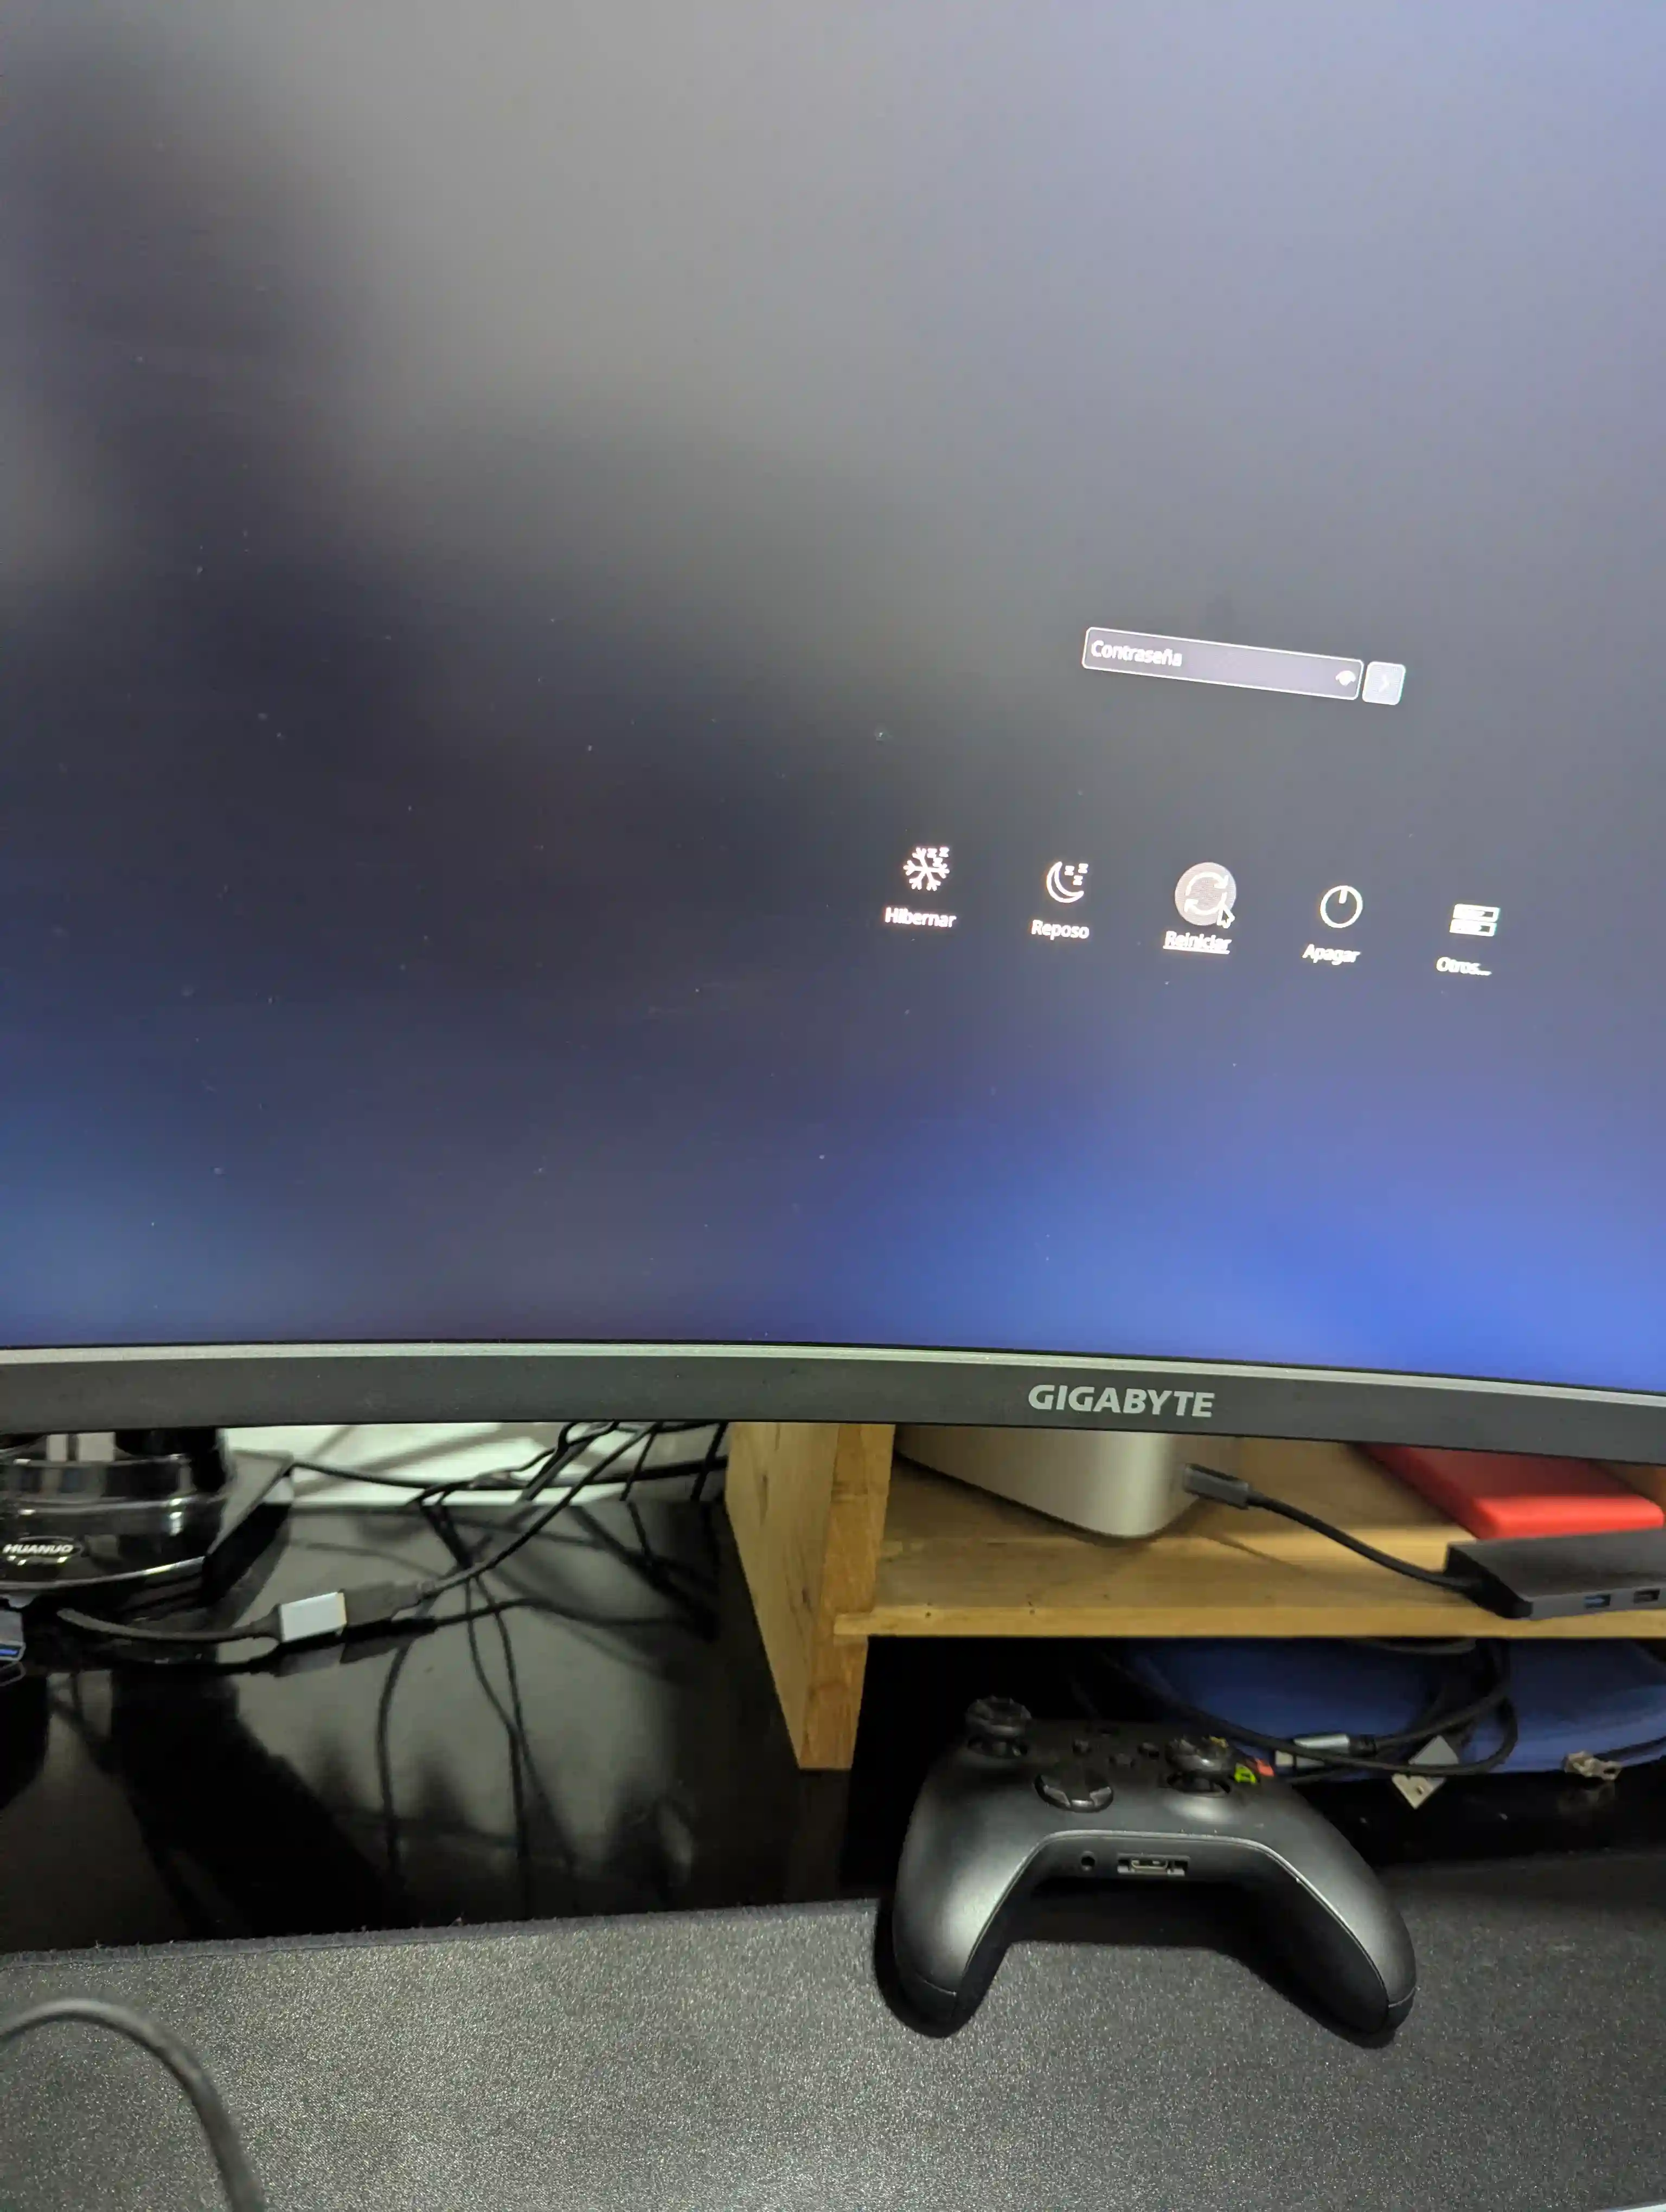
The login interface freezes graphically before loading the wallpaper and system services, leaving the buttons completely "dead" because the video driver was not initialized in time during startup.
Since you're on CachyOS, we can nip this in the bud by forcing the video drivers to load early.
How to revive the screen right now (Without forcibly turning off)
If you're stuck on that frozen screen and don't want to shut down the PC by holding the physical button:
- Press the shortcut Ctrl + Alt + F3 (this will take you out of the frozen interface and open a pure text mode terminal).
- Enter your username and password.
- Restart the graphical environment at once by executing:
sudo systemctl restart sddmPart 4: Software Management — Pacman and Paru
To understand how to install and manage software on CachyOS, you need to understand that the ecosystem is divided into two worlds: the official and the community. Each one has their tool.
The Official Manager: Pacman
pacman is the system's native package manager, programmed in C to maintain lightweight databases and fast operations. It is the equivalent of apt on Ubuntu/Debian, but considerably faster.
- Where do you get the programs from: From the official and stable Arch Linux repositories, complemented by CachyOS' own optimized repositories.
- What download: Binary packages already compiled and ready to use (extension
.pkg.tar.zst). They install in seconds. - Security: Absolute. All software has been verified, packaged and digitally signed by the distribution's official developers.
- Typical command:
sudo pacman -S steam
The Community Assistant: Paru
paru works as a wrapper advanced (wrapper) designed to interact with the AUR (Arch User Repository), the massive community-powered repository that hosts software like Google Chrome, Android Studio, or DaVinci Resolve.
- Where do you get the programs from: From the AUR, an open repository powered by the community. All the software that official maintainers cannot distribute directly lives here.
- What download: It does not download the finished program, but rather a build script called
PKGBUILD. The tool reads this "recipe", downloads the source code or binaries from the creator's official website, compiles them on your machine and finally callspacmanfor installation. - Interoperability:
paruIt is a total replacement ofpacman. You can search for and install both AUR packages and official packages. - Security: Community. Being an open repository, it will always show you the PKGBUILD code before running anything, so you can audit it.
- Typical command:
paru -S android-studio(Does not usesudoat the beginning; requests it at the end for security).
The Restaurant Analogy
Imagine that your operating system is a restaurant:
pacmanis the Main Chef: Manage the kitchen and serve finished dishes directly from the official menu. Everything is certified and guaranteed.paruis the Kitchen Assistant: If you order an exotic dish that is not on the menu, he goes to the community market, gets the recipe, acquires the ingredients, processes them and delivers them to the Head Chef (pacman) so that it gives them the final approval and serves them in the system.
Quick Comparison Table
| Feature | pacman | paru |
|---|---|---|
| Repository | Official (stable and optimized) | AUR (community and third parties) + officials |
| File type | Precompiled binary (instant install) | PKGBUILD build scripts (requires local compilation) |
Requires sudo at the beginning | Yeah | No — it asks for it at the end to install |
| Can it replace the other? | No, it does not interact with the AUR | Yes, it acts as a wrapper and also searches official repositories |
| Speed | Very fast (just download and unzip) | Slower (download + local compilation) |
Anatomy of Pacman Commands: Flags and Modifiers
The syntax of pacman is organized hierarchically: the letters in CAPITAL LETTERS determine the main operation, and the letters in lowercase They are modifiers of that action.
The Sync Modifier (-S)
The flag -S (sync) indicates that the operation will query the remote repositories. Its most important combinations are:
sudo pacman -Sy(Sync + Refresh): Synchronizes local databases by downloading the latest package lists. Equivalent toapt update.sudo pacman -Su(Sync+Upgrade): Update all installed packages that are outdated. Equivalent toapt upgrade.sudo pacman -Syu(The standard combination): Synchronize remote repositories AND update the entire system in a single atomic command. This is the command you should run periodically to keep your system up to date.
sudo pacman -SyuWhich you can run at least once a week to keep the system up to date, this command updates OS dependencies and also the software you have installed.
Update system and packages
In your navigation bar, you will see that there is a tool called Cachy-Update, which you can use instead of the previous command, it has advantages such as that it already updates from the AUR repository; andIt is NOT necessary to update packages installed with these tools such as Flutter, or VSC (as we will see later) through Flutter upgrade, on the contrary, if you update it manually, you can get permission problems when Flutter is installed using the sudo command and in the end, the update and installation should be done using pacman.
From the CachyOS Wiki, they recommend using Octopi:
- Start Octopi from the applications menu.
- In the main window, click the Check updates button (top left), and now System upgrade next to it. (System update).
- Octopi will check for updates.
404 in Arch/CachyOS
Many times when installing new software (for example udo pacman -S Olama-cuda), we get a 404:
 ollama-cuda-0.31.2-1.1-x86_64_v3                    773,2 MiB  15,5 MiB/s 00:50 [----------------------------------------------] 100%

error: no se pudo obtener el archivo «ollama-cuda-0.31.2-1.1-x86_64_v3.pkg.tar.zst» desde cachyos.doridian.net: The requested URL retu

rned error: 404

error: no se pudo obtener el archivo «ollama-cuda-0.31.2-1.1-x86_64_v3.pkg.tar.zst.sig» desde mirror.krfoss.org: The requested URL ret

urned error: 404

advertencia: no se pudieron recibir algunos archivos

error: no se pudo realizar la operación (no se pudieron descargar algunos archivos)

Ocurrieron errores, por lo que no se actualizarán los paquetes
To do this, we must update the Database:
sudo pacman -Syyu- -Syy: Forces the download of package databases from scratch, ensuring that your system knows the exact URLs and versions that currently exist on the CachyOS servers.
- -u: Update your system to avoid broken dependency issues.
Other Main Operations
-R(Remove): Uninstalls a system package.sudo pacman -R discord # Elimina el paquete sudo pacman -Rns discord # Elimina el paquete + dependencias huérfanas + archivos de configuración-Q(Query): Queries about locally installed packages.pacman -Q # Lista todos los paquetes instalados pacman -Qs firefox # Busca "firefox" entre los paquetes instalados pacman -Qi firefox # Muestra información detallada de un paquete instalado-F(Files): Searches remote repositories to which package a specific file or library belongs to. Extremely useful for resolving type errorslibXYZ.so.1: cannot open shared object file.sudo pacman -Fy # Actualiza la base de datos de archivos pacman -F libGLU.so.1 # Descubre qué paquete contiene esa librería-U(Upgrade from file): Install a package directly from a file.pkg.tar.zstlocal.sudo pacman -U ./paquete.pkg.tar.zst
Common Commands Table: Ubuntu vs. CachyOS
| Action | Ubuntu (apt) | CachyOS — Official (pacman) | CachyOS — Community (paru) |
|---|---|---|---|
| Install a package | sudo apt install <pkg> | sudo pacman -S <pkg> | paru -S <pkg> |
| Update the system | sudo apt update && sudo apt upgrade | sudo pacman -Syu | paru -Syu |
| Find a package | apt search <pkg> | pacman -Ss <pkg> | paru -Ss <pkg> |
| Delete a package | sudo apt remove <pkg> | sudo pacman -R <pkg> | paru -R <pkg> |
| Remove + orphan dependencies | sudo apt autoremove | sudo pacman -Rns <pkg> | paru -Rns <pkg> |
| List installed packages | apt list --installed | pacman -Q | paru -Q |
| Clear download cache | sudo apt clean | sudo pacman -Sc | paru -Sc |
Diagnostic Note: If the system returns
unknown command: paru, the binary is not installed. In clean installations of CachyOS it may already be included, but if not, install it with:sudo pacman -S paru. never runsudo paru—the wizard will refuse to function as root by security design.
Part 5: Automount partitions
In modern Linux distributions, such as CachyOS or Arch Linux, manually mounting disks through the graphical interface of for example KDE usually assigns temporary paths and variables within /run/media/, and an annoyance when logging in that asks you for the password to mount the disks.
For professional software development or multimedia production workflows where these disks are essential for software such as OBS, Davinci, Gimp to work with the files stored on these disks, the ideal is to configure a permanent and fixed automount at system startup by modifying the native configuration file /etc/fstab.
1. Identify partitions
Before modifying any parameters, we need to know with millimeter precision the globally unique identifiers (UUID) and formats of our disks. To do this, we use the following command in the terminal:
lsblk -fCommand explanation:
lsblk: Means List Block Devices. It is responsible for listing all the storage devices available on the hardware (SSD, NVMe, HDD).-f: It is the flag of Filesystem. Forces the command to display detailed information about file systems, LABEL names, current mount points and, most importantly, the UUID code. Using the UUID ensures that the configuration is not broken if you change the order of the physical cables on your motherboard.
2. Create the mount points
The system needs an empty physical folder into which to "merge" the files from the disk. We must prepare this directory before configuring automatic mounting:
sudo mkdir -p /mnt/AlmacenExplanation of the command and its parameter:
sudo: Executes the statement with superuser privileges, necessary to modify system directories such as/mnt/.mkdir: Standard command for creating directories (Make Directory).-p: It is the crucial parameter of Parents (parents). It serves a double security function: first, if the intermediate route does not exist (for example, if/mntwas not created), it automatically creates it along the way without failing. Second, if the final folder already exists, the command simply does nothing and avoids throwing an annoying error in the terminal.
3. The mount instruction in /etc/fstab
Once the destination folder is created on the system (for example, on /mnt/Almacen), a configuration line is added to the end of the file /etc/fstab. Below is a standard instruction optimized for performance and security:
UUID=4d294d69-a027-474b-b908-314443e6290c /mnt/Almacen btrfs defaults,noatime,compress=zstd:1,nofail 0 0You can use nano:
sudo nano /etc/fstabCopy and paste the changes Control+O to save and Control+X to exit
Then, run the following command to see that everything is OK and verify the integrity of the disks that we are going to automatically mount when starting the computer:
sudo findmnt --verifyAs additional help, use a chat AI like Gemini, pass it the output of the lsblk -f command so that it composes the automount, with that output, use another AI like ChatGTP or Perplexity to verify that the data is OK and you can restart safely; detailed steps, in the wiki:
https://wiki.cachyos.org/configuration/automount_with_fstab/
4. Detailed explanation of the instruction
The file /etc/fstab processes the configuration by strictly dividing it into 6 columns separated by spaces or tabs. Each component fulfills a crucial function:
- Column 1 (Identifier):
UUID=4d294d69-a027-474b-b908-314443e6290c. Specifies exactly which physical partition to initialize, using its unique identifier. - Column 2 (Mount Point):
/mnt/Almacen. Determines the absolute path of the system directory where disk files will be "merged" and displayed. - Column 3 (File System Type):
btrfs. Tells the Linux Kernel which driver or native driver to use to interact with the disk structure (can be changed byext4,ntfs3, etc.). - Column 4 (Mounting Options): It is a comma-separated block of parameters without spaces that define the behavior of the partition:
defaults: Applies a set of standard and safe operating system settings, such as allowing reading, writing, and executing binaries.noatime: Disables writing access metadata every time you open a file to read it. This dramatically reduces unnecessary writes, optimizing speed and extending the life of SSDs.compress=zstd:1: Enables transparent compression in the background using the ZSTD algorithm at level 1. Reduces footprint and speeds up read rates by processing fewer bytes of mass storage.nofail: It is the most important security parameter. If the drive becomes disconnected, physically fails, or becomes corrupted, this tag forces the system to ignore the error and continue with the normal boot of your desktop environment, avoiding emergency mode lock screens.
- Column 5 (Dump):
0. Tells the legacy backup tool dump whether you should back up this partition. When set to zero, it is completely disabled. - Column 6 (Pass):
0. Determines the order in which the utilityfsckwill inspect the device for errors during boot. When set to zero for auxiliary disks, power-on scanning is skipped to maintain immediate and fast booting.
Also, you can mount disks from KDE Partition Manager although I DO NOT recommend it because when you log in, a window will appear to give the credentials to mount:
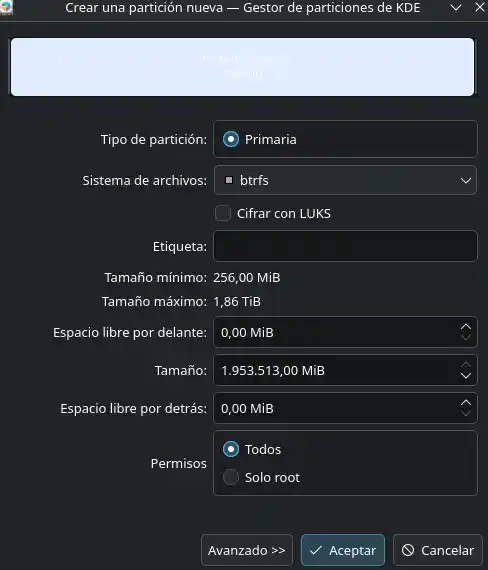
Part 6: Essential Software Guide for Developers
CachyOS uses Pacman as the default package manager for its official repositories (which include precompiled, processor-optimized binaries), and Paru as an assistant for the AUR (Arch User Repository), allowing you to install community-maintained software such as Google Chrome.
For periodic update tasks, the terminal or graphical tools such as Octopi can be used. It is recommended to run updates once or twice a week to maintain system stability and avoid conflicts between package versions.
To mount additional disk drives permanently at system startup, you must configure the /etc/fstab adding the UUID identifiers of the corresponding partitions, avoiding depending on the automatic tools of the desktop environment that request credentials on each reboot.
One of the biggest advantages of CachyOS is immediate access to almost any development tool through pacman and the AUR. Below is a selection of essential software categorized by work area.
General Development Tools and Games
Visual Studio Code: The most popular code editor in the world. Available directly from the CachyOS repositories with full extension support.
sudo pacman -S codeOr install the official binary version from Microsoft (includes telemetry and complete marketplace):
paru -S visual-studio-code-binGit: Version control, essential for any modern development project.
sudo pacman -S gitConfigure your global identity after installation:
git config --global user.name "Tu Nombre"
git config --global user.email "tu@email.com"
Build Tools Base: The group
base-develincludes gcc, make, and other essential utilities required to compile software from source (and required by paru for the AUR).sudo pacman -S base-develNeovim: The modern, extensible text editor for the terminal, with a huge plugin ecosystem. Powerful alternative for those who prefer keyboard-based workflow.
sudo pacman -S neovimJetBrains Toolbox: Installer and manager of JetBrains IDEs (IntelliJ, PHPStorm, WebStorm, DataGrip, etc.). The neatest way to keep multiple IDEs up to date.
paru -S jetbrains-toolboxObsidian:
sudo pacman -S obsidianFilezilla:
sudo pacman -S filezillaOBS:
sudo pacman -S obs-studioA plugin for transitions in OBS:
paru -S obs-move-transitionIf you have a Stream Deck:
paru -S streamdeck-ui --noconfirmOr the more complete version that can even use plugins:
$ paru -S streamcontroller
:: Resolviendo dependencias...
:: Hay 2 proveedores disponibles para streamcontroller
:: Repositorio AUR:
    1) streamcontroller  2) streamcontroller-git
Te recomiendo la opción 1, ya que la de git puede ser más inestable.
Audio Effects:
sudo pacman -S easyeffectsVLC:
sudo pacman -S vlcIn order to use EpicGame and GOG:
sudo pacman -S heroic-games-launcher-binBlender:
sudo pacman -S blenderWhen you open Blender for the first time, do this to make sure it uses the full power of your graphics when rendering:
Go to the top menu: Edit > Preferences.Select the System tab on the left.
At the top, you will see several tabs: None, CUDA, OptiX, HIP, OneAPI.
Select OptiX (it's NVIDIA's optimized engine for RTX cards, much faster than traditional CUDA for ray tracing rendering).
Check the box for your NVIDIA GeForce RTX 5070.
If you have a Wacom tablet:
sudo pacman -S wacomtabletwacomtablet: It is the official KDE module that allows you to configure everything graphically from the system settings.
If you have a VR:
paru -S alvr-bin --noconfirmOr if you prefer not simpler as wivrn:
paru -S wivrn-dashboard --noconfirmI recommend that you follow the steps on GitHub, but in summary it is, open port 5353 and 9757:
sudo ufw allow 5353/udp
sudo ufw allow 9757
Reload the Firewall:
sudo ufw reloadActivate and start the Avahi service:
sudo systemctl enable --now avahi-daemon systemctl status avahi-daemon- And restart your computer. If you have problems with this version of wivrn, at the end of the post we'll see how to install it using git to avoid frozen dependencies, such as the following error:
/usr/bin/wivrn-server: error while loading shared libraries: libavcodec.so.62: cannot open shared object file: No such file or directoryOllama:
sudo pacman -S ollamaIn the case of Ollama, if you use NVIDIA, it is necessary to install the cuda package so that Ollama can use the GPU, if not, it will be devilishly slow since it will execute through the CPU instead of your GTP, to do this:
sudo pacman -S ollama-cudaRun this command to revert the Ollama service to its original factory state:
sudo systemctl revert ollamaLet's tell systemd to throw the old process out of RAM, read the new files from rocama-cuda, and start the clean service:
sudo systemctl daemon-reload
sudo systemctl restart ollama
Open your graph monitor in a terminal:
watch -n 1 nvidia-smiIn another terminal, ask your model something:
ollama run gemma2 "Hola"Now you should see how the memory consumption in nvidia-smi takes a jump and the olivama_llama_server process appears processing happily on your GPU.
Shelly is a modern package manager for Arch Linux, designed to be a more intuitive alternative. It offers a visual interface focused on user experience and ease of use and you can use other package managers graphically:
sudo pacman -S shellyWe activate in the background:
sudo systemctl enable --now ollamaGitHub to authenticate through our projects with Git:
sudo pacman -S github-cliThen:
gh auth loginA key mapper, ideal for programmable keyboards:
paru -S input-remapper-git
sudo systemctl enable --now input-remapper
Answer the terminal questions with the arrow keys and Enter:
What account do you want to log into? Select GitHub.com.
What is your preferred protocol for Git operations on this host? Select HTTPS.
Authenticate Git with your GitHub credentials? Select Yes.
How would you like to authenticate GitHub CLI? Select Login with a web browser.
The final step: The terminal will give you an 8-digit code (copy it) and tell you to press Enter to open your browser. The website will open
GitHub, paste the code, authorize and that's it! You are now logged into Git forever.
Execution Environments and Languages
Node.js and npm: The JavaScript runtime, essential for modern web development with React, Vue, Next.js and the like, you can install a specific version such as:
sudo pacman -S nodejs npmOr better, it is recommended to use nvm (Node Version Manager) to manage multiple Node versions without conflicts:
paru -S nvmWe install the legacy version:
nvm install --ltsOr a specific one:
nvm install 20We use:
nvm use 20PHP and Composer: For backend web development with frameworks like Laravel.
sudo pacman -S php composerIf you use Fish as a shell, add the Composer binaries directory to your PATH:
set -U fish_user_paths $HOME/.config/composer/vendor/bin $fish_user_pathsPython and pip: Python comes preinstalled on CachyOS, but you can make sure you have the development tools:
sudo pacman -S python python-pipJava (JDK): For native Android development or enterprise applications.
sudo pacman -S jdk-openjdkFlutter and Dart: The Google SDK for cross-platform application development (Android, iOS, Web, Desktop) from a single code base.
paru -S flutter-bin --noconfirmWe add to the path:
fish_add_path /opt/flutter/binIf when doing flutter doctor you see something like:
[✗] Chrome - develop for the web (Cannot find Chrome executable at google-chrome)
! Cannot find Chrome. Try setting CHROME_EXECUTABLE to a Chrome executable.set -Ux CHROME_EXECUTABLE (which cachy-browser || which google-chrome-stable || which chromium || echo "")
Databases
MariaDB (MySQL): The most used relational database in web development.
sudo pacman -S mariadb
sudo mariadb-install-db --user=mysql --basedir=/usr --datadir=/var/lib/mysql
sudo systemctl enable --now mariadb
PostgreSQL: The most advanced relational database in the open source world.
sudo pacman -S postgresql
sudo -u postgres initdb -D /var/lib/postgres/data
sudo systemctl enable --now postgresql
Redis: In-memory data store for cache, queues, and sessions.
sudo pacman -S redis
sudo systemctl enable --now redis
TablePlus/DBeaver: Graphical clients to manage databases. DBeaver is open source and supports virtually any engine.
paru -S dbeaver
Installing and Configuring PostgreSQL with pgvector
If you want to work with AI and use vector databases, the solution is PSQL.
Once our Markdown files have been fragmented and converted into semantic vectors, the final infrastructure step is to persist them in a high-performance relational database engine that supports similarity search operations. In this ecosystem we will choose PostgreSQL along with the native extension pgvector.
1. Server Installation and Vector Extension
In Arch Linux-based environments (such as CachyOS), the pgvector It is already packaged in the official community repositories, eliminating the need to compile the tools by hand. We install the core and its utilities through the terminal:
sudo pacman -S postgresql postgresql-old-upgrade pgvectorpostgresql-old-upgrade is a common dependency that pacman often requests on Arch for database service management).
2. Data Cluster Initialization
Before starting the service for the first time, it is mandatory to configure the base directory on the disk where PostgreSQL will physically manage the tables and indexes. We execute the initialization under the dedicated system user:
sudo -u postgres initdb -D /var/lib/postgres/data3. Service Management with systemd
We activate the server daemon in the background and add it to the operating system boot sequence:
# Iniciar el servidor inmediatamente
sudo systemctl start postgresql

# Habilitar el inicio automático en cada arranque
sudo systemctl enable postgresql

# Para verificar que esté corriendo perfectamente sin errores de puertos o configuración
systemctl status postgresql
4. Creating the Environment and Credentials
We access the integrated interactive console (psql) to assign a strong password to the default administrator and structure our project's database (in this example, called ld):
sudo -u postgres psqlWithin the Postgres interactive SQL interface, we execute the control statements:
-- Asignar la clave de acceso al rol administrador
ALTER USER postgres WITH PASSWORD 'root';

-- Instanciar la base de datos dedicada
CREATE DATABASE ld;

-- Salir de la consola de comandos
\q
5. Enabling the pgvector Extension
The extension has been added to the system binaries, but must be explicitly enabled in our database schema for the engine to recognize the data type. vector. We connect directly to the new instance:
psql -U postgres -d ld -h localhostOnce authenticated with our password, we inject the registration command:
CREATE EXTENSION IF NOT EXISTS vector;You can verify correct provisioning of the library by listing the loaded utilities using the shortcut \dx. From this point on, your relational database instance is ready to store, index, and perform cosine distance calculations on 768-dimensional numeric arrays.
Containers and Virtualization
Docker and Docker Compose: The standard container platform for application development and deployment in isolated, reproducible environments.
sudo pacman -S docker docker-compose
sudo systemctl enable --now docker
sudo usermod -aG docker $USER
Sign out and sign back in for the group changes to take effect.
Distrobox: Already mentioned in the glossary, it is an exceptional tool for running software from other distributions transparently, sharing the GPU and the graphical environment. Ideal for DaVinci Resolve, Red Hat tools, etc.
sudo pacman -S distroboxPodman: Alternative to Docker without a background daemon (daemonless), more secure by default. Fully compatible with most Docker commands.
sudo pacman -S podman
Network Tools and APIs
curl and wget: Essential command line tools for transferring data and downloading files.
sudo pacman -S curl wgetInsomnia / Bruno: Graphical clients to test REST and GraphQL APIs. Bruno is open source and stores collections as plain text files (Git-friendly).
paru -S insomnia-bin
# o la alternativa open source:
paru -S bruno-bin
ngrok/Cloudflared: Tools to expose a local server to the internet temporarily, useful for testing webhooks from Stripe, GitHub, etc.
paru -S cloudflared
Terminal and Shell
Fish Shell: A user-friendly, interactive shell with intelligent out-of-the-box autocompletion, real-time syntax highlighting, and advanced history management. It is not POSIX compatible, but its learning curve is minimal.
sudo pacman -S fish
chsh -s /usr/bin/fish     # Establece Fish como shell predeterminado
Zsh + Oh My Zsh: The POSIX-compliant alternative with a huge ecosystem of themes and plugins.
sudo pacman -S zsh
paru -S oh-my-zsh-git
Starship: A minimalist, extremely fast and customizable prompt for any shell (Fish, Zsh, Bash). Shows contextual Git information, language versions, Kubernetes status, etc.
sudo pacman -S starshiptmux: Terminal multiplexer that allows you to divide the screen into panels, maintain persistent sessions on the server and much more.
sudo pacman -S tmuxfzf: A fuzzy finder for the terminal that powers command history, file search, and more.
sudo pacman -S fzfAlacritty/Kitty: High-performance terminals with GPU acceleration. Much faster than traditional emulators.
sudo pacman -S alacritty
# o
sudo pacman -S kitty
Browsers and Communication
Google Chrome:
paru -S google-chrome --noconfirmOr a beautiful Firefox-based browser:
sudo pacman -S zen-browser-binFirefox: Included by default in many CachyOS configurations. If not present:
sudo pacman -S firefoxDiscord:
sudo pacman -S discordSlack:
paru -S slack-desktop --noconfirm- OpenCode:
sudo pacman -S opencodeAndroid Studio: The official IDE for Android application development.
paru -S android-studio --noconfirmCursor:
paru -S cursor-bin
Local Artificial Intelligence
Ollama: The easiest tool to run large language models (LLMs) locally on your hardware. Compatible with models such as Llama 3, Mistral, Phi-3, CodeLlama and many more.
paru -S ollama
sudo systemctl enable --now ollama
# Descargar y ejecutar un modelo:
ollama run llama3.2
Open WebUI: A ChatGPT style web interface to interact with your Ollama models graphically. It is deployed as a Docker container.
docker run -d -p 3000:8080 --add-host=host.docker.internal:host-gateway \
  -v open-webui:/app/backend/data \
  --name open-webui \
  ghcr.io/open-webui/open-webui:main
Access the interface in
http://localhost:3000.
Part 7: DaVinci Resolve on CachyOS
Migrating editing software from Windows to Linux was a challenge in DaVinci Resolve. When using the PipeWire sound server on CachyOS, DaVinci Resolve requires installing ALSA support libraries to enable audio playback.
Additionally, the free version of DaVinci Resolve for Linux does not include native support for the h.264 and h.265 video codecs. To work with recordings generated by OBS Studio, it is necessary to convert the files using scripts to compatible formats such as DNxHR or ProRes before editing, and then transcode the exported file to a compressed format for final distribution.
DaVinci Resolve is one of the most complex applications to configure on Linux. Here I document two approaches: native installation (simpler, but with limitations) and via Distrobox container (more robust, the recommended option).
Option A: Native Installation with Pacman and Paru (NVIDIA Hardware)
Native installation on CachyOS is possible, but requires the proprietary drivers and CUDA compute libraries first so DaVinci can take advantage of the GPU:
sudo pacman -S nvidia nvidia-utils opencl-nvidia cuda
paru -S davinci-resolve
Problem: No audio or audio loop in DaVinci Resolve
A very common problem in Arch Linux-based distributions (CachyOS, Manjaro, EndeavorOS, Garuda) is that DaVinci Resolve does not output sound or generates an audio loop. The reason is that DaVinci interacts directly with ALSA, and although the modern audio server PipeWire emulates ALSA transparently to most programs, DaVinci requires an additional compatibility bridge.
Solution: Install the package pulseaudio-alsa alongside existing PipeWire infrastructure:
sudo pacman -Syu pulseaudio-alsaOnce the installation is complete, it is mandatory restart the computer. Restarting just the PipeWire services is not enough for DaVinci to recognize the new audio environment. After the restart, check the playback on the timeline.
If the problem persists, confirm that the full PipeWire stack is installed:
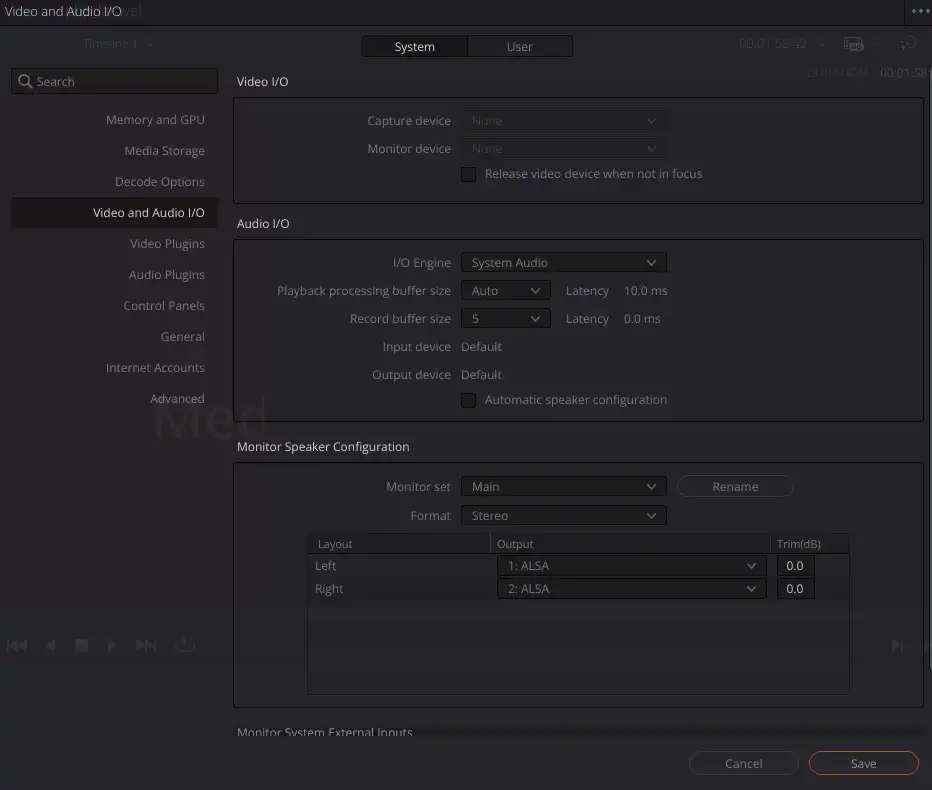
sudo pacman -S pipewire pipewire-alsa pipewire-pulse wireplumberThen, from within DaVinci Resolve, navigate to Preferences → System → Video and Audio I/O and set the Speaker Configuration in ALSA (if available) or in Automatic.
Special case: MP4 files with AAC audio without sound
If your clips display audio waves correctly on the timeline but don't make any sound, it's not a configuration issue: it's a licensing limitation. DaVinci Resolve on Linux does not support native AAC codec decoding (the standard audio .mp4 files of modern cameras and smartphones).
The ultimate solution is to transcode the clip's audio stream to uncompressed PCM format before importing it, keeping the video intact:
ffmpeg -i entrada.mp4 -c:v copy -c:a pcm_s16le salida.mp4To diagnose that ALSA is responding correctly at the system level before blaming DaVinci, you can run:
speaker-test -c 2This command plays pink noise alternating between the left and right channel. If you hear the noise, the problem is with the DaVinci and not the audio system.
Fountain: discuss.cachyos.org — No sound in DaVinci Resolve
You can also use a graphical UI like octopi to install Davinci among other programs:
paru -S octopi --noconfirm
Option B: Installation with Distrobox (Recommended for maximum stability)
DaVinci Resolve is officially designed for Red Hat Enterprise Linux / Rocky Linux. Running it natively on Arch/CachyOS usually breaks dependencies with the constant updates of the rolling release system. The most robust and isolated solution is to use a container Rocky Linux 9 with Distrobox.
Step 1: Create the base container
distrobox create --name davinci-env --image rockylinux:9
distrobox enter davinci-env
Step 2: Resolve dependencies within the container
When trying to launch the DaVinci Resolve binary on /opt/resolve/bin/resolve, the system will show missing library errors sequentially. Below is the complete map of errors and their solutions:
| Library Error | What does that bookstore do? | Solution inside the container |
|---|---|---|
libGLU.so.1 | OpenGL Utilities for Interface Rendering | sudo dnf install -y mesa-libGLU |
libOpenCL.so.1 | Open compute interface for video engine to detect hardware | sudo dnf install -y ocl-icd |
libdbus-1.so.3 | Messaging system for communication between threads and services | sudo dnf install -y dbus-libs |
libxkbcommon-x11.so.0 | Handling keymaps under X11 windows servers | sudo dnf install -y libxkbcommon-x11 |
libcrypt.so.1 | Legacy encryption library, removed in modern distros but required by DaVinci | sudo dnf install -y libxcrypt-compat |
To install the entire combo of dependencies in one go and avoid the error-install-retry cycle, run inside the container:
sudo dnf install -y alsa-lib apr apr-util fontconfig freetype libglvnd-egl libglvnd-opengl \
  libxkbcommon libxkbcommon-x11 libXtst mtdev pulseaudio-libs xcb-util xcb-util-cursor \
  xcb-util-image xcb-util-keysyms xcb-util-renderutil xcb-util-wm mesa-dri-drivers \
  mesa-vulkan-drivers libXv mesa-libGLU ocl-icd dbus-libs libxcrypt-compat
Step 3: Correct binary permissions
If you copied DaVinci files with elevated privileges, the files may maintain root restrictions that prevent execution:
sudo chmod +x /opt/resolve/bin/resolve
sudo chown -R $USER:$USER /opt/resolve
Step 4: NVIDIA GPU Integration (CUDA/OpenCL Acceleration)
If DaVinci suddenly quits after the log line Loaded log config from .../log-conf.xml no library errors .so, the problem is that the container does not have access to the CUDA/OpenCL compute calls from the host system's GPU.
The native Rocky Linux repositories do not contain the proprietary NVIDIA drivers. You must force Distrobox to bind the hardware modules directly from CachyOS:
- Get out of the container:
exiteitherCtrl + D. - Re-enter by forcing the export of NVIDIA hardware interfaces:
distrobox enter --nvidia davinci-env- Launch DaVinci specifying the supported Qt graphical backend to avoid display conflicts:
QT_QPA_PLATFORM=xcb /opt/resolve/bin/resolveWith these steps, the development environment is completely configured with GPU acceleration and full access to host system resources.
Silent video in Davinci on Linux
If you use Linux (This distro) and need to convert your videos (e.g. OBS recordings) so that DaVinci Resolve imports them perfectly with native audio and video, you can use this ffmpeg-based script.
To solve the classic problem of videos without audio (or incompatible) in DaVinci Resolve for Linux, we can create a native launcher for the desktop environment. This will allow us to convert any video (.mp4, .mkv, .mov) to the professional DNxHR format with 16-bit PCM audio with just a right click.
Steps to integrate it into your system:
- Create an empty text file on your desktop or in your personal folder and name it exactly like: Convert_DaVinci.desktop
- Open the file with any text editor and paste the following content:
[Desktop Entry]
Comment[es_VE]=
Comment=
Exec=konsole -e ffmpeg -i %f -c:v dnxhd -profile:v dnxhr_hq -c:a pcm_s16le %f_davinci.mov
GenericName[es_VE]=
GenericName=
Icon=video-x-generic
MimeType=video/quicktime;video/mp4;video/matroska;
Name[es_VE]=Convertir para DaVinci
Name=Convertir para DaVinci
Path=
StartupNotify=true
Terminal=false
TerminalOptions=
Type=Application
X-KDE-SubstituteUID=false
X-KDE-Username=
Save the changes.
Right click on the created file, go to Properties -> Permissions and check the "Is executable" box (or run chmod +x Convert_DaVinci.desktop in the terminal).
And another to reduce the weight of the final file:
[Desktop Entry]
Categories=AudioVideo;Video;Utility;
Comment[es_VE]=Comprime a H.264 MP4 directo
Comment=Comprime a H.264 MP4 directo
Exec=konsole -e sh -c 'ffmpeg -i "$1" -c:v libx264 -crf 20 -c:a aac -b:a 192k "${1}_final.mp4" -y' _ %f
GenericName[es_VE]=
GenericName=
Icon=video-x-generic
MimeType=video/quicktime;video/mp4;video/matroska;
Name[es_VE]=FFmpeg Render H264 (CRF 20)
Name=FFmpeg Render H264 (CRF 20)
Path=
StartupNotify=true
Terminal=false
TerminalOptions=
Type=Application
X-KDE-SubstituteUID=false
X-KDE-Username=
How to use it?
Now, when you go to your videos folder, just right-click on any media file, select "Open with" and choose "Convert for DaVinci". A small Konsole console window will open showing the ffmpeg process and, upon completion, you will have your file ready to edit without loss of quality.
Other useful commands for videos
- Generate an mp3 audio from a video: ffmpeg -i tu_video.mov -vn -acodec libmp3lame -aq 4 extracted_audio.mp3
- Generate a more optimized mp4 in weights based on a mov: ffmpeg -i master_avid.mov -c:v libx264 -crf 20 -c:a aac -b:a 192k video_final.mp4
Aspects to improve and positive points
Among the limitations identified in the daily use experience are:
- Wayland Graphics Server: Although it offers greater security and performance, some plugins such as Subinator for OBS cannot perform cursor tracking due to protocol restrictions. Similarly, in X11 there are screen desynchronization problems.
- Window behavior: The Dolphin environment does not allow you to drag tabs out of the current window to create a new instance directly, and Firefox's PiP (Picture-in-Picture) mode has overlaps in layer management.
- Session restoration: When restarting the system, certain applications only restore a single instance instead of keeping all windows that were previously open.
On the other hand, distribution offers notable operational advantages:
- Clipboard management: The history integrated into the KDE Plasma environment allows you to efficiently recover text and elements copied in previous sessions.
- File operations: When moving files between different storage drives, the system offers the direct option to move instead of duplicating the content by default.
- Gaming Performance: Titles tested through the Proton compatibility layer, such as uncharted and Age of Empires, they run with the same rate of performance and stability as on Windows.
User experience and environment customization
At the interface level, the desktop offers a great capacity for customization. For example, I've adjusted the colors and visual effects to give the windows a more attractive style (like the "chubby windows" effect). Although some elements such as the PiP mode on YouTube still do not behave optimally between desktops, the aesthetic experience is very satisfactory.
A detail that I value positively is the clipboard manager, which allows you to remember multiple previously copied items, and file management. Unlike other systems where moving a file to another disk creates a copy, in Linux the movement is direct, which greatly simplifies daily organization.
Fix libavcodec.so error in WiVRn (Arch / CachyOS)
When running wivrn-server on rolling release distributions like Arch Linux or CachyOS, it is common to encounter the error error while loading shared libraries: libavcodec.so.62: cannot open shared object file.
Why does this issue occur?
This issue occurs when you install a precompiled (binary) version of WiVRn. Those packages are linked to a specific version of FFmpeg (in this case, libavcodec.so.62). When the system updates FFmpeg to a newer version, the packaged executable loses the link to the old library and fails to launch.
Compiling from repository (AUR / Source)
The proper and permanent fix is to clone the repository and compile the package directly on your machine. This way, the compiler links the binary to the exact libraries your system is using today.
Steps with paru (wivrn-full-git):
- Compile the server and the interface together to avoid dependency conflicts:
paru -S --rebuild wivrn-full-git - Confirm the replacement of old binary packages if the terminal prompts you to replace them.
Why is compiling from source better?
- Exact synchronization: It links directly against the active version of FFmpeg on your system, eliminating missing library errors.
- No package locks: Avoids rigid dependency conflicts between
wivrn-serverandwivrn-dashboard. - Update resilience: It is the most stable method to maintain video rendering applications on rolling release distributions.
It is not necessary to uninstall your current version, paru automatically does it for us:
paru -S --rebuild wivrn-full-git
:: Resolving dependencies...
:: Calculating conflicts...
:: Calculating inner conflicts...

:: Conflicts found:
wivrn-full-git: wivrn-server wivrn-dashboard

:: Conflicting packages will have to be confirmed manually

Repository (5) Old Version New Version Build Only
cachyos-extra-v3/boost 1.91.0-2.1 Yes
cachyos-extra-v3/eigen 5.0.1-2.1 Yes
extra/cli11 2.7.2-1 Yes
extra/extra-cmake-modules 6.28.0-1 Yes
extra/vulkan-headers 1:1.4.357.0-1 Yes

Aur (1) Old Version New Version Build Only
aur/wivrn-full-git r2580.75e0158-1 No


:: wivrn-full-git-r2716.874ee96-1 and wivrn-server-26.6.2-1 are in conflict. Remove wivrn-server? [y/N] y
:: wivrn-full-git-r2716.874ee96-1 and wivrn-dashboard-26.6.2-1 are in conflict. Remove wivrn-dashboard? [y/N] y
WiVRn on Meta Quest
On Meta Quest, you must connect them to the PC (make sure to have developer mode enabled and accept the connection prompt inside the headset to allow PC connectivity).
You must have the exact same version installed on the headset (apk) and on the PC. To achieve this, open WiVRn on the PC and click "Install Application". WiVRn will install a specific version on the headset, which is the one you MUST run. It does NOT appear in the standard app library, but you can search for it from the search panel.
Here are a few commands to manage installations on Meta Quest directly from your PC.
To list installed apps containing "wivrn" in their package name:
❯ adb shell pm list packages | grep wivrn
package:org.meumeu.wivrn.github
package:org.meumeu.wivrn.github.nightly
To uninstall an app:
adb uninstall org.meumeu.wivrn.githubGaming Performance and Development Tools
Regarding gaming, tools like Proton perform surprisingly well. I tested titles like "AOE" and performance was solid. In software development with VS Code and running multiple instances, the system remains stable, though there are minor window management behaviors I am still fine-tuning.
My Reasons for Switching to Linux (CachyOS)
I am sharing the reasons why I am currently using Linux and the experience I have had after migrating, in case it is useful to you or if you are facing a similar situation.
Background in Using Linux
I am not new to the Linux ecosystem. I used it throughout my university career (approximately four or five years) working with distributions like Ubuntu, Fedora, and Linux Mint with excellent results.
I stopped using it when I finished university and bought my first desktop computer. During my university years, I used a laptop for convenience, but after graduating, I preferred a desktop computer for performance and the ability to upgrade hardware. At that time, driver and gaming support on Linux was limited, which is why I returned to Windows and abandoned the dual boot setup I had previously used.
Motivation for the Change
For a long time, I wanted to return to Linux, especially as I observed the progress of compatibility layers like Proton and the Steam Deck platform, which run a wide variety of video games smoothly. Workload and daily workflow postponed the transition, as reconfiguring a productive environment requires planning.
Thanks to the integration of artificial intelligence tools into my workflow, I managed to complete backlogged projects more efficiently and free up the time needed to make the definitive migration. The main reasons for the change include:
- System performance: Avoiding background processes and forced updates that slow down the computer.
- Licensing: Reduction of costs associated with commercial licenses.
- Customization: Full control over installed software, running services, and storage management.
Recent Problems on Windows
I conceive the operating system as a platform to run the applications I need for my daily work. However, recurring instability in Windows made my productivity difficult:
- System inconsistency: Random failures in basic functions such as the clipboard (copy and paste operations with
Ctrl + Cor context menu). Restarting file explorer processes did not always solve the problem, requiring a system reboot. - Unexpected game crashes: Titles developed in Unreal Engine (such as RoboCop: Rogue City and Star Wars Jedi: Survivor) experienced constant crashes during level transitions or loading screens, regardless of resolution or graphics settings.
- Disrupted development environment: Unexpected errors with Android Studio environment variables and the Flutter SDK without apparent cause.
The Transition Process: CachyOS and Disk Management
For the migration, I selected the CachyOS distribution. I maintain a configuration with multiple storage drives to organize workloads:
- An NVMe SSD dedicated exclusively to the Linux operating system.
- A high-speed SSD for the game library and artificial intelligence models.
- A traditional mechanical hard drive for large files (images, video projects, and backups).
- A secondary drive temporarily retained with the previous Windows installation via dual boot.
Replacing Recording and Editing Software
One of the biggest challenges when switching operating systems was replacing video production software. On Windows, I used Camtasia because it integrated recording and editing into a single tool, although it had drawbacks such as annual renewal payments and the lack of a Linux version.
I replaced this workflow by combining two industry-standard tools:
- OBS Studio: Used for screen capture and recording. It offers cross-platform support, multi-camera management, and complex scene setup.
- DaVinci Resolve: Used for professional video editing. It has advanced features such as automatic silence removal in the audio track, which significantly optimizes cutting times.
Hardware and Peripheral Support
Regarding specialized hardware, the availability of official drivers on Linux varies:
- Elgato Stream Deck: Integrated operation via open-source software developed by the community, such as Stream Controller.
- Peripherals and Programmable Keyboards: Key and pedal mapping via the Input Remapper tool.
- Cameras and Drawing Tablets (Wacom): Although they work directly for operational tasks, updating the firmware for some devices still requires occasional use of a Windows or macOS machine.
Virtual Reality (VR) and Video Codecs
Using VR headsets (Meta Quest) under Linux through tools like WiVRn allows running various titles smoothly. However, specific limitations exist in games with complex gesture mechanics that require adjusting layers like Proton.
On the other hand, in video editing with the free version of DaVinci Resolve for Linux, there is a native limitation for directly importing the H.264/H.265 codec. This requires pre-transcoding clips into uncompressed intermediate formats (such as DNxHR or ProRes) for editing, and re-encoding the final file back to MP4 for publishing.
Conclusion
In summary, although Linux presents a learning curve regarding driver configuration and graphics protocols (Wayland vs. X11), it is a robust environment that allows me to run my main work tools successfully.
The overall experience with CachyOS after a month of work has been highly satisfying. Despite requiring specific adjustments in video codec configuration and specific development applications, the system stands out for its low resource consumption, silence from the fans, and speed in executing tasks. For profiles focused on programming and software development, CachyOS represents a robust and efficient environment compared to traditional desktop alternatives.
For software development (PHP, Python, JavaScript, Flutter, Android Studio, Visual Studio Code / Antigravity), Linux offers a stable, fast, and consistent environment. Despite the necessary adjustments for peripherals or video codecs, the transition has been very positive for daily productivity.