Integrar Stripe con Laravel Cashier puede parecer complejo al principio, pero en realidad es una de las formas más seguras y flexibles de gestionar pagos y suscripciones en tus proyectos Laravel.
Stripe nos permite realizar pagos en distintas plataformas, y para nuestro caso de interés, que es desarrollar aplicaciones con Laravel, podemos integrarlo directamente en nuestra aplicación. Así, los clientes podrán realizar pagos y comprar productos dentro de nuestra plataforma.
En este artículo te explico cómo hacerlo paso a paso, tal como lo implementé en mi propio entorno (Laravel con Vue 3).
Además, te contaré algunos errores que me encontré en producción y cómo los solucioné para que tú no tengas que pasar por lo mismo. 😉
Laravel Cashier es la forma oficial que tenemos para integrar Stripe con Laravel, así de simple, permite emplear Stripe, fácilmente; ademas, veremos como emplear Vue Stripe junto con Laravel.
Crear cuenta en Stripe
Lo primero que debes hacer es crear una cuenta en Stripe:
🔗 https://stripe.com/es
Si ya tienes una cuenta, puedes iniciar sesión directamente; si no, sigue los pasos de registro que Stripe te indica. Una vez creada, tendrás acceso al dashboard:
Dashboard de Stripe
En el dashboard encontrarás todo lo que necesitamos para el curso:
- Modo de prueba y producción: Puedes alternar entre ellos.
- Claves públicas y secretas: Necesarias para integrar Stripe en tu proyecto.
- Opciones de pago: Apple Pay, Google Pay, PayPal y más.
- Catálogo de productos: Aquí puedes crear los productos que venderás en tu aplicación.
Es importante mantener las claves en modo prueba mientras desarrollamos y reemplazarlas con las de producción cuando lancemos la aplicación.
Qué ofrece Stripe
Stripe funciona de manera similar a PayPal, pero ofrece más opciones:
- Pagos únicos
- Pagos recurrentes
- Suscripciones
- Gestión de productos y precios
Para configurar los productos:
- Ve a Catálogo de productos en tu dashboard.
- Crea los productos que vas a vender (por ejemplo, “Zapatos” o “Libro Laravel”).
- Define los precios para cada producto.
Puedes crear productos por categoría, marca o cualquier criterio que necesites.
Stripe y Laravel
Laravel ofrece una integración oficial con Stripe mediante el paquete Laravel Cashier:
🔗 Laravel Cashier
Con Cashier podemos:
- Crear clientes y productos
- Gestionar pagos únicos y suscripciones
- Generar facturas
- Manejar pagos recurrentes
Además, Stripe también ofrece su API nativa que se puede usar en cualquier proyecto PHP:
🔗 Stripe API
Puedes elegir entre usar la API oficial de Stripe o Laravel Cashier, dependiendo de tus necesidades. Por ejemplo, para un pago simple, la API oficial puede ser suficiente; para pagos recurrentes o suscripciones, Cashier facilita mucho el trabajo.
Instalación y configuración de Laravel Cashier
Para instalar y configurar Cashier en Laravel, debes publicar las migraciones y el archivo de configuración:
$ php artisan vendor:publish --tag="cashier-migrations"
$ php artisan vendor:publish --tag="cashier-config"
Una vez hecho esto, podrás gestionar clientes, suscripciones y pagos directamente desde tu aplicación Laravel.
Alternativa con Vue
Si tu proyecto utiliza Laravel con Inertia o Vue, también puedes integrar Stripe mediante un plugin de Vue llamado Vue Stripe:
🔗 https://vuestripe.com/
Este plugin es muy útil cuando solo quieres vender productos rápidamente y gestionar pagos de manera sencilla.
Resumen
En resumen, Stripe es una billetera electrónica muy versátil que podemos emplear:
- Directamente con su API nativa
- A través de Laravel Cashier
- Con plugins de Vue para aplicaciones front-end
🚀 ¿Qué es Laravel Cashier y por qué usarlo con Stripe?
Laravel Cashier es un paquete oficial que simplifica todo el manejo de pagos recurrentes y suscripciones con Stripe (y Paddle). En lugar de escribir lógica personalizada, Cashier te ofrece métodos listos para crear, cancelar o verificar suscripciones.
En mi caso, probé integrar Stripe “a pelo” y luego con Cashier, y la diferencia es enorme. Cashier te evita lidiar con tokens, IDs y webhooks directamente; todo se resume en métodos como newSubscription() o subscribed().
💡 Ventajas de usar Cashier
- Implementación rápida sin escribir lógica de pagos desde cero.
- Manejo automático de suscripciones, cancelaciones y períodos de gracia.
- Compatibilidad nativa con Laravel.
- Integración sencilla con Stripe Checkout.
Eso sí, si tu app es pequeña y solo quieres cobrar un producto puntual, usar Cashier podría ser demasiado. En esos casos, Stripe Checkout directo puede ser suficiente.
Crear Product ID y Price ID
Antes de seguir avanzando tienes que venir aquí a la primera página que te presentaba cuando te indicaba al inicio de esta sección hace un par de videos atrás en las cuales te indicaba que cuando te autenticadas caías en esta página que es el dashboard.stripe.com:
Entonces estamos aquí voy a venir aquí a la página de inicio aquí tienes que venir y colocar entorno de prueba qué serían los entornos para realizar pruebas esto no le hagas caso es algo que me está pidiendo información adicional para mi cuenta aquí también puedes habilitar el modo de prueba.
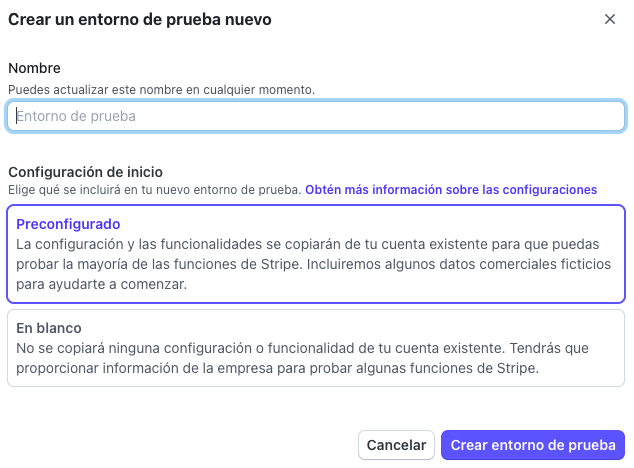
Crear entorno de Prueba
Como primer paso, debemos de ir al siguiente enlace:
Click en la esquina superior derecha:
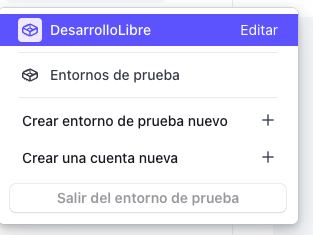
Y crear el entorno de prueba:
Crear productos de prueba
A diferencia de PayPal, debemos de crear los productos que vamos a vender para poder referenciales mediante nuestra aplicación en Laravel/Vue mediante un identificador como veremos más adelante; para ello, desde el siguiente enlace:
https://dashboard.stripe.com/test/products?active=true
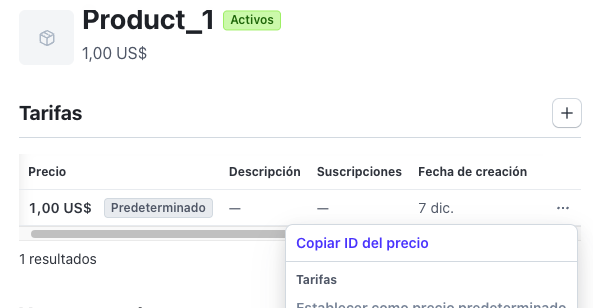
Creamos al menos un producto desde el botón de "Crea un producto":
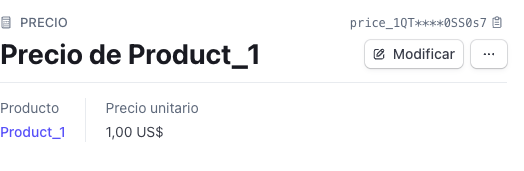
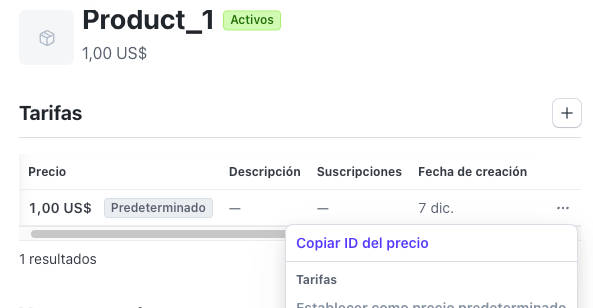
Desde el detalle del producto, en el precio configurado, al darle un click, tendrás el identificador del precio, que usaremos más adelante para poder hacer una compra a este producto con el precio seleccionado:
Desde el botón de + de la imagen anterior, puedes crear más tarifas/precios ya que un producto puede tener de 1 a n pecios que son los que empleamos en nuestra aplicación para configurar los pagos; los pagos deben ser de tipo puntual NO los recurrentes, los pagos recurrentes son para las suscripciones.
Stripe maneja una estructura un poco diferente a lo que estamos acostumbrados por ejemplo con PayPal en la cual simplemente establecemos un precio y listo aquí no podemos establecer el precio o el monto que nosotros queramos tenemos que establecer es un una referencia un pago o un precio mejor dicho que va a estar referenciado aquí en nuestra Api entonces para poder crear ese precio primero tenemos que crear un producto.
https://dashboard.stripe.com/test/products
Crear Producto
Creamos al menos un producto desde el botón de "Crea un producto":
Recurrentes vs Pago único
Por acá para indicar periodos de facturación 6 meses 3 meses anual semanal diario o personalizado eso no bueno es para la parte de suscripción se pudiera decir para facilitarnos la vida vamos a colocar aquí puntual que significa que es un único pago y aquí coloca el monto yo voy a colocarle uno que es referente a un euro o un dó otra vez de aquí pasa puntual y ahí lo estableces.
Crear Precio
Y eso sería todo damos aquí añadir producto y ahí tenemos nuestro producto ahora tenemos que seleccionar el producto a ver que esta parte siempre es un poquito complicada con esta interfaz aquí creo que también sale donde dice precios y o tarifas esta sería para ver el del creo que este es el del precio de igual manera darle atrás aquí los tres puntos está el producto sí este sería ya el de los precios mira aquí tenemos copiar el ID del precio ya que cuando creamos un producto.
⚙️ Instalación de Laravel Cashier y configuración de Stripe
El comando composer require Laravel cashier nada raro bueno aquí para acá a tu proyecto lo colocas y dejas que esto instale felizmente en la vida:
$ composer require laravel/cashierY publicamos su configuración y migraciones:
$ php artisan vendor:publish --tag="cashier-config"
$ php artisan vendor:publish --tag="cashier-migrations"
$ php artisan migrate
Esto crea tres tablas principales (customers, subscriptions, subscription_items) y el archivo de configuración config/cashier.php.
🧩 Configurar las claves de Stripe
En tu archivo .env agrega las siguientes variables:
STRIPE_KEY=tu-clave-publica
STRIPE_SECRET=tu-clave-secreta
STRIPE_WEBHOOK_SECRET=tu-webhook-secret
“Missing API key provided.”
Resultó que no había publicado correctamente el archivo cashier.php en config.
Así que asegúrate de correr php artisan vendor:publish --tag="cashier-config" antes de desplegar.
💸 Implementar pagos únicos con Stripe Checkout
Stripe Checkout te permite redirigir al usuario a una página segura para pagar, sin almacenar datos sensibles.
En tu controlador Laravel:
use Laravel\Cashier\Checkout;
use Illuminate\Http\Request;
function createSession(string $priceId)
{
   $session = Checkout::guest()->create($priceId, [
       'mode' => 'payment',
       'success_url' => url('/success').'?session_id={CHECKOUT_SESSION_ID}',
       'cancel_url' => url('/cancel'),
   ]);
   return $session->id;
}
Este método crea una Checkout Session y devuelve su ID, que puedes usar desde el frontend con sessionId; si retornas el objeto:
return $sessionLaravel automáticamente hace la redirección a la web de Stripe para hacer el pago.
💬 Prefiero este enfoque porque redirige al usuario a Stripe (como hace PayPal).
Así evitas manejar tarjetas dentro de tu app y generas más confianza.
🔁 Suscripciones recurrentes con Laravel Cashier
Para habilitar suscripciones:
Crea un Price ID recurrente desde el dashboard de Stripe.
Usa el método newSubscription() en tu backend:
Route::post('/user/subscribe', function (Request $request) {
   $request->user()->newSubscription('default', 'price_monthly')
       ->create($request->paymentMethodId);
});
Indicamos cuál sería el plan y el precio, y por lo demás, aquí lo creamos mediante algún método de pago.
A partir de aquí tenemos mucha información adicional. Por ejemplo, podemos establecer suscripciones de prueba (trial), definiendo los días que va a durar dicha prueba.
Esta sección también incluye opciones relacionadas con facturación, aunque realmente no voy a cubrir esa parte en este curso.
Cupones y descuentos
En cuanto a los cupones y descuentos, normalmente yo los gestiono directamente desde la aplicación, pero también puedes crearlos o administrarlos desde Stripe.
En mi caso, si necesito aplicar un descuento, lo hago antes de establecerlo en Stripe, en base a alguna condición interna.
Ahí tienes entonces la parte de los cupones (coupons), y también una opción para configurar el trial, aunque no recuerdo exactamente dónde está ubicada dentro del panel.
Verificación de suscripciones
Otro aspecto interesante es la posibilidad de verificar si un usuario ya está suscrito, lo cual resulta muy útil para controlar el acceso o evitar duplicar planes.
En resumen, con esto ya tenemos prácticamente todo configurado para gestionar planes, precios, cupones y periodos de prueba en Stripe.
Para verificar si un usuario está suscrito:
if ($user->subscribed('default')) {
   // Acceso permitido
}
Crear un Price de tipo recurrente en el dashboard de Stripe
Recuerda que debes establecer un pago recurrente y no puntual.
Puedes hacerlo directamente desde el panel de Stripe:
👉 https://dashboard.stripe.com/dashboard
Una vez creado el precio, copia el ID del precio generado.
Ejemplo de suscripción en Laravel
Aquí tienes un ejemplo de cómo crear una nueva suscripción desde tu aplicación Laravel utilizando el Price ID obtenido:
Route::get('/stripe/new-subscription', function () {
    $user = User::find(1);
    dd(
        $user->newSubscription(
            'default',
            'YOUR_RECURRENT_PRICE_ID'
        )->create('<USER_PAYMENT_METHOD_ID>')
    );
});
💡 La etiqueta 'default' puede ser reemplazada por cualquier otro nombre, ya que simplemente funciona como una etiqueta interna utilizada por el sistema.
Otros métodos importantes
Stripe maneja lo que se conoce como un periodo de gracia, es decir, si el usuario ya ha pagado la suscripción, puede seguir disfrutando del servicio hasta que finalice el tiempo que pagó.
Puedes verificar si el usuario aún se encuentra dentro de este periodo con el siguiente método:
$user->subscription('default')->onGracePeriod();Incluso si la suscripción fue cancelada, el usuario seguirá teniendo acceso durante los días restantes que ya pagó.
Verificar si la suscripción está activa
Para comprobar si la suscripción del usuario sigue activa o recurrente, utiliza el siguiente método:
$user->subscription('default')->recurring();💻 Integración de Vue Stripe 4 en Laravel - Legacy
Si usas Vue 3 en el frontend, puedes integrar Vue Stripe para gestionar pagos y suscripciones desde componentes.
Esta implementación que te muestro usa la versión 4:
$ npm install @vue-stripe/vue-stripe@^4.5.0En el siguiente apartado te muestro OTRA implementación que puedes usar en Vue o JavaScript y que NO requiere usar este paquete para pagos únicos.
$ npm install @vue-stripe/vue-stripeLuego, crea un componente simple:
<template>
 <div>
   <stripe-checkout
     ref="checkoutRef"
     mode="payment"
     :pk="publishableKey"
     :line-items="lineItems"
     :success-url="successURL"
     :cancel-url="cancelURL"
     @loading="v => loading = v"
   />
   <button :disabled="loading" @click="submit">Pay now!</button>
 </div>
</template>
<script>
import { StripeCheckout } from '@vue-stripe/vue-stripe';
export default {
 components: { StripeCheckout },
 data() {
   this.publishableKey = 'pk_test_...';
   return {
     loading: false,
     lineItems: [{ price: 'price_1234', quantity: 1 }],
     successURL: 'http://tuapp.test/success',
     cancelURL: 'http://tuapp.test/cancel',
   };
 },
 methods: {
   submit() {
     this.$refs.checkoutRef.redirectToCheckout();
   },
 },
};
</script>
Parámetros que puedes configurar:
- pk (string - requerido): Clave publicable de Stripe.
- sessionId (string - No requerido): El ID de la sesión de pago que se utiliza en la integración del cliente y el servidor.
- lineItems (array[object] - No requerido): Un array de objetos que representan los artículos que el cliente desea comprar, debemos de colocar el o los priceId configurados al producto que creamos en el dashboard de Stripe.
- mode (string - No requerido): El modo de la sesión de pago, ya sea de pago o de suscripción.
- successUrl (string - No requerido): La URL a la que Stripe debe enviar a los clientes cuando se complete el pago.
- cancelUrl (string - No requerido): La URL a la que Stripe debe enviar a los clientes cuando se cancela el pago.
Aquí el componente de success y cancel el componente realmente me da igual obviamente tuviera que crear alguno par stripe pero no nos importa ahorita mucho entonces aquí lo tenemos:
router.js
import { createRouter, createWebHistory } from "vue-router";
import { useCookies } from 'vue3-cookies'
const { cookies } = useCookies()
import List from './componets/ListComponent.vue'
import OnePayment from "./componets/stripe/OnePayment.vue";
const routes = [
    ***
    {
        name: 'stripe',
        path: '/vue/stripe/one-payment',
        component: OnePayment
    },
    {
        name: 'success',
        path: '/vue/stripe/success',
        component: List
    },
    {
        name: 'cancel',
        path: '/vue/stripe/cancel',
        component: List
    },
]
const router = createRouter({
    history: createWebHistory(),
    routes: routes
})
export default router
⚙️ Consejo:
- Desde el cliente (Vue) solo se usa la clave pública.
- La clave secreta siempre debe mantenerse en el servidor.
Integración solo en el cliente, riesgos y limitantes en el uso de Vue Stripe
Si revisamos la consola de desarrolladores, veremos un mensaje como el siguiente:
v3:1 Uncaught (in promise) IntegrationError: The Checkout client-only integration is not enabled. Enable it in the Dashboard at https://dashboard.stripe.com/account/checkout/settings.
    at Sl (v3:1:461068)
    at e._handleMessage (v3:1:469393)
    at e._handleMessage (v3:1:85275)
🛡️ Claves Públicas y Secretas: Seguridad en Transacciones
En este tipo de servicios, siempre debe existir una clave privada o clave secreta. Prácticamente, todos los servicios de pago funcionan así. La clave secreta se emplea usualmente del lado del servidor para garantizar que la operación se está procesando de manera correcta y segura.
Es un proceso similar al que hicimos con PayPal: en el cliente armamos el plugin con la clave pública, pero en el servidor, una vez que la orden estaba creada, aprobábamos esa orden mediante la clave secreta. Esto añade una capa adicional de seguridad.
La clave pública y la clave secreta funcionan de manera análoga a un usuario y una contraseña (donde la clave pública es el usuario y la clave privada es la contraseña). En la configuración actual de Stripe, solo estamos trabajando con la clave pública, lo cual hace la operación mucho más insegura.
⚠️ Riesgos de Seguridad al Usar Solo la Clave Pública
Es un riesgo significativo: un atacante podría interceptar la petición y cambiar tu clave pública por la suya. Si esta clave pública estuviera persistente, por ejemplo, en una base de datos, e intercede e inyecta la suya, todos los pagos caerían en su cuenta. De ahí la importancia de la clave secreta.
Por esta razón, la opción de "Habilitar integración solo del cliente" se encuentra ofuscada por defecto, ya que es una operación menos segura que el método tradicional.
Una vez que permitimos esta integración (dando clic), el proceso debería funcionar correctamente:
🛑 El Problema Principal: Lógica de Asignación de Productos
El problema clave con la configuración actual es la falta de lógica de aplicación tras el pago.
Si estamos vendiendo algo (un curso, boletos, un libro, etc.), se supone que cuando el usuario realiza el pago, nosotros le asignamos ese registro o producto. Con la configuración actual de solo cliente, no es posible realizar este tipo de operaciones.
Por lo tanto, esta implementación no pasa de ser un simple "acceso rápido" para que nos paguen a una cuenta configurada únicamente mediante la clave pública.
Resumen de Limitaciones
En resumen, las limitaciones de la configuración actual son dos:
- Inseguridad: Es más inseguro porque solo se utiliza la clave pública para hacer match con la cuenta. Esto, dependiendo de la integración, puede hacerla más susceptible al hackeo y al desvío de fondos a otra cuenta.
- Incapacidad de Asignar Productos: No es posible, al menos con esta configuración, implementar la lógica necesaria para que, una vez realizado el pago, nuestra aplicación pueda liberar o asignar los productos que el usuario acaba de comprar.
- Resolveremos esto en los siguientes videos, pero es importante que entiendas estas limitantes de antemano.
Integración con Vue, Forma moderna
Todo el código presentado antes queda igual, salvo el componente de Vue OnePayment.vue que queda de la siguiente manera:
resources/js/vue/componets/stripe/OnePayment.vue
<template>
  <div>
    <div v-if="publishableKey">
      <div v-if="checkoutUrl">
        <button @click="submit" :disabled="loading">Pay Now</button>
      </div>
      <p v-else>Cargando sesión...</p>
    </div>
    <div v-else>Cargando configuración de Stripe...</div>
  </div>
</template>

<script>
export default {
  data() {
    return {
      loading: false,
      publishableKey: window.Laravel.clientStripe,
      checkoutUrl: '',
       lineItems: [
        {
          price: 'price_1QTO20EHJX14M8EEKW0SS0s7', // recurrente
          quantity: 1
        },
      ]
    };
  },
  methods: {
    submit() {
      if (this.checkoutUrl) {
        window.location.href = this.checkoutUrl;
      }
    }
  },
  async mounted() {
    try {
      const res = await this.$axios.get('/api/stripe/create-session/' + this.lineItems[0].price);
      console.log("Respuesta de Stripe:", res.data);

      // El objeto Session devuelto por Stripe (vía Laravel) contiene una propiedad 'url'.
      // Redirigir directamente a esta URL es el método actual recomendado.
      if (res.data && res.data.url) {
        this.checkoutUrl = res.data.url;
      } else {
        console.error("No se pudo obtener la URL de Checkout del servidor. Estructura recibida:", res.data);
      }
    } catch (error) {
      console.error("Error obteniendo sesión:", error);
    }
  }
}
</script>
Como puedes apreciar, NO es necesario el plugin de Vue Stripe, simplemente desde el objeto Checkout.
app/Http/Controllers/Api/StripeController.php
class StripeController extends Controller
{
    function createSession(***)
    {

        ***
        return response()->json([
            'id' => $session->id,
            'url' => $session->url
        ]);
    }
}
Hacemos las redirecciones de manera manual.
No usar el priceID para procesar los pagos
También, podemos suministrar el monto directamente desde el cliente:
const res = await this.$axios.get(this.$api.stripeCreateSessionId, {
  params: {
    amount: this.basePrice,
  }
});
Y en el servidor:
public function createSessionId()
{
    $successRouteUrl = request('successRouteUrl');
    $checkoutSessionId = '{CHECKOUT_SESSION_ID}';

    $separator = strpos($successRouteUrl, '?') === false ? '?' : '&';
    $url = "{$successRouteUrl}{$separator}session_id={$checkoutSessionId}";

    if (request()->has('amount')) {
        $sessionId = $this->createSessionByAmount(request('amount'), $url);
    } else {
        $sessionId = $this->createSessionByPriceId(request('price_id'), $url);
    }

    return $this->successResponse($sessionId);
}
public function createSessionByPriceId(string $priceId, string $successRouteUrl, string $cancelUrl = "https://academy.desarrollolibre.net/")
{
    $session = Checkout::guest()->create(
        $priceId,
        [
            'mode' => 'payment',
            'success_url' => $successRouteUrl,
            'cancel_url' => $cancelUrl,
        ],
    );

    return response()->json([
        'id' => $session->id,
        'url' => $session->url
    ]);
}

public function createSessionByAmount(float $amount, string $successRouteUrl, string $cancelUrl = "https://academy.desarrollolibre.net/")
{
    $session = Cashier::stripe()->checkout->sessions->create([
        'success_url' => $successRouteUrl,
        'cancel_url' => $cancelUrl,
        'line_items' => [
            [
                'price_data' => [
                    'currency' => 'usd',
                    'product_data' => [
                        'name' => 'Compra en Desarrollolibre Academy',
                    ],
                    'unit_amount' => $amount * 100, // Stripe uses cents
                ],
                'quantity' => 1,
            ],
        ],
        'mode' => 'payment',
    ]);

    return $session->id;
}
Extra: Cómo habilitar el Instant Payment Notification (IPN) en PayPal
Te comento como crear el Instant Payment Notification (IPN) en PayPal; el IPN es una notificación de pago de realizada por PayPal a una URL que nosotros configuremos.
Al contrario de cómo estaba funcionando hace un tiempo en la cual era necesaria tener un certificado SSL en nuestro servidor para poder configurar el IPN mediante una URL, esto ya no es necesario y con cualquier URL en dominio público (en Internet) servirá para poder emplear el IPN en nuestras aplicaciones, en nuestro caso no es necesario, pero en caso de que sea necesario para el flujo.
El vídeo es el siguiente: https://www.youtube.com/embed/4IXCmMV5zPA
Pasos
- Primero iniciamos sesión con nuestra cuenta de desarrollo en PayPal.
- Profile.
- My selling tools.
- Clic en la opción Instant payment notifications.
- Establece la URL para poder recibir la notificación de pago mediante esta URL que lógicamente estará atado a un controlador en alguna tecnología como PHP.
Siguiente paso, aprende a dar los primeros pasos con Boost con este tutorial sobre como emplear la SDK de Laravel.