
Content Index
- Create a Stripe Account
- Stripe Dashboard
- What Stripe Offers
- Stripe and Laravel
- Installation and Configuration of Laravel Cashier
- Alternative with Vue
- Summary
- What is Laravel Cashier and why use it with Stripe?
- Advantages of using Cashier
- Create Test Environment
- Create Test Products
- Recurring vs One-time Payment
- Create Price Reference
- ⚙️ Laravel Cashier Installation and Stripe Configuration
- Configure Stripe Keys
- Implement one-time payments with Stripe Checkout
- Recurring Subscriptions with Laravel Cashier
- Coupons and Discounts
- Subscription Verification
- Example of Subscription Verification Flow
- Handling Grace Periods
- Verify Active Recurrent Billing
- Vue Stripe 4 Integration in Laravel - Legacy
- Router Configuration Reference
- Integration with Vue, Modern Form
- Do not use priceID to process payments
- ️ Public and Secret Keys: Security in Transactions
- ⚠️ Security Risks When Using Only the Public Key
- The Main Problem: Product Assignment Logic
- Summary of Limitations
Integrating Stripe with Laravel Cashier may seem complex at first, but in reality, it's one of the safest and most flexible ways to manage payments and subscriptions in your Laravel projects.
Stripe allows us to process payments across various platforms, and for our purposes, which involve developing applications with Laravel, we can integrate it directly into our application. This way, customers can make payments and purchase products within our platform by rendering a Stripe button from a Blade/Template component in Laravel to complete the purchase.
In this article, I explain how to do it step by step, just as I implemented it in my own environment (Laravel with Vue 3).
Furthermore, I'll tell you about some errors I encountered in production and how I solved them so you don't have to go through the same thing.
Laravel Cashier is the official way we have to integrate Stripe with Laravel—it's that simple, allowing for easy use of Stripe; moreover, we'll see how to use Vue Stripe along with Laravel.
Create a Stripe Account
The first thing you should do is create a Stripe account:
If you already have an account, you can log in directly; if not, follow the registration steps that Stripe indicates. Once created, you will have access to the dashboard.
Stripe Dashboard
In the dashboard, you will find everything we need for the course:
- Test and production mode: You can switch between them seamlessly.
- Publishable and secret keys: Necessary for integrating Stripe into your project.
- Payment options: Apple Pay, Google Pay, PayPal, and more.
- Product catalog: Here you can create the products you will sell in your application.
It is important to keep the keys in test mode while developing and replace them with the production ones when we launch the application.
What Stripe Offers
Stripe works similarly to PayPal but offers more modular options:
- One-time payments
- Recurring payments
- Subscriptions
- Product and price management
To configure the products:
- Go to Product Catalog in your dashboard.
- Create the products you are going to sell (for example, “Shoes” or “Laravel Book”).
- Define the prices for each product.
You can create products by category, brand, or any criterion you need.
Stripe and Laravel
Laravel offers an official integration with Stripe through the Laravel Cashier package:
With Cashier we can:
- Create customers and products
- Manage one-time payments and subscriptions
- Generate invoices
- Handle recurring payments
Additionally, Stripe also offers its native SDK API which can be used in any PHP project:
You can choose between using the official Stripe API or Laravel Cashier, depending on your needs. For example, for a simple payment, the official API may suffice; for recurring payments or subscriptions, Cashier makes the job much easier.
Installation and Configuration of Laravel Cashier
To install and configure Cashier in Laravel, you must publish the migrations and the configuration file:
$ php artisan vendor:publish --tag="cashier-migrations"
$ php artisan vendor:publish --tag="cashier-config"
Once this is done, you can manage customers, subscriptions, and payments directly from your Laravel application.
Alternative with Vue
If your project uses Laravel with Inertia or Vue, you can also integrate Stripe using a Vue plugin called Vue Stripe:
This plugin is very useful when you only want to sell products quickly and manage payments simply.
Summary
In summary, Stripe is a very versatile electronic wallet that we can use:
- Directly with its native API
- Through Laravel Cashier
- With Vue plugins for front-end applications
What is Laravel Cashier and why use it with Stripe?
Laravel Cashier is an official package that simplifies all the handling of recurring payments and subscriptions with Stripe (and Paddle). Instead of writing custom logic, Cashier offers you ready-made methods for creating, canceling, or verifying subscriptions.
In my case, I tried integrating Stripe "bare-bones" and then with Cashier, and the difference is huge. Cashier avoids you having to deal with tokens, IDs, and webhooks directly; everything comes down to methods like newSubscription() or subscribed().
Advantages of using Cashier
- Quick implementation without writing payment logic from scratch.
- Automatic handling of subscriptions, cancellations, and grace periods.
- Native compatibility with Laravel.
- Simple integration with Stripe Checkout.
However, if your app is small and you only want to charge for a specific product once, using Cashier might be overkill. In those cases, direct Stripe Checkout may be sufficient.
Create Test Environment
Before moving on, you have to log into your account dashboard. As a first step, we must go to the following link:
Click on the upper right corner to activate the "Test mode" environments for performing tests safely:
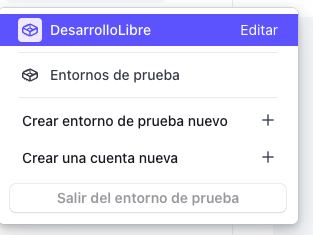
Once enabled, your dashboard will render the sandbox analytics:
Create Test Products
Unlike PayPal, we must create the products we are going to sell so we can reference them through our Laravel/Vue application using an identifier, as we will see later. For this, access the following link:
https://dashboard.stripe.com/test/products
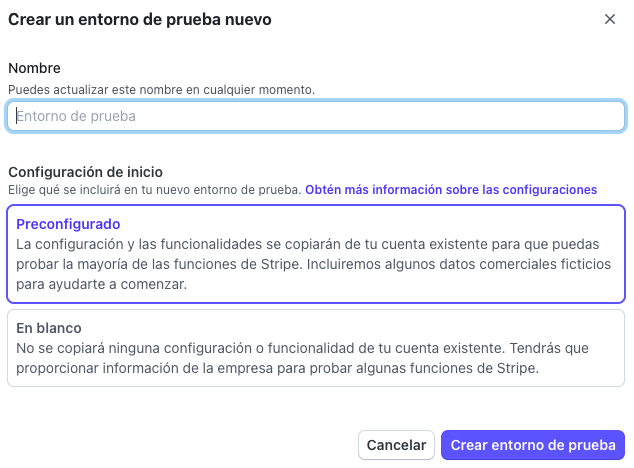
We create at least one product from the "Create a product" button:

From the product details, in the configured price, by clicking on it, you will have the price identifier, which we will use later to be able to make a purchase of this product with the selected price:
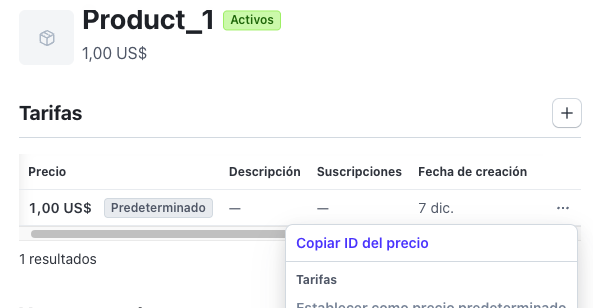
From the active actions layout, you can create more rates/prices since a product can have 1 to n prices which are the ones we use in our application to configure payments.
Recurring vs One-time Payment
Stripe handles a slightly different structure to what we are used to, for example with PayPal, where we simply set an arbitrary price amount at runtime. Here we cannot set any arbitrary price on the fly using default settings; we have to establish a price reference pre-configured inside our catalog product.
When creating a price, you can set the billing period (6 months, 3 months, annual, weekly, daily, or custom) for the subscription part. To keep things straightforward for one-time sales, let's select "One-time" here, which means it is a single unique payment, and then enter the amount in your selected currency.
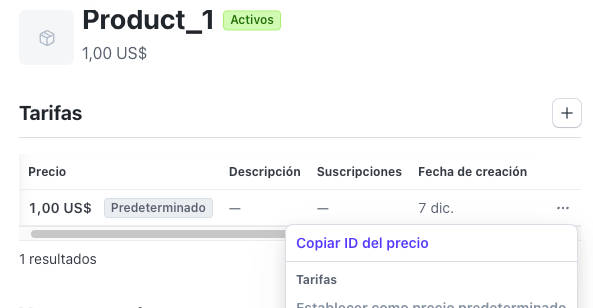
Create Price Reference
And that would be it. We click to save the product and there we have our model ready. Now we select the product, check its rates section, and click on the copy button to grab the Price ID, which always starts with a price_... prefix string.
⚙️ Laravel Cashier Installation and Stripe Configuration
Run the composer command in your terminal root directory to pull the dependency:
$ composer require laravel/cashierAnd we publish its assets, configuration, and structural migrations:
$ php artisan vendor:publish --tag="cashier-config"
$ php artisan vendor:publish --tag="cashier-migrations"
$ php artisan migrate
This creates three main database tables (customers, subscriptions, subscription_items) and publishes the config file at config/cashier.php.
Configure Stripe Keys
In your .env environment file, append the following credentials variables:
STRIPE_KEY=pk_test_yourPublishableKey Here
STRIPE_SECRET=sk_test_yourSecretKeyHere
STRIPE_WEBHOOK_SECRET=whsec_yourWebhookSecretHere
Production Tip: If you face a “Missing API key provided” exception error, it usually means your production environment hasn't compiled the cached configurations yet or you missed publishing the file. Make sure you run
php artisan vendor:publish --tag="cashier-config"properly.
Implement one-time payments with Stripe Checkout
Stripe Checkout allows you to redirect the user to a secure payment gateway hosted by Stripe, without storing or manipulating sensitive cards data in your application servers.
In your Laravel controller:
<?php

namespace App\Http\Controllers\Api;

use App\Http\Controllers\Controller;
use Laravel\Cashier\Checkout;
use Illuminate\Http\Request;

class StripeController extends Controller
{
    public function createSession(string $priceId)
    {
        $session = Checkout::guest()->create($priceId, [
            'mode' => 'payment',
            'success_url' => url('/success') . '?session_id={CHECKOUT_SESSION_ID}',
            'cancel_url' => url('/cancel'),
        ]);

        return response()->json(['id' => $session->id]);
    }
}
This method creates a Checkout Session and returns its ID, which you can use from the frontend template. If you return the checkout instance directly instead of a JSON string array response, Laravel Cashier automatically triggers a direct backend redirect header to the Stripe web platform.
I prefer this approach because it offloads security liabilities to Stripe (like PayPal does). This way you avoid handling raw PCI-compliance cards within your forms and build more customer trust.
Recurring Subscriptions with Laravel Cashier
To enable subscription plans:
- Create a recurring type Price ID from the Stripe dashboard.
- Use the
newSubscription()builder method in your backend routing actions:
use Illuminate\Http\Request;

Route::post('/user/subscribe', function (Request $request) {
    $request->user()->newSubscription('default', 'price_monthly_id_here')
        ->create($request->paymentMethodId);
});
We indicate what the plan internal alias reference and price would be, and the SDK creates the customer attachment using the frontend payment token token string.
Coupons and Discounts
Regarding coupons and discounts, you can manage them directly from the internal application state logic or register them on the Stripe panel. In my case, if I need to apply a customizable seasonal discount code, I prefer calculating the final price threshold on my end before passing data parameters over to the gateway.
Subscription Verification
Another crucial aspect is checking if an authenticated user model is already on an active plan billing cycle to avoid duplicated purchases.
if ($user->subscribed('default')) {
    // Access allowed to premium academy content
}
Example of Subscription Verification Flow
Here is an entry example of how to attach a new plan subscription using a specific pre-fetched user model:
Route::get('/stripe/new-subscription', function () {
    $user = User::find(1);

    return $user->newSubscription('default', 'YOUR_RECURRENT_PRICE_ID')
        ->create('<USER_PAYMENT_METHOD_ID>');
});
The tag string label 'default' can be replaced by any other name representation (like 'premium' or 'yearly'), as it simply works as an internal label used by the application codebase logic to filter subscription scopes.
Handling Grace Periods
Stripe handles what is known as a grace period. This means that if a customer cancels their subscription, they can continue to enjoy the application features until the current paid period ends. You can check this status with the following conditional check:
if ($user->subscription('default')->onGracePeriod()) {
    // Subscription canceled, but access still valid until period expiration
}
Verify Active Recurrent Billing
To check if the user's subscription is fully active, healthy, and will automatically renew on the next cycle without being canceled, use the recurring() method query:
if ($user->subscription('default')->recurring()) {
    // Plan is recurring fine
}
Vue Stripe 4 Integration in Laravel - Legacy
If you are building an SPA using Vue 3 on your frontend layer, you can rely on the legacy Vue Stripe wrappers library to handle element payloads components.
This specific implementation uses version 4 tags:
$ npm install @vue-stripe/vue-stripe@^4.5.0Note: In the next section, I'll show you ANOTHER cleaner implementation that you can use in Vue or vanilla JavaScript and that DOES NOT require any client-side wrapper package for processing single payments.
Then, create your client component view markup:
<template>
  <div>
    <stripe-checkout
      ref="checkoutRef"
      mode="payment"
      :pk="publishableKey"
      :line-items="lineItems"
      :success-url="successURL"
      :cancel-url="cancelURL"
      @loading="v => loading = v"
    />
    <button :disabled="loading" @click="submit">Pay now!</button>
  </div>
</template>

<script>
import { StripeCheckout } from '@vue-stripe/vue-stripe';

export default {
  components: { StripeCheckout },
  data() {
    return {
      publishableKey: 'pk_test_51...',
      loading: false,
      lineItems: [{ price: 'price_12345', quantity: 1 }],
      successURL: 'http://tuapp.test/vue/stripe/success',
      cancelURL: 'http://tuapp.test/vue/stripe/cancel',
    };
  },
  methods: {
    submit() {
      this.$refs.checkoutRef.redirectToCheckout();
    },
  },
};
</script>
Router Configuration Reference
router.js
import { createRouter, createWebHistory } from "vue-router";
import List from './componets/ListComponent.vue';
import OnePayment from "./componets/stripe/OnePayment.vue";

const routes = [
    {
        name: 'stripe',
        path: '/vue/stripe/one-payment',
        component: OnePayment
    },
    {
        name: 'success',
        path: '/vue/stripe/success',
        component: List
    },
    {
        name: 'cancel',
        path: '/vue/stripe/cancel',
        component: List
    },
];

const router = createRouter({
    history: createWebHistory(),
    routes
});

export default router;
⚙️ Security Reminder: Only public keys (pk_...) should be exposed in your client files layers (Vue/JS). The secret keys (sk_...) must remain tightly sealed inside your backend environment configuration.
Integration with Vue, Modern Form
All the code presented above remains the same, except for the Vue OnePayment.vue component, which can be optimized to perform manual native redirections without requiring external library wrappers package layers:
resources/js/vue/componets/stripe/OnePayment.vue
<template>
  <div>
    <div v-if="publishableKey">
      <div v-if="checkoutUrl">
        <button @click="submit" :disabled="loading">Pay Now</button>
      </div>
      <p v-else>Cargando sesión...</p>
    </div>
    <div v-else>Cargando configuración de Stripe...</div>
  </div>
</template>

<script>
export default {
  data() {
    return {
      loading: false,
      publishableKey: window.Laravel.clientStripe,
      checkoutUrl: '',
      lineItems: [
        {
          price: 'price_1QTO20EHJX14M8EEKW0SS0s7',
          quantity: 1
        },
      ]
    };
  },
  methods: {
    submit() {
      if (this.checkoutUrl) {
        window.location.href = this.checkoutUrl;
      }
    }
  },
  async mounted() {
    try {
      const res = await this.$axios.get('/api/stripe/create-session/' + this.lineItems[0].price);
      console.log("Respuesta de Stripe:", res.data);

      if (res.data && res.data.url) {
        this.checkoutUrl = res.data.url;
      } else {
        console.error("No se pudo obtener la URL de Checkout del servidor. Estructura recibida:", res.data);
      }
    } catch (error) {
      console.error("Error obteniendo sesión:", error);
    }
  }
}
</script>
As you can see, the Vue Stripe plugin is NOT necessary; it can be done natively by parsing the response URL data from the Stripe Session object.
app/Http/Controllers/Api/StripeController.php
<?php

namespace App\Http\Controllers\Api;

use App\Http\Controllers\Controller;
use Laravel\Cashier\Checkout;

class StripeController extends Controller
{
    public function createSession(string $priceId)
    {
        $session = Checkout::guest()->create($priceId, [
            'mode' => 'payment',
            'success_url' => url('/success'),
            'cancel_url' => url('/cancel'),
        ]);

        return response()->json([
            'id' => $session->id,
            'url' => $session->url
        ]);
    }
}
Do not use priceID to process payments
Alternatively, we can supply custom amounts dynamic fields directly from the customer request parameters payload:
const res = await this.$axios.get(this.$api.stripeCreateSessionId, {
  params: {
    amount: this.basePrice,
  }
});
And on the backend architecture controller server layer, we dynamically branch our session builder patterns handlers:
public function createSessionId()
{
    $successRouteUrl = request('successRouteUrl');
    $checkoutSessionId = '{CHECKOUT_SESSION_ID}';

    $separator = strpos($successRouteUrl, '?') === false ? '?' : '&';
    $url = "{$successRouteUrl}{$separator}session_id={$checkoutSessionId}";

    if (request()->has('amount')) {
        $sessionId = $this->createSessionByAmount(request('amount'), $url);
    } else {
        $sessionId = $this->createSessionByPriceId(request('price_id'), $url);
    }

    return $this->successResponse($sessionId);
}

public function createSessionByPriceId(string $priceId, string $successRouteUrl, string $cancelUrl = "https://academy.desarrollolibre.net/")
{
    $session = Checkout::guest()->create(
        $priceId,
        [
            'mode' => 'payment',
            'success_url' => $successRouteUrl,
            'cancel_url' => $cancelUrl,
        ],
    );

    return response()->json([
        'id' => $session->id,
        'url' => $session->url
    ]);
}

public function createSessionByAmount(float $amount, string $successRouteUrl, string $cancelUrl = "https://academy.desarrollolibre.net/")
{
    $session = Cashier::stripe()->checkout->sessions->create([
        'success_url' => $successRouteUrl,
        'cancel_url' => $cancelUrl,
        'line_items' => [
            [
                'price_data' => [
                    'currency' => 'usd',
                    'product_data' => [
                        'name' => 'Compra en Desarrollolibre Academy',
                    ],
                    'unit_amount' => $amount * 100, // Stripe handles integer cents values
                ],
                'quantity' => 1,
            ],
        ],
        'mode' => 'payment',
    ]);

    return $session->id;
}
If we check the developer console during a client-only integration setup, we will likely encounter an exception message like the following:
v3:1 Uncaught (in promise) IntegrationError: The Checkout client-only integration is not enabled. Enable it in the Dashboard at https://dashboard.stripe.com/account/checkout/settings. at Sl (v3:1:461068) at e._handleMessage (v3:1:469393) at e._handleMessage (v3:1:85275)️ Public and Secret Keys: Security in Transactions
In standard payment gateway architectures, a private key or secret key must always exist. Practically all modern payment services operate under this asymmetric pattern. The secret key is strictly intended to be executed on the server side to ensure that the payment intent or payload verification is being processed correctly and securely away from client manipulation.
It is a process highly analogous to what we implemented previously with PayPal: on the front-end client layer, we boot the gateway initialization using only the public key, but on the back-end server layer, once the order webhook or redirect triggers, we validate and approve that specific order payload using our secret key credentials. This introduces a robust security layer.
Think of the public key and secret key as a username and password pair (where the public key acts as the public username identifier and the private key acts as the secure password). In a client-only architecture, we are exclusively utilizing the public key, bypassing backend validation and introducing vulnerabilities into the payment lifecycle.
⚠️ Security Risks When Using Only the Public Key
Relying exclusively on client-side requests poses a significant architecture risk: a malicious actor could intercept the network payloads or manipulate the bundled script to swap your public key with theirs. If your configuration parameters are exposed directly or lack server-side sanity verification, all subsequent checkout redirections would process funds directly into the attacker's gateway account instead of yours.
For this exact reason, Stripe obfuscates the "Enable client-only integration" configuration settings switcher by default inside their dashboard panel, flagging it as a less secure workflow alternative compared to the tokenized server-driven methods.
Once you manually allow this legacy integration layout inside your account settings, the routing process should execute without throwing initialization errors, but the architectural vulnerabilities will remain.
The Main Problem: Product Assignment Logic
Beyond immediate security risks, the fundamental limitation of a client-only configuration is the total absence of post-payment application logic.
When selling digital goods (such as an online course, event tickets, or a technical book), your database system must instantly react to successful payments by creating relationships, updating ownership rows, or provisioning access tokens for that specific user ID. Because a client-only configuration handles the entire interaction directly within the user's browser, your backend application is left completely blind to whether the transaction was actually completed or fraudulently bypassed.
Consequently, this simplified approach acts merely as a superficial "quick donation link" or payment button wrapper. It is incapable of managing automated digital delivery, user provisioning, or secure access controls.
Summary of Limitations
To summarize, executing a client-only checkout strategy introduces two major roadblocks:
- Vulnerability and Insecurity: Relying solely on client-side public keys to map accounts significantly increases exposure to script injection, request hijacking, and unauthorized fund diversion.
- Inability to Process Backend Logic: Without a server-side handshake, your platform cannot programmatically release course enrollments, send automated transactional invoices, or grant database permissions once the user completes the checkout.
We will address and resolve these critical structural bottlenecks in the upcoming sections by implementing webhooks and secure backend controller flows, but mastering these constraints beforehand is vital to designing production-ready systems.
Next step, learn how to get started with Boost with this tutorial on how to use the Laravel SDK.