
In this post we will see how to create a wave.
For this we will use the Canvas element provided by HTML5 and the function called Window.requestAnimationFrame() introduced in a previous installment called: THE SECRET OF ANIMATIONS IN JAVASCRIPT (REQUESTANIMATIONFRAME()); Recording a bit the use of the Window.requestAnimationFrame() function, it allows you to animate figures drawn on a Canvas element; in other words:
With the requestAnimationFrame() function, smooth transitions or changes are obtained through an API that is optimized to work with Canvas.
For more information, see the link above.
What is a Wave Effect in JavaScript and Why Use Canvas?
A wave effect is an animation that simulates the behavior of a wave or oscillation. It can be used for:
- Visualizations
- Animated backgrounds
- Futuristic effects
- Mathematical representations
While there are "wave" effects made solely with CSS (like ripple buttons), Canvas allows complete control over every pixel and every frame.
When you work with Canvas:
- You draw directly on a canvas.
- You control coordinates, shapes, and colors.
- You can apply real mathematics to the movement.
That's why it's ideal for sinusoidal waves and complex animations.
Why requestAnimationFrame is key to smooth animations
One of the most common mistakes is using setInterval or setTimeout for animation. I did it myself at first… until I saw stuttering, excessive resource consumption, and unnatural animations.
requestAnimationFrame:
- Syncs with browser refreshes.
- Automatically pauses if the tab is inactive.
- Produces much smoother transitions.
In wave animations, where every frame matters, the difference is huge.
Building the Wave (JavaScript)
The JavaScript is actually short and simple; but at the same time it can be somewhat entangled due to the mathematical operations of addition and division but I will try to explain it in the simplest way.
Before showing the code, it is necessary to remember the sine or cosine function that you probably saw at school and university; these functions are like waves that come and go:
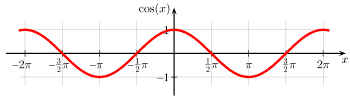
Image obtained from: Coseno.
Sine and cosine functions applied to animations
How a sine wave behaves
The cosine or sine function is wonderful for us to carry out this experiment and this is due to its wave or wave effect that they have; If you do not remember what these functions are on the Internet, you will get a lot of material about it.
Returning to the application of these functions in JavaScript we have that:
Math.cos(n)is used to apply the cosine.Math.sin(n)It is used to apply the breast.
Trigonometric functions like Math.sin() and Math.cos() generate periodic curves that rise and fall smoothly. Just what we need to simulate a wave.
y = amplitude * Math.sin(frequency * x + phase);Where:
- Amplitude controls the height of the wave.
- Frequency defines how many oscillations there are.
- Phase allows you to animate the movement.
Finally I present the complete JavaScript code:
    var c = document.getElementById('canv');
    var $ = c.getContext('2d');
    var w = c.width = window.innerWidth;
    var h = c.height = window.innerHeight;
    var draw = function(t) {
      $.lineWidth = 1;
      $.fillStyle = 'rgb(0, 0, 0)';
      $.fillRect(0, 0, w, h);
      for (var i = -60; i < 60; i += 1) {
        $.strokeStyle = 'rgb(255, 255, 255)';
        $.beginPath();
        $.moveTo(0, h / 2);
        for (var j = 0; j < w; j += 10) {
          $.lineTo(10 * Math.cos(i) +
            j + (0.008 * j * j),
            Math.floor(h / 2 + j / 2 *
              Math.cos(j / 50 - t / 50 - i / 118) +
              (i * 0.9) * Math.cos(j / 25 - (i + t) / 65)));
        };
        $.stroke();
      }
    }
    var t = 0;
    window.addEventListener('resize', function() {
      c.width = w = window.innerWidth;
      c.height = h = window.innerHeight;
    }, false);
    var run = function() {
      window.requestAnimationFrame(run);
      t += 5;
      draw(t);
    };
    run();
As you can imagine, HTML consists of a simple Canvas tag.
Some considerations about the above JavaScript
First we initialize some global variables to get access to the Canvas element, its context and dimensions:
var c = document.getElementById('canv'); var $ = c.getContext('2d'); var w = c.width = window.innerWidth; var h = c.height = window.innerHeight;Inside draw() function
We define some styles to the lines that we are going to paint:
$.lineWidth = 1;
$.fillStyle = 'rgb(0, 0, 0)';
$.fillRect(0, 0, w, h);
$.strokeStyle = 'rgb(255, 255, 255)';
This first for allows you to draw a set of lines in parallel; by varying the lower and upper bounds we can create more or less wide waves; In addition, this for is in charge of initializing the necessary components to paint lines.
    for (var i = -60; i < 60; i += 1) {
              $.beginPath();
              $.moveTo(0, h / 2);
                       /*For anidado*/
              $.stroke();
            }
In other words, if this for were not there, our waveform would look like a whip:
Why a Single Waveform Looks Artificial
Here's something I learned through experimentation:
When you use a single sine function, the animation becomes too perfect… and therefore, unrealistic.
By combining several cosine functions with slight offsets and adjustments, the waveform starts to look more organic. That was the point at which my animation stopped looking “mathematical” and began to look alive.
The following code is a nested for that prints w lines at a time; where w is the width of the screen:
    for (var j = 0; j < w; j += 10) {
      $.lineTo(10 * Math.cos(i) +
        j + (0.008 * j * j),
        Math.floor(h / 2 + j / 2 *
          Math.cos(j / 50 - t / 50 - i / 118) +
          (i * 0.9) * Math.cos(j / 25 - (i + t) / 65)));
    };
As you can see, we use multiple cosine functions (Math.cos) to create a varied ripple effect (and not as constant as cosine).
The divisions and multiplications by low numbers are to keep the values as "constant" as possible so that the wave will not vary in size radically as the values of the fors (var j and var i) increase.
To have a varied animation, each time the draw() function is executed recursively through the window.requestAnimationFrame(run); the value of the variable t is varied for this purpose.
Finally we create the function run() which is called when loading the web page.
var run = function() {
      window.requestAnimationFrame(run);
      t += 5;
     draw(t);
};
Drawing the wave step by step
function draw(t) {
 ctx.lineWidth = 1;
 ctx.fillStyle = 'rgb(0, 0, 0)';
 ctx.fillRect(0, 0, w, h);
 for (var i = -60; i < 60; i++) {
   ctx.strokeStyle = 'rgb(255,255,255)';
   ctx.beginPath();
   ctx.moveTo(0, h / 2);
   for (var j = 0; j < w; j += 10) {
     ctx.lineTo(
       10 * Math.cos(i) + j + (0.008 * j * j),
       Math.floor(
         h / 2 +
         j / 2 * Math.cos(j / 50 - t / 50 - i / 118) +
         (i * 0.9) * Math.cos(j / 25 - (i + t) / 65)
       )
     );
   }
   ctx.stroke();
 }
}- The first for loop creates multiple parallel lines.
- The second for loop draws each line across the width.
- Several cosines are combined to break the perfect symmetry.
When I removed that first for loop, the wave looked like a whip. By adding it, the effect gained depth.
Superimposing waves for a more organic effect
This approach generates:
- Visual variation
- Sense of volume
- Non-repetitive movement
It is exactly what simple single sine wave examples do not offer.
Controlling amplitude, frequency, and wave movement
- Avoiding extreme deformations
- A typical mistake is not limiting values. If you don't control the divisions and multiplications, the wave starts to grow uncontrollably.
- From experience, using small and progressive values keeps the animation stable.
- Adjustments that make a visual difference
- Small changes produce huge effects:
- Slowly increasing the phase
- Slightly varying the amplitude
- Introducing minimal offsets
- Small changes produce huge effects:
- In animations of this type, less is more.
Optimization and performance in Canvas animations
Common mistakes when animating waves
- Redrawing without clearing the canvas
- Using too many calculations per frame
- Not adapting the canvas to resizing
I always listen for the resize event:
window.addEventListener('resize', function () {
 c.width = w = window.innerWidth;
 c.height = h = window.innerHeight;
});
Practical tips for stable animations
- Use requestAnimationFrame
- Avoid unnecessary loops
- Control mathematical constants well
- Test on large and small screens
Wave effect variations and possible improvements
Once you master the base, you can:
- Add dynamic color
- Introduce random noise
- Create mouse-reactive waves
- Synchronize multiple wave layers
This is where Canvas really shines compared to CSS.
Frequently asked questions about wave effects in JavaScript
- Is Canvas better than CSS for this effect?
- Yes, when you need real waves and mathematical control.
- Can I use sine or cosine interchangeably?
- Yes, the main difference is the initial phase shift.
- Does it consume many resources?
- Well optimized, no. requestAnimationFrame helps a lot.
- Does it work on mobile?
- Yes, as long as you adjust resolution and calculations.
Conclusion
Creating a wave effect in JavaScript goes far beyond a visual trick. When you combine Canvas, requestAnimationFrame, and trigonometry, you can build fluid, organic, and fully customizable animations.
In my experience, the jump from using a single wave to superimposing several functions was what truly transformed the final result. From there, the possibilities are enormous.