
Content Index
- 1. Context: The difference between authenticated users and visitors
- ️ How to write an effective prompt for Antigravity
- The relative path trick and exact code location
- Modularization and best practices (Pinia and Vue)
- Challenges in Flutter projects and global changes
- The ideal workflow: test, review, and synchronize with Git
- Google Antigravity IDE: How to use AI to accelerate your coding (Example with Django)
- The project: Blog module with Django
- The Planning Tool
- Implementation and results
- Characteristics of the generated code
- Conclusions
I want to share a couple of tricks and considerations so that Google Antigravity IDE (or any AI programming agent) generates exactly what you are looking for when implementing specific functionalities. These are the prompts and strategies I use daily, and I am sure they will serve you well too.
1. Context: The difference between authenticated users and visitors
Imagine you want to add a new functionality to an online academy. In it, paid courses (where the user must be authenticated) and free material (where logging in is not necessary) coexist.
This distinction is a critical point that you must convey to the agent from the beginning:
- With authentication: It is possible to save progress in the database using the user's
id. - Without authentication: There is no persistent identity, so the storage logic changes completely and must rely on client-side alternatives.
With this context clear, I evaluate the existing code. In my case, I already have the payment and authentication logic covered, but I deliberately left an else block to manage free content progress locally, which is precisely what I want to solve.
️ How to write an effective prompt for Antigravity
To prevent the agent from inventing solutions you don't need, I always follow this scheme when writing my prompts for Antigravity:
- Provide context: I explain the problem and the current situation of the code so the agent understands the starting point.
- Provide clear guidelines: I indicate the technical solution I prefer. For example, I ask it to use
localStorageas the browser's persistent storage mechanism.
The browser offers various types of client-side storage:
Cookies,IndexedDB, andlocalStorage, among others. I preferlocalStoragefor its simplicity of implementation and reading. You can inspect its content by opening the browser's DevTools, in the Application > Local Storage tab.
The relative path trick and exact code location
So that Antigravity doesn't get lost in a sea of files —something that easily happens in large Laravel, Django, or Flutter projects—, I use two vital strategies before executing any prompt:
- Copy the relative path: Right-click on the file within the explorer and select "Copy Relative Path". Paste that path into the chat so the agent knows exactly which file it needs to work on, without having to guess.
- Point out the exact block: In addition to the path, I pass the piece of code where I want the implementation. For example, I tell it to look for the
watchthat monitors theclassIndexandsectionIndexproperties to update progress locally when the resource is free.
Modularization and best practices (Pinia and Vue)
To prevent the agent from "spitting out" all the code in a single file and making it difficult to maintain, I include explicit modularization instructions. In my stack, I use Pinia to handle the global state of the Vue application.
With this guideline, the agent generated a local function to save progress given the courseID, section, and class, but delegated the storage logic to a separate file managed by Pinia. The result: clean, predictable, and easy-to-scale code. If your prompt is too generic, the AI will put all the logic into the same component, which is a bad practice that will complicate your maintenance in the future.
Challenges in Flutter projects and global changes
When you ask for changes that affect multiple project files (like configuring payments in a Flutter app), prompt precision is even more critical. A vague prompt can lead to two common problems:
- Obsolete versions: AI agents tend to install old package versions because their training data does not always reflect the latest releases. The solution is simple: always specify the exact version or explicitly request "the latest available stable version".
- In my case, I directly specified the version of the plugin I wanted to install.
- Forgotten files: In a Flutter project, the agent modified
pubspec.yamlcorrectly, but forgot to updateAndroidManifest.xml. Without the permissions declared in that file, the functionality simply does not work on Android.- The prompt was to add the
in_app_purchasepackage to enable purchases through Google Play. This operation requires adding the<uses-permission android:name="com.android.vending.BILLING" />permission inAndroidManifest.xml, a step the agent omitted until I pointed it out in a second prompt.
- The prompt was to add the
If you don't specify exactly which files it should touch, the agent can break the harmony of the project: it introduces redundancies, changes the established code style, or ignores existing configurations. Remember that when starting a new conversation, the agent evaluates the project from scratch and does not always have full visibility of prior context. Therefore, targeted changes and manual verification of each result are indispensable habits when programming with Antigravity.
The ideal workflow: test, review, and synchronize with Git
One of the advantages I value most about working with Antigravity IDE is its integration with Git: modified lines are visually marked in the editor (in yellow) so you can review exactly what changed before accepting it. My workflow after each generation is as follows:
- Analyze: I review the change marks in the editor and compare them with the original code.
- Execute and test: I verify that the functionality behaves as expected in the browser or emulator.
- Synchronize: If the change is correct, I run
git add,git commit, andgit push. - Revert if necessary: If something goes wrong, I use
git reset --hard HEADto return to the last stable state and retry with a more precise prompt.
Summary: give the agent context, paste the relative path of the file, point out the exact code block to work on, review the changes one by one, and constantly synchronize with Git.
Google Antigravity IDE: How to use AI to accelerate your coding (Example with Django)
It is time for another practice to expand our capabilities with Artificial Intelligence. On this occasion, we will use Google Antigravity to program a complete module, taking advantage of its integration with intelligent agents directly from the editor.
If you want to follow this practice, you can download Antigravity from its official page. The fundamental difference compared to the traditional editor (VS Code) is that it includes an Agent tab and a Planning tool, which is what we will explore today.
My stance is clear: the modern way of programming involves working with AI. If you don't use it, your competition will, and you will lose ground. In this course, we seek balance: solid technical teaching, empowered with these tools to accelerate developments we already master.
The project: Blog module with Django
For this practice, I asked the agent to develop a Blog module that was missing from the project. The goal was to create:
- Post listing: With filters by categories, types, and pagination.
- Detail page: Styled with Bootstrap.
- Existing models: Instead of creating a new model from scratch, I instructed it to use the
Elementmodel (which acts as a representation of the posts) and its relationships withCategoryandType.
The prompt I used was the following:
Create a module in the elements app to have a Blog with filters by types, category, pagination, and styled with Bootstrap, featuring a list and a detail view.
It is a quite improvable prompt: we didn't specify whether we want it to create a new model (in our case we want it to reuse the existing Element model), nor did we attach screenshots of the expected design. Even so, it serves to illustrate the workflow with Antigravity. The models we already had in the project were:
class Category(models.Model):
    title = models.CharField(max_length=255)
    slug = models.SlugField(max_length=255,blank=True)

    def __str__(self):
        return self.title

class Type(models.Model):
    title = models.CharField(max_length=255)
    slug = models.SlugField(max_length=255,blank=True)

    def __str__(self):
        return self.title

class ElementManager(models.Manager):
    def get_queryset(self):
        # Whenever Element.objects.all() is used, it will include select_related
        return super().get_queryset().select_related('category', 'type')

class Element(models.Model):
    title = models.CharField(max_length=255)
    slug = models.SlugField(max_length=255,blank=True)
    description = models.TextField() # blank=True, null=True
    price = models.DecimalField(max_digits=10,decimal_places=2, default=6.10) # 12345678.10
    category = models.ForeignKey(Category, on_delete=models.CASCADE) #, related_name='elements'
    created = models.DateTimeField(auto_now_add=True)
    updated = models.DateTimeField(auto_now=True)
    type = models.ForeignKey(Type, on_delete=models.CASCADE)
By specifying the elements app as an inspection point, the agent reduces the time it spends scanning the project and saves tokens, which translates into faster and more focused responses.
The Planning Tool
This is, in my opinion, the main advantage of Antigravity over other tools like Gemini CLI. Before writing a single line of code, the agent generates a Roadmap with all the files it plans to modify or create, giving you the opportunity to correct course before it's too late.
The AI shows you exactly which files it is going to touch:
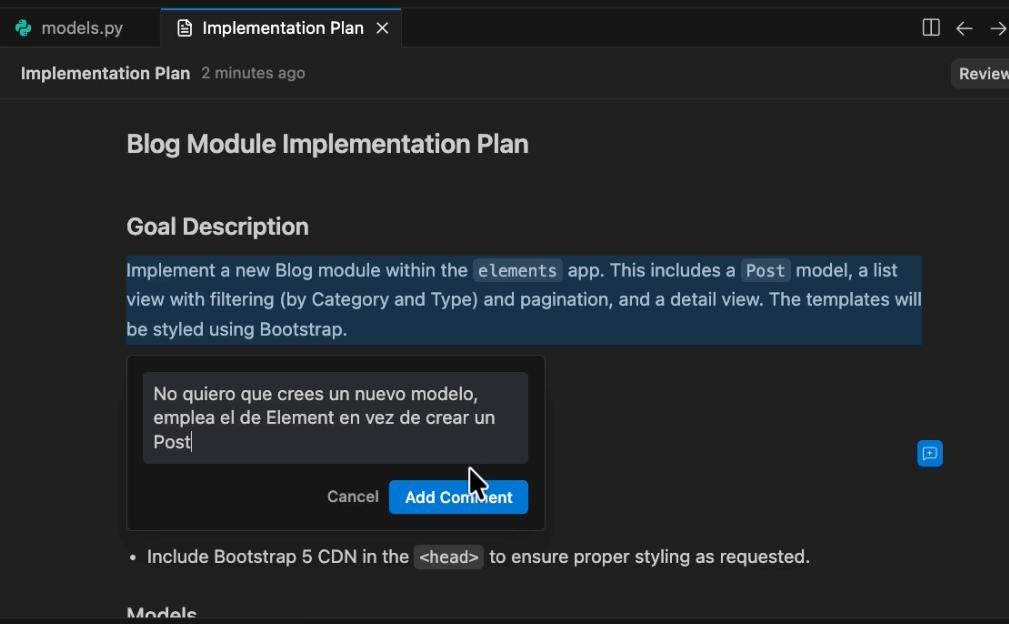
As you can see in the Roadmap, the agent wanted to generate a new Post model, which is not what we are looking for. This happened precisely because the initial prompt was imprecise. But here lies the value of planning: you can correct it before it executes any changes. You simply comment "Do not create a new model; use the Element model instead" and it readjusts its plan.
If the AI plans to create a
Postmodel and you want it to useElement, add a comment directly in the planning. The agent will readjust its Roadmap before touching a single line of code.
As a security recommendation: always synchronize your project with Git before accepting proposed changes. If the result is not what is expected, you can easily revert with
git reset --hard HEAD.
During the practice, the editor hung on "Thinking..." indefinitely because it had a problem trying to spin up the virtual environment and run the migrations. The errors that appeared in the terminal were:
python manage.py makemigrationszsh: command not found: python
from django.core.management import execute_from_command_lineModuleNotFoundError: No module named 'django'
ImportError: Couldn't import Django. Are you sure it's installed and available on your PYTHONPATH environment variable? Did you forget to activate a virtual environment?
What happened is that the agent tried to run python directly instead of python3, and the virtual environment was not activated. I ran the command manually, informed the agent that I had already run it, but since it still didn't respond, I had to terminate its execution and restart it, telling it to continue with the generation of views and templates.
Implementation and results
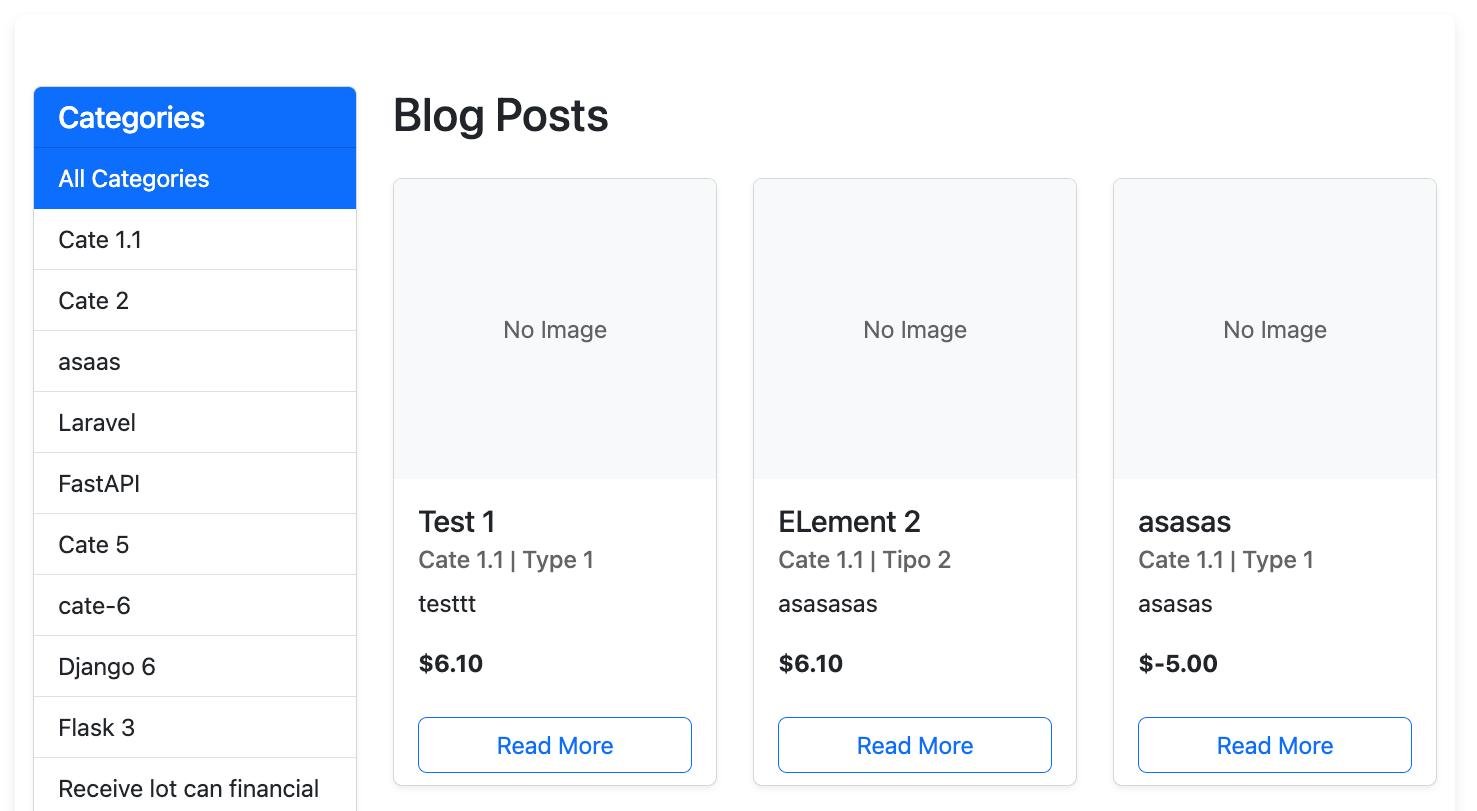
After some iterations —following the same process: reviewing the Roadmap, fixing what doesn't fit with a comment, and clicking the "Proceed" button in the upper right corner—, the agent generated a functional mockup.
The result was a Bootstrap card listing with category and type filters, plus a detail page:
Characteristics of the generated code
Dynamic filters: The view optionally reads the type and category parameters from the URL (request.GET) and adjusts the queryset accordingly:
elements\views.py
def blog_list(request):
    elements = Element.objects.select_related('category', 'type').all()

    # Filters
    type_slug = request.GET.get('type')
    category_slug = request.GET.get('category')
    if type_slug:
        elements = elements.filter(type__slug=type_slug)

    if category_slug:
        elements = elements.filter(category__slug=category_slug)
Query optimization: It used select_related to fetch the category and type relationships in a single SQL query, avoiding the classic N+1 query problem that slows down applications as they grow:
elements = Element.objects.select_related('category', 'type').all()elements\views.py
Slug handling: It configured the routes to use the slug field instead of the id (primary key) in the URLs. This is a best practice for both SEO and link readability:
elements\urls.py
path('blog/<slug:slug>/', blog_detail, name='blog_detail'),elements\views.py
def blog_detail(request, slug):
    element = get_object_or_404(Element, slug=slug)
return render(request, 'elements/blog_detail.html', {'element': element})Pagination: It implemented standard Django logic to read the page parameter from the URL and pass the corresponding objects to the template.
Conclusions
As you can appreciate, Antigravity and tools of this kind offer real advantages in modern development. Of course, results are not always identical between sessions: I ran this same test twice on the same base project and in the first iteration I had to make additional corrections, such as telling it to use the slug instead of the id as a URL identifier, or completing the design with a second prompt attaching reference screenshots so it would apply a similar style:
elements\templates\base.html
<!-- Google Fonts -->
    <link
        href="https://fonts.googleapis.com/css2?family=Lora:ital,wght@0,400;0,700;1,400;1,700&family=Open+Sans:ital,wght@0,300;0,400;0,600;0,700;0,800;1,300;1,400;1,600;1,700;1,800&display=swap"
        rel="stylesheet">
    <!-- Font Awesome -->
    <link rel="stylesheet" href="https://cdnjs.cloudflare.com/ajax/libs/font-awesome/6.4.0/css/all.min.css">
    <link rel="stylesheet" href="{% static 'css/styles.css' %}">
    <style>
        body {
            font-family: 'Lora', 'Times New Roman', serif;
            font-size: 20px;
            color: #212529;
        }
        h1,
        h2,
        h3,
        h4,
        h5,
        h6 {
            font-family: 'Open Sans', 'Helvetica Neue', Helvetica, Arial, sans-serif;
            font-weight: 800;
        }
    </style>
In short: although AI can infer styles from screenshots you attach, there will always be necessary manual adjustments. In this practice, for example, we had to fix some syntax errors in the templates (malformed closed HTML tags). AI tools accelerate development, but they do not replace the programmer; they still require your technical judgment to work well.