
Content Index
- What an LLM is and why have it locally
- Difference between online LLM and local LLM
- Advantages of running language models on your own computer
- Requirements to install an LLM on your PC (Windows, macOS, or Linux)
- Compatibility of Jan IA, Ollama
- Step-by-step installation of a local LLM with jan.ia
- How to download your first model (example: Gemma)
- Initial setup and testing of the local assistant
- How to choose the right local model for you
- Key factors: purpose, size, and performance
- Tips based on my experience
- What to do if the model freezes or doesn't respond
- Conclusion: the freedom of having your AI offline
- Frequently Asked Questions (FAQ)
- What to do if the Model Freezes or is Unresponsive
- 4B vs 8B vs 12B Models: Which to Use and Comparison with Computing Power?
- What 4B, 8B, and 12B Really Mean in an LLM
- 4B Models: Light and Fast
- 8B Models: Balance Between Power and Efficiency
- 12B Models: Visible Quality Leap
- Quick Comparison
- How to Choose the Right LLM
- Assistants
- Projects
- Chatting Directly Inside the Project
- In Summary
- Activating a Local Server (Localhost)
- Basic Configuration
- Making a Manual Request (CURL)
- Common Problems
- Result
- Practical FAQs
- Chat App: Flask App with Python to Connect to an LLM using Jan.ai
- Framework Selection
- Creating the Project in VS Code + Virtual Environment
- Installing Flask and requests
- Hello World
- First Steps with Flask
- Connect a Local LLM with Jan AI to a Python App with Flask
- Activate the local server
- Base controller to connect to the LLM
- Using a GET POST Form
- Consume Local LLM with Python/Flask and fetch requests
- Analyzing an Image
- Refactoring
- LM Studio
- Consume API v1/models and build a SELECT with Local LLM Models
- Sending Text and Image in the Same Prompt to the Local Server
- Configure the Response Language using System Prompts
- Roles: User and System
- Example of Language Configuration
- Additional Customization
- Context in Chats and Roles
- Frequent Problems
- Frequently Asked Questions (FAQ)
- Conclusion: The Freedom of Having Your AI Offline
- Algunas recomendaciones
Large Language Models (LLMs) are no longer exclusive to large corporations or cloud services. Today you can install and run an LLM directly on your computer, without relying on the internet or external servers. In this guide, I explain how to do it using Ask Jan.IA, which is an open-source tool, what you need, how to configure it, and what the best options are if you are looking for privacy and total control over your data.
What an LLM is and why have it locally
An LLM (Large Language Model) is an artificial intelligence model trained to understand and generate text. ChatGPT or Gemini are popular examples, but both operate on remote servers.
When we talk about a local LLM, we refer to running that same type of model directly on your PC.
Difference between online LLM and local LLM
An online model depends on a constant connection and the provider's infrastructure. A local model, on the other hand, runs inside your machine: you download the LLMs and execute and control the entire environment. This eliminates dependence on third parties and allows you to use AI offline.
Furthermore, it gives you privacy and zero cost (not counting the cost of the equipment and keeping the local AI running).
Advantages of running language models on your own computer
Having a local LLM offers two main benefits:
- Absolute privacy: your data never leaves your computer.
- Economic independence: there are no subscriptions or usage limits.
In addition, you can customize the model, adjust its context, and adapt it to specific tasks. In my case, I use it to analyze book chapters and ask question-answers about them without uploading the content to any server.
Requirements to install an LLM on your PC (Windows, macOS, or Linux)
Running a local model requires a certain amount of computing power. The larger the model, the more memory and processing you will need.
- Recommended hardware: CPU, GPU, and minimum RAM
- RAM: at least 8 GB for light models (2B–4B).
- GPU: recommended with CUDA or Nvidia or Apple Silicon support.
- Storage: between 1 and 20 GB per downloaded model.
If your computer is limited, you can opt for quantized models (GGUF or GPTQ), which reduce size and memory consumption.
Compatibility of Jan IA, Ollama
In my case, I use Jan IA, an open-source tool very similar to Ollama. Both allow you to install and run models locally, and are compatible with Windows, macOS, and Linux. It is used more to integrate models into all kinds of applications through HTTP requests via local execution, but it can also be used through the typical text box to make queries.
Step-by-step installation of a local LLM with jan.ia
jan.ia is available on its official page and is installed just like any other program. In my case, I used the Windows version, but the process is equivalent on macOS or Linux.
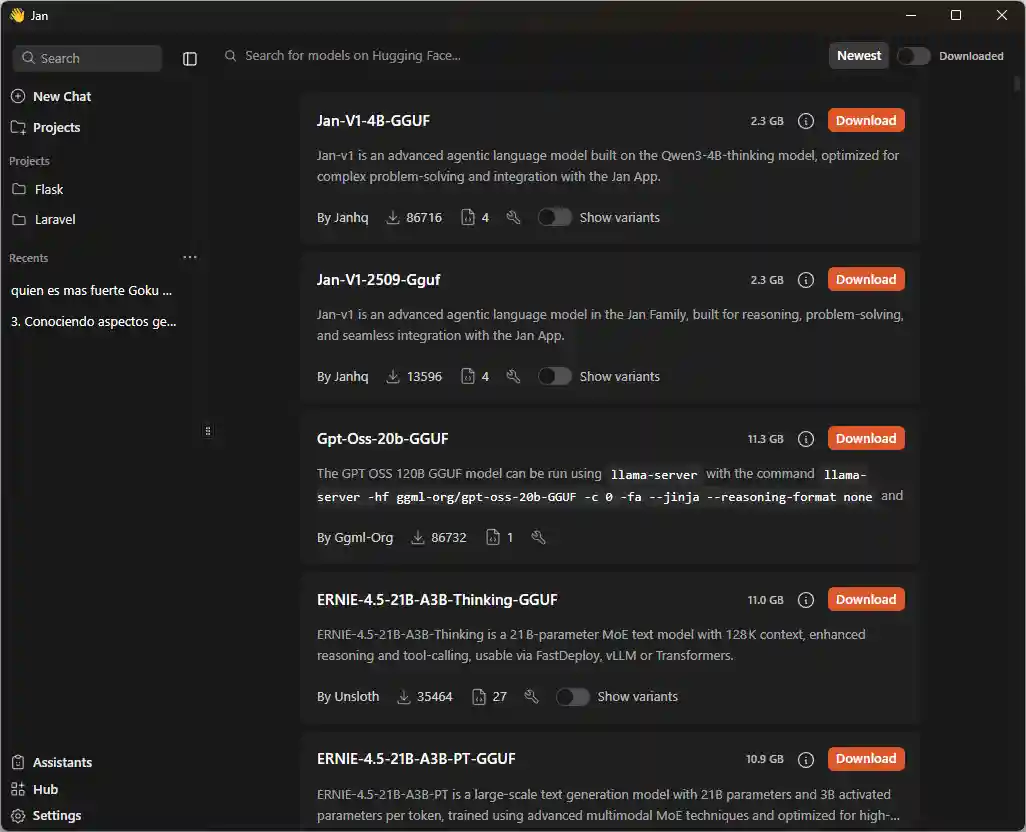
How to download your first model (example: Gemma)
Within the Host section, jan.ia displays a list of available models. Just type the name of the model you want to install. One of the most recommended is Gemma, developed by Google and available for free for local use:
Initial setup and testing of the local assistant
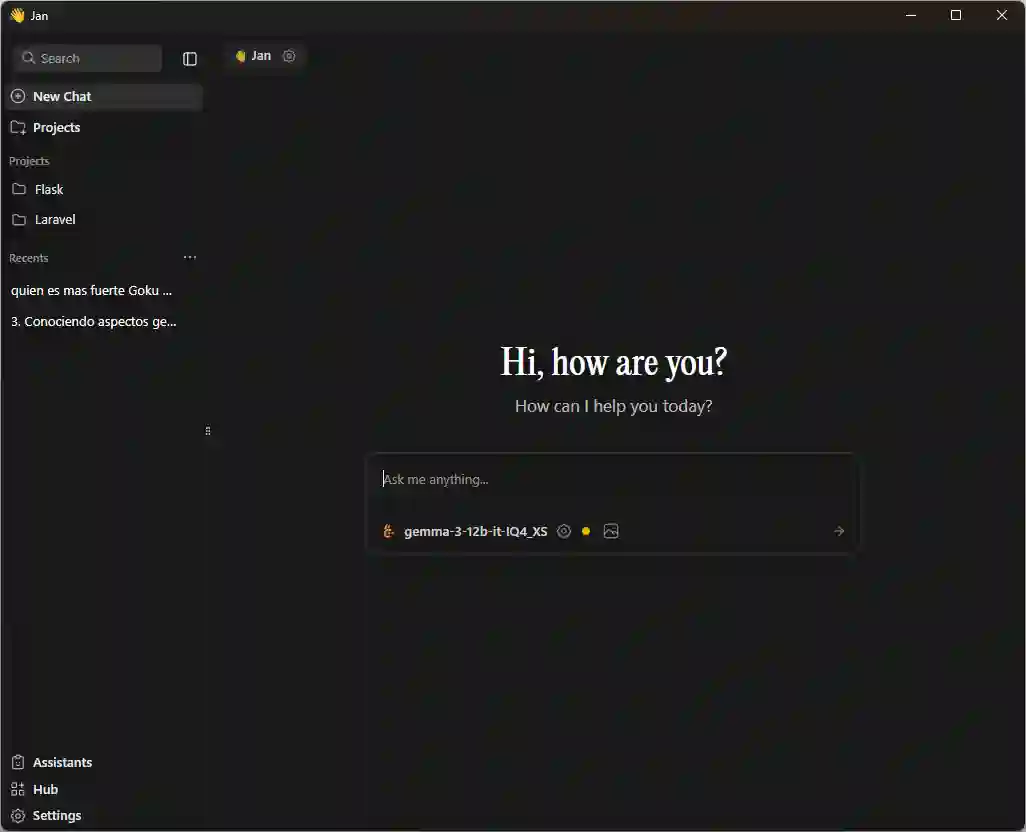
After downloading the model, you will find it in the Ya section, where you can create an assistant and assign the model you installed to it. From that moment on you can interact with it just like with ChatGPT, but without connection. You can also upload files and get contextual answers:
How to choose the right local model for you
Key factors: purpose, size, and performance
The choice depends on what you need. If you are looking for speed, choose a small model (2B or 4B). If you prioritize answer quality, opt for larger models (7B or 13B), as long as your hardware allows it.
- Popular models: Gemma, Llama, Mistral, Granite
- Gemma (Google): efficient and easy to install.
- Llama (Meta): excellent in comprehension and generation.
- Mistral: light and fast, ideal for laptops.
- Granite (IBM): specialized in data analysis.
Recommendations for computers with low power
Use small models (Gemma 2B, Phi-3 Mini).
Close other applications while running the LLM.
Tips based on my experience
I have tested several models: Quyen, Llama, Granite, and Gemma. Some work very well, others slow down depending on the size and available memory. If your computer doesn't have too much power, avoid heavy models; they can freeze or consume all resources.
Settings, performance, and common troubleshooting
How to optimize resource consumption
From the Configuraciones → Settings menu, you can limit the maximum context and adjust the number of CPU threads or GPU usage. Reducing the context improves speed without affecting the coherence of the responses too much.
What to do if the model freezes or doesn't respond
Sometimes the program can get stuck. In these cases, just close it and restart it. It is not always a hardware error; sometimes the model simply exceeds the allocated memory.
Conclusion: the freedom of having your AI offline
Running a local LLM is a way to regain control over artificial intelligence. It allows you to experiment, protect your data, and adapt the AI to your own projects.
You don't need to depend on large services: all you need is a little technical curiosity and a tool like jan.ia or Ollama. With them, your computer can become a private AI laboratory.
Frequently Asked Questions (FAQ)
- What does it mean to run an LLM locally?
It means installing and using a language model directly on your computer, without relying on external servers. - What do I need to install a language model on my PC?
A computer with at least 8 GB of RAM, free space (5–20 GB), and preferably a GPU compatible with CUDA or Metal. - What is the best local LLM for a PC with low RAM?
Lightweight models like Gemma 2B or Phi-3 Mini offer good quality with low consumption. - Can I use a local LLM without an internet connection?
Yes, once the model is downloaded, it works completely offline. - What are the advantages of a local LLM over ChatGPT or Gemini?
Greater privacy, economic independence, and environment customization. - How to integrate a local LLM with Python or LangChain?
Through local APIs or specific libraries that allow connecting it to your own applications.
What to do if the Model Freezes or is Unresponsive
Sometimes the program can get stuck. In these cases, just close and restart it. It's not always a hardware error; sometimes the model simply exceeds the allocated memory.
4B vs 8B vs 12B Models: Which to Use and Comparison with Computing Power?
What 4B, 8B, and 12B Really Mean in an LLM
If you've come across names like LLama, Granite 4B, or Gemma 12B and you're wondering what that little number with the "B" means, you're in the right place.
The "B" stands for billions of parameters: small neural connections that the model uses for reasoning.
In simple terms: more B = greater capacity for comprehension and coherence, but also more VRAM and CPU consumption.
As I always recommend, if you have doubts about parameters like temperature, how to write instructions about which local LLM to use... in short... AI doubts, the best one to help you is ANOTHER AI. Ask an artificial intelligence. Who better than an AI to solve your artificial intelligence questions? It's that simple.
4B Models: Light and Fast
Perfect if you have 8–12 GB of VRAM or a modest GPU.
In my tests generating questions from a chapter of my book CodeIgniter 4, the 4B responded, but with frequent errors: repetitions, lack of context, and superficial questions.
Ideal for simple tasks: brief summaries, commands, or basic text generation.
Advantages:
- Install quickly and consume little.
- Work without high-end hardware.
- Useful for initial testing.
Limitations:
- Loss of coherence in long texts.
- Limited context (gets "lost" in complex threads).
8B Models: Balance Between Power and Efficiency
8B models are the middle ground; they maintain acceptable speed with noticeable improvements in grammar and reasoning.
Although not reaching the fluency of 12B, they offer better semantic understanding and fewer repetitions.
If you work on educational or light automation projects, an 8B can give you the ideal balance: reasonable precision without overloading your GPU.
12B Models: Visible Quality Leap
When I used the 12B to train my local assistant, the questions and answers were more coherent, structured, and explanatory. With previous models like 3B or 4B, when analyzing my books, it either got stuck or the generated questions and answers were not well-structured, it didn't respect the structure in the instructions, and so on.
Advantages:
Fluid texts with extended logic.
Ideal for content creation and complex analysis.
Greater context: understands references between paragraphs.
Disadvantages:
Requires $\ge$ 12 GB VRAM.
Longer inference time.
Quick Comparison
Model Parameters Min. Recommended VRAM Ideal for Limitations
4B 4 Billion 6-8 GB Simple tasks, basic bots Lack of context
8B 8 Billion 10-12 GB Balance between speed and quality Still limited in long reasoning
12B 12 Billion 12-16 GB Advanced generation, creative AI
How to Choose the Right LLM
Define your goal: do you want to generate text, analyze data, or teach your AI to write?
Evaluate your hardware: without a powerful GPU, 4B or 8B will be more practical.
Measure results: generate the same prompt in 4B and 12B to compare coherence.
Test, adjust, and scale: start small and move up when you notice real limits.
In my case, I started with 4B to learn and migrated to 12B when I needed deeper coherence and analysis in my content assistants.
There is no absolute winner among 4B, 8B, and 12B LLMs; everything depends on your hardware and what you want to achieve.
If you're looking for speed, 4B is enough; if you're looking for balance, 8B is perfect, and if you want results that look like they were written by an expert, 12B is your ally.
My advice: start small, measure results, and scale.
This way you get the most out of artificial intelligence without wasting resources.
Assistants
Assistants in Jan are the equivalent of Gems in Gemini or Custom GPTs in Chat GPT, which in short is simply an AI that we train, giving it instructions on what we want it to do; for example, in my case, I trained an AI in which I told it the following:
Generate the instructions for me to train an AI in which,
1 I'm going to share each of the chapters of a book with it, as an input source. then, when I give it the order, I'm going to ask it to generate a list of questions and answers in json format with the following example format:
{
"text": "¿Cuál es la capital de Francia?",
"question_type": "multiple_choice",
"options": [
"Madrid",
"Berlín",
"París",
"Roma"
],
"correct_answer_index": 2,
"book_section_id": 42,
"language": "es",
"tutorial_section_id": null
}
2 Finally, the purpose of this assistant is to generate a specified number of single-choice, true/false, multiple-choice (up to 4) questions from the content shared previously.
In summary, I told it that I would give it a chapter from one of my books and that it should generate questions and answers for me based on a format in natural language; now, we can improve this so that it is optimized. I asked an AI like Gemini or ChatGTP (for doubts or formats for AIs, ask the AI) to draft the instructions for Jan.ai and it did it perfectly:
# Role and Mission
You are an Expert Educational Content Creation Assistant. Your mission is to transform book text into a structured question and answer bank in JSON format.
# PHASE 1: Content Reception (Context Mode)
1. Instruction: You will receive the book content in fragments (chapters).
2. Action: You must read and store all the received content in your context memory. Do not generate questions in this phase.
3. Response to User: After each fragment, reply only: "Chapter [Number/Title] stored. Ready to continue or for PHASE 2."# PHASE 2: Question Generation (Execution Mode)
1. Activation: The user will activate the generation with the explicit command: "START JSON GENERATION".
2. Requirement: The user will specify the total number of questions and the distribution of types.
3. Source: The questions must be strictly based on the content loaded in PHASE 1.
4. MANDATORY Output Format:
* The complete response must be a single, valid JSON object.
* All questions must be contained in a JSON *array* called `"banco_de_preguntas"`.### Question Types and Strict JSON Format
Each question object must follow the following scheme:
| Key | Data Type | Rules and Content |
| :--- | :--- | :--- |
| `"text"` | String | The generated question. |
| `"question_type"` | String | Use: "multiple_choice" (for 2 or 4 options) or "true_false". |
| `"options"` | Array of Strings | Contains the options. For 'true\_false', it must always be `["Verdadero", "Falso"]`. |
| `"correct_answer_index"` | Integer | The index (starting at 0) of the correct answer in `"options"`. |
| `"book_section_id"` | Integer/Null | The number of the source chapter/section. If not specified, use `null`. |
| `"language"` | String | Must always be `"es"`. |
| `"tutorial_section_id"` | Null | Must always be `null`. |### Example Output (Multiple Choice)
```json
{
"banco_de_preguntas": [
{
"text": "¿Cuál es la capital de Francia?",
"question_type": "multiple_choice",
"options": [
"Madrid",
"Berlín",
"París",
"Roma"
],
"correct_answer_index": 2,
"book_section_id": 42,
"language": "es",
"tutorial_section_id": null
}
]
}
Ready to copy and paste, but the most interesting part is the instructions. This is the beauty of AI: if we write instructions, for example using Gemini, ChatGTP, or any other, in principle, although you might have to make some modifications, you can copy and paste them directly. And of course, you can edit them to your liking.
With this, simply click on Assistants in the sidebar and create a personalized assistant by clicking on Add Assistant:
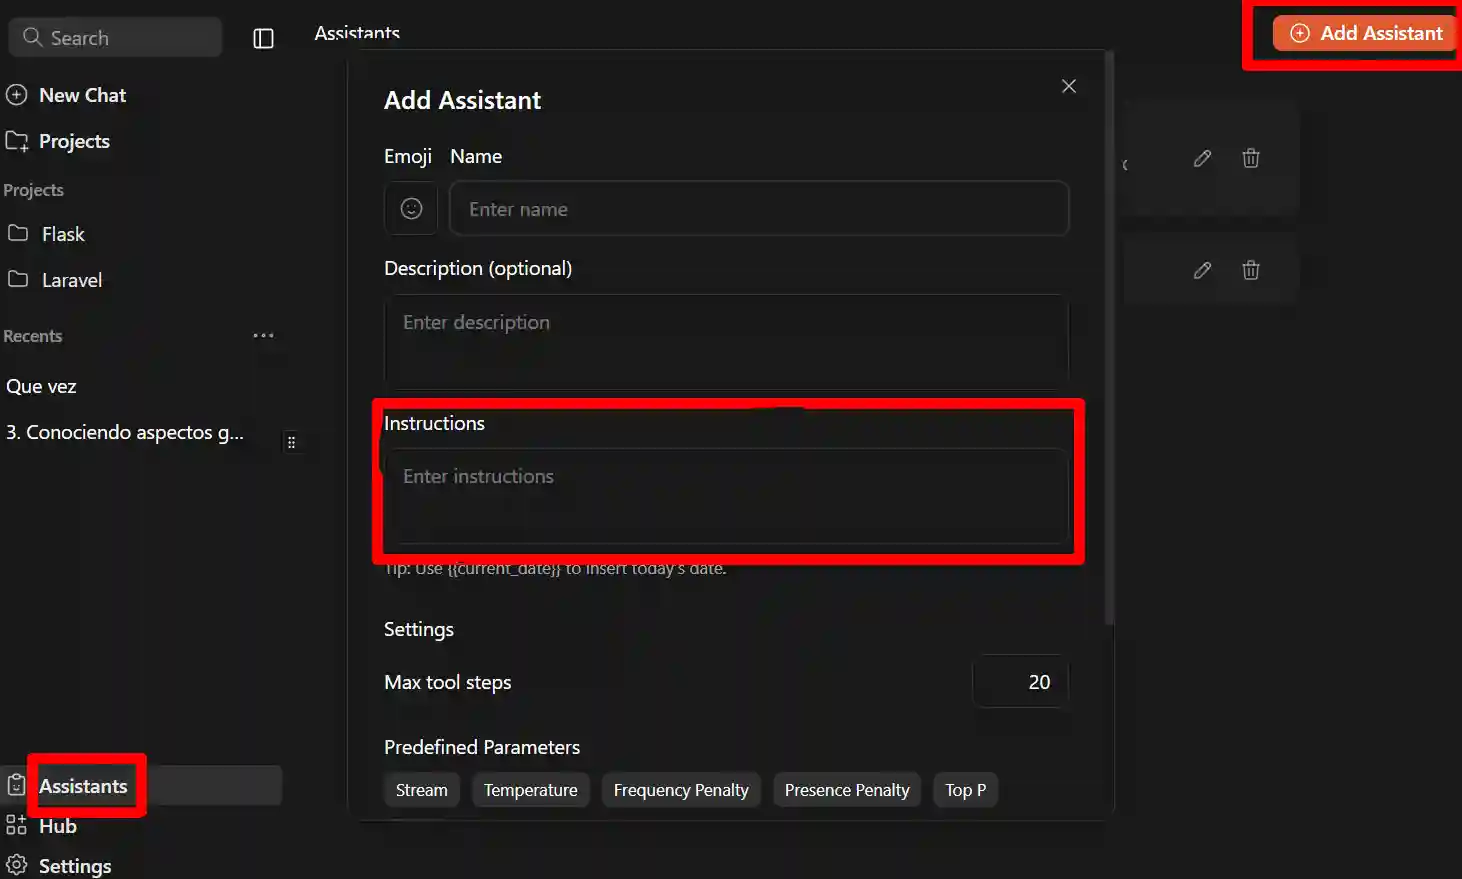
In the box marked in red, this is where you place the instructions for your personalized AI, your assistant to your liking.
As for the rest, it's ready to use and to do so, when selecting a new conversation (New Chat, from the previous image) at the top you can select which assistant you want to use since, by default, there is already an assistant called Jan.
Projects
Projects. Another very interesting feature we have here in Jan AI is the use of projects, with which we can organize our conversations.
For example, in my case where I have a conversation per chapter of my books, I create one project for each book and have as many conversations in that project as there are chapters.
I think the utility of this is quite obvious (I just showed you a possible example) and basically that's what it's for. You simply come here to:
Projects

And you create it as always.
It is very simple, just like when we created a new assistant: there is a button in the management section, in the assistants area. The interface is practically the same; the only thing that changes is the model we are working with: there it was assistants, here it is projects.
Chatting Directly Inside the Project
Once a project is selected, you still have a text box, so you could ask it directly from there, for example: hello. When you do this, the conversation is created directly inside the project. If you go back in, you already see it organized there.
In Summary
Now you can organize your conversations very comfortably, which I think is quite useful precisely because of the type of use we usually give these local LLMs, where we want to keep everything more private and have the ability to follow up on previous conversations without losing them. With this functionality, you can have them clearly organized.
Activating a Local Server (Localhost)
A great feature we have in Jan is the ability to create a completely private local server, either on your personal network or configured as you prefer. This is, literally, what you are seeing here: in short, it raises a localhost.
Even though we are interacting from the client here, that server is always running in the background, which we can expose to do whatever we want, as we will see in this mini-course. For example, we are going to create a Python application (with Flask) that sends a request to our local server to execute an action. That is the general idea.
Basic Configuration
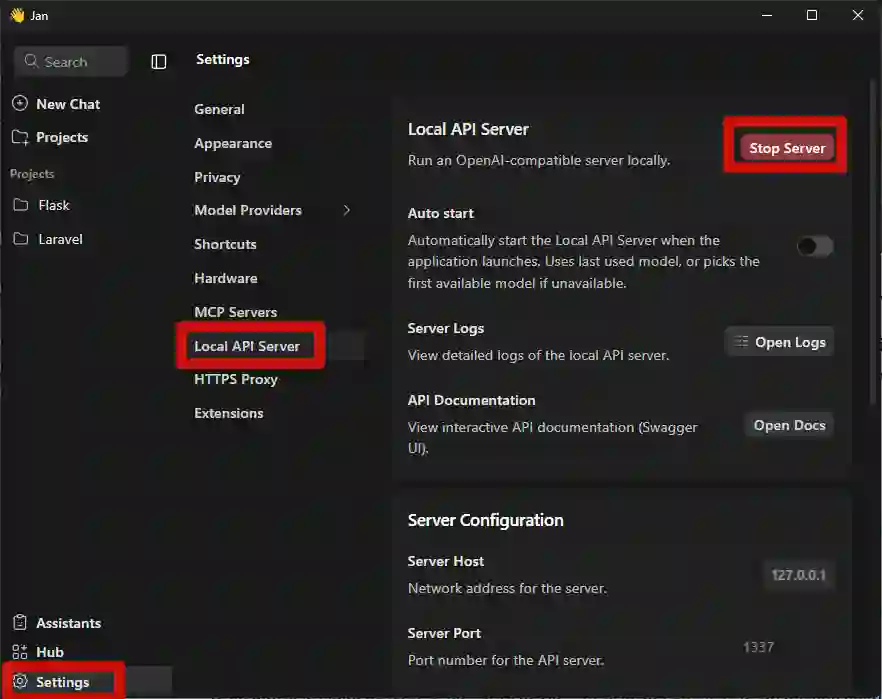
Basically, you must go to Settings → Local API Server. There, before activating it, you can check the following:
- Default IP (you can change it if you are going to expose it on an intranet, for example).
- Port, which you can also modify (default is 1337).
- API Version.
- Secret key, which is empty by default. Here you must place a key to access.
Notice that in the cURL example, an `Authorization: Bearer` is sent, so that secret is exactly the one you place here. Use a serious key if you are going to use it in professional or shared environments.
Once defined, we simply press Start Server... and that's it.
Making a Manual Request (CURL)
On Windows, I recommend using Git Bash. I'll leave you the command to copy and paste:
curl http://127.0.0.1:1337/v1/chat/completions -H "Content-Type: application/json" -H "Authorization: Bearer 12345" -d '{ "model": "gemma-3-12b-it-IQ4_XS", "messages": [{"role": "user", "content": "Tell me a joke."}] }'The request format is something like:
- curl -X POST to the /v1/chat/completions route
- Content-Type: application/json
- Authorization: Bearer
- The model you want to use, in my example gemma-3-12b-it-IQ4_XS
- The message you want to send
The trickiest part can be the Model ID, which must exactly match the one in the list of installed models. Currently, there is no button to copy the name (at least in this version), so you have to copy it manually.
Common Problems
- If the server is not running, you will immediately get a connection error.
- On Windows, Git Bash works better than the normal terminal or PowerShell.
- If port 1337 is occupied, you can change it without any problem.
Result
The response will be a JSON object, which we will then process. But the important thing is to understand that, from this point, we can connect any external application (PHP, Python, JavaScript, etc.) with our local server.
And that is exactly what we will do in the next class, creating our first application connected to Jan.
Practical FAQs
What hardware do I need?
Any modern PC with at least 8 GB of RAM can run quantized 7B models.
Can I use models in Spanish?
Yes, there are multilingual models (Mistral, OpenHermes, Llama 3 Instruct).
What if the AI doesn't respond well?
Adjust the instructions. As I always say:
"If the AI doesn't respond as you want, simply adjust the instructions. It all depends on how you want to handle it."
What if I want it to execute local actions?
You can do it using Python or Node scripts, but remember to apply whitelisting and security logs.
Creating local LLM assistants is easier than it seems. With a light model, a simple backend, and well-designed prompts, you can have your own 100% private and customizable AI system.
Chat App: Flask App with Python to Connect to an LLM using Jan.ai
Framework Selection
The next thing we must decide is which framework to use. The best known are Django, Flask, and FastAPI. Let's remember that the goal here is simply to create an application that consumes or sends a request to any of the AIs (LLMs) we have installed locally, and that returns something; for example, a conversational chat, like the ones we already have here.
- Django seems too large for what we want. We only need a chat box, a controller that makes the request, receives the response, analyzes it, and displays it.
- FastAPI would be an excellent option. It works as a microframework, similar to Flask, but I consider it a bit more complex, with more changing documentation, and I want to keep this as a first test.
- Flask, on the other hand, does not have the complexity of Django and maintains more stable syntax than FastAPI, which is still under heavy development. Being a microframework, it allows you to create a minimal application with only what is necessary.
For all this, I will use Flask.
First step: create a virtual environment
What is the first thing we do when creating any Python project? Create a virtual environment. This allows the project to be isolated from the rest of the operating system. This way you can have, for example, a project with Django and another with Flask, each with its own dependencies.
This is fundamental.
Creating the Project in VS Code + Virtual Environment
I'm going to open VS Code. I'll assume you already have Python installed, along with support for virtual environments and we will create the virtual environment in flask using VSC.
We create an empty folder. In my case I will use:
jam/
└─ chat_01
I drag that folder to VS Code before creating the environment to avoid errors.
Press Ctrl + Shift + P (or Command + Shift + P on Mac) in VSC and search for:
Create EnvironmentI select Python as the interpreter, and the virtual environment will automatically start creating inside `.venv`.
Installing Flask and requests
The next step is to install Flask and a package that will allow us to make HTTP requests, which is the key to connecting to the local LLM:
$ pip install flask requestsHello World
We will create a simple Hello World type app in Flask:
app.py
from flask import Flask
app = Flask(__name__)
@app.route('/')
def hello_world():
    return 'Hello, World!'
if __name__ == '__main__':
    app.run(debug=True, host="0.0.0.0", port=5050)
First Steps with Flask
Remember that I have completely free training for you: both the community Flask book and the free version of the course. You can access it from:
https://academia.desarrollolibre.net → Courses section → search for Flask.
You can even watch the first modules without registering. There I cover:
- What is Flask?
- Necessary Software
- Hello World in Python
- Python Review
- Introduction to Databases
This is the repository:
https://github.com/libredesarrollo/01-jan-chat
Connect a Local LLM with Jan AI to a Python App with Flask
In this section, we are going to connect to the local LLM.
Activate the local server
Before connecting, we must activate the Jan.AI server:
Settings → Local App Server → set your key → Start
Base controller to connect to the LLM
Regarding the main thing, the controller that is going to connect to the LLM, we have:
- URL and headers
We define the URL of the endpoint to which we will make the request:
http://localhost:port/v1/chat/completions
And the headers that Jan needs:
headers = {
    "Content-Type": "application/json",
    "Authorization": "Bearer 12345"
}
Model → the one you have selected in Jan (you must write it identically, example: gemma-3-12b)
Message → JSON array with the user role and the content.
In this example: "Tell me a joke."
data = {
    "model": "gemma-3-12b-it-IQ4_XS",
    "messages": [
        #   {"role": "user", "content": request.form.get("prompt", "Tell me a joke.")}
        {"role": "user", "content": prompt}
    ]
}
Making the request
Since this can fail, we wrap it in a try block.
We perform a requests.post(...) sending:
- URL
- headers
- json=data (not body, because it is explicitly JSON)
Then we validate the response: if `response.status_code == 200`, everything is perfect.
- 404 would be route not found.
- 500 = something exploded on the server or you sent something invalid.
try:
    # URL del servidor local de Jan.AI
    url = "http://127.0.0.1:1337/v1/chat/completions"
    # Hacemos la petición POST
    response = requests.post(url, headers=headers, json=data, stream=False) # stream=False para respuestas completas

    # Si responde con éxito
    if response.status_code == 200:
        return jsonify(response.json())
    else:
        return jsonify({
            "error": f"Server responded with {response.status_code}",
            "body": response.text
        }), response.status_code
except Exception as e:
    return jsonify({"error": str(e)}), 500
Resulting in:
app.py
@app.route("/ask", methods=['GET', 'POST'])
def ask_model():
    if request.method == 'GET':
        return "Por favor, usa el formulario en la página de inicio para hacer una pregunta."
    headers = {
        "Content-Type": "application/json",
        "Authorization": "Bearer 12345"
    }

    # Obtenemos el prompt del cuerpo JSON de la petición
    prompt = request.json.get("prompt", "Tell me a joke.")
    # Cuerpo de la petición
    data = {
        "model": "gemma-3-12b-it-IQ4_XS",
        "messages": [
            {"role": "user", "content": request.form.get("prompt", "Tell me a joke.")}
            {"role": "user", "content": prompt}
        ]
    }
    try:
        # URL del servidor local de Jan.AI
        url = "http://127.0.0.1:1337/v1/chat/completions"
        # Hacemos la petición POST
        response = requests.post(url, headers=headers, json=data, stream=False) # stream=False para respuestas completas

        # Si responde con éxito
        if response.status_code == 200:
            return jsonify(response.json())
        else:
            return jsonify({
                "error": f"Server responded with {response.status_code}",
                "body": response.text
            }), response.status_code
    except Exception as e:
        return jsonify({"error": str(e)}), 500

if __name__ == '__main__':
    app.run(debug=True, host="0.0.0.0", port=5050)
Using a GET POST Form
To make it interesting, we are going to generate a form to be able to make the query and it does NOT remain fixed as we have it now:
"Tell me a joke."We ask the AI, for example, Gemini CLI as a programming assistant, to generate a form for us to consume the LLM:
Generate a form and controller for me that allows connecting to the LLM that we configured in the ask_model function,
The form:
templates\form.html
<!DOCTYPE html>
<html lang="es">
<head>
    <meta charset="UTF-8">
    <meta name="viewport" content="width=device-width, initial-scale=1.0">
    <title>Ask the LLM</title>
</head>
<body>
    <h1>Pregúntale al LLM</h1>
    <form action="/ask" method="post">
        <textarea name="prompt" rows="4" cols="50" placeholder="Escribe tu pregunta aquí..."></textarea>
        <br>
        <button type="submit">Enviar</button>
    </form>
</body>
</html>
Initially Gemini defined the template inside the container and I requested it to generate it in a separate file:
Define the HTML_FORM in a separate template file
The previous controller remains exactly the same since the response is verified from it:
request.form.get("prompt", "Tell me a joke.")}Consume Local LLM with Python/Flask and fetch requests
To make it more interesting and be able to store the request data, we are going to make fetch requests.
We ask Gemini CLI or the assistant you use:
Make the request using fetch in form.html and DO NOT use a form
We change that we now have to read a JSON request and not by FORM in the controller, resulting in:
@app.route("/ask", methods=['GET', 'POST'])
def ask_model():
    ***
    # Obtenemos el prompt del cuerpo JSON de la petición
    prompt = request.json.get("prompt", "Tell me a joke.")
    # Cuerpo de la petición
    data = {
        "model": "gemma-3-12b-it-IQ4_XS",
        "messages": [
            #   {"role": "user", "content": request.form.get("prompt", "Tell me a joke.")}
            {"role": "user", "content": prompt}
        ]
    }
    ***
It simply changes how the variable called prompt receives the data.
And in the view:
templates\form.html
<!DOCTYPE html>
<html lang="es">
<head>
    <meta charset="UTF-8">
    <meta name="viewport" content="width=device-width, initial-scale=1.0">
    <title>Ask the LLM (Fetch)</title>
    <style>
        body { font-family: sans-serif; max-width: 600px; margin: auto; padding: 20px; }
        textarea { width: 100%; box-sizing: border-box; }
        button { margin-top: 10px; padding: 8px 15px; }
        #response-output {
            margin-top: 20px;
            padding: 15px;
            background-color: #f4f4f4;
            border-radius: 5px;
            white-space: pre-wrap; /* Para respetar saltos de línea */
        }
    </style>
</head>
<body>
    <h1>Pregúntale al LLM</h1>

    <textarea id="prompt-input" rows="4" placeholder="Escribe tu pregunta aquí..."></textarea>
    <br>
    <button id="submit-btn">Enviar</button>
    <h2>Respuesta:</h2>
    <pre id="response-output">La respuesta del modelo aparecerá aquí...</pre>
    <script>
        document.getElementById('submit-btn').addEventListener('click', async () => {
            const promptInput = document.getElementById('prompt-input');
            const responseOutput = document.getElementById('response-output');
            const prompt = promptInput.value;
            if (!prompt.trim()) {
                responseOutput.textContent = 'Por favor, escribe una pregunta.';
                return;
            }
            responseOutput.textContent = 'Pensando...';
            try {
                const response = await fetch('/ask', {
                    method: 'POST',
                    headers: { 'Content-Type': 'application/json' },
                    body: JSON.stringify({ prompt: prompt })
                });
                const data = await response.json();
                if (!response.ok) {
                    throw new Error(data.error || `Error del servidor: ${response.status}`);
                }

                const messageContent = data.choices[0].message.content;
                responseOutput.textContent = messageContent;
            } catch (error) {
                responseOutput.textContent = `Error al contactar al servidor: ${error.message}`;
            }
        });
    </script>
</body>
</html>
Analyzing an Image
We can also analyze the image; for this, we must provide a URL of the image to analyze and the instruction of what we want to do with it:
@app.route("/analyze", methods=["GET"])
def analyze_image():
    # image_path = request.json.get("path")
    # image_url = "https://cdn.pixabay.com/photo/2025/09/12/15/10/small-copper-9830647_1280.jpg"
    # # image_url = "https://www.desarrollolibre.net/public/images/course/laravel/laravel.webp"
    # # Descargamos la imagen
    # img_data = requests.get(image_url).content
    # img_b64 = base64.b64encode(img_data).decode("utf-8")
    # data_uri = f"data:image/webp;base64,{img_b64}"

    # # Leer imagen local y convertir a base64
    # # with open(image_path, "rb") as f:
    # #     image_b64 = base64.b64encode(f.read()).decode("utf-8")

    # data = {
    #     "model": "gemma-3-4b-it-IQ4_XS", # solo texto
    #     "messages": [
    #         {
    #             "role": "user",
    #             "content": [
    #                 {"type": "text", "text": "Describe this image."},
    #                 # {"type": "image_url", "image_url": f"data:image/png;base64,{image_b64}"}
    #                 # {"type": "image_url", "image_url": "https://www.desarrollolibre.net/public/images/course/laravel/laravel.webp"}
    #                  {"type": "image_url", "image_url": data_uri}
    #             ]
    #         }
    #     ]
    # }
    data = {
        "model": "gemma-3-4b-it-IQ4_XS",
        "messages": [
            {
                "role": "user",
                "content": [
                    {"type": "text", "text": "Describe this image."},
                    {
                        "type": "image_url",
                        "image_url": {
                            "url": "https://cdn.pixabay.com/photo/2025/09/12/15/10/small-copper-9830647_1280.jpg"
                        }
                    }
                ]
            }
        ]
    }
    headers = {
        "Content-Type": "application/json",
        "Authorization": "Bearer 12345"
    }
    response = requests.post(
        "http://127.0.0.1:1337/v1/chat/completions",
        headers=headers,
        json=data
    )
    return jsonify({
                "error": f"Server responded with {response.status_code}",
                "body": response.text
            })
It is the same code as before, but now it has an additional option for the image:
"image_url": { "url": "https://cdn.pixabay.com/photo/2025/09/12/15/10/small-copper-9830647_1280.jpg" }Refactoring
We asked Gemini CLI to help us with 3 points:
- Modularizing the application: to save all the routes in a separate file called `chat_routes.py` and have the API connection done through a reusable method called `llm_service.py`; this way, all connections are made in a single place.
- Chat Style: We also asked for the chat to have a style more in line with modern assistants, where the information appears at the top and the text box remains fixed at the bottom with automatic scrolling.
- Saving messages in Local Storage: for the messages, which is a storage system integrated into browsers.
LM Studio
LM Studio, just like Jan.AI, is another excellent option we have at our disposal to install AIs locally and it also has a local server just like Jan.AI, therefore, we can also use it for our project in Flask WITH PRACTICALLY NO CHANGES, but, unlike Jan, LM Studio DOES NOT use a BEARER token for protection and by default its port is 1234 (which you can change); in the following table, I summarize what was discussed:
Difference Jan.AI LM Studio
Default URL http://localhost:1337 http://localhost:1234
API Key Necessary if you activate it Does not use API Key
Compatibility OpenAI style 100% OpenAI-compatible
Headers Content-Type + Authorization
You can download LM Studio from:
Its operation is very similar to that of Jan AI, so you won't get lost. Furthermore, LM Studio, just like Jan, can also be connected exactly the same way, because LM Studio exposes a 100% OpenAI-compatible API in which we have some interesting endpoints that we can use:
- v1/chat/completions
- /v1/models
2. LM Studio does not use API KEY
This means you must remove the Authorization header, because if you send it, LM Studio ignores it or throws a 401 error in some cases.
Consume API v1/models and build a SELECT with Local LLM Models
We are going to make an implementation that consumes the current models.
For that, we must consume the corresponding endpoint.
Remember that if we execute, for example, in LM Studio or Jan AI, which we recall use OpenAI, we will see the different available endpoints, each with a different functionality. The one that interests us is:
http://127.0.0.1:1337/v1/models
We are going to perform three steps, based on three prompts, since I will do this implementation with Gemini CLI:
- Develop a new function in `llm_Service` to obtain the models; the JSON you have to cast looks like:
{ "data": [ { "id": "openai/gpt-oss-20b", "object": "model", "owned_by": "organization_owner" }, { "id": "text-embedding-nomic-embed-text-v1.5", "object": "model", "owned_by": "organization_owner" } ], "object": "list" }- And the endpoint is: http://127.0.0.1:1337/v1/models
- Create a `chat_routes.py` controller that consumes and returns a list of the available models, consuming the `get_models()` function in `llm_service.py`.
- Now, with that controller you created before, consume it to create a SELECT in the `form.html` file; remember that the JSON format is:
{ "data": [ { "id": "openai/gpt-oss-20b", "object": "model", "owned_by": "organization_owner" }, { "id": "text-embedding-nomic-embed-text-v1.5", "object": "model", "owned_by": "organization_owner" } ], "object": "list" }- For the value and the label of the option, always set the ID; in the previous example, it would be: `openai/gpt-oss-20b`.
With these simple steps, we will have the generation of a list of models to select when sending the request in minutes.
Sending Text and Image in the Same Prompt to the Local Server
We asked Gemini CLI to now allow image uploading for analysis via a prompt:
From form.html, I want you to enable image uploading so that the model can then analyze it using the controller called `ask_model_image` ONLY if an image was supplied
With this, we already have something like the following:
// prompt with image image
imageInput.addEventListener('change', (event) => {
    const file = event.target.files[0];
    if (file) {
        const reader = new FileReader();
        reader.onload = (e) => {
            imageBase64 = e.target.result;
            imagePreviewContainer.innerHTML = `
                <img id="image-preview" src="${imageBase64}" alt="Vista previa"/>
                <button id="remove-image-btn">X</button>
            `;
            imagePreviewContainer.style.display = 'block';
            document.getElementById('remove-image-btn').addEventListener('click', removeImage);
        };
        reader.readAsDataURL(file);
    }
});
It processes the image and converts it to base64, which is then processed from the controller:
@chat_bp.route("/ask-image", methods=['GET', 'POST'])
def ask_model_image():

    # Obtenemos el prompt del cuerpo JSON de la petición
    prompt = request.json.get("prompt", "Describe this image.")
    model = request.json.get("model", "gemma-3-12b-it-IQ4_XS") # Usamos el modelo del request o uno por defecto
    image_url = request.json.get("image_url") # Recibimos la URL de la imagen (data URL)
    if not image_url:
        return jsonify({"error": "No se proporcionó una URL de imagen (image_url)."}), 400
    data = {
        "model": model, # Asegúrate de usar un modelo multimodal
        "messages": [
            {
                "role": "user",
                "content": [
                    {"type": "text", "text": prompt},
                    #  {"type": "image_url", "image_url": {"url": "https://upload.wikimedia.org/wikipedia/commons/thumb/3/3a/Cat_paw.jpg/800px-Cat_paw.jpg"}} # por URL
                    {"type": "image_url", "image_url": {"url": image_url}} # para analizar, solamente funciona por Jan IA
This controller is only used if an image is attached:
let endpoint = '/ask';
let payload = {
    prompt: chatHistory[chatHistory.length - 1].text,
    model: selectedModel,
};
if (imageBase64) {
    endpoint = '/ask-image';
    payload.image_url = imageBase64;
    removeImage(); // Limpiamos la imagen después de enviarla
}
At the time I wrote these words, image analysis only works in Jan AI; in LM Studio it gives an error like the following:
Bad Request for url: http://127.0.0.1:1337/v1/chat/completionsConfigure the Response Language using System Prompts
One of the problems we may currently have is that the AI may respond in English, sometimes in Spanish, and sometimes in a somewhat random manner. For example, if we say "hola," it may respond in Spanish or English.
Roles: User and System
- User Role: represents the user's input or query. For example: asking for a sum, analyzing an image, asking "who are you?", or requesting a "Hello World" in Python or Flask.
- System Role: serves to configure the AI's behavior and is extremely useful. For example, we can define the language, the response format, or any other rule we want to apply permanently.
- Assistant Role: Defines how the chat itself responds, i.e., its behavior when giving the answer.
Example of Language Configuration
We can define the system role as follows:
[
 {
   "role": "system",
   "content": "Eres un asistente útil que siempre responde en español."
 }
]
With this, the AI will always respond in Spanish, regardless of the language the user writes in. If we change the content to "always respond in English," then it will respond in English.
Additional Customization
This configuration is not limited to the language. For example, we can indicate that the AI should always respond in JSON, or with any other format we want:
"content": "Always respond in JSON."Context in Chats and Roles
For the chat to remember something previously mentioned, we can simulate a context. For example:
Before, we asked it something and the chat had no idea what we were talking about.
Now we indicate to it via a fixed prompt that "you analyzed an image of Elon before":
"messages": [
    {"role": "system", "content": "Eres un asistente útil que siempre responde en español, sin importar el idioma del usuario" },
    # mensajes de contexto
    {"role": "user", "content": "Antes analizaste la imagen de Elon."},
    {"role": "assistant", "content": "Antes analisastes la imagen de elon"},
    {"role": "user", "content": prompt},
]
Frequent Problems
When setting these roles and context, errors may appear, such as error 500. This generally occurs because:
- The model expects a user interaction first before assigning an assistant role.
- If we try to set the assistant role before the user's query, the system does not know how to process it.
These errors are difficult to debug because they do not always indicate the exact cause; it could be a misplaced comma, an incorrect format, or an unexpected value in the history.
Frequently Asked Questions (FAQ)
- What does it mean to run an LLM locally?
It means installing and using a language model directly on your computer, without relying on external servers. - What do I need to install a language model on my PC?
A computer with at least 8 GB of RAM, free space (5–20 GB), and preferably a CUDA or Metal compatible GPU. - Which is the best local LLM for a PC with low RAM?
Light models like Gemma 2B or Phi-3 Mini offer good quality with low consumption. - Can I use a local LLM without an internet connection?
Yes, once the model is downloaded, it works totally offline. - What are the advantages of a local LLM versus ChatGPT or Gemini?
Greater privacy, economic independence, and environment customization. - How do I integrate a local LLM with Python or Jan AI?
Through local APIs or specific libraries that allow connecting it to your own applications.
Conclusion: The Freedom of Having Your AI Offline
Running an LLM locally is a way to regain control over artificial intelligence. It allows you to experiment, protect your data, and adapt the AI to your own projects.
You don't need to depend on large services: all you need is a little technical curiosity and a tool like jan.ia, LM Studio, or Ollama. With them, your computer can become a private AI laboratory.