
Creating clickable zones within an image is one of those things that seems like magic the first time you see it. And yes, they are still used more often than you might think: interactive infographics, floor plans, real maps, diagrams, and even educational images.
In HTML, this is achieved with a powerful pair: the <map> and <area> elements.
When I first worked with them using an image of the solar system, I discovered they are much more flexible than I imagined. And also fussier: if one coordinate is wrong, the whole thing breaks.
Previously we saw how to create an HTML Modal
With the <area> element, it is possible to create clickable zones inside an image; the <area> element must contain child elements called <map> which are what allows the creation of the clickable zones themselves through the coordinates established in the element as attributes; below is the table of contents:
What is an HTML image map?
An image map is simply an image with selectable zones.
Each zone is defined using an <area> element, and all these zones live inside a <map>.
The idea is:
- <img> = your image.
- usemap="#name" = connects the image to the map.
- <map name="name"> = contains your areas.
- <area> = each clickable region, with shape and coordinates.
They are perfect when you want the user to be able to "explore" an image.
How the <img> + usemap + <map> + <area> relationship works
When I implemented my map of planets, the first thing I understood was this:
- Your image must include usemap="#something".
- You must create a <map name="something">.
- Inside the <map> you define as many areas as you want.
General example:
<img src="imagen.jpg" alt="Mapa interactivo" usemap="#zonas">
<map name="zonas">
 <area shape="rect" coords="10,10,100,50" href="enlace1.html" alt="Sección 1">
 <area shape="circle" coords="200,150,40" href="enlace2.html" alt="Sección 2">
</map>
Once this is understood, everything else is geometry.
1. Essential Attributes of the <area> Element
The main attributes for the <area> element are used to:
| alt | Specify alternative text. |
| coords | Specify the coordinates of the area; the number of parameters indicates a different shape:
|
| download | Specify a resource (file) for download. |
| href | URL. |
| target | Specifies where the new window, referenced in the href attribute, will open. |
shape: rect, circle, poly, and default
Defines the shape of the area.
- rect → rectangle
- coords="x1,y1,x2,y2"
- circle → circle
- coords="x,y,radius"
- poly → polygon with multiple points
- coords="x1,y1,x2,y2,x3,y3,..."
default → the entire image (rarely used)
When I worked with the image of the planets that you can see in the links above, I almost only used circle, because the shapes fit better and the coordinates were more intuitive.
coords: how to define coordinates correctly
This is where the drama often comes: the coordinates must be exact.
In my case, trying to do it "by eye," I ended up marking Saturn where Mars was.
Solution: use an image editor (I'll tell you which ones and how below).
Each shape has its format:
- rect: x1,y1 = top-left corner; x2,y2 = bottom-right corner.
- circle: x,y = center; r = radius.
- poly: sequence of points connected to each other.
href, alt, target, and download
These are the attributes that turn your area into a real link.
- href → the URL it leads to.
- alt → alternative text (extremely important for accessibility).
- target → where it opens (_blank, _self, etc.).
- download → allows downloading a resource upon click.
When I added downloads to one of my first maps, I discovered that <area download> works exactly the same as in <a>.
Advanced Attributes: rel, ping, referrerpolicy
Few guides mention them, but they exist and are used:
rel → relationship with the destination (nofollow, noreferrer…).
ping → URLs for tracking.
referrerpolicy → how the Referer header is sent.
If you're going to use <area> in real projects, it's good to know about them even if you don't use all of them.
2. Usage of the <area> and <map> Elements
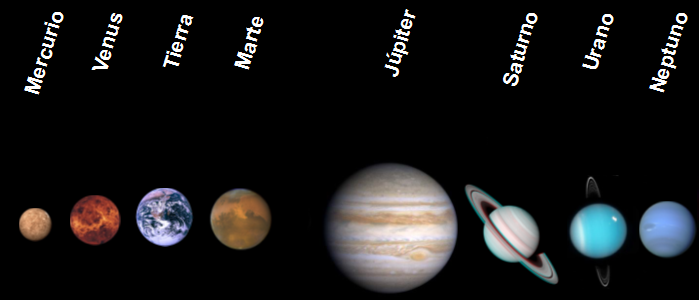
An image must be defined using the <img> tag and subsequently, the clickable zones are defined with the coordinates established as an attribute of the <area> element. In turn, the image is set with a usemap attribute that indicates the name of the <map> we will define later:
<img src="sistema_solar_planetas.png" width="700" height="300" alt="planetas del sistema solar" usemap="#planetasmap">Now we define the <map> element whose children are <area> elements; the coords (coordinates) attribute is set for each of these elements; for our example, we will define as many <area> elements with their coordinates as there are planets in the Solar System; additionally, the <map> element must be defined with a name attribute whose value is the one set in the image via the usemap attribute (usemap = name):
<map name="planetasmap">
  <area shape="circle" coords="35,224,17" href="#" alt="Mercury">
  <area shape="circle" coords="95,220,26" href="#" alt="Venus">
  <area shape="circle" coords="165,217,29" href="#" alt="Tierra">
  <area shape="circle" coords="241,219,31" href="#" alt="Marte">
  <area shape="circle" coords="392,226,66" href="#" alt="Jupiter">
  <area shape="circle" coords="512,233,28" href="#" alt="Saturno">
  <area shape="circle" coords="600,231,28" href="#" alt="Urano">
  <area shape="circle" coords="668,229,28" href="#" alt="Neptuno">
</map>
Possible Uses of the <area> and <map> Elements
A common use consists of referencing the <area> elements to pages (via the href attribute); resources can also be referenced for download (via the download attribute):
Click the planets in the following example:
It may be a bit complicated to try and guess the coordinates to obtain the exact desired position to be marked via coordinates, luckily there are image editing software like Gimp or Photoshop that have tools which indicate the cursor position over the image, which is a great help in successfully obtaining the coordinates.
Practical Examples of Image Maps
Nothing like seeing them in action.
Basic example with rectangles
<img src="tienda.jpg" alt="Store" usemap="#zonas"> <map name="zonas"> <area shape="rect" coords="20,20,150,200" href="camisas.html" alt="Shirts"> <area shape="rect" coords="200,20,350,200" href="pantalones.html" alt="Pants"> </map>Example with complex shapes (circles and polygons)
<img src="tienda.jpg" alt="Tienda" usemap="#zonas">
<map name="zonas">
 <area shape="rect" coords="20,20,150,200" href="camisas.html" alt="Camisas">
 <area shape="rect" coords="200,20,350,200" href="pantalones.html" alt="Pantalones">
</map>
Applied example: planet map (based on my experience)
Each planet was a circular <area> with its own link:
<img src="sistema_solar.png" width="700" height="300" alt="Planetas" usemap="#planetas">
<map name="planetas">
 <area shape="circle" coords="35,224,17" href="#" alt="Mercurio">
 <area shape="circle" coords="95,220,26" href="#" alt="Venus">
 <area shape="circle" coords="165,217,29" href="#" alt="Tierra">
 <area shape="circle" coords="241,219,31" href="#" alt="Marte">
</map>
Matching each circle to its planet was the biggest challenge... until I discovered the tools in the next section.
How to get exact coordinates for an <area> (real tips)
Nobody tells you this, but it's the key to making precise maps.
When I tried to calculate coords manually, I went crazy.
The solution was to use tools that show the cursor position in real-time:
- Recommended options
- Gimp (free)
- Photoshop
- Figma
- Photopea (online)
- Here's what I always do:
- I open the image.
- I activate the ruler or the coordinate panel.
- I move the mouse to the desired point.
- I note the exact X and Y.
And that's it: millimetrically precise coords without suffering.
Good Accessibility and Technical SEO Practices
- Always use alt on every <area>.
- Use simple shapes whenever possible.
- If your image is informative, include a textual alternative.
- If there are many areas, also consider alternative text links.
- Avoid using <area> for critical navigation on mobiles (zones are hard to tap).
Common Errors and How to Avoid Them
- ❌ usemap="mapa" → must be usemap="#mapa".
- ❌ <map name="mapa"> with a different name from usemap.
- ❌ Inverted coordinates ("y1,x1…").
- ❌ Not using alt.
- ❌ Using very large images without scaling (the coords change).
I once had to redo all the coords because I exported the image 300px wider... I learned to always fix the final size before calculating anything.
Frequently Asked Questions about <area> and <map>
- Are image maps still used today?
- Yes, especially in education, interactive diagrams, and visual dashboards.
- Do the coords change if I resize the image?
- Yes. You must use the image at a fixed size or generate new coords.
- Can I use irregular shapes?
- Of course: shape="poly" with as many points as you want.
- Can I download files from an area?
- Yes: <area download> works the same as <a download>.
✔ Conclusion
The <map> and <area> elements are a surprisingly effective tool for creating fully interactive images in HTML. They don't require JavaScript, are lightweight, and work in virtually any browser.
If you understand how shape, coords, the usemap–name relationship work, and you use tools to get precise coordinates, you can create very professional visual experiences.
Now learn how to use the HTML datalist tag