
Content Index
- Create a Flutter project and add Flame
- Game Class and components in Flutter Flame
- Game/FlameGame type Classes
- Components
- Conclusions
- Draw a sprite/image
- What is a Sprite?
- Conclusions
- Draw a circle in Flame with Flutter
- Game loop: Game cycle
- Render function
- Update function
- Update function (update)
- Draw a rectangle
- Game Class in Flame Flutter 2D games
- Types of classes
- Update function - Update Sprite position
- Keyboard input event in Flutter Flame
- Game type class
- Component level
- Practical case
- Challenge: Move sprite when pressing directional arrows
- Sprites or images for Flame - SpriteComponent
- Sprites
- Referencing a Sprite
- SpriteComponent: Components for rendering images
- Create a Sprite Sheet to generate animated images for 2D games with TexturePacker
- How to use a Sprite Sheet in Flutter with Flame 13 - Animated 2D Games
- Practical Case
- Load a Sprite
- How to use a Flutter Sprite Sheet Component with Flame
- Sprite animation with SpriteAnimationComponent
- SpriteAnimationComponent: Tests
- Keyboard Input FlameGame, Game class level
- Game Class Level
- Practical Case
- Tap or click event at the component level
- HasTappables : Tap at the Component Level
- Change Sprite Animations by Tap Flutter
- Challenge Resolution
- Create a Parallax Background in Flame
- Varying Speed in the Layers
- Create a Component Class for the Parallax
- CameraComponent in Flame to follow components in Flutter and use of World
- World
- CameraComponent
- Implement the Camera Component
- SpriteAnimationTicker in Flame to control an animation in Flutter
- Implement a Joystick with joystickcomponent
- GamePad in Flutter and Flame - Dualsense - Xbox
- First steps with the gamepads plugin
- Define a listener to detect key presses
In this guide, you will take the first steps in creating your first 2D games with Flutter and Flame; the table of contents is above, but essentially, you will see everything from installation, the environment, and creating your first games.
To get to this point, remember that we have covered several posts in which I teach you how to create an app in Flutter; the last thing is good practices for which to use, whether a Stateful/Stateless Widget class or a method/function in Flutter.
Create a Flutter project and add Flame
2D game development with Flutter and Flame can be very exciting and rewarding, the truth is it's quite an experience to be able to develop mobile games so easily. If you are new to game development or want to start in game development and, of course, know how to develop in Flutter, these tutorials are for you!
Flutter is a cross-platform mobile application development framework that uses the Dart programming language, and Flame is a high-performance 2D game library built on top of Flutter; as we will see in this series of tutorials, both are best friends and complement each other really well.
Being able to use Flutter widgets to build all those necessary graphic elements in any game, such as text, action buttons, and chaining them with a process in Flame, is really simple to do.
With Flutter, we can create all kinds of applications, especially those focused on the mobile environment, but we can also use the same project to develop not only for Android and iOS, but also for desktop for Linux, MacOS, and Windows, and also for web development by making subtle changes to the project at the code level. However, Flutter goes much further with Flame.
Flame is an engine for creating 2D games with Flutter that we can use in a Flutter project by installing a simple package via pub; therefore, with this, we can create 2D games with Flame for mobile, desktop, and web.
In this post, we are going to learn how to create a Flutter project and add the necessary base library to develop our 2D games using Flutter; therefore, this is a chapter you should refer to every time we create a new project in subsequent entries.
Let's start by creating the project we're going to use to create the application:
$ flutter create Once the Flutter project is created, we switch to the project folder:
$ cd And we add the Flame library:
$ flutter pub add flameFinally, we open VSC or the editor you use to develop in Flutter; for this, you can do the manual process (open the project we created earlier from VSC), or use the VSC command (if you have it configured):
$ code .Remember that this material is part of my complete course and book on Flame and Flutter which you can purchase for a modest price if you want to delve deeper into 2D game development.
Game Class and components in Flutter Flame
We will learn about the key elements of Flame, its organization, components, and key structures; this is a purely reference chapter, don't worry if you didn't understand all the terms explained in this section, the following chapters offer a more practical outline in which we build an application step by step; when one of these classes and functions is presented, you can return to this chapter to review what was explained in it.
You can create a project called "pruebasflame" as shown in the previous chapter.
A Flame project can be divided into two parts:
- The main class, which is the one that allows all application modules to communicate, as well as using Flame's own processes such as the collision and input system (keyboard, gestures...).
- The components, which are the elements of our game: a background, player, enemy, etc.
To make the idea easier to understand, you can see Flame's Game type class as Flutter's MaterialApp and Flame's components as each of the pages that make up the application in Flutter:
We are going to learn more about each of these Flame elements in detail.
Game/FlameGame type Classes
The Game class in Flame is an essential component for creating 2D games with Flutter. This class is the principal class of the entire game and is responsible for configuring, rendering, and updating the game elements; in short, it is the central class that governs the entire application; this class is equivalent to the MaterialApp class in Flutter; from this class, we can use all kinds of functionalities that are part of the Flame API such as taps, drag and drop, collisions, and much more.
In Flame, we have two types of main classes: the Game class, which offers a more simplified scheme than the FlameGame class; for example, the Game class only allows defining components local to its own class, which is unthinkable when we have a large application.
In the Game class, the screen size is defined, sprites are created, game logic is established, and necessary resources such as images and sounds are loaded. Furthermore, the Game class also handles the game's update and rendering cycle.
By inheriting from the Game class, the game's logic and appearance can be customized. With the help of the Game class in Flame, all kinds of 2D games can be created. It's important to mention that Flame also offers other components, such as Sprite and Animation, that help build more complex and dynamic games.
We will talk about components next.
Components
One of the great features that Flame has is that we can use the different characteristics of Flame in components where a component can be several things such as a player, an enemy, a background, particle effects, texts, joystick, among others; to which we can incorporate more features such as the use of collisions, updates, interaction with keys, drag and drop, tap, etc; as you can see, it has a very similar approach to Flutter widgets, but in this case with components and based on games.
In essence, a game entity, such as the player, is represented by a component, which is a class, and thanks to the Game type class of our application which is the global entity, we can communicate the components with each other; for example, with inputs or collisions, which gives us a very modular and scalable environment for the application.
We have many types of components, in this book, we will see some such as:
- SpriteComponent
- SpriteAnimationComponent
- PositionComponent
- TextComponent
You can see the complete list at:
https://docs.flame-engine.org/1.5.0/flame/components.html
Conclusions
In Flame, components are interactive objects that are part of a 2D game and can be of different types, such as sprites, animations, visual effects, sounds, among others; these interactive components can have different purposes such as a player, an enemy, a consumable, some object that can harm a player, and essentially, anything in the game including the game's background; components are the central piece in Flame and are governed by other components or by the Game type classes we presented earlier.
Components in Flame are used to represent visual and functional elements in the game, such as characters, obstacles, objects, and environment elements.
The great thing about components is that each component has its own structure and behavior, and they can be combined and customized to create unique games. By adding components to a scene in Flame, you can define how they interact with each other and how they behave in the game. For example, you can define the properties of a sprite, such as its speed and direction, and how it should react when colliding with another object.
Components in Flame provide a clear organization of code and efficient resource management, which facilitates the creation and maintenance of complex games; since components are classes, they can inherit from other classes, or implement and easily reuse them. In summary, components in Flame are essential elements in the creation of 2D games in Flutter, as they allow the creation of interactive and personalized objects that make up the game itself.
Remember that this material is part of my complete book and course on Flutter Flame.
Draw a sprite/image
What is a Sprite?
Before starting to develop in Flame, let's introduce the concept of sprite, which is fundamental in the development of any 2D game; 2D games are characterized by the fact that many of them are based on images, unlike 3D games, in which we see complete models created with programs like Blender, in 2D development this is not necessarily the case; games like Plants vs Zombies are a good example of an image-based 2D game:
And this is where the concept of Sprite comes in; a sprite refers to an image or set of images that are used to create characters and all kinds of objects or elements in our game; that is, every visual element of our game in Flame is a sprite; in Flame, we have a huge set of ready-to-use functions to vary sprites, create animated sprites, hide them, perform geometric operations, among other features.
Sprites are used to establish the shape, size, and position of the elements on the screen, it is the visual representation that a user has when interacting with any element, for example, the player with a consumable, with tiles, a house, door, and a long etc.
As we mentioned before, Sprites are also used for animations. 2D game developers often create sprite sheets that contain multiple sprite images, although sometimes they generate them separately and we can combine them; in Flame, the ideal is to keep all the states in a single image and from it, the animations are loaded and defined, but this is another topic.
Before starting to use more complete sprites, we are going to create a simple one, draw an image.
Ultimately, a Sprite is nothing more than an image that can have an organization to—for example—be able to create an animation from it.
In the following code, you can see the basic structure of a Flame application, in which we have the global entity FlameGame and the definition and subsequent addition of a component within the FlameGame class:
import 'package:flame/components.dart';
import 'package:flame/game.dart';
import 'package:flutter/material.dart';
class MySprite extends SpriteComponent {
MySprite() : super(size: Vector2.all(16));
@override
Future<void> onLoad() async {
sprite = await Sprite.load('image.png');
}
}
class MyGame extends FlameGame {
@override
Future<void> onLoad() async {
await add(MySprite());
}
}
main() {
runApp(GameWidget(game: MyGame()));
}
For the previous implementation, we are loading an image:
sprite = await Sprite.load('image.png');Which must exist in the following path:
assets/images/image.png
And register the image in the app:
pubspec.yaml
 assets:
- assets/images/image.png
And the sprite will have a size of 16 pixels as specified in the class constructor:
size: Vector2.all(16)Then, we add it from the global instance:
add(MySprite());Conclusions
With this, we manage to paint an image or sprite in Flame, this is the first step we must take to do anything, as we mentioned before, images or sprites are the heart of this type of games and therefore we must know how to load them, and not only load them, but defining other characteristics such as size and position are fundamental; with this, we saw another example of how to use components in Flame, although, this time it is not a PositionComponent in Flame, but a SpriteComponent.
Remember that this article is a small part of my complete course and book on Flutter and Flame.
Draw a circle in Flame with Flutter
To start developing 2D games with Flutter and Flame, you can follow these tutorials that I bring to your disposal in which we will learn the basic concepts to create 2D games with Flutter.
Before getting into the matter of image or sprite management, collision detection, tap events... We must start slowly and initially, we will want to draw something on the screen, some primitive like a circle, which is very simple to do; these exercises are fundamental to understand how to develop more complete components such as sprites, animations, and of course, how to interact with all these images according to some user action.
Draw a circle
To draw a circle in Flame with Flutter, you can use the Circle class from the `Flame/components.dart` package. This class allows drawing a circle on the canvas based on coordinates that would be to define its center and size:
Offset(10, 10)And also the color
BasicPalette.red.paint()In this example, we will see how to draw a circle with the FlameGame class:
lib/main.dart
import 'package:flame/components.dart';
import 'package:flame/game.dart';
import 'package:flame/palette.dart';
import 'package:flutter/material.dart';
class MyCircle extends PositionComponent {
MyCircle() : super();
@override
Future<void> onLoad() async {}
@override
void render(Canvas canvas) {
canvas.drawCircle(const Offset(10, 10), 10, BasicPalette.red.paint());
// canvas.drawRect(Rect.fromCircle(center: const Offset(0, 0), radius: 20),
//  BasicPalette.red.paint());
}
}
class MyGame extends FlameGame {
@override
Future<void> onLoad() async {
await add(MyCircle());
}
}
main() {
runApp(GameWidget(game: MyGame()));
}
In this other example, we have the same application, but using the Game class instead:
lib/main.dart
import 'package:flame/palette.dart';
import 'package:flutter/material.dart';
import 'package:flame/game.dart';
void main() async {
runApp(GameWidget(game: MyCircle()));
}
class MyCircle with Game {
@override
Future<void> onLoad() async {
super.onLoad();
// init
}
@override
void render(Canvas canvas) {
canvas.drawCircle(const Offset(10, 10), 10, BasicPalette.red.paint());
// canvas.drawRect(Rect.fromCircle(center: const Offset(0, 0), radius: 20),
//  BasicPalette.red.paint());
}
@override
void update(double deltaTime) {}
}
Whether it's the program with the Game or FlameGame class, if you run the script above, you will see a result like the following:

As you can conclude, those approaches that allow us to organize the code into classes are the approach that allows components to be reused more easily, as well as extending them or creating others; therefore, these examples reinforce the reason why the FlameGame class is used instead of the Game class; besides that, with the FlameGame class, we have access to other functionalities of the Flame API.
As you saw before, we used the fundamental methods of the GameLoop in Flame, which are the render function and the update function.
The FlameGame class maintains a list of all game components, and these can be added dynamically to the game as needed; for example, we could add several enemy SpriteComponent components to the game and then remove them from the game as the player kills the enemies. Then, the FlameGame class will iterate over these components telling each component to update and render itself.
The GameWidget class represents the constructor that we usually use to create the game instance in Flame and set it in the Flutter widget tree.
As a recommendation, click on the FlameGame, Game, PositionComponent, SpriteComponent class, and the rest, to see the detail of them, see what properties they implement, as in the case of the Game type classes:
class PositionComponent extends Component
implements
AnchorProvider,
AngleProvider,
PositionProvider,
ScaleProvider,
CoordinateTransform {
PositionComponent({
Vector2? position,
Vector2? size,
Vector2? scale,
double? angle,
this.nativeAngle = 0,
Anchor? anchor,
super.children,
***
Or on the functions that you can implement and what parameters you can send and the type, as in the case of the Canvas, and test them and evaluate the result...
For example, to draw a rectangle, we can do it by defining two points on the screen:
canvas.drawRect(Rect.fromPoints(const Offset(10,10), const Offset(500,500)), BasicPalette.purple.paint());Or by means of a circle, but instead of drawing a circle with canvas.drawCircle(), we draw a rectangle:
canvas.drawRect(Rect.fromCircle(center: const Offset(100, 100), radius: 50.0),BasicPalette.brown.paint());In summary, with these examples, it becomes clearer how Flame works, a component-based structure, which like widgets, are an element of several of our games, we see how to use PositionComponent which are basic widgets and that inherit from other types of widgets that we will present later; elements such as position, size, scale, among other geometric operations, are fundamental in any video game engine and in Flame it is no exception.
Game loop: Game cycle
The Flame module called GameLoop or game cycle is nothing more than a simple abstraction of the concept of a game loop. Basically, most games rely on two methods:
- The render method takes the canvas to draw the current state of the game.
- The update method, which receives the time (delta) since the last update and allows moving to the next state, that is, updating the state of the game.
The Game Loop can be considered the most important process in video game development; since it is from it that we can implement our application.
The GameLoop, as you can well imagine by its name, is an infinite loop that is responsible for updating the state of the game; this goes from adding elements on the screen, moving the player or enemies, and in short, any change on the screen is done from the GameLoop; in Flame, it is basically the update() function that executes infinitely, and it is here where various types of checks are placed, such as to listeners, etc. This loop is responsible for the game running correctly; using primitives we can control the execution speed of the game so that it runs correctly, and in the case of Flame, so that it runs at the same speed on all devices; in other words, how many updates per second will occur; this is important since the number of times per second that this function is executed depends on the processing speed, and when the application is running in different environments, it is important to perform this type of configuration.
In general, the Game Loop is responsible for processing everything that happens in the game and updating the graphical user interface accordingly.
In Flame, we have a method to initialize the game and another to perform updates; Flame follows these principles and we have a pair of functions that allow us to perform these operations.
Render function
The render() function receives a parameter of type object that refers to the canvas:
@override
void render(Canvas canvas) {
canvas.drawRect(squarePos, squarePaint);
}
Which, as happens with other technologies like HTML5, is nothing more than a blank canvas to draw on; here, we can draw anything, for example, a circle:
@override
void render(Canvas canvas) {
canvas.drawCircle(const Offset(10, 10), 10, BasicPalette.red.paint());
}
Update function
The elements that are in the game need to be constantly redrawn according to the current state of the game; to understand this more clearly, let's see an example:
Suppose a game element represented by a sprite (an image), which in this example we will call "player"; when the user clicks on a button, then the player must update their position; this update is applied in the game using a function called update().
As we saw in the example of the moving circle, it is this function that is responsible for updating the position of the circle on the screen.
The update() function is exactly as its name indicates, an update function, which receives a parameter, called "deltatime" (dt) which tells us:
the time that has elapsed since the previous frame was drawn. This variable should be used to make your component move at the same speed on all devices.
Devices operate at different speeds, depending on the processing power (that is, according to the processor the device has, specifically, the frequency at which the processor works), so if we ignore the delta value and simply run everything at the maximum speed the processor can run, that is, the game could have speed problems to correctly control its character as it would be too fast or too slow. By using the deltaTime parameter in our movement calculation, we can ensure that our sprites will move at the speed we desire on devices with different processor speeds.
By updating any aspect of the game through the update() function, it is automatically reflected by the render() function and with this, the game's graphical update.
The Game loop is used by all implementations of the Game type classes and their components:
https://docs.flame-engine.org/1.6.0/flame/game.html
Update function (update)
The elements that are in the game need to be constantly redrawn according to the current state of the game; to understand this more clearly, let's see an example:
Suppose a game element represented by a sprite (an image), which in this example we will call "player"; when the user clicks on a button, then the player must update their position; this update is applied in the game using a function called update().
As we saw in the example of the moving circle, it is this function that is responsible for updating the position of the circle on the screen.
The update() function is exactly as its name indicates, an update function, which receives a parameter, called "deltatime" (dt) which tells us
the time that has elapsed since the previous frame was drawn. This variable should be used to make your component move at the same speed on all devices.
By updating any aspect of the game through the update() function, it is automatically reflected by the render() function and with this, the game's graphical update.
The elements that are in the game need to be constantly redrawn according to the current state of the game; to understand this more clearly, let's look at an example:
Suppose a game element represented by a sprite (an image), which in this example we will call "player"; when the user clicks on a button, then the player must update its position; this update is applied in the game using a function called update().
As we saw in the moving circle example, it is this function that is responsible for updating the circle's position on the screen.
The update() function is exactly as its name indicates, an update function, which receives a parameter, called "deltatime" (dt) that tells us
the time that has elapsed since the previous frame was drawn. This variable should be used to make your component move at the same speed on all devices.
By updating any aspect of the game through the update() function, it is automatically reflected by the render() function and with this, the game's graphical update.
In Flame, the update() method is used to update the game state in each interaction; as we explained before in the GameLoop post, it is fundamental for performing any update on the screen. This method is called automatically by the Flame game engine at a relatively constant time which, as we mentioned before, how often this function is called depends on the processing speed of the device used.
The update function receives a parameter called DeltaTime which is the time elapsed since the last invocation of that function.
Within the update() method, tasks such as updating position, scaling... and in essence, any operation you want to perform in the game can be done; a common validation is to check for collisions, among other operations.
Below is a basic example of how the update() method can be implemented in a game class in Flame:
import 'package:flame/game.dart';
class MyGame extends FlameGame{
 @override
 void update(double dt) {
  super.update(dt);
 }
}
In this example, a MyGame class that extends FlameGame is defined. The update() method is overridden to perform the operations mentioned above; it is important to note that this function is also available in components in Flame and not only at the level of the Game type classes.
It is important to call the super.update(dt) method at the end of the update() method, as this is responsible for updating the game components and rendering them on the screen.
I hope this information is useful for understanding the function of the update() method in Flame.
The Game loop is used by all implementations of the Game type classes and their components:
https://docs.flame-engine.org/1.6.0/flame/game.html
Draw a rectangle
Previously, we saw how to draw a circle in Flame using the Canvas, continuing with the basic shapes, we are going to draw a rectangle or square in Flame.
Recapping a bit; Flame is a 2D game engine that runs on Flutter; very easy to use and with which we can start in the world of 2D game development; with a Flutter project, we can have the same game for different platforms like Windows, Linux, MacOS and of course, mobile devices.
With Flame, we can create cross-platform 2D games for iOS and Android.
Flame offers many ready-to-use functionalities such as sprites, handling collisions, input events, etc. It also offers support for audio integration among many other things.
To draw a rectangle we can use exactly the same code presented in draw a circle in Flame but, changing the canvas function with:
canvas.drawRect(Rect.fromCircle(center: const Offset(0, 0), radius: 20), BasicPalette.red.paint());Game Class in Flame Flutter 2D games
As we mentioned in previous entries, an application created in Flame consists of two parts, the components and a single instance of a Game class (Game type class), of which we have several, although the most versatile is FlameGame.
This main class is used to create the game, these classes can be Game, BaseGame, and FlameGame, which provides a complete set of tools for 2D game development as we have seen up to this point and as we will see in future installments.
Through a Game type class, we can initialize and control the entire application, from its lifecycle, updates via the GameLoop, communication with other components, interacting with the user, enabling certain functionalities to components, among others. In summary, we can use the Game class in Flame to create and control ALL the game, as well as to add and manage all the components in various ways according to our game's business logic.
Types of classes
The BaseGame class in Flame is an abstract class that provides a set of useful tools and methods for 2D game development.
The Game class, a subclass of BaseGame, is used to implement the actual game. We can use the BaseGame class to customize and extend the game lifecycle functionality, handle input events, use cameras, process images, data input via keyboards, taps, among others...
Update function - Update Sprite position
As we mentioned in previous entries, any update we want to perform in the game must be done through the update() method; with this, we can update different aspects of a component in our game such as size, position, etc. During the update, we are going to change the sprite's position by setting the x and y values on the position property; in this example, we see a minimal implementation of how to update a sprite's position:
import 'package:flame/game.dart';
import 'package:flame/components/sprite.dart';
class MyGame extends Game {
late SpriteComponent sprite;
@override
Future<void> onLoad() async {
 sprite = SpriteComponent.fromImage(
  await images.load('sprite.png'),
  x: 20,
  y: 100,
 );
}
@override
void update(double dt) {
 // update the sprite position here
 sprite.x += 10 * dt;
}
@override
void render(Canvas canvas) {
 sprite.render(canvas);
}
}
In this example, the sprite will start at position (20, 100) and will move horizontally to the right in each interaction of the update() function.
The position is updated in the update method using the calculation sprite.x += 10 * dt, which adds 10 pixels per second; remember that the dt parameter is the time passed since the previous call; therefore, after one second, it will move 10 pixels; this is very important since the movement will be constant regardless of the game speed and it is precisely by multiplying the position by the dt factor, which is the time elapsed since the last frame in seconds.
Here is an example of how to update a sprite's position in Flame's `Game` class:
To move a PositionComponent or a Sprite in general, we have the position property, which receives a Vector2; we can use the update() function to update the image's position and automatically move it:
class PlayerImageSpriteComponent extends SpriteComponent{
***
@override
void update(double dt) {
position = Vector2(centerX++, centerY++);
super.update(dt);
}
}
In this other example, the dt factor is not used and therefore, the update will be quite fast and different for each device; to make the speed constant regardless of the processing speed, we have:
class PlayerImageSpriteComponent extends SpriteComponent{
***
@override
void update(double dt) {
position = Vector2(centerX++, centerY++) * dt;
super.update(dt);
}
}
Keyboard input event in Flutter Flame
In Flame, we have access to the keyboard as a data source, that is, a mechanism with which the user can interact with the application; just as with other components in Flame, we have access to keyboard data input both at the Game class level and component level; although, their implementation is practically the same; let's look at both implementations.
With the KeyboardEvents class in the Game type classes or the KeyboardHandler class in components, we have functions that allow detecting and responding to keyboard events performed by the user and also key combinations. key combinations and related events; we have constants like LogicalKeyboardKey.arrowUp to determine each key; let's look at a practical implementation.
Game type class
Continuing with our application, we are going to place the keyboard input listener at the FlameGame class level:
class MyGame extends FlameGame with KeyboardEvents {
***
@override
KeyEventResult onKeyEvent(
RawKeyEvent event,
Set<LogicalKeyboardKey> keysPressed,
) {
super.onKeyEvent(event, keysPressed);
//print(keysPressed);
print(event);
return KeyEventResult.handled;
}
}
When pressing different keys, with any of the events, we will see an output like the following:
{LogicalKeyboardKey#00301(keyId: "0x100000301", keyLabel: "Arrow Down", debugName: "Arrow Down")}
RawKeyUpEvent#881c1(logicalKey: LogicalKeyboardKey#00304(keyId: "0x100000304", keyLabel: "Arrow Up", debugName: "Arrow Up"), physicalKey: PhysicalKeyboardKey#70052(usbHidUsage: "0x00070052", debugName: "Arrow Up"))
In the previous case, the up arrow key or arrow up was pressed.
For this experiment, we will not make any further adaptations in the application since the game logic will be implemented in the components and not at the game level.
You can create conditions like:
keysPressed.contains(LogicalKeyboardKey.arrowUp)To inquire about the pressed key.
Component level
To be able to use the events locally in the components, we must use the HasKeyboardHandlerComponents mixin at the FlameGame class level:
lib/main.dart
class <LevelGame> extends FlameGame
with
 HasKeyboardHandlerComponents {}
And now, at the level of the component to which we are going to place the keyboard event listener, we use the KeyboardHandler mixin:
class <Component> extends <TypeComponent> with KeyboardHandler {}Practical case
With the previous configurations made both at the Game class level and in the component, we are going to make some modifications to the component class called "PlayerImageSpriteComponent", we are going to add the event to move the sprite:
lib/components/player_image_sprite_component.dart
import 'package:flame/components.dart';
class PlayerImageSpriteComponent extends SpriteComponent with KeyboardHandler {
***
@override
bool onKeyEvent(
RawKeyEvent event,
Set<LogicalKeyboardKey> keysPressed,
) {
if (keysPressed.contains(LogicalKeyboardKey.arrowUp)) {
position = Vector2(centerX, centerY--);
} else if (keysPressed.contains(LogicalKeyboardKey.arrowDown)) {
position = Vector2(centerX, centerY++);
} else if (keysPressed.contains(LogicalKeyboardKey.arrowRight)) {
position = Vector2(centerX++, centerY);
} else if (keysPressed.contains(LogicalKeyboardKey.arrowLeft)) {
position = Vector2(centerX--, centerY);
}
return true;
}
}
As you can see in the previous code, we can easily move the sprite using the keyboard arrows and modifying the position vector provided by the SpriteComponent/PositionComponent class; although this is not the optimal way to move the player, since we are not using deltatime, it is a first approach.
Challenge: Move sprite when pressing directional arrows
We already know how to use the keyboard events in Flame at the class and component level, now, as a challenge, adapt the previous code so that in addition to the arrows, the w (up), d (right), s (down), and a (left) keys can also be used.
Challenge Resolution
To add the typical WASD keys to our script, we can do a simple conditional with an OR:
@override
bool onKeyEvent(
RawKeyEvent event,
Set<LogicalKeyboardKey> keysPressed,
) {
if (keysPressed.contains(LogicalKeyboardKey.arrowUp) ||
keysPressed.contains(LogicalKeyboardKey.keyW)) {
position = Vector2(centerX, centerY--);
} else if (keysPressed.contains(LogicalKeyboardKey.arrowDown) ||
keysPressed.contains(LogicalKeyboardKey.keyS)) {
position = Vector2(centerX, centerY++);
} else if (keysPressed.contains(LogicalKeyboardKey.arrowRight) ||
keysPressed.contains(LogicalKeyboardKey.keyD)) {
position = Vector2(centerX++, centerY);
} else if (keysPressed.contains(LogicalKeyboardKey.arrowLeft) ||
keysPressed.contains(LogicalKeyboardKey.keyA)) {
position = Vector2(centerX--, centerY);
}
return true;
}
As you can see, the logic is simple, it is enough to detect the typical WASD and arrow keys and move the player to the corresponding position; let's remember that for:
- X, if it is positive, it moves to the right, and negative to the left.
- Y, if it is positive, it moves down, and negative up.
Sprites or images for Flame - SpriteComponent
We are going to learn about the main elements we need to know to work with Flame, we will see how to create components, which are the key piece for creating each of the elements of our game, the basic structure of a game with Flame, and the use of inputs (keyboard, joystick, etc.) which is the way in which the user can interact with the application.
Sprites
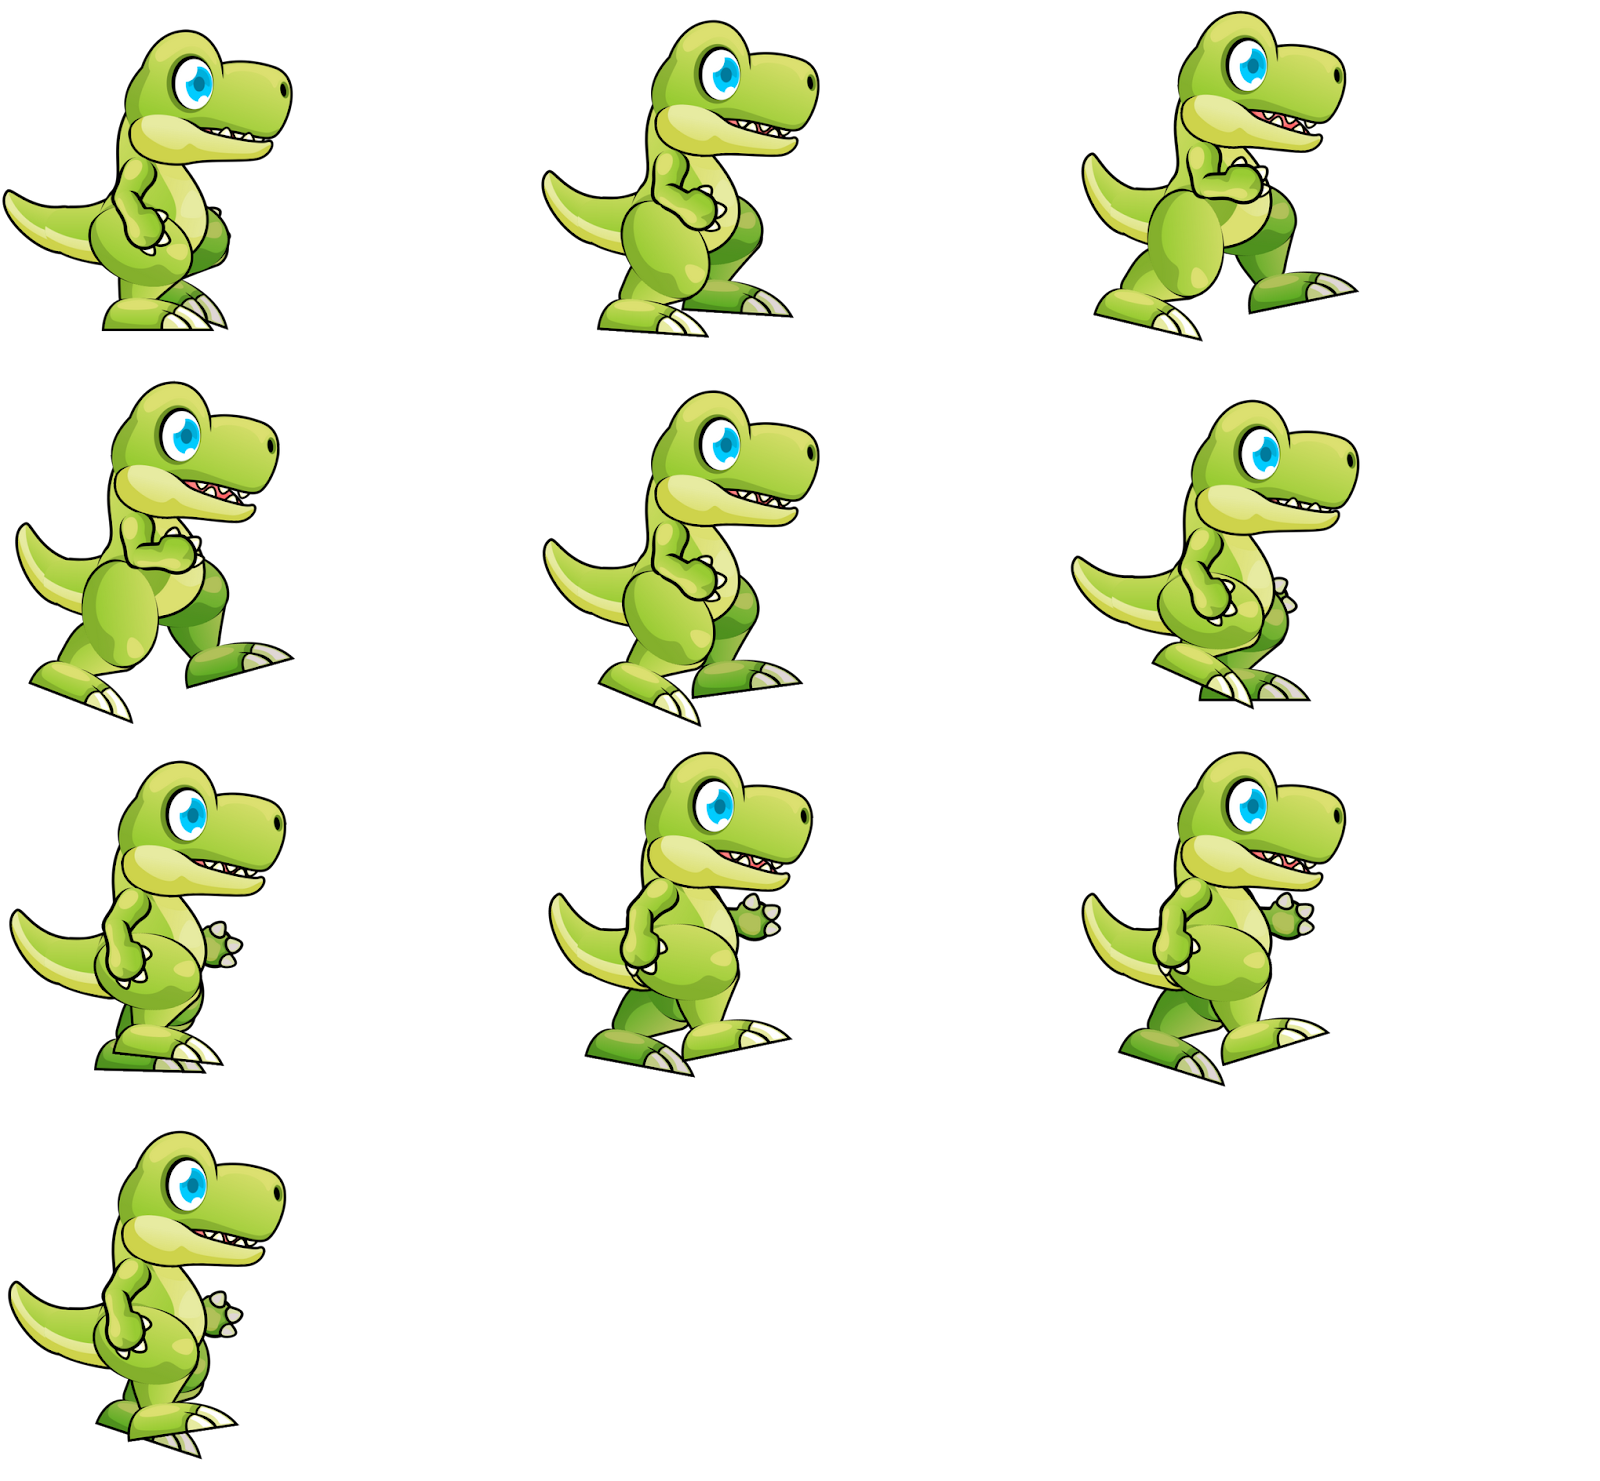
Sprites are a common term in 2D game development and are nothing more than images that represent the game's objects and characters. Sprites can be animated or static; this means that in the case of animated sprites, each of the frames for an action (as you can see in the images in this publication) are available in the same image; states like dying, walking, running, or jumping are the typical ones we can use.
Sprites can be combined into sprite sheets to reduce the amount of memory resources needed to load them; since, if we loaded each frame in a different image, each one would have to be accessed individually, an operation that would not be optimal; we can also combine multiple frames of various types and even of other players or objects, all in a single image.
Referencing a Sprite
Each sprite has a position in the game's 2D space and can change its position in each frame, allowing for the creation of animations.
In 2D game development, the use of sprites is very common due to their simplicity and efficiency in memory usage; on the Internet, you can find all kinds of object and character sprites, both free and paid; on websites like HumbleStore or Fanatical, they always have bundles of sprites that we can use in our projects at a very reduced price.
First, let's start by defining what a Sprite is.
SpriteComponent: Components for rendering images
SpriteComponents are a type of component in 2D video game development that is used to render images, that is, sprites. Sprites are used to represent game objects and characters in 2D and can be animated or static; in the course and book, we use the SpriteComponent component to draw static characters, as a background component, for tiles, for consumables, and in general, you can use it to represent any object with which one can interact in the game in some way.
The SpriteComponent is responsible for loading and displaying an image in the game. This component can receive a sprite sheet, which is an image containing several different sprites that are used in the game. The SpriteComponent allows selecting one of the sprites from the sprite sheet for display in the game.
In summary, SpriteComponents are important components in 2D game development, as they allow game objects and characters to be represented through the use of sprites.
As we mentioned before, a sprite is a series of images joined in the same file next to each other like the following:

https://www.pngwing.com/es/free-png-izmqx
Or like this:
https://www.gameart2d.com/free-dino-sprites.html
A sprite is nothing more than a collection of images placed in a single image and are widely used in any video game engine like Unity; in video game development, a sprite is an image where all the movements (states) of a character or object are included; therefore, it is common for a 2D game to have multiple images for each animatable object.
Create a Sprite Sheet to generate animated images for 2D games with TexturePacker
An animated sprite is a set of 2D images combined to generate an animation. In video games and generally in any 2D animation, sprites are used to generate the characters, objects, and other elements that move; these sprites can be a sprite sheet like the one shown in the image below.
Animated sprites are generally created as a series of sequential frames (a sprite sheet), which are played back in rapid succession to create the illusion of movement.
Animated sprites can be created by hand or using specialized software, and can be saved in different file formats, such as PNG or GIF. In Flame, we can easily generate sprite-based animations using a series of functions available in Flame.
Now, we are interested not only in processing a single image, but several of them, for this, we will use an image that consists of several images, such as the one presented above:

In which, it simulated a walk of our player.
For this example, we have individual images for the walk:

To avoid loading one image at a time into the project, and handling them independently and with this, increasing resource consumption (since, at the project level, each image would have to be loaded individually), we are going to merge all these steps into one; this format is known as "sprite sheet"; for this task, you can use any image editing program, but to facilitate the process, it is recommended to use programs like the following:
https://www.codeandweb.com/texturepacker
The previous program, called TexturePacker, allows us to create a sprite sheet for the images; you can install the previous program on Linux, Windows, and MacOS; for this process, you can download any image kit you want; although, on this website:
https://www.gameart2d.com/freebies.html
You will find several sprites that you can use for free.
Once the previous program is installed and your image kit is downloaded, we are going to create the sprite sheet; for this, we drag and drop the images we want to work with into this area; in the case of the book, these are the images shown above:
And we will have:

With the "Zoom" option located in the lower-left corner, you can adjust the zoom to fully view the sprite sheet:

You can preview the scene:

Indicating the FPS (speed) of the animation (remember to select all loaded sprites):
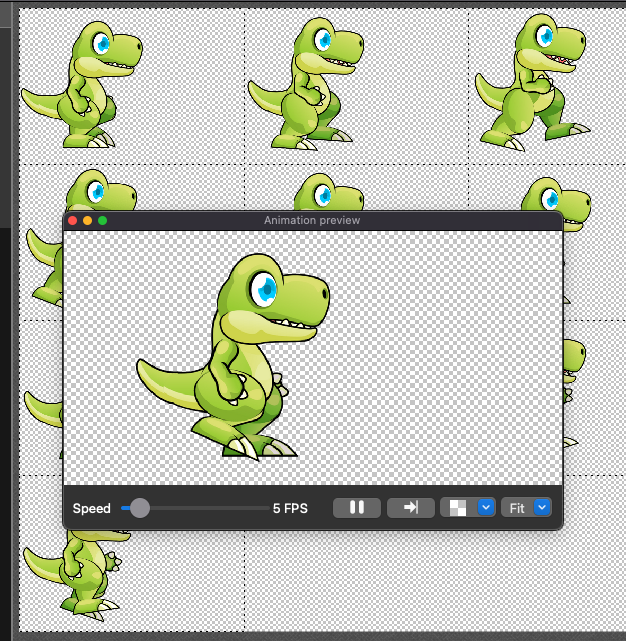
And finally, exporting the project for our sprite sheet:

And we'll have our sprite sheet, which we'll name as dino.png:
Which we will then copy into the Flutter project
How to use a Sprite Sheet in Flutter with Flame 13 - Animated 2D Games
A sprite is nothing more than an object or character and they are widely used in any video game engine like Unity; in video game development, sprites are where all the movements (states) of a character or object are included; therefore, it is common for a 2D game to have multiple images for each animatable object.
we are interested not only in processing a single image, but several of them, for this, we will use an image that consists of several images, such as the one generated previously.
A sprite sheet is an image that contains several sprites or smaller images used in 2D game development. Sprite sheets usually represent objects, characters, and game elements, and can be static or animated. The sprite sheet allows the game to load multiple necessary images for the game at once, which can improve loading efficiency and overall game performance. By having all the images in a single image, it facilitates the management and organization of graphic resources in 2D game development.
Practical Case
Finally, at the level of our code, we will create the following class:
lib/components/player_sprite_sheet_component.dart
import 'package:flame/sprite.dart';
import 'package:flutter/material.dart';
import 'package:flame/flame.dart';
import 'package:flame/components.dart';
import 'dart:ui';
class PlayerSpriteSheetComponent extends SpriteComponent {
late double screenWidth, screenHeight, centerX, centerY;
final double spriteSheetWidth = 680, spriteSheetHeight = 472;
@override
Future<void>? onLoad() async {
//sprite = await Sprite.load('tiger.png');
final spriteImage = await Flame.images.load('dino.png');
final spriteSheet = SpriteSheet(image: spriteImage, srcSize: Vector2(spriteSheetWidth, spriteSheetHeight));
sprite = spriteSheet.getSprite(2, 1);
screenWidth = MediaQueryData.fromWindow(window).size.width;
screenHeight = MediaQueryData.fromWindow(window).size.height;
size = Vector2(spriteSheetWidth, spriteSheetHeight);
centerX = (screenWidth / 2) - (spriteSheetWidth / 2);
centerY = (screenHeight / 2) - (spriteSheetHeight / 2);
position = Vector2(centerX, centerY);
return super.onLoad();
}
}
Explanation of the previous code
As you can see in the previous code, we define the size for each sprite of our sprite sheet; for the image we selected, it would be 680 pixels x 472 pixels:

For this, we use a couple of properties:
late double spriteSheetWidth = 680.0, spriteSheetHeight = 472.0;It is important to note that you must specify the size according to the sprite you are using.
We load the sprite sheet:
var spriteImages = await Flame.images.load('dino.png');And we define the spriteSheet so that it can be manipulated using a property; it is in this step that we use the individual dimensions of each state:
final spriteSheet = SpriteSheet(image: spriteImages, srcSize: Vector2(spriteSheetWidth, spriteSheetHeight));Finally, it is now possible to individually query each position of one of the steps of the sprite sheet:
sprite = spriteSheet.getSprite(1, 1);There are sprite sheets with different sizes for each frame or sprite, therefore, you must be sure that the sprite sheet you are using has the same sizes for each of the sprites, in this example it is 680 px 472 px.
Load a Sprite
It is also possible to load sprites using the load function; the loadSprite function of the Flame class is used to load the sprite: sprite = await Flame.images.load('imagen.png');
Once the sprite is loaded, you could use the SpriteComponent component to render it in the game as if it were a component; this may seem small but, by using the Flame components, we can use features such as the collision system, data input and in general, any functionality available in a PositionComponent class.
Here is an example of how to load a sprite in Flame:
import 'package:flame/components/sprite_component.dart';
import 'package:flame/flame.dart';
class MyGame extends BaseGame {
SpriteComponent _spriteComponent;
MyGame() {
 _loadSprite();
}
void _loadSprite() async {
 var image = await Flame.images.load('ruta/a/la/imagen.png');
 _spriteComponent = SpriteComponent.fromImage(0, 0, image);
 add(_spriteComponent);
}
}
This code will create a new game (MyGame) and load a sprite using the Flame load function, and render it in the SpriteComponent component.
Remember that this material is part of my course and book in Flame for 2D game creation.
How to use a Flutter Sprite Sheet Component with Flame
To generate an animated Sprite Sheet, we have to perform several operations ranging from loading a sprite image to referencing it in the project; each state of the sprite must have a defined size; for this, we use a couple of properties:
late double spriteSheetWidth = 680.0, spriteSheetHeight = 472.0;It is important to note that you must specify the size according to the sprite you are using.
We load the sprite sheet:
var spriteImages = await Flame.images.load('dino.png');And we define the SpriteSheet so that it can be manipulated using a property; it is in this step that we use the individual dimensions of each state:
final spriteSheet = SpriteSheet(image: spriteImages, srcSize: Vector2(spriteSheetWidth, spriteSheetHeight));Finally, it is now possible to individually query each position of one of the steps of the sprite sheet:
sprite = spriteSheet.getSprite(1, 1);An animation is nothing more than a list of Sprites, therefore, if you form a sprite list, you can use them in the corresponding Flame component to handle animated sprites; for example:
class PlayeSpriteSheetComponent extends SpriteAnimationComponent {
 late double screenWidth, screenHeight, centerX, centerY;
 final double spriteWidth = 512.0, spriteHeight = 512.0;
 late double spriteSheetWidth = 680.0, spriteSheetHeight = 472.0;
 late SpriteAnimation dinoAnimation;
 @override
 Future<void> onLoad() async {
  super.onLoad();
  screenWidth = MediaQueryData.fromWindow(window).size.width;
  screenHeight = MediaQueryData.fromWindow(window).size.height;
  centerX = (screenWidth / 2) - (spriteSheetWidth / 2);
  centerY = (screenHeight / 2) - (spriteSheetHeight / 2);
  var spriteImages = await Flame.images.load('dino.png');
  final spriteSheet = SpriteSheet(
    image: spriteImages,
    srcSize: Vector2(spriteSheetWidth, spriteSheetHeight));
  //sprite = spriteSheet.getSprite(1, 1);
  position = Vector2(centerX, centerY);
  size = Vector2(spriteSheetWidth, spriteSheetHeight);
  //sprite = await Sprite.load('Sprite.png');
  animation = [spriteSheet.getSprite(1, 1),spriteSheet.getSprite(1, 2)];
 }
}
Sprite animation with SpriteAnimationComponent
In Flame, we have a component to generate animations based on a Sprite Sheet such as:

In the course and book on Flame for creating 2D games, we create a function, with which, we can easily generate an animated list ready to use in a SpriteAnimation; we simply view the sprite sheet as a matrix and define the initial and final position, as well as the size of the sprite sheet; among other options:
extension CreateAnimationByLimit on SpriteSheet {
 SpriteAnimation createAnimationByLimit({
  required int xInit,
  required int yInit,
  required int step,
  required int sizeX,
  required double stepTime,
  bool loop = true,
 }) {
  final List<Sprite> spriteList = [];
  int x = xInit;
  int y = yInit - 1;
  for (var i = 0; i<step; i++) {
   if (y >= sizeX) {
    y = 0;
    x++;
   } else {
    y++;
   }
   spriteList.add(getSprite(x, y));
   // print(x.toString() + ' ' + y.toString());
  }
  return SpriteAnimation.spriteList(spriteList,
    stepTime: stepTime, loop: loop);
 }
}
SpriteAnimationComponent: Tests
For this function, we will need the following parameters:
- Initial step in X (for example (3,0)).
- Initial step in Y (for example (3,0)).
- Number of steps (for example, the value 6 corresponds to us wanting 6 sprites).
- The width of the matrix (in the dino.png image the sprite matrix would be 3x3, therefore, the width would be 3).
- Animation speed.
- Whether it will run in a loop.
Keeping this in mind, we will create the following extension function that extends the SpriteSheet class:
lib/components/player_sprite_sheet_component.dart
extension CreateAnimationByLimit on SpriteSheet {
SpriteAnimation createAnimationByLimit({
required int xInit,
required int yInit,
required int step,
required int sizeX,
required double stepTime,
bool loop = true,
}) {
final List<Sprite> spriteList = [];
int x = xInit;
int y = yInit - 1;
for (var i = 0; i<step; i++) {
if (y >= sizeX) {
y = 0;
x++;
} else {
y++;
}
spriteList.add(getSprite(x, y));
// print(x.toString() + ' ' + y.toString());
}
return SpriteAnimation.spriteList(spriteList,
stepTime: stepTime, loop: loop);
}
}
The most important thing to note is the for loop block in which we iterate through the sprite matrix exactly as in the examples explained above; with this list of sprites, we generate the animation using SpriteAnimation.spriteList().
With the code defined above in the PlayeSpriteSheetComponent class, we define the animation property, using the function called createAnimationByLimit() that we created previously. The rest of the properties are the same ones used in any other SpriteComponent or PositionComponent that we presented in previous installments; properties such as size and position are necessary to indicate the size and position of the sprite.
Keyboard Input FlameGame, Game class level
Allowing the user to interact with the game via:
- Keyboard
- Drag and Drop
- Gestures
- Tap/touch (in most cases, equivalent to the click event)
- Virtual joystick
Among others; input is a fundamental functionality in any game today; in Flame, we can implement this type of functionality through events which are listened to by a listener function.
In this section, we are going to work with keyboard input; Flame offers two different ways to capture keyboard input:
- At the Game class level.
- At the component level.
In either scenario, its use is very simple and is similar to other approaches, for example, JavaScript, in which we have a listener function called onKeyEvent that runs every time a key is pressed. In that function, we receive the event with the pressed key to which we can apply any logic.
Game Class Level
To enable the application to recognize keyboard events, that is, to be able to assign a function when a key is pressed, we can use the KeyboardEvents class on the Game type class.
This is the most global way since the events are executed at the Game class level, which, as we recall, is global to the entire application and not to the components, which is where we are mostly interested in interacting; that is, as we saw in the previous example, where we drew a sprite in a component, if we wanted to move that sprite, which can simulate our player, we are interested in that component receiving the keyboard events (or input in general); even so, it is important to know that at the Game class level we can add this type of interactivity since many times it is necessary for several components to perform some functionality when (for example) a keyboard input occurs; for example, we have two components:
- A player
- The scenario/stage
Which, as we saw, are two separate classes. Depending on your game's logic, pressing (for example) the movement key (up arrow or W key) might apply movement to the player and a change in the scenario, and in these cases, you have to communicate two components and not just one.
At the FlameGame class level, we must add the KeyboardEvents mixin and with this, override the onKeyEvent function; this method receives two parameters which return the pressed keys:
- The RawKeyEvent
- The LogicalKeyboardKeys
Practical Case
Continuing with our application, we will place the keyboard input listener at the FlameGame class level:
class MyGame extends FlameGame with KeyboardEvents {
***
@override
KeyEventResult onKeyEvent(
RawKeyEvent event,
Set<LogicalKeyboardKey> keysPressed,
) {
super.onKeyEvent(event, keysPressed);
//print(keysPressed);
print(event);
return KeyEventResult.handled;
}
}
When pressing different keys, with any of the events, we will see an output like the following:
{LogicalKeyboardKey#00301(keyId: "0x100000301", keyLabel: "Arrow Down", debugName: "Arrow Down")}
RawKeyUpEvent#881c1(logicalKey: LogicalKeyboardKey#00304(keyId: "0x100000304", keyLabel: "Arrow Up", debugName: "Arrow Up"), physicalKey: PhysicalKeyboardKey#70052(usbHidUsage: "0x00070052", debugName: "Arrow Up"))
In the previous case, the up arrow key was pressed.
For this experiment, we will not make any further adaptations to the application since the game logic will be implemented in the components and not at the game level.
You can create conditions like:
keysPressed.contains(LogicalKeyboardKey.arrowUp)To check for the pressed key.
Tap or click event at the component level
The "tap" event refers to one of the many actions we have available as user (player) input where they touch or click on the window of our game on a screen with which the user can interact, such as a smartphone with Android, iOS, a tablet, iPad, etc.
The tap can be the action of touching the element with a finger, while on a computer, a tap can be the action of clicking the element with a mouse; and in Flame with Flutter, this is fundamental.
The "tap" event is commonly used in mobile and desktop application development to allow users to interact with the user interface; it is the event par excellence along with keyboard input, which we cover in another entry.
With the tap event, we can make all kinds of games, like the typical Plants vs. Zombies to select and place a plant, to indicate that a character has to jump, attack...
Ultimately, like all data input, what you want to do is up to you.
Tap is another data input that we can use in Flame, it is the screen tap which ultimately is a click event; as with keyboard input, we can use the tap event at the class level as well as at the component level.
HasTappables : Tap at the Component Level
To be able to use the tap event at the component level, first, we must enable it at the component level in the Game type class:
lib/main.dart
class <LevelGame> extends FlameGame
with
 HasTappables {}
And from the component, we implement the Tappable mixin:
class <Component> extends <TypeComponent> with Tappable {}With this, we have access to the same functions as those used at the Game class level that we showed before.
For example, a possible implementation looks like:
lib\components\player_sprite_sheet_component.dart
class PlayeSpriteSheetComponent extends SpriteAnimationComponent with Tappable {
***
@override
bool onTapDown(TapDownInfo info) {
print("Player tap down on ${info.eventPosition.game}");
return true;
}

@override
bool onTapUp(TapUpInfo info) {
print("Player tap up on ${info.eventPosition.game}");
return true;
}
}
With the pair of functions above, we can determine whether to execute the event when touching the screen or when releasing the screen press, respectively; usually, onTapDown is used, which is when the user clicks on the screen, but you may also want to place some logic when the user lifts their finger or releases the click... in that case, you can use onTapUp instead.
Again, what you implement in these functions depends on your game. In our course and book on Flame for 2D game development, we make all kinds of games with them, whether it's to select and place plants in our Plants vs. Zombies game, to select items, among others.
Change Sprite Animations by Tap Flutter
As a small challenge, you must implement the following logic in the animated sprite sheet component, and you have to implement a very simple logic to vary the animation every time a tap occurs on the screen; for this, you can use a numerical property which will indicate the animation to be executed:
- animationIndex with the value of zero, the death animation is shown.
- animationIndex with the value of one, the idle animation is shown.
- animationIndex with the value of two, the jump animation is shown.
- animationIndex with the value of three, the walking animation is shown.
- animationIndex with the value of four, the running animation is shown.
Challenge Resolution
As a resolution, we can use a switch where we change the animation according to the value of animationIndex which we will increment every time the "tap" occurs on the screen:
lib\components\player_sprite_sheet_component.dart
***
int animationIndex = 0;
***
@override
bool onTapDown(TapDownInfo info) {
super.onTapDown(info);
print(info);
animationIndex++;
if (animationIndex>4) animationIndex = 0;
switch (animationIndex) {
case 1:
animation = dinoIdleAnimation;
break;
case 2:
animation = dinoJumpAnimation;
break;
case 3:
animation = dinoWalkAnimation;
break;
case 4:
animation = dinoRunAnimation;
break;
case 0:
default:
animation = dinoDeadAnimation;
break;
}
return true;
}
As you can see, we can easily switch between one animation and another using a numeric value that corresponds to an index of the animation we want to animate.
This snippet is part of the complete project:
https://github.com/libredesarrollo/flame-curso-libro-dinojump03
In which, we see how to create the animation step by step; the important thing is to note how simple it is to do this type of integration. Each key on the keyboard is associated with a different action like walking, jumping, or running, which in turn is associated with a different animation that is easily changed by assigning a different value to the animation property.
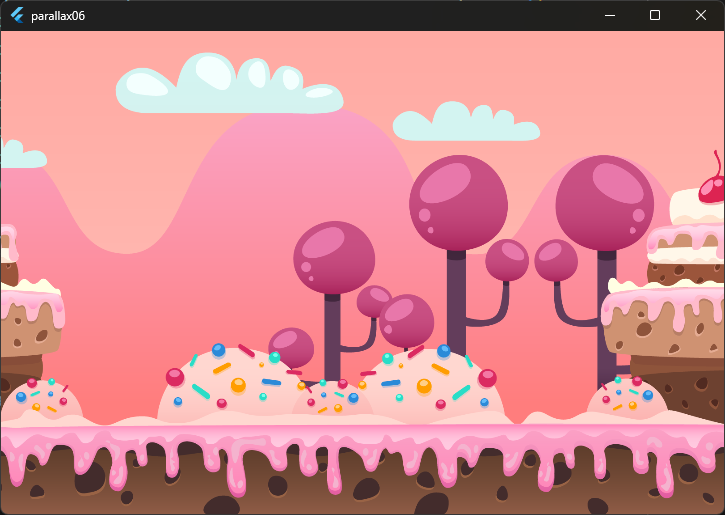
Create a Parallax Background in Flame
Parallax type backgrounds are used in all kinds of applications, not only in 2D games, but also on web pages to define backgrounds, etc. In this post, we will see how to define a parallax background as a backdrop for our 2D games with Flame.
Let's start by loading the images for the parallax background:
In Flame, we have a component called ParallaxComponent that makes the process of creating a parallax effect very easy; by defining the images to use as a list:
lib/main.dart
class MyGame extends FlameGame {
@override
void onLoad() async {
super.onLoad();
add(await bgParallax());
}
Future<ParallaxComponent> bgParallax() async {
ParallaxComponent parallaxComponent = await loadParallaxComponent([
ParallaxImageData('layer06_sky.png'),
ParallaxImageData('layer05_rocks.png'),
ParallaxImageData('layer04_clouds.png'),
ParallaxImageData('layer03_trees.png'),
ParallaxImageData('layer02_cake.png'),
ParallaxImageData('layer01_ground.png'),
],
baseVelocity: Vector2(10, 0));
return parallaxComponent;
}
}
You'll see that we've almost achieved the parallax effect, but for now, all layers move at the same speed; the baseVelocity argument allows us to define the displacement of the backgrounds, and it is usually desired that the displacement occurs on the X-axis and not the Y-axis, so:
baseVelocity: Vector2(10, 0)As an assignment, try different values when defining the vector and use different images (comment and uncomment some of the ParallaxImageData defined above, change the order of the layers) and evaluate their behavior; but, in essence, if you use high values, such as:
baseVelocity: Vector2(100, 0)You will see a fast displacement in the backgrounds; if you place lower values:
baseVelocity: Vector2(5, 0)The displacement will be slower, and if you define the displacement in Y:
baseVelocity: Vector2(5, 10)The layers will move on the X and Y axes.
When running the application, you should see an output like the following:
Varying Speed in the Layers
For now, we get a somewhat boring parallax background since, although we have a background that moves, everything moves at the same speed; but, to customize this aspect, that is, to make the backgrounds move at different speeds, we can use the velocityMultiplierDelta parameter, which allows the background images (layers) to move with a faster speed, the "closer" the image is:
lib/main.dart
Future<ParallaxComponent> bgParallax() async {
ParallaxComponent parallaxComponent = await loadParallaxComponent([
***
baseVelocity: Vector2(10, 0),
velocityMultiplierDelta: Vector2(1.1, 0));
}
With this, we will have the same effect but now the layers move at different speeds; for you to understand how this argument works, try placing higher values and you will see that the closer the layer is, the faster it will move.
Create a Component Class for the Parallax
We can create the equivalent of the parallax with a component class, resulting in:
lib\background\candy_background.dart
import 'dart:async';
import 'package:flame/components.dart';
import 'package:flame/parallax.dart';
import 'package:parallax06/main.dart';
class CandyBackground extends ParallaxComponent {
@override
FutureOr<void> onLoad() async {
parallax = await gameRef.loadParallax([
ParallaxImageData('layer06_sky.png'),
ParallaxImageData('layer05_rocks.png'),
ParallaxImageData('layer04_clouds.png'),
ParallaxImageData('layer03_trees.png'),
ParallaxImageData('layer02_cake.png'),
ParallaxImageData('layer01_ground.png'),
],
baseVelocity: Vector2(10, 0),
velocityMultiplierDelta: Vector2(1.1, 1.1));
return super.onLoad();
}
}
The gameRef allows us to get a reference to the game (the MyGame class defined in main); as for main:
lib/main.dart
import 'package:flutter/material.dart';
import 'package:flame/game.dart';
import 'package:parallax06/background/candy_background.dart';
class MyGame extends FlameGame {
@override
void onLoad() async {
super.onLoad();
add(CandyBackground());
}
And with this, we have the same result as before.
CameraComponent in Flame to follow components in Flutter and use of World
We currently have a background larger than what can be shown in the window, resulting in a large part of it not being visible; in order to take advantage of this non-visible background and have it displayed as the player moves, we need to set up camera tracking for the player.
The concept of the camera, having been worked on in any video game engine like Unity or Unreal or 3D/2D content creation software like Blender, should be familiar to you; but in essence, the camera is simply a mechanism by which we can observe a part of the world, where the world is nothing more than all the components within the game; and through coordinates, we can move this observer.
In these types of games, the camera usually follows the player, and with this, we can visualize parts of the background that are not visible as the player moves through the world.
You can get more information about it at:
https://docs.flame-engine.org/latest/flame/camera_component.html
In Flame, we have a component called CameraComponent with which we can indicate the viewing area.
World
The World component, as its name indicates, is a component that can be used to house all the other components that make up the game world. In the case of the game we are implementing, this would be:
- The background.
- The tiles.
- The player.
- The meteors.
All these components must be added to an instance of the World component so that they are on the same layer and thus can interact with the player.
Using a World component is as simple as creating the instance:
final world = World();
And adding it to Flame:
add(world);
And at this point, all the components that are part of the game must be added to the world instance:
world.add(<COMPONENT>);The World component and CameraComponent are designed to work together; an instance of the CameraComponent class "looks" at the world/world and this is the reason why we introduce the world component along with the camera component.
It is usually not mandatory to use a World component for our Flame games, since we can add the components of our game directly to the Flame instance:
add(player);
Or to the components themselves, but, in this type of game where we have a world larger than what can fit on the screen, it is necessary to use a camera that follows or watches our player.
CameraComponent
CameraComponent, as we mentioned before, is the component used to observe the world. We have several properties to set in this component so that it "looks" exactly where we want and follows a component:
- The Viewport is a window through which the world is viewed. That window has a certain size, shape, and position on the screen.
- The Viewfinder is responsible for knowing what location in the underlying game world we are currently looking at. The Viewfinder also controls the zoom level and the rotation angle of the view; this property is key in these games since it is the one that is updated to "look" at the player.
Like any other game, the camera must observe the player who is the one moving through the world, although, fortunately, this update is done automatically using the follow() function, which receives a component to observe as a parameter and updates the camera's position while it moves across the screen:
cameraComponent.follow(player);The Viewfinder allows customizing aspects in the visualization like the anchor, with which we can specify the center of the camera; that is, our world looks like the following:

The camera must be centered in the bottom-left corner, meaning on the bottomLeft:

And for this:
cameraComponent.viewfinder.anchor = Anchor.bottomLeftImplement the Camera Component
Having clarified how the world and camera components work, let's implement the logic in our application:
class MyGame extends FlameGame *** {
***
late PlayerComponent player;
final world = World();
late final CameraComponent cameraComponent;
@override
void onLoad() {
var background = Background();
add(world);
world.add(background);
background.loaded.then(
(value) {
player = PlayerComponent();
cameraComponent = CameraComponent(world: world);
cameraComponent.follow(player);
cameraComponent.setBounds(Rectangle.fromLTRB(0, 0, background.size.x, background.size.y)));
// cameraComponent.viewfinder.anchor = Anchor.bottomLeft;
cameraComponent.viewfinder.anchor = const Anchor(0.1, 0.9);
add(cameraComponent);
cameraComponent.world.add(player);
},
);
add(ScreenHitbox());
}
}
Key Points
We define and add the world object to Flame:
final world = World();
***
add(world);
When using the camera component, it's necessary to employ a world object:
cameraComponent = CameraComponent(world: world);With an instance of the previous component, we can customize various aspects of the visualization, such as having the camera follow a component using the follow() function, which takes the component to follow as a parameter:
cameraComponent.follow(player);The center of the camera is defined in the bottom-left corner, but if we leave it this way:
cameraComponent.viewfinder.anchor = Anchor.bottomLeft; // Anchor(0, 1);When positioning the camera that is following the player, we'll see that the player is only partially visible:

This is because the camera "follows" the player's anchor, which is aligned in the center:
 PlayerComponent({required this.mapSize}) : super() {
anchor = Anchor.center;
debugMode = true;
}
To avoid this behavior, we can specify numerical values for the camera's anchor that are not as restricted as the previous value.
cameraComponent.viewfinder.anchor = const Anchor(0.1, 0.9);
And with this, we have a complete view of the player:

In addition to the above, we can also place restrictions on the camera's visualization (the visible area by the camera, which in this case, is exactly the size of the image or map); it is important to mention that the visualization area corresponds to a rectangle with the size of the background; therefore:
cameraComponent.setBounds(Rectangle.fromLTRB(0, 0, background.size.x, background.size.y)));And from the main, we pass the camera position:
lib\main.dart
@override
void update(double dt) {
if (elapsedTime>1.0) {
Vector2 cp = cameraComponent.viewfinder.position;
cp.y = cameraComponent.viewfinder.position.y -
cameraComponent.viewport.size.y;
world.add(MeteorComponent(cameraPosition: cp));
elapsedTime = 0.0;
}
elapsedTime += dt;
super.update(dt);
}
As you can see, we don't directly have the camera's position, so we must perform a calculation; as we commented earlier, using the Viewfinder:
cameraComponent.viewfinder
We have the camera's position, which is updated as the player moves across the screen, and we can get it with:
cameraComponent.viewfinder.position
But, this gives us the camera's position at the bottom corner, meaning the lower part, and we need to generate the meteors at the top part, for this reason, we subtract the camera's height, which we can get with:
cameraComponent.viewport.size.yThis material is part of my complete course and book on 2D game development with Flutter and Flame.
SpriteAnimationTicker in Flame to control an animation in Flutter
An AnimationTicker is a technique used in various animation libraries and allows controlling an animation; in the case of Flame, they also allow listening to the animation states; for example, when the animation completes:
animationTicker.onComplete = () {
***
}
};
When an animation frame is executed:
animationTicker.onFrame = (index) {
***
}
};
All of this is done using Flame's SpriteAnimationTicker class; for the game we are implementing, it is necessary to know when the "dying" animation ends to restart the game; for this, we can use any of the listeners shown above.
First, we need to initialize the ticker:
lib/components/player_component.dart
class PlayerComponent extends Character {
***
late SpriteAnimationTicker deadAnimationTicker;
@override
void onLoad() async {
***
deadAnimationTicker = deadAnimation.createTicker();
}
@override
void update(double dt) {
***
deadAnimationTicker.update(dt);
super.update(dt);
}
}
With the createTicker() function, we create a ticker (SpriteAnimationTicker) over the animation we are going to control; in the case of the game we are implementing, we are interested in detecting when the dying animation finishes executing, which will only run when the player runs out of lives, and when the animation ends, the level is restarted. The reason deadAnimationTicker property is initialized in onLoad() and not when the deadAnimation animation is used (when the player runs out of lives) is that it is necessary to update the ticker in the update() function according to the ticker's lifecycle:
deadAnimationTicker.update(dt)
With the ticker, a listener is created to detect when the animation finishes executing; for this, we can use the onComplete() listener:
deadAnimationTicker.onComplete = () {
// TODO
};
Or the onFrame() listener, which runs for every frame, but checking if the current frame is the last one:
deadAnimationTicker.onFrame = (index) {
if (deadAnimationTicker.isLastFrame) {
// TODO
}
};
Finally, the complete code looks like this:
lib/components/player_component.dart
class PlayerComponent extends Character {
void reset({bool dead = false}) async {
game.overlays.remove('Statistics');
game.overlays.add('Statistics');
velocity = Vector2.all(0);
game.paused = false;
blockPlayer = true;
inviciblePlayer = true;
movementType = MovementType.idle;
if (dead) {
animation = deadAnimation;
deadAnimationTicker = deadAnimation.createTicker();
deadAnimationTicker.onFrame = (index) {
// print("***--" + index.toString());
if (deadAnimationTicker.isLastFrame) {
animation = idleAnimation;
position =
Vector2(spriteSheetWidth / 4, mapSize.y - spriteSheetHeight);
}
};
deadAnimationTicker.onComplete = () {
if (animation == deadAnimation) {
animation = idleAnimation;
position =
Vector2(spriteSheetWidth / 4, mapSize.y - spriteSheetHeight);
}
};
} else {
animation = idleAnimation;
position = Vector2(spriteSheetWidth / 4, mapSize.y - spriteSheetHeight);
size = Vector2(spriteSheetWidth / 4, spriteSheetHeight / 4);
}
game.colisionMeteors = 0;
game.addConsumibles();
//position = Vector2(spriteSheetWidth / 4, 0);
}
}
This material is part of my complete course and book on 2D game development with Flutter and Flame.
Implement a Joystick with joystickcomponent
Up to this point, we have used the keyboard as the main source for interacting with the game, but this has the drawback that we could only use devices with a keyboard, such as a PC or Mac, leaving the application out of other devices like Android and iOS phones; for this type of application, where it is necessary to move the player on all axes (or just left to right and vice versa, as in the case of the dinosaur game) we can implement a virtual joystick; Flame has this type of component already ready to use in our application.
A virtual joystick looks like the following:

In short, you can see that they consist of two components:
- The translucent circle that indicates the movement area of the lever/knob.
- The solid-colored circle contained within the previous one that indicates the control for the user to move the virtual joystick; this corresponds to the lever or knob.
Let's start by implementing a joystick class like this:
lib\components\hud\joystick.dart
import 'package:flame/components.dart';
import 'package:flutter/material.dart';
class Joystick extends JoystickComponent {
Joystick(
{required PositionComponent knob,
required PositionComponent background,
required EdgeInsets margin})
: super(knob: knob, background: background, margin: margin);
}
The JoystickComponent class exists in the Flame API, and to implement it, we must define two fundamental properties:
- knob, which refers to the control stick.
- background, which is the area where the control stick can be moved.
Both are PositionComponents, therefore, they can be a Sprite or a geometric shape like a circle.
There are other properties to customize the joystick which you can consult in the official documentation, but these are the main or key ones.
Finally, we create another file and class, with which we will implement the custom Joystick class defined above, which we will call Hud from heads-up display, a common term in video games to refer to the section of icons, maps, life, etc. about the character. In this class, we implement the knob and background properties of the joystick as a couple of circles with colors, in addition to positioning it on the screen using the margin:
lib\components\hud\hud.dart
import 'dart:async';
import 'package:flame/components.dart';
import 'package:flame/palette.dart';
import 'package:flutter/widgets.dart';
import 'package:parallax06/hud/joystick.dart';
class HudComponent extends PositionComponent {
late Joystick joystick;
@override
void onLoad() {
final joystickKnobPaint = BasicPalette.red.withAlpha(200).paint();
final joystickBackgroundPaint = BasicPalette.black.withAlpha(100).paint();
joystick = Joystick(
knob: CircleComponent(radius: 30.0, paint: joystickKnobPaint),
background:
CircleComponent(radius: 100, paint: joystickBackgroundPaint),
margin: const EdgeInsets.only(left: 40, top: 100));
add(joystick);
}
}
Finally, from the main, we add an instance of the previous class:
lib\main.dart
import 'package:parallax06/hud/hud_component.dart';
***
class MyGame extends FlameGame
with HasKeyboardHandlerComponents, HasCollisionDetection {
***
late HudComponent hudComponent;
@override
void onLoad() async {
***
hudComponent = HudComponent();
add(hudComponent);
}
***
}
Flame's Joystick component has everything needed to implement movement in our components; using the enum type:
joystick.direction
We know the state of the knob or control stick:
enum JoystickDirection {
up,
upLeft,
upRight,
right,
down,
downRight,
downLeft,
left,
idle,
}
We also have other options we can use to determine the displacement of the knob; meaning, the further the user moves the control stick:

The higher the vector will be:
[-1.0,-67.0] (joystick.delta)And the closer the knob is to the center (the less it is displaced):

The lower the vector will be:
[-1.0,-21.0] (joystick.delta)With this vector, we also have the angle, meaning that if we move the knob up, we will have a negative value in Y:
[X,-72.0] (joystick.delta)And positive if it goes down:
[X,72.0] (joystick.delta)And the same logic applies to the X-axis. With this, we can directly use this property to move the player without the need for additional comparisons; finally, the player's movement using the joystick looks like this:
lib\components\player_component.dart
class PlayerComponent extends Character with HasGameRef<MyGame> {
***
final double _maxVelocity = 5.0;
@override
void update(double dt) {
***
_movePlayerJoystick(dt);
}
void _movePlayerJoystick(double delta) {
if (gameRef.hudComponent.joystick.direction != JoystickDirection.idle) {
position.add(gameRef.hudComponent.joystick.delta * _maxVelocity * delta);
}
}
}
It is important to mention that we can have two or more functions enabled for movement (as is the case for our application), in our project this would be movement via keyboard and also via joystick.
Finally, when running the application, we will have:

Of course, you can implement the joystick in previous games to use the game on other devices that do not have keyboards.
This material is part of my complete course and book on 2D game development with Flutter and Flame.
GamePad in Flutter and Flame - Dualsense - Xbox
The GamePad is the quintessential mechanism for playing video games and one of the first elements that come to mind when we hear the word video game or video game console; using this type of controls for our games is not impossible; however, in Flame, we do not have many options; in the official documentation, we will see that at the time these words were written, there is a very short section that mentions the use of the gamepad in Flame:
https://docs.flame-engine.org/latest/flame/inputs/other_inputs.html
The problem with the package they mention:
https://github.com/flame-engine/flame_gamepad
Is that at the time these words were written, it has not been updated for more than 3 years, and in software development, which includes video game development, that is a considerably long time, therefore, I personally would not recommend its use since there may be package version issues with the current project, which would cause problems in the implementation.
In Flutter (Not directly Flame, but the framework known as Flutter) there are a few plugins we can use; for example, this one:
https://pub.dev/packages/gamepads
At the time these words were written, the package is under development, therefore, its documentation is very scarce and its implementation is not entirely friendly as we will see in the implementation section; however, it is a package that has potential and is in constant development, so it is the one we are going to use; it is important to mention that this package is not designed for Flame, just like the Sharedpreferences package, but we can use it without problems in a project with Flutter and Flame; currently, this package is not available for web or mobile.
First steps with the gamepads plugin
Let's start by adding the dependency for the previous package:
pubspec.yaml
dependencies:
flutter:
sdk: flutter
***
gamepads:
Which has 2 main classes:
- GamepadController: Represents a single currently connected gamepad.
- GamepadEvent: Is an event that is built when an input occurs from a gamepad, in other words, when a key is pressed, an event of this type is constructed.
The GamepadEvent class contains the following properties:
class GamepadEvent {
// The id assigned to the gamepad that fired the event.
final String gamepadId;
// The timestamp at which the event was fired, in milliseconds.
final int timestamp;
// The [KeyType] of the key that was pressed.
final KeyType type;
// An identifier of the pressed button/analog stick.
final String key;
// The current value of the pressed button/analog stick.
final double value;
}
The most important ones would be key, which indicates the pressed key, and value, with which, depending on the type of button pressed, we can know the angle or whether the button was pressed or released.
The type of input can be of two types, which is represented by an enum type called KeyType:
- analog: Analog inputs have a range of possible values depending on how far/hard they are pressed (they represent analog sticks, rear triggers, some types of d-pads, etc.)
- button: Buttons have only two states, pressed (1.0) or not pressed (0.0).
Define a listener to detect key presses
For this plugin, we have two main uses, to know the number of connected controllers; for this:
gamepads = await Gamepads.list()Or to create a listener that allows listening for key presses on all connected gamepads:
Gamepads.events.listen((GamepadEvent event) { });As you can see, here we have the GamepadEvent event which has the structure mentioned before; as you can see, the use of the package is extremely simple, since it does not require setting up a connected controller or something similar, we automatically have a listener for all controllers connected to the device; from the player component, we place the listener for the gamepad:
import 'package:gamepads/gamepads.dart';
***
@override
Future<void>? onLoad() async {
// final gamepads = await Gamepads.list();
// print('Gamepads' + gamepads.toString());
Gamepads.events.listen((GamepadEvent event) {
print("gamepadId" + event.gamepadId);
print("timestamp" + event.timestamp.toString());
print("type " + event.type.toString());
print("key " + event.key.toString());
print("value " + event.value.toString());
});
}
As a recommendation, connect a device to your PC/Mac, via Bluetooth or its USB cable, start the application and start pressing some buttons on the gamepad, including its joysticks and D-pads and analyze the response, you will see that some are properly "button" and others are "analog" based on the type classification mentioned above, in the case of buttons, you will see that the previous listener executes when the button is pressed and released.
Based on tests performed on a Windows 11 device with an Xbox S|X controller, we have the following implementation to detect the "A" button:
import 'package:gamepads/gamepads.dart';
***
@override
Future<void>? onLoad() async {
// final gamepads = await Gamepads.list();
// print('Gamepads' + gamepads.toString());
Gamepads.events.listen((GamepadEvent event) {
// print("gamepadId" + event.gamepadId);
// print("timestamp" + event.timestamp.toString());
// print("type " + event.type.toString());
// print("key " + event.key.toString());
// print("value " + event.value.toString());
 if (event.key == 'button-0' && event.value == 1.0) {
print('rotate');
}
});
}
And for the D-pad, to detect displacement:
import 'package:gamepads/gamepads.dart';
***
@override
Future<void>? onLoad() async {
Gamepads.events.listen((GamepadEvent event) {
if (event.key == 'button-0' && event.value == 1.0) {
print('jump');
} else if (event.key == 'pov' && event.value == 0.0) {
// up
print('up');
} else if (event.key == 'pov' && event.value == 4500.0) {
// up - right
print('up - right');
} else if (event.key == 'pov' && event.value == 9000.0) {
// right
print('right');
} else if (event.key == 'pov' && event.value == 13500.0) {
// buttom right
print('buttom right');
} else if (event.key == 'pov' && event.value == 18000.0) {
// buttom
print('buttom');
} else if (event.key == 'pov' && event.value == 22500.0) {
// buttom left
print('buttom left');
} else if (event.key == 'pov' && event.value == 27000.0) {
// left
print('left');
} else if (event.key == 'pov' && event.value == 31500.0) {
// top left
print('top left');
}
});
}
The D-pad case is interesting since, according to the plugin used, it corresponds to a single button, therefore, when pressing "up arrow" we have a value of 0.0, when pressing "down arrow" we have a value of 18000, as you can see, these are values that correspond to a 360-degree space; therefore, we can customize the experience as we want; finally, the implementation using the D-pad is as follows:
import 'package:gamepads/gamepads.dart';
***
@override
FutureOr<void> onLoad() async {
// var gamepads = await Gamepads.list();
// print('*******');
// print(gamepads.toString());
Gamepads.events.listen((GamepadEvent event) {

if (event.key == 'button-0' && event.value == 1.0) {
// print('Rotate');
_rotate();
} else if (event.key == 'pov' && event.value == 0) {
// up
// print('up');
movementType = MovementType.up;
} else if (event.key == 'pov' && event.value == 4500) {
// up right
// print('up right');
} else if (event.key == 'pov' && event.value == 9000) {
// right
// print('right');
movementType = MovementType.right;
} else if (event.key == 'pov' && event.value == 13500) {
// buttom right
// print('buttom right');
} else if (event.key == 'pov' && event.value == 18000) {
//bottom
// print('bottom');
movementType = MovementType.down;
} else if (event.key == 'pov' && event.value == 22500) {
// buttom left
// print('buttom left');
} else if (event.key == 'pov' && event.value == 27000) {
// left
// print('left');
movementType = MovementType.left;
} else if (event.key == 'pov' && event.value == 31500) {
// top left
// print('top left');
} else {
movementType = MovementType.idle;
//
}
});
***
}
It is clear that these values may change if you use another type of controller or in future versions of the plugin, therefore, the reader is recommended to adapt the previous script to their needs.
With this implementation, we have other inputs for the games we have implemented in this book and which, of course, you can adapt to others like the dinosaur game.