")
The true magic of Flask doesn't lie solely in its minimalist core, but in its almost limitless capacity for extension. Being a micro-framework, Flask gives us just the right tools to get started, but it grants us total freedom to choose which "muscle" we want to add to our application according to our project's needs.
In this chapter, we will make the leap from a basic application to a professional and robust structure. You will learn to integrate critical components that every modern application requires: from visual interfaces with Bootstrap 5 and automated database management with Flask-Migrate, to complex administration systems with Flask-Admin and performance optimization using Flask-Caching.
Author's Note: The Python ecosystem evolves rapidly. Throughout these lessons, you will not only learn to implement these tools, but we will also identify which packages remain the industry standard and which have given way to more modern and secure alternatives, such as the transition from Flask-Mail to the renewed Flask-mailman.
Throughout the book, we have used several specific extensions for Flask to implement various functionalities; among the main ones we have:
- Flask-WTF: Define forms and validations based on classes and use them on the client and server side.
- Flask-SQLAlchemy: Use to connect the application to a database.
- Flask-Migrate: To create a migration system for tables in the database.
- Flask-Restless: To create a REST API.
- Flask-User: To create a module for the user.
All these extensions are widely used in Flask projects since most web applications need these features to implement their different functionalities.
Flask, being a micro-framework as mentioned at the beginning, brings the minimum and necessary to function and it is through these extensions that we can power the framework; in this section we will see how to use other extensions that you will surely find interesting and that we have not been able to use in the project for the simple reason that they have not been necessary.
For this section, I recommend that you clone the project we already have and we will call it:
my_app_extensions/
We create the virtual environment and install the dependencies with:
$ pip freeze > requirements.txtWe handle it this way because the implementations made here are purely experimental and we don't want them to be part of the project we have been developing.
We left off with the fact that we know how to create a paging system in Flask.
Bootstrap-Flask
We are going to learn about a quite interesting package which is Flask-Bootstrap5, which as you can guess, simply allows us to integrate Bootstrap 5 into our Flask project natively.
It is very important that you take into account the version you need, since there are different packages for each Bootstrap generation:
- Flask-Bootstrap: Installs version 3 (obsolete for modern projects).
- Flask-Bootstrap4: For version 4.
- Flask-Bootstrap5: It is the version we will use, since it is the current one and the one that best adapts to modern standards without depending on jQuery.
- Bootstrap-Flask: Another version of Bootstrap 5 which is the one we use.
As you can see in the official Bootstrap documentation, we are using version 5, therefore, the previous packages are becoming obsolete for this purpose. To install it, we simply run:
$ pip install Bootstrap-FlaskPress enter; in my case I already had it installed, so the process was quite fast. So now we simply have to use this package.
Configuration and Initialization
We configure:
from flask import Flask
from flask_bootstrap import Bootstrap5
app = Flask(__name__)
bootstrap = Bootstrap5(app)
And we load the CSS and JavaScript:
<head>
....
{{ bootstrap.load_css() }}
</head>
<body>
...
{{ bootstrap.load_js() }}
</body>
Author's Opinion: It's the one I like the least. Personally, I prefer to use Bootstrap's direct CDN to have total control over versions. Packages usually lag behind official releases. If you decide to use it, make sure to install version 5 and not earlier ones.
Usage: Import and load CSS/JS directly in your Jinja2 templates.
️ Flask-Migrate
We are going to learn about a very interesting new module that will allow us to easily manage our database.
You will remember that, previously, when we wanted to add a new column to the products table, we did it manually to speed up the process. This was necessary because we had already created the tables several sections ago; had we not done it that way, we would have had to delete them all and recreate them automatically from Flask to incorporate the change.
To avoid this problem when integrating new tables or renaming columns, there is a module called Flask-Migrate. If you have taken my Laravel or CodeIgniter courses, this will be familiar to you, as it follows the same migration scheme: managing the different states or versions of our database.
Installation and Configuration
The first thing we should do is install the module via pip:
$ pip install Flask-MigrateOnce installed, we must integrate it into our application. Although Flask doesn't force using an MVC structure, it's always recommended to maintain organization. We will need three key elements:
- Our Flask application instance (app).
- Database configuration.
- SQLAlchemy instance (db).
Code integration:
In our __init__.py file, we import the module and create the migrate instance passing both the app and the db:
from flask_migrate import Migrate
# ...
migrate = Migrate(app, db)
Repository Initialization
Flask-Migrate will automatically detect all the models we have defined in the application, regardless of whether they are in separate files. The first command we must run in the terminal is:
$ flask db initThis command initializes a migration repository. You will see a folder called migrations created in your project. It is very similar to what Git does with git init. Inside you will find a folder called versions, which for now will be empty.
Important note: Before continuing, I have created a new empty database for these tests and I have commented the db.create_all() line in the code, since from now on table control will be handled by Flask-Migrate.
Generate and Apply Migrations
To create our tables for the first time (or detect new changes), we use the migrate command:
$ flask db migrate -m “Initial migration”This command detects our models and generates a script file inside migrations/versions. This file contains two main functions:
- upgrade(): Applies changes (create tables, add columns).
- downgrade(): Reverts the changes made.
To finally apply these changes in the real database, we run:
$ flask db upgradeModify and Revert Changes
The most interesting thing about Flask-Migrate is the ease of modifying the structure. For example, if we decide to rename the username column to user in the Users model:
- We make the change in the models.py file.
- We run flask db migrate so the system detects that one column was deleted and another added.
- We run flask db upgrade to apply the change.
If you make a mistake, you can use flask db downgrade to go back to the previous state.
Incorporating new tables
If we create a new model (for example, a Test class), we simply run migrate and then upgrade. Flask-Migrate will detect that it is a new element and will incorporate it without affecting the content of existing tables.
In this way, you maintain a version history of your database, allowing you to upgrade or downgrade version as needed during the development of your application.
Flask-Babel
We are going to learn about a very interesting package called Flask-Babel. As you can guess, this module serves to add translation functionality, that is, translations to our application. Thanks to this, we can offer our platform in multiple languages.
Although the process may seem a bit tangled because it uses several commands, this is because the system is highly automated. Flask-Babel translates our applications using specific translation files.
Installation
To install it, we simply run:
$ pip install Flask-BabelIt is a lightweight package, so the installation will be fast. Once installed, we will already have all the necessary references in our project.
Language Selector Configuration
The first thing we must configure is a function called get_locale. In it we indicate which language the application should use by default. We can do it in several ways:
- Hardcoded: Set a fixed language (e.g. Spanish or English).
- User settings: Get it from the authenticated user's profile.
- Browser selector: Check browser headers to detect the user's preferred language. This is the best option for the experience to be dynamic.
Code Initialization
First, we must import and initialize Babel in our main file:
from flask_babel import Babel
babel = Babel(app)
Then, we define the function with the @babel.localeselector decorator (or the corresponding one according to your Babel version):
@babel.localeselector
def get_locale():
   # In this test we return 'es' for Spanish
   return 'es'
Marking Texts for Translation
For Flask-Babel to know which words to translate, we must use the gettext function. First we import it and then wrap our text strings with it:
from flask_babel import gettext
# Example in a controller
print(gettext('name'))
print(gettext('save'))
The Extraction and Translation Process
This is where the process gets interesting. We must follow a series of technical steps to generate the files:
1. Configuration file (babel.cfg)
We create a file called babel.cfg to indicate which files the system should analyze for texts to translate (.py files and Jinja2 .html files):
[python: **.py]
[jinja2: **/templates/**.html]
2. Text extraction
We run the extraction command to generate a base file called messages.pot. This file will contain all the "keys" we defined with gettext:
$ pybabel extract -F babel.cfg -o messages.pot .3. Language initialization
Now we create the folders for each specific language (e.g. Spanish and English) based on the .pot file:
pybabel init -i messages.pot -d translations -l es
pybabel init -i messages.pot -d translations -l en
4. Manual translation
Inside the translations folder, we will find .po files. This is where we manually write the translation for each word (e.g. "Save" -> "Guardar").
5. Compilation
Finally, we compile the translations to a binary format (.mo) that the application can read quickly:
$ pybabel compile -d translationsTranslation Directory Configuration
If when running your application you see that translations are not applied and only the "key" appears, it is likely that Flask is not finding the translations folder.
Because our folder structure is custom, we must specify the path in the configuration:
BABEL_TRANSLATION_DIRECTORIES = ‘full/path/to/your/translations/folder’Once the absolute path is configured, if your browser is in Spanish, the application will automatically show "Nombre" or "Guardar". If you change the selector to English, you will see the texts with the changes you made in the English translation file.
Author's Opinion: Essential for internationalization (translations). It is a manual but robust process:
- Mark texts with gettext or _().
- Create a mapping file and extract the texts.
- Initialize languages and compile binary files (.mo).
Flask-Admin
We are going to learn about another very interesting module called Flask-Admin. If you have taken my Master course in CodeIgniter, you will see that it is very similar to the Grocery CRUD library, as it allows us to generate administration interfaces (CRUD) easily and quickly.
Installation
To start, let's go to its GitHub repository to get the installation command. We simply run in the terminal:
$ pip install flask-adminAs in the previous videos, I already have it installed on my computer, so the process will be immediate.
Initial Configuration
The first thing we should do is import the module and initialize it in our application.
- Import: In the __init__.py file, we import the main class:
from flask_admin import Admin
- Instance: We create the instance after the database configuration (db).
- Template Mode: Flask-Admin supports several styles; in this case, we will use Bootstrap 3.
from flask_admin import Admin
# ... after configuring the DB
admin = Admin(app, name='My Panel', template_mode='bootstrap3')
Creation of Model Views (ModelView)
For Flask-Admin to know which tables to manage, we must use something called ModelView. This is a component dedicated to handling creation, editing, updating and deletion pages of our CRUD.
We must import specific support for SQLAlchemy:
from flask_admin.contrib.sqla import ModelViewModel Registration
To register a model, we use the add_view method. It is important to pass it the model and the database session (db.session).
For this first test, we will use the Users model, as it is simpler. We will avoid Category or Product models for now because they have complex relationships that could give problems if not configured carefully.
Common error fix: Make sure to import your models after having initialized the database (db). If you try to import the User model at the beginning of the file, you might get an error because the db resource doesn't exist yet.
# Inside the configuration block
from my_app.auth.models import User
admin.add_view(ModelView(User, db.session))
Exploring the Admin Panel
Once the application is running, we can access the interface through the route:
http://localhost:5000/admin
When entering, you will see that Flask-Admin has automatically created everything for us:
- Users Tab: A table appears with all records.
- CRUD Operations: You have buttons to create, edit and delete.
- Enum Handling: If your model has Enum type fields (like user role), Flask-Admin automatically generates a dropdown menu for you to select the correct option.
- Automatic Forms: When clicking "Create new", the system generates the necessary fields based on your database columns.
It is an extremely powerful module that saves us hours of manual work in creating internal panels.
Flask-Admin Customization via Attributes
We will continue working with Flask-Admin to customize its behavior. In this section, we will see how to hide specific columns and how to disable certain operations (create, edit or delete).
To go deeper, we can consult the "ModelView configuration attributes" section in the official documentation. As you will see, the mechanism consists of creating a custom class that inherits from ModelView and defining in it the desired parameters.
Flask-Admin Customization via Attributes
We will continue working with Flask-Admin to customize its behavior. In this section, we will see how to hide specific columns and how to disable certain operations like create, edit or delete.
To go deeper, we can consult the "ModelView configuration attributes" section in the official documentation. As you will see, the mechanism consists of creating a custom class that inherits from ModelView and defining in it the desired parameters.
Creation of a Custom ModelView
Instead of using the default ModelView class, we are going to define our own in the file where the model is located (for example, in user.py).
1. Class Definition
First, we must make sure to import ModelView and then create our custom class that receives this as parameter:
from flask_admin.contrib.sqla import ModelView
class UserModelView(ModelView):
   # Here we will define customization attributes
   pass
2. Operation Restriction
Suppose we don't want user records to be editable. To do this, we use the can_edit attribute. You can try others like can_create or can_delete according to your needs:
class UserModelView(ModelView):
   can_edit = False  # Disables editing option
3. Column Exclusion
To remove sensitive columns from the listing (like password hash), we use the attribute column_exclude_list. This receives a list (array) with the names of the fields we want to omit:
class UserModelView(ModelView):
   can_edit = False
   column_exclude_list = ['password_hash'] # Excludes column from listing
Registering ModelView in the Application
Once our custom class is defined, we must tell Flask-Admin to use it. To do this, we return to our initialization file (__init__.py):
We import our new class: UserModelView.
- We update the registration: Instead of passing the generic ModelView, we pass our custom class when creating the instance in admin.
# In the Admin configuration file (__init__.py)
admin.add_view(UserModelView(User, db.session))
By refreshing the application, you will see that the password column has disappeared from the listing and that the edit button is no longer available. That's how easy it is to customize columns and operations in our administrative panel.
Data Manipulation: Export, Search and Filters
Now we are going to learn how to manipulate data easily in Flask-Admin, either by exporting it or performing search and filtering operations directly from the listing.
1. Data Export
To enable this function, we return to the official documentation and look for the export option. Basically, it is about activating an attribute called can_export.
By default, data will be exported in CSV format, which you can open perfectly with software like Excel.
class UserModelView(ModelView):
   can_export = True
If we refresh the application, we will see a new export option. Clicking it will generate a file that includes all our columns (username, password_hash, role, etc.). By default, the data will come separated by commas.
Limit export
If you need to indicate a maximum number of elements to export, you can use the attribute export_max_rows. This is useful to avoid overhead on the database:
class UserModelView(ModelView):
   can_export = True
   export_max_rows = 1  # Only exports the first record found
Search Options
To add a search bar in our table, we use the attribute column_searchable_list. We can specify which columns we want to be searchable.
Note: It makes no sense to search by the password column, as it being converted to a hash, characters will not match what the user writes. It is better to exclude it.
class UserModelView(ModelView):
   # We define that it can be searched by username and role
   column_searchable_list = ['username', 'role']
Upon refreshing, an input field will appear where you can filter quickly. For example, if you search "regular", the table will show only users with that role.
Filtering Options (Filters)
Filtering is a different mechanism that allows performing more complex logical operations. To activate it, we use column_filters. This list can be equal to or completely different from search.
class UserModelView(ModelView):
   column_filters = ['username', 'role']
When using filters, you will see that you have advanced options. First you select the column and then the operation (if it is equal to, if it's not equal, if it contains, etc.). For example:
- You select Role filter.
- You indicate the "equals" operation.
- You select or write "regular".
Apply filter and the table will update automatically.
This system is very powerful because it allows you to combine multiple rules to find specific records in a granular way.
Date Handling with Date Picker
As you may have noticed in previous videos, I temporarily added a new column to our user model called birthday. Let's see how this field behaves according to the data type we define.
1. Use of DateTime Type Columns
In the initial definition of our user, we configured this column as a DateTime type.
If we return to the application and select Create or Update option, we will see that clicking the field automatically displays a DayPicker (the date selector that Bootstrap 3 uses by default). Being a DateTime type column, the component allows us to select both date and exact time.
# Example of definition in model
birthday = db.Column(db.DateTime)
2. Change to Date Type (Date Only)
What if we are only interested in the date, which is ideal for a birthday? To simplify the interface, we can change the column definition simply to Date.
Upon making this change and refreshing the application, you will notice that the selector now only shows the calendar to choose day, month and year, completely removing hour and minute options.
# Optimized definition for birthday
birthday = db.Column(db.Date)
Conclusion
That's how easy it is to use a DayPicker in Flask-Admin: you only need to correctly indicate if your column is Date or DateTime type in your database model, and the framework will take care of rendering the appropriate visual component for the user.
Creating Selection Fields with form_choices
Now then, what if we want a field to only take a determined number of values? In practice, this consists of converting a text field into a selection list (select).
1. Defining Options (Choices)
To achieve this, we are going to consult the official documentation under the Choices section. The attribute we must use is form_choices. In this, we must indicate the field name (in our case, username) and a list of allowed values.
To facilitate demonstration, we are going to copy the structure from documentation and paste it in our ModelView class:
class UserModelView(ModelView):
   form_choices = {
       'username': [
           ('usuario1', 'User'),
           ('admin', 'Administrator'),
           ('editor', 'Editor')
       ]
   }
2. Tuple Format (Value and Label)
As you can see, each option is defined by a tuple (a pair of values):
- First value: It's the real data that will be saved in the database.
- Second value: It's the "label" that the user will see in the interface (for example, "User").
If we refresh the application and go to Create section, we will see that the username field is no longer a free text box, but a select type field, very similar to the one we already have configured for role.
Example
If we add a new tuple like ('user_final', 'Final User'), upon saving and refreshing, we will have that new option available in the dropdown menu. This technique is excellent for limiting user inputs and avoiding errors in data loading.
Here is the improved text. I have organized information with titles, corrected punctuation and adjusted technical terminology (like WTForms and InputRequired) so the explanation is more professional and precise.
Form Validation with WTForms
Now we are going to learn how to apply validation rules to our forms in Flask-Admin. Specifically, we will configure our inputs so that all fields are mandatory (required).
1. form_args Configuration
To set these rules, we return to the official documentation and look for validation option. The attribute we need is form_args. This dictionary allows us to define specific arguments for each field, such as validators and custom labels.
It's fundamental to remember that Flask-Admin builds these forms using internally the WTForms module, which we have already used previously in the course.
from wtforms.validators import InputRequired
class UserModelView(ModelView):
   form_args = {
       'username': {
           'label': 'User',
           'validators': [InputRequired()]
       }
   }
2. Implementing Labels and Validators
As you saw in previous code, inside form_args we define the column name and assign its properties:
- label: Allows changing the name the end user sees (for example, change "username" to "User").
- validators: Is a list where we include InputRequired() rule.
If we return to the application and refresh, you will notice that the field now has an asterisk. If you try to save the form without completing the username, the system will stop the process and indicate that the field is required.
3. Validating Multiple Fields
We can extend this logic to other fields very easily. For example, so that password is also mandatory, we simply add the corresponding column (in our case, pw_hash) to the dictionary:
class UserModelView(ModelView):
   form_args = {
       'username': {
           'label': 'User',
           'validators': [InputRequired()]
       },
       'pw_hash': {
           'label': 'Password',
           'validators': [InputRequired()]
       }
   }
Now, when trying to create a user, Flask-Admin will sequentially verify that both fields have content. If any is missing, it will show error message and not allow saving record until information is complete.
The Problem: Passwords without Hash in Flask-Admin
As you can see, here we face a major problem: if we edit a user directly from the panel, the password is not being converted into a hash. This would leave the user completely unusable, as they could not log in; remember that our application is built to validate protected passwords. For example, if we observe the "admin" user, we will see that their password is indeed properly hashed.
Looking for a solution in documentation
How can we automate this process in Flask-Admin? To solve it, we must go to official documentation, specifically to ModelView section, which is where we manage almost all operations of our models.
After researching available methods, we find two very interesting ones:
- on_model_change: Executes before model is saved to database.
- after_model_change: Executes after change has been successfully made.
In our case, we need on_model_change, as we must convert password into a hash just before it is stored.
on_model_change method implementation
The on_model_change method receives three parameters (besides self):
- form: The WTForms form.
- model: Model instance with current data.
- is_created: A boolean indicating if we are creating a new record (True) or updating an existing one (False).
Applying Hash to password
To perform the operation, we simply access password attribute through model object. Here you have the example of how to define it in your class:
def on_model_change(self, form, model, is_created):
   # We print to verify if it's creation or edition
   print(f"Is creation?: {is_created}")

   # We get password from model and convert it to hash
   # We use previously defined method in our User class
   if model.password:
       model.password = generate_password_hash(model.password)
Operation tests
- Edition: If we edit an existing record and save, we will see that console prints False. When entering record again, plain text we put will have transformed into a hash string.
- Creation: When creating "User 2", console will print True. Flask-Admin will detect it's a new record, execute same logic and save protected password automatically.
Additional methods and use cases
It's important to remember that there is a method for each operation (create, update or delete) and that these have their "before" and "after" versions:
- on_model_delete: Useful if you need to perform cleanup before deleting a record.
- after_model_change: Is ideal for actions that should only occur when record is already safe in database. For example, sending a welcome email or confirmation notification to user just after their account has been created.
The Problem: Hash in Edition Form
We are going to cover a common problem. If we go to Users section and select "Create", everything works perfectly: rules indicate username and password are required. However, what happens when we try to edit an existing user?
When entering edit mode, password Hash appears in text field. This is a problem for two reasons:
- Aesthetics: It's not visually pleasant to show such a long and complex token.
- Business logic: Generally, administrators should not edit password directly from this module; key change is usually managed in a separate module or by user themselves.
We want to explore two variants: that field appears empty when editing, or directly removing password field from edition form.
Exploring ModelView Documentation
To solve this, we consult official ModelView documentation. We will look for method called edit_form. As its name indicates, this method allows us to receive an instance of form or model being "painted" on screen and modify its behavior before it's shown to user.
edit_form method implementation
We go to our models file and, inside class that inherits from ModelView, we will define the method. It's fundamental to call superclass (super()) so form loads with its default values and we only modify what interests us.
def edit_form(self, obj=None):
   # We call superclass to get base form
   form = super(UserModelView, self).edit_form(obj)

   # Here we will perform our modifications
   return form
Customizing Fields Dynamically
Given that this is a Flask-WTF form, we can apply all operations we already know from that library.
Variant 1: Clear field (Hide Hash)
If we only want password field to appear empty instead of showing ugly token, we can clear its data:
form.password_hash.data = “”Variant 2: Remove field completely
In my case, I prefer that field doesn't even appear during edition. To delete a field programmatically, we use del instruction:
del form.password_hashFinal result
With this change, if we go to Creation form, all fields will appear (including password). But if we go to Edition one, password field will have disappeared. This way, we can dynamically customize what information administrator can see or modify according to operation being performed.
Visual customization of Flask-Admin
Now we are going to learn to customize Flask-Admin, specifically template or visual part. To achieve it, first thing we must do is create a folder called admin inside our templates directory.
Inside this folder, we will indicate file name we want to modify. For example, for home page, file must be called index.html. You will notice that, when making this change, if you leave file empty, admin main page will appear completely blank. This happens because Flask-Admin is now prioritizing your file over original one. If you write a simple "Hello", you will see that's what's rendered in browser.
Extending Official Templates
To not lose all panel structure, we must base on original files. To do so, we can go to official GitHub repository of Flask-Admin, navigate to templates folder and look for Bootstrap versions.
If we open original index.html file, we will see it's a view with very little code that extends from a "mother" view. We can copy that structure in our local file:
{% extends 'admin/master.html' %}
{% block body %}
   <h1>Hello World</h1>
   <p>We are customizing main view.</p>
{% endblock %}
Upon reloading server, you will see admin design returns, but now includes your custom content inside page body.
Using Blocks for Advanced Customization
Official documentation offers a table with all available blocks we can override, such as title (title), header (head), body (body), among others.
1. Change title
If you want to modify title that appears in browser tab, you can use title block:
{% block title %}Super CRUD{% endblock %}2. Include custom CSS (FontAwesome)
To add external libraries like FontAwesome, we must use head_css block. It's very important that, inside this block, you call super() function. If you don't do it, you will override all default CSS of Flask-Admin (Bootstrap 3) and page will look "broken".
Here is how to include a user icon using FontAwesome:
{% block head_css %}
   {{ super() }}
   <link rel="stylesheet" href="https://cdnjs.cloudflare.com/ajax/libs/font-awesome/6.0.0/css/all.min.css">
{% endblock %}
{% block body %}
   <h1><i class="fa fa-user"></i> Welcome to Panel</h1>
{% endblock %}
By calling {{ super() }}, we indicate Flask to keep original admin CSS and simply add our new stylesheet. This is how easy we can integrate custom styles and external libraries to improve visual experience of our panel.
Customization of specific templates in Flask-Admin
Previously we saw how to customize Flask-Admin base file (admin/master.html template). Now then, what about rest of templates? I mean index, creation, edition or detail views.
If we check official GitHub repository, we will find a folder called model. Inside it exist key files such as:
- list.html: Table or listing view.
- create.html: View to create new records.
- edit.html: Edition view.
- details.html: Record details view.
There is also a folder called modals, containing templates for when you decide to work with forms in pop-up windows (modals). If you wish to customize these views, you must follow a similar process to what we did with base.
Customizing listing view (list.html)
To customize records table, we must create a folder called model inside our templates/admin directory. Inside it, we will create list.html file.
If you run application with this empty file, page will appear in blank. To avoid it, we must copy original Flask-Admin code. You will see it's a complex structure full of blocks and conditionals based on Bootstrap 3. We won't enter into detail in each line, as objective is to understand how to extend it to perform tests and visual adjustments.
Case study: Adding an icon to creation button
We want to add a "plus" (+) icon to creation link using FontAwesome.
Identify block: In list.html code, we look for creation link. Flask-Admin usually has conditionals to verify if creation is through a modal or independent page.
Modify link: Once link is localized, we can try to add icon:
<a href="{{ url }}" class="btn btn-primary">
   <i class="fa fa-plus"></i> Create new
</a>
Configuration in model: If when reloading you don't see changes, make sure that in your UserModelView you don't have create_modal = True activated, as that would force Flask to use a different template.
External styles integration (FontAwesome)
If when inserting icon it doesn't appear, it's because list.html template doesn't have access to FontAwesome styles. Same as we did with base template, we must override CSS block:
{% extends 'admin/model/list.html' %}
{% block head_css %}
   {{ super() }}
   <link rel="stylesheet" href="https://cdnjs.cloudflare.com/ajax/libs/font-awesome/6.0.0/css/all.min.css">
{% endblock %}
By calling {{ super() }}, we keep original Bootstrap design and add our icon library.
This same mechanism is what you should use if you wish to customize detail, edition views or any other, either in traditional scheme or through modals.
Protecting Flask-Admin with Flask-Login
Before starting, I will explain objective of this section: we want to protect our Flask-Admin panel with user and password. To achieve it, we will use module we already have installed, Flask-Login, integrating it directly with our administration views.
Process is simple and consists of developing a couple of methods inside our classes. First we will protect user management module and then we will see how to apply this same scheme to rest of CRUDs efficiently.
Key methods: is_accessible and inaccessible_callback
According to official documentation, there are two fundamental methods that we must override in our ModelView:
is_accessible: Must return a boolean value (True or False) indicating if current user has permission to see that module.
inaccessible_callback: Is action that executes when is_accessible returns False. Here we can show an error message or, most common, redirect user to login screen.
Basic implementation
We go to our models file and locate UserModelView class. We will implement both methods:
from flask_login import current_user
from flask import redirect, url_for
class UserModelView(ModelView):
   def is_accessible(self):
       # We verify if user is authenticated through Flask-Login
       return current_user.is_authenticated
   def inaccessible_callback(self, name, **kwargs):
       # If not authenticated, we send them to login
       return redirect(url_for('login'))
If we return a False manually in is_accessible, you will notice that menu option disappears. If you try to force entry by writing URL manually (e.g. /admin/user), system will execute inaccessible_callback and show you message or redirection you configured.
Optimization through Inheritance
If you have several CRUDs (Products, Categories, etc.), it would be impractical to copy and paste these methods in each class. Since Python is an object-oriented language, ideal is to use inheritance.
We can create a custom base class containing protection logic and make rest of our views inherit from it:
# Protected base class
class AdminModelView(ModelView):
   def is_accessible(self):
       return current_user.is_authenticated
   def inaccessible_callback(self, name, **kwargs):
       return redirect(url_for('login'))
# Now your specific views inherit from protected base
class UserModelView(AdminModelView):
   pass
class ProductModelView(AdminModelView):
   pass
Organization note: Ideal is that this AdminModelView class is defined in a superior or shared file so you can import it in all your modules cleanly.
Final verification
- Normal mode: If you are logged in, you will see all modules and can manage your records.
- Incognito mode: As there is no active session, options will disappear and direct access will be blocked.
Author's Opinion: Equivalent to Django administration panel. Allows creating a complete CRUD automatically.
Usage: You define a
ModelViewclass linked to your database models and you already have a management interface ready. Includes useful tools like date-pickers.
Flask Debug Toolbar
It's time to meet another very interesting and special module that will allow us to get detailed information about what's happening in our application. In other words, it facilitates debugging our application quickly and easily.
This module is called Flask-DebugToolbar. Its operation is simple: it adds a toolbar in browser that gives us technical information about execution of our application, such as system configurations, SQLAlchemy queries, Flask version, among other data.
Installation and Integration
To get this module, first is to install it via package manager. We simply run following command in terminal:
$ pip install flask-debugtoolbarOnce installed, integration process is very similar to what we've done with other modules. We only must import extension and pass application instance (app).
Prerequisites
For toolbar to work correctly, it's indispensable to fulfill two conditions in our configuration file (config.py):
- Have Debug mode active (DEBUG = True).
- Have a Secret Key configured (SECRET_KEY).
Code Implementation
In our initialization file (__init__.py), we perform import and initialization. We can place it, for example, after cache configuration:
from flask_debugtoolbar import DebugToolbarExtension
# ... after other initializations ...
toolbar = DebugToolbarExtension(app)
And ready! With this we already have our toolbar active.
Exploring Toolbar Functionalities
When starting application and refreshing browser, toolbar will appear on side. We can hide it so it doesn't bother or display it to inspect generated information.
Available information:
- Flask Version: Indicates exact version we are using.
- Processing time: How much it took server to process current page.
- Headers: Shows request headers (port, server, method type like GET, etc.).
- Config: A listing of all configurations we defined in system.
- SQLAlchemy: This is one of most interesting parts. Indicates how many SQL queries were executed to load page.
Query Analysis
If we navigate to a products page, we could see that, for example, 3 queries are executed. Upon inspecting them, toolbar will show us:
- Query to get authenticated user.
- Query to select product.
- Query to load categories.
This information is fundamental to detect common errors, like performing excessive or unnecessary queries, allowing us to optimize our application to maximum.
With Flask Debug Toolbar extension in Flask, we can get information about application at moment of development; when rendering views, we will see a panel like following:
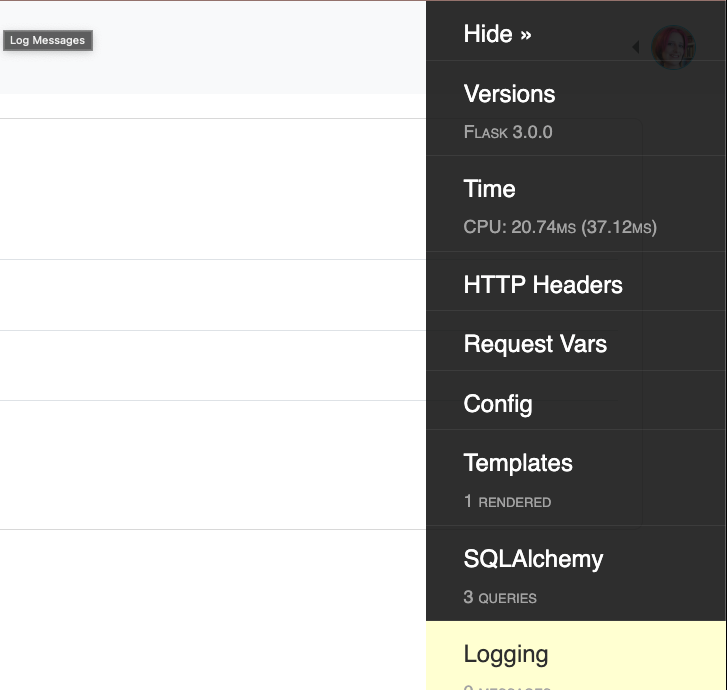
Figure 14-1: Flask Debug Toolbar
We install extension through:
$ pip install flask-debugtoolbarhttps://flask-debugtoolbar.readthedocs.io/en/latest/
We register extension globally at application level:
app\my_app\__init__.py
from flask_debugtoolbar import DebugToolbarExtension
***
# debug
toolbar = DebugToolbarExtension(app)
# blueprints
And enable debug mode so Flask Debug Toolbar can inspect queries:
my_app\config.py
class DevConfig(Config):
    ***
    SQLALCHEMY_RECORD_QUERIES = True
When entering some module of application, we will see data like SQLAlchemy queries; for example:
(ms)6.0144
SELECT EXPLAIN
./tasks/operations.py:49 (pagination)
SELECT count(*) AS count_1 FROM (SELECT tasks.id AS tasks_id, tasks.name AS tasks_name, tasks.document_id AS tasks_document_id, tasks.category_id AS tasks_category_id FROM tasks) AS anon_1
With this plugin, you can know more in detail advantages of using cache in modules where it's possible to use them and see a significant decrease in processing time compared to SQLAlchemy option; you can see more data like server response time, configurations used, routes, installed packages, etc.
Therefore, we have a more optimized application by simply performing previous change; this plugin is excellent to know all kind of details and detect possible bottlenecks in application to correct them.
Flask-Security-Too: The Modern Standard for Authentication
If Flask-Login is the engine and Flask-User was an educational prototype, Flask-Security-Too is the armored chassis of a race car. While other extensions limit themselves to telling you "who the user is", this plugin takes care of protecting the entire ecosystem of your application.
It's important to highlight that Flask-Security-Too is the continuation (fork) maintained and updated of original Flask-Security project. Today, it's the definitive recommendation for real projects requiring a professional, safe and compatible permission system with most recent Flask versions.
What does Flask-Security-Too offer?
Unlike simpler tools, this plugin integrates natively several Flask extensions to offer an "all-in-one" solution:
- Robust Authentication: Login, logout and new user registration.
- Complete Authorization: Role handling (e.g. admin, editor, user) and specific permissions by views.
- Account Recovery: Integrated forgot password management and email confirmation.
- Advanced Security: Protection against brute force attacks, session tracking and MFA (Two-factor authentication) support.
- API Ready: Native token support, ideal if you are building a SPA with Vue, Alpine.js or React.
Main Dependencies
Flask-Security-Too is powerful because it relies on standards of Flask ecosystem:
- Flask-Login: For user session handling.
- Flask-WTF: For form validation and security (CSRF protection).
- Flask-Mail: For confirmation and recovery emails sending.
- Passlib / Cryptography: For secure password hashing.
- SQLAlchemy / MongoEngine: Flexible support for multiple database engines.
Installation and Basic Configuration
To start using industry standard, we install main package along with database support:
$ pip install Flask-Security-Too Flask-SQLAlchemyQuick Implementation Example
In Flask-Security-Too we define models for User and Role, connecting them through an intermediate table obligatorily to take advantage of permission system:
from flask import Flask
from flask_sqlalchemy import SQLAlchemy
from flask_security import Security, SQLAlchemyUserDatastore, UserMixin, RoleMixin, login_required
app = Flask(__name__)
app.config['SECRET_KEY'] = 'super-secret-key'
app.config['SECURITY_PASSWORD_SALT'] = 'super-secure-salt'
app.config['SQLALCHEMY_DATABASE_URI'] = 'sqlite:///project.db'
db = SQLAlchemy(app)
# Model Definition
roles_users = db.Table('roles_users',
    db.Column('user_id', db.Integer(), db.ForeignKey('user.id')),
    db.Column('role_id', db.Integer(), db.ForeignKey('role.id')))
class Role(db.Model, RoleMixin):
    id = db.Column(db.Integer(), primary_key=True)
    name = db.Column(db.String(80), unique=True)
class User(db.Model, UserMixin):
    id = db.Column(db.Integer, primary_key=True)
    email = db.Column(db.String(255), unique=True)
    password = db.Column(db.String(255))
    active = db.Column(db.Boolean())
    roles = db.relationship('Role', secondary=roles_users, backref=db.backref('users', lazy='dynamic'))
# Flask-Security-Too Setup
user_datastore = SQLAlchemyUserDatastore(db, User, Role)
security = Security(app, user_datastore)
@app.route('/')
@login_required
def home():
    return "Welcome to a secure application"

@app.before_first_request
def create_user():
    db.create_all()
    # Create Roles
    admin_role = user_datastore.find_or_create_role(name='admin', description='Administrator')
    user_role = user_datastore.find_or_create_role(name='user', description='Final user')
    # Create User with Role
    user_datastore.create_user(email='admin@example.com', password='password', roles=[admin_role])
    db.session.commit()
# --- Protected Routes ---
@app.route('/admin')
@roles_required('admin') # Only users with 'admin' role
def admin_panel():
    return "Welcome to Administration Panel"
@app.route('/dashboard')
@roles_required('user') # Only users with 'user' role
def user_dashboard():
    return "Welcome to User Dashboard"
if __name__ == '__main__':
    app.run(debug=True)
Why choose it over Flask-User?
- Active Maintenance: Receives constant updates to mitigate new security vulnerabilities.
- Modularity: You can activate or deactivate functions (e.g. only login, or login + registration + trackable) through configuration variables.
- Compatibility: Works perfectly with modern versions of Flask (3.x+) and Python 3.9+.
If you are planning to take your application to production, don't waste time with old or unmaintained systems. Flask-Security-Too is the right investment for scalability of your project.
Official documentation: https://flask-security-too.readthedocs.io/
Flask User (Legacy)
Another very interesting plugin is Flask User, which unlike Flask Login that provides a set of functions and structure to implement login, Flask User provides a base system to perform authentication; these are Flask User dependencies:
Important note: Currently Flask-User has very low maintenance. Although we cover it in this course for its educational simplicity, for real and modern projects it's strongly recommended to use Flask-Security-Too, which is current industry standard for its robustness and frequent updates.
brypt 2.0+
cryptography 1.6+
Flask 0.9+
Flask-Login 0.2+
Flask-WTF 0.9+
passlib 1.6+
As you can appreciate, one of Flask User dependencies is Flask Login; Flask User provides:
- User registration
- Email confirmation
- User authentication
- Change username
- Change password
- Forgot password
- Role-based authorization
- Internationalization
Plugin can be installed through:
$ pip install flask-userUnfortunately at time these words were written, plugin has more than 4 years without update, therefore, it's only compatible for Flask 0.X which is a very old version of framework and therefore, this section is purely informative and not recommended to use in your real projects.
If you want to know more implementation details, you can consult official documentation:
https://flask-user.readthedocs.io/en/latest/basic_app.html
Author's Opinion: To handle users, roles and route protection, Flask-Security-Too is the definitive solution. It offers:
- Roles and permissions management.
- @roles_accepted or @roles_required decorators.
- Already structured intermediate database tables.
Flask-Restless (Legacy)
At this point, we already know how to create a functional REST API using Flask. However, we are going to learn about a module that was very popular: Flask-Restless.
WARNING: Flask-Restless is included here only as historical reference. Currently this package is obsolete, not compatible with modern versions of SQLAlchemy and NOT recommended for use in new applications. For modern APIs, consider using Flask-Smorest or Flask-RESTX.
That said, let's briefly see how it worked to understand the concept of automatic API generation...
Installation
To start, first is to install package. You can do it in typical way running following command in your terminal:
$ pip install Flask-RestlessExample with Flask-RESTful (Manual)
To contrast, let's first see how we would do it in "traditional" and manual way using Flask-RESTful, which requires defining resources and routes one by one. This will serve you to value how much Flask-Restless simplifies work later:
from flask import request
from flask_restful import Resource, abort, reqparse, fields, marshal_with
from flask_httpauth import HTTPBasicAuth
from my_app.product.models import Category
from my_app.auth.model.user import User
from my_app import user_manager
from my_app import db
# We define fields that will be returned in JSON
resource_fields = {
    'id': fields.Integer,
    'name': fields.String
}
auth = HTTPBasicAuth()
@auth.verify_password
def verify_password(username, password):
    user = User.query.filter_by(username=username).first()
    # We verify if user exists and if password matches
    if not user or not user_manager.verify_password(password_hash=user.password, password=password):
        return False
    return True
Base Class and Utilities
We use a Base class to reuse common logic, such as record existence verification and manual serialization.
class Base:
   def category_to_json(self, category):
       """Converts a Category object to dictionary."""
       return {
           'id': category.id,
           'name': category.name,
       }
   def abort_if_doesnt_exist(self, id, as_json=True):
       """
       Verifies if category exists by ID.
       If not exists, throws 404 error.
       """
       # It's recommended to use Session.get(Model, id) in recent versions of SQLAlchemy
       category = db.session.get(Category, id)

       if category is None:
           abort(404, message="Category {} doesn't exist".format(id))

       return self.category_to_json(category) if as_json else category
Resources: Category Management
Here we define methods to handle an individual category or full listing.
class CategoryRestFul(Resource, Base):
   """Handling operations on a specific category."""
   @auth.login_required
   @marshal_with(resource_fields, envelope="category")
   def get(self, id):
       return self.abort_if_doesnt_exist(id, False)
   @marshal_with(resource_fields, envelope="category")
   def patch(self, id):
       parser = reqparse.RequestParser()
       parser.add_argument('name', required=True, help="Name is mandatory")
       args = parser.parse_args()
       c = self.abort_if_doesnt_exist(id, False)
       c.name = args['name']
       db.session.add(c)
       db.session.commit()
       return c
   def delete(self, id):
       c = self.abort_if_doesnt_exist(id, False)
       db.session.delete(c)
       db.session.commit()
       return {'msj': 'ok'}, 200
class CategoryRestFulList(Resource, Base):
   """Handling listing and creation of categories."""
   @marshal_with(resource_fields, envelope="categories")
   def get(self):
       return Category.query.all()
   @marshal_with(resource_fields, envelope="category")
   def post(self):
       parser = reqparse.RequestParser()
       parser.add_argument('name', required=True, help="Name is mandatory")
       args = parser.parse_args()
       c = Category(args['name'])
       db.session.add(c)
       db.session.commit()
       return c, 201  # We return 201 indicating it has been created
Search Resource
This resource allows filtering categories by name using LIKE operator.
class CategoryRestFulListSearch(Resource, Base):
   @marshal_with(resource_fields, envelope="category")
   def get(self):
       parser = reqparse.RequestParser()
       parser.add_argument('search', required=True, help="You must specify a search term")
       args = parser.parse_args()
       # We perform search by partial coincidence
       return Category.query.filter(Category.name.like(f"%{args['search']}%")).all()
API Manager Configuration
If we check Quickstart section in official documentation, we will see an example that, although it seems complex, is very simple. To integrate this module in our project, we must follow these steps:
- Import module:
from flask_restless import APIManager
- Instantiate Manager: We create a variable (for example, restless_manager) calling APIManager class. To this class we must pass application instance (app) and database.
- You must pass it flask_sqlalchemy_db object linked to your database (for example, flask_sqlalchemy_db=db), not only db object directly, otherwise it will give you error.
- Create endpoint: We use create_api method indicating model we want to work with and allowed methods.
restless_manager = APIManager(app, flask_sqlalchemy_db=db)
restless_manager.create_api(Product, methods=['GET', 'POST', 'DELETE'])
Resources and Routes Access
By default, Flask-Restless builds URI based on __tablename__ attribute of your model. If your table is called products, route will be /api/products.
- Avoid conflicts: If you already had routes created manually or through Blueprints with same name, remember to comment them so they don't clash with new generated API.
- Data query: When accessing localhost:5000/api/products, you will see results paginated automatically. If you want a specific product, simply add ID at end: /api/products/28.
Methods and Prefixes Customization
HTTP Methods Control
You can define exactly what operations you want to allow through methods parameter. If you define only GET and POST, and then try to make a request of another type (or remove GET from list), server will return an error indicating that method is not supported. This is ideal to protect your data.
URL Change (Prefix)
If you don't want your API to start with /api/ and prefer something like /api/v2/, you can use url_prefix option:
restless_manager.create_api(
   Product,
   methods=['GET'],
   url_prefix='/api/v2'
)
Now, your products will be available at localhost:5000/api/v2/products.
Advanced Operations
Official documentation details all capabilities of this module:
- GET: General listing, detail by ID or advanced search operations.
- DELETE: Deletion by ID or through search terms.
- POST: New resources creation.
- PUT / PATCH: Specific instances update or global updates of all instances.
With Flask-Restless, we have a powerful tool to create a robust, paginated and ready to consume API in a matter of minutes.
CRUD Operations Tests with Flask-Restless
We will continue performing tests with Flask-Restless. On this occasion, we will see how POST, PATCH, PUT and DELETE type requests work. To do so, we will rely on official documentation to customize our API and use Postman to run requests.
During this process we will make some mistakes on purpose so you learn to identify them and know how to solve them when they appear.
Resources Creation (POST)
To create an element, we will use POST method. Remember that in this case no identifier should be passed in URL, as we are creating a new resource.
- Postman Setup: Copy your application URL. In my case it's api/v2/products (remember we changed prefix previously).
- Data sending: According to documentation, we must send information in JSON format. In Postman, go to Body tab, select raw and make sure to mark JSON in dropdown menu.
Common errors handling
If you try to send only name, for example {"name": "p30"}, server will return an error indicating mandatory fields are missing like price (price) or category (category_id).
Note on files: If your model has a file field (file), we will have a problem sending it via JSON. To simplify this test, we will temporarily comment everything related to files field in our model.
After adjusting JSON with required fields:
{
   "name": "p30",
   "price": 50.5,
   "category_id": 1
}
Records Update (PATCH and PUT)
To update, process is very similar to POST, but with two key differences:
- URL: You must include resource identifier at end of route (e.g. /api/v2/products/32).
- Methods: You must enable PATCH or PUT in your create_api configuration.
# Example of configuration enabling methods
manager.create_api(Product, methods=['GET', 'POST', 'PATCH', 'PUT', 'DELETE'])- PATCH: Use it for partial modifications. If you send only name, only name will update.
- PUT: Is used for complete updates. If you don't enable method specifically in code, Postman will return a "Method not supported" error.
Resources Deletion (DELETE)
Finally, for DELETE method, we don't need to send any JSON body. Simply select method in Postman and point to ID of record we want to delete.
Upon running it, you will notice you don't receive a response content (it's an empty response), but if you perform a global GET or try to search that specific ID, you will see record no longer exists.
Search and Filtering Operations in Flask-Restless
Now we are going to see another type of fundamental operations: search ones. In Flask-Restless, we can pass a parameter called q in URL to send terms that customize response or type of operation server is going to perform.
To understand exact format we must specify, we can consult official documentation. Basic structure is based on passing a JSON object containing search criteria.
Filters usage (filters)
To perform filtering, we must pass a list under filters key. Each filter is a dictionary with following format:
- name: Field we want to compare (e.g. name, id, category_id).
- op: Comparison operator (e.g. ==, >=, <=, !=, like, in, etc.).
- val: Value we want to compare with.
Practical Examples in Postman:
- Filter by ID: If we want to bring all products whose ID is greater than or equal to 1, we would write in URL: ?q={"filters":[{"name":"id","op":">=","val":1}]} This will return all records that fulfill condition. If we change value to 26, only we will get those with a superior ID.
- Filter by Category: We can ask by category_id. If we put 1, it will bring products of that specific category.
- Multiple Filters: As filters is a list, we can pass more than one search condition separating them by commas inside brackets. Only results that fulfill all sent conditions will be returned.
Pagination and Ordering
Besides filters, there are other very simple to use parameters that help us organize data:
- limit: Indicates maximum amount of records API will return. For example, ?q={"limit":1} to get only one result.
- offset: Indicates how many records it should skip before starting to return data. In conjunction with limit, it's base to create a manual pagination.
- order_by: Allows defining results order (ascending or descending) according to a specific field.
Conclusion
As you can see, performing complex requests is quite simple if you follow required JSON format. You only must write in your browser or Postman: ?q= followed by JSON with your limit, offset or filters parameters.
I invite you to continue performing tests with other operators and fields; this module is very flexible and allows you to build powerful queries with very little effort.
Author's Opinion: There are modern ways to create a RestAPI.
What you should NOT use (Legacy/Obsolete)
It's common to find these packages in old Google tutorials, but avoid them in new projects:
| Obsolete Package | Modern Alternative | Reason |
|---|---|---|
| Flask-User | Flask-Security-Too | Lack of maintenance. |
| Flask-Mail | Flask-Mailman | Discontinued. |
| Flask-Bootstrap 4 | Flask-Bootstrap 5 | Old version. |
| Flask-Restless | Marshmallow / API-Spec | Very limited currently. |