
Content Index
- What is a REST API in practice?
- Server and Client
- What a REST API Can Do
- REST and its Rules
- HTTP and Methods
- APIs in General
- Why Django REST Framework?
- Response Formats: JSON and XML
- API Consumption
- Introduction to Django and Rest APIs
- What is a Rest API and why use Django to build it?
- Advantages of Django Rest Framework (DRF)
- The main concepts of Django and the REST framework are:
- Components to create a Rest API in DRF
- Initial development environment configuration
- Installation of Django and Django Rest Framework
- Basic project configuration
- Models and Serializers: defining the data structure
- Serialization with ModelSerializer
- Creating views and ViewSets in Django Rest Framework
- Routing and API testing
- Authentication token in the Rest API using Django Rest Framework
- The Stateless Principle
- Points to consider
- Protecting a Rest API
- Creating the function to generate Authentication Tokens and verify credentials (login)
- Explanation of the previous function
- Testing authentication in Postman
- Protection of ModelViewSet
Django is one of those frameworks that's been on the market for a long time and is being used more every day along with the Python ecosystem: the creation of Rest APIs, which, as we've seen in several tutorials, videos, and my courses, are easily scalable, flexible, and all of this is thanks to the great modularity of the Python ecosystem, which is, of course, also inherited by Django.
Building a Rest API in Django is one of the most common tasks today, just like sending events using signals as we saw before, especially if you want to connect your backend with web or mobile applications in Flutter, React, Android, or iOS. Django, along with Django Rest Framework (DRF), offers an elegant, modular, and secure way to create scalable APIs without complications.
A Rest API is a fundamental component in any application today that offers us a simple, organized, and customizable mechanism to share data or functionality through other applications; it even allows us to add layers of security with relative ease if you use a framework, package, or something similar; in Django, using Django Rest Framework, this is no exception and allows us to create very personalized Rest APIs through this package for Django using classes or methods that we can customize.
So, again I repeat, there are many ways to create Rest resources using Django Rest Framework (DRF), and in this post, we are going to see the simplest, most generated, and most direct approach to learning how to take the first steps with DRF.
In my experience, after several courses and real projects, I can say that DRF greatly facilitates the work, especially when you understand its structure well: models, serializers, views, routes, and authentication.
What is a REST API in practice?
I’m going to tell you a little “grandpa story.”
Let's assume we have our super application in Django. We already have our entities, we can create records, edit them, delete them, all thanks to Django and Django Admin.
Now, imagine we want to consume that information from another application, for example, an application made in Vue, React, Angular, Astro, or any of the 20 existing JavaScript frameworks.
But not only that. It could also be a mobile application:
- Android (Android Studio)
- React Native
- Flutter (my favorite)
- iOS with Swift or SwiftUI
Think, for example, of Gmail: you can view your emails from the browser, but also from your mobile. What is happening there is that the mobile application (the client) connects to a server, and that server exposes an API.
That is basically a REST API: A mechanism that allows different applications to communicate with each other.
Server and Client
In most cases, we have:
- A server, which in our case will be Django.
- A client, which can be a web application or a mobile app.
Although we usually connect server with client, you could also consume a REST API from another application in Django, or from Laravel, Flask, etc. In short: a REST API allows us to interconnect applications, regardless of the technology they use.
What a REST API Can Do
A REST API is not just for creating, reading, updating, or deleting data. It can also:
- Send emails
- Execute processes
- Automate tasks
- Expose services to third parties
Everything is programmable.
The key idea I want you to keep is this:
A REST API is a mechanism to connect different applications, usually a server with one or more clients.
REST and its Rules
A REST API is not just about “returning data.” It has rules.
For example:
- GET → query data
- POST → create records
- PUT / PATCH → update (fully or partially)
- DELETE → delete
Although you could technically use GET to create data or POST to query, it is not recommended, for security reasons and best practices.
REST is, basically, a set of rules that tell us how we should perform that communication.
HTTP and Methods
Here is something important:
HTML only understands GET and POST, but the HTTP protocol (the one we use when browsing the internet, with HTTP or HTTPS) supports many more methods:
- GET
- POST
- PUT
- PATCH
- DELETE
And precisely REST APIs are based on HTTP, not on HTML.
APIs in General
An API is an application programming interface. There are many types of APIs:
- SOAP
- GraphQL
- REST
They all serve to communicate applications, but each has its own rules, advantages, and disadvantages, just like when you compare Django with Laravel.
In this course we are going to work with REST, using Django REST Framework.
Why Django REST Framework?
Django REST Framework already implements all these best practices for us:
- Handling HTTP methods
- Status codes (200, 404, 401, 500, etc.)
- Data serialization
- Security
- We don't have to reinvent the wheel.
Remember that Django already has many HTTP responses ready, and DRF takes advantage of all that to build REST APIs simply and cleanly.
Response Formats: JSON and XML
Normally, a REST API returns data in:
- JSON (the most used today)
- XML
These are not objects in memory, but plain text, which can be easily sent, copied, saved, and shared between applications.
Django REST Framework allows us to easily decide the format in which to return the information, without having to implement it manually.
API Consumption
To consume a REST API we can use:
- Tools like curl
- JavaScript with fetch
- Libraries like Axios
- Any programming language
Later, when we consume the API from a Vue application, you will see it practically.
Introduction to Django and Rest APIs
What is a Rest API and why use Django to build it?
A Rest API (Representational State Transfer) is a standard way for applications to communicate with each other through HTTP requests. Simply put, it's the "door" through which an external app can access your system's data.
Django is perfect for building APIs because it combines a powerful ORM (for handling databases without writing SQL) with a mature ecosystem and a huge community. If you already know Django, making the leap to Django Rest Framework is completely natural.
Although Rest APIs are NOT a standard, they are a measure that has been adopted by multiple frameworks to build this type of system whose main purpose is to connect with other systems or applications, as I mentioned before; so, for example, having an app in Django, we can connect it with apps created in Flutter, Android, iOS, React or anything else similar... which is excellent since with a single backend we can create multiple applications that consume this Django app.
A real-world example is an online shopping app, which is an app with a central repository created (for example) in Django and then you can create the apps for the client, either for mobile and/or browsers using (for example) the technologies indicated above...
Advantages of Django Rest Framework (DRF)
- Automatic serialization of models to JSON.
- Very flexible permission control and authentication.
- System of generic views and ViewSets that avoids duplicating code.
- Direct integration with tools like Postman or Swagger.
In my case, I have used DRF to create APIs that connect with frontends made in Flutter and React, leveraging a single stable and maintainable backend.
The main concepts of Django and the REST framework are:
Model classes provide an Object Relational Map (ORM) for the established database. A model maps to a table in the database. You can query databases without writing a single line of SQL. With models, it is easy to define tables and relationships between them.
Views are in charge of the request process. They work as controllers in the MVC; let's remember that Django uses MTV. You can implement them in many ways, such as functions or classes.
Serializer classes provide control over data types and request and response structures.
Templates are files with static and dynamic content. They are made up of static code and other elements that depend on the context, although this is not relevant in a Rest type app.
These are some of the best practices to follow when using Django for development:
Configuration structure: anyone new to development can easily create an application with ease using the Django framework. It is vital to create a structure that is easy to maintain and reuse when necessary. Whenever you use Django, generate a settings.py file that contains all the details related to the project or your work environment so that you do not make any changes to the main configuration file and generate new files for different environments.
One project, several applications in Django: there can be many applications in a single Django project. An application is a collection of related functions and model sets. It is a good practice to maintain order and define locations for standard functions. There is an application called api, through which the routing of the other applications in the main application folder can be defined.
ViewSet: is the most important component for viewing Rest APIs in Django models. Regular views in Django act as a controller for HTTP requests; view sets give you options like creating or listing. The best feature of view sets is that they make the code consistent and repetition can be avoided; therefore, with this component, we can specify the structure and which models they are going to work with.
Generic Views: the Django framework has a feature called generic views that facilitates functions and tasks related to models. Some of the functions include retrieving data, creating, and destroying lists. The only thing you have to do is define the class view as a child of the generic view.
Customize functions: the generic views provided in the Django documentation list a variety of functions such as ListAPIView, CreateAPIView, RetreiveAPIVIew, RetrieveDestroyAPIView. But if you are looking to customize the views, you can redefine get, post, put, delete, and other methods. You can also use mixins to redefine specific methods and functions like create, update, destroy, and others.
Components to create a Rest API in DRF
In DRF there are 3 main components to create any type of Rest resource:
- The serialization classes, which allow us to indicate the data set we are going to work with.
- The classes or methods with the Rest resources, which use the serializers to map the responses of the Rest resources that we create at this point.
- Routing, like any http component in Django, we have to create a path component.
And we can manage all of this using classes, properties, and functions in DRF.
Initial development environment configuration
Prerequisites
Before you begin, make sure you have Python 3.10+, pip, and a virtual environment installed. From the terminal:
$ python -m venv env
source env/bin/activate  # o env\Scripts\activate en Windows
Installation of Django and Django Rest Framework
To begin building our REST API, the first step is to install the third-party Django REST Framework (DRF) package, as mentioned in the introduction.
DRF is the standard tool in the Django ecosystem for this purpose, and it's installed as a plugin, adhering to Django's philosophy that it doesn't include all features by default to avoid overloading the framework.
$ pip install django djangorestframeworkThen, create a new project and a main app:
$ django-admin startproject myproject
$ cd myproject
$ python manage.py startapp api
Basic project configuration
In your settings.py file, add the necessary applications:
INSTALLED_APPS = [
   ...
   'rest_framework',
   'api',
]
Maintaining one settings.py file per environment (development, testing, and production) prevents many errors when deploying. This way you can customize variables without touching the main file.
Models and Serializers: defining the data structure
Serialization is a presentation layer responsible for translating or formatting data before it is sent to the client, and vice versa. Its main purposes are:
- Schema Definition: Limiting or exposing exactly which fields in a Django model are accessible through the API (e.g., excluding sensitive fields like passwords).
- Data Formatting: Applying specific formats to fields (e.g., changing the date format to YYYY-MM-DD).
- Dynamic Fields: Allowing the addition or modification of fields that do not exist directly in the model (calculated fields).
Creating the base model
As an example, let's define a category table:
from django.db import models
class Category(models.Model):
   title = models.CharField(max_length=255)
   url_clean = models.CharField(max_length=255)
   def __str__(self):
       return self.title
Serialization with ModelSerializer
In serializers.py:
from rest_framework import serializers
from .models import Category
class CategorySerializer(serializers.ModelSerializer):
   class Meta:
       model = Category
       fields = '__all__'
The serializer is responsible for converting Django objects into JSON format and vice versa. Thanks to Django's ORM, you can query without writing a single line of SQL.
Creating views and ViewSets in Django Rest Framework
Difference between APIView, GenericView and ViewSet
- APIView: total control, more code.
- GenericView: preconfigured views (list, create, delete).
- ViewSet: groups CRUD actions into a single class.
If your intention is to create a CRUD-type Rest API, there is already a class in DRF that you can inherit and it will be created automatically thanks to the two attributes we define, the queryset, to define the data pool, and the serializer_class to define the serializer class; all of this we will do in a file called viewsets.py:
from rest_framework import viewsets
from .models import Category
from .serializers import CategorySerializer
class CategoryViewSet(viewsets.ModelViewSet):
    queryset = Category.objects.all()
    serializer_class = CategorySerializer
The first class we have to define would be `serializers.py`, which allows us to define the serialization of our classes. This is useful for indicating which fields we are going to work with, for example, all of them:
from rest_framework import serializers
from .models import Category
class CategorySerializer(serializers.ModelSerializer):
  class Meta:
    model = Category
    fields = '__all__'
Routing and API testing
Configuring routes with routers.SimpleRouter().
With our two resources created, the next thing we need is route management; for that:
from rest_framework import routers
from .viewsets import CategoryViewSet
router = routers.SimpleRouter()
router.register('category', CategoryViewSet)
urlpatterns = router.urls
Then, in our main file for the routes:
path('api/', include('restful.urls')),Testing endpoints with Postman or cURL
With the server running:
$ python manage.py runserverVisit http://localhost:8000/category/ or test with Postman.
Personally, I always test each endpoint in Postman before deploying to ensure that permissions and responses work as I expect.
Authentication token in the Rest API using Django Rest Framework
Authentication is the process of verifying a user's identity, while Permissions determine whether an authenticated (or unauthenticated) user has access to a specific resource. DRF offers several ways to manage both, but understanding the stateless concept of a REST API is crucial.
The Stateless Principle
- A RESTful API should be stateless. This means the server should not rely on session information or cookies to handle requests. Each request should contain all the information necessary to authenticate and authorize the user.
- Problem with Sessions: Session authentication relies on cookies and server state. It is not recommended practice for REST APIs because the session is tied to the server and does not allow for a clean separation between client and server.
- Preferred Alternatives: Authentication methods based on credentials sent with each request (such as Basic Authentication or Token Authentication) are preferable because they are stateless.
Protecting the Rest API with required authentication is another common feature in this type of APIs; as a matter of good practice, Rest APIs should be stateless, which means that the session should not be used to handle user authentication, instead, encrypted tokens are used for this purpose; DRF provides these features that we can easily enable, indicating one or more authentication classes; in Django, we have 3 main types of classes that we can use:
Protecting a Rest API like the one built previously, whether it is of the CRUD type or any other, so that it can only be accessed through some mechanism is a common feature today, and a widely used mechanism is through Tokens, Authentication Tokens, and we can do this easily in Django Rest Framework without much complication.
Token authentication is a widely used scheme in web applications in which we define our Rest API to protect certain resources or even the entire Rest API; we can easily configure all of this in a Rest API created with Django Rest Framework, which is what we are going to do in this post.
Points to consider
To create our Rest API with authentication token protection, we can do it natively using Django Rest Framework. For this, we have to define a couple of configurations in our settings file, specifically in the `REST_FRAMEWORK` key or key, which is the one we use to handle this type of configuration at all levels.
Protecting a Rest API
The configuration we are going to make would be to apply globally in a Rest type class; as you can see, when working with DRF we have many ways to do the same thing and here we simply offer you one version. You simply have to indicate in your Django project configuration file, called `settings.py`, and add the following configuration:
settings.py
REST_FRAMEWORK = {
    'DEFAULT_PERMISSION_CLASSES':[
        'rest_framework.permissions.IsAuthenticated'
    ],
    'DEFAULT_AUTHENTICATION_CLASSES':[
        'rest_framework.authentication.TokenAuthentication'
    ]
}
You must also add the tokens app:
INSTALLED_APPS += ['rest_framework.authtoken']Run migrations:
$ python manage.py migrate authtokenCreating the function to generate Authentication Tokens and verify credentials (login)
Token-based authentication is the preferred mechanism for modern REST APIs because it is stateless and easy to implement in mobile or web clients. It involves providing a unique string of text (the token) that the client must send with each request to validate its identity.
Now, the next thing we have to do would be to create the function that our user would use to generate the token. This method or function will be a custom Rest resource for us that will allow us to generate said token using the `get_or_create` function of the Token model that we import for free from our DRF.
Now, we generate said token once the user's credentials have been verified against the one we have in the User model and in the database; so, finally:
from rest_framework.decorators import api_view
from rest_framework.authtoken.models import Token
from rest_framework.response import Response

from django.contrib.auth.models import User
from django.contrib.auth.hashers import check_password

@api_view(['POST'])
def login(request):

    username = request.POST.get('username')
    password = request.POST.get('password')

    try:
        user = User.objects.get(username=username)
    except User.DoesNotExist:
        return Response("Usuario inválido")

    if not check_password(password, user.password):
        return Response("Contraseña inválida")
    token, _ = Token.objects.get_or_create(user=user)
    return Response(token.key)
Explanation of the previous function
As you can see, since this is the resource we have to use for login, and since the entire Rest API is protected by auth tokens, we have to specifically indicate that the previous resource can be accessed without the need for this token to be present in the request we are sending; therefore, we use the `permission_classes` decorator with the value of `AllowAny` so that it is publicly accessible; otherwise, it is a simple credential check like the one we did previously to check the credentials; otherwise, we have the generation of the authentication token, to which we have to pass the user for whom we want to create or search, in case it exists, the token.
The function really explains itself, we have the parameters we receive via a post request, in this case we use the same users that Django uses internally throughout the application. Therefore, the custom login process uses the `check_password` function that Django provides for this purpose; now, from Postman we can consume the previous function.
Testing authentication in Postman
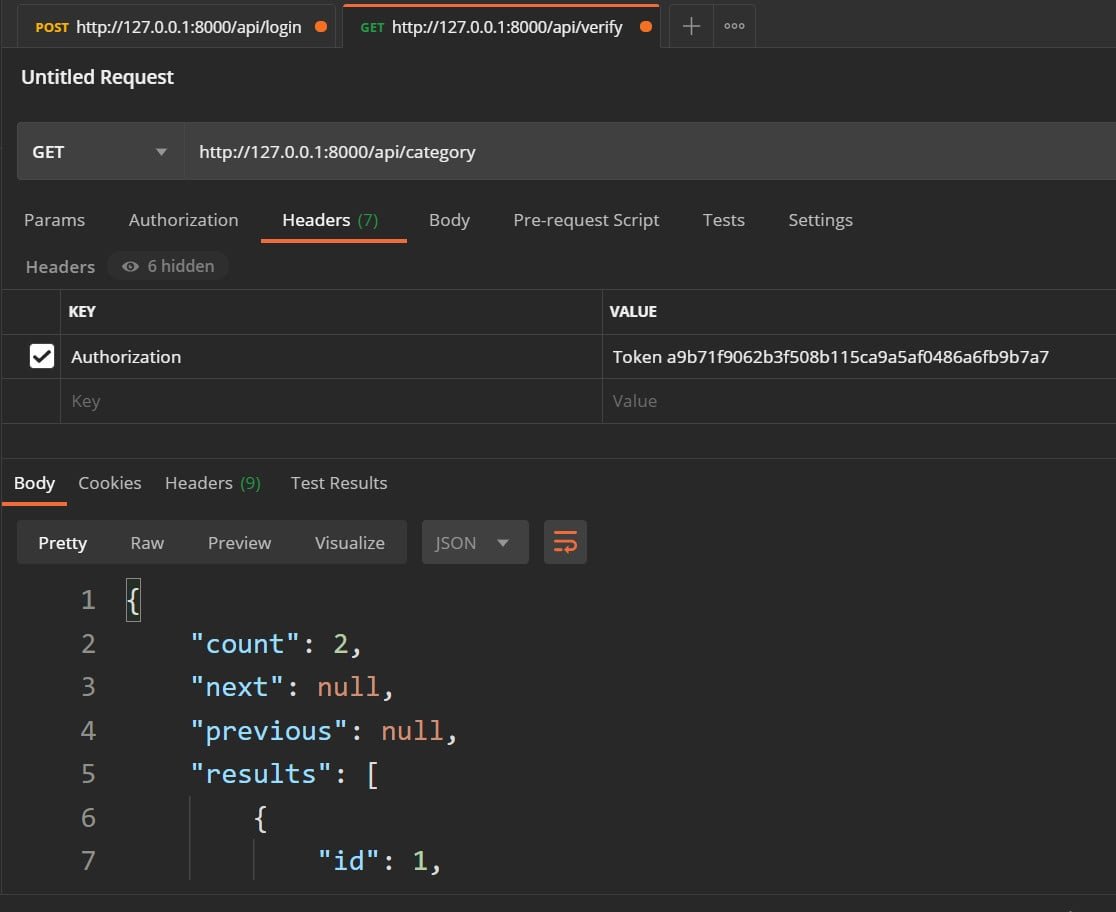
By sending a POST request to /login, you will receive a token. Then, use that token in the headers (`Authorization: Token
When I tested this flow for the first time, I was surprised how simple it is to protect an entire API with DRF: all you need is to configure a couple of classes in the settings.py and adjust the permissions.
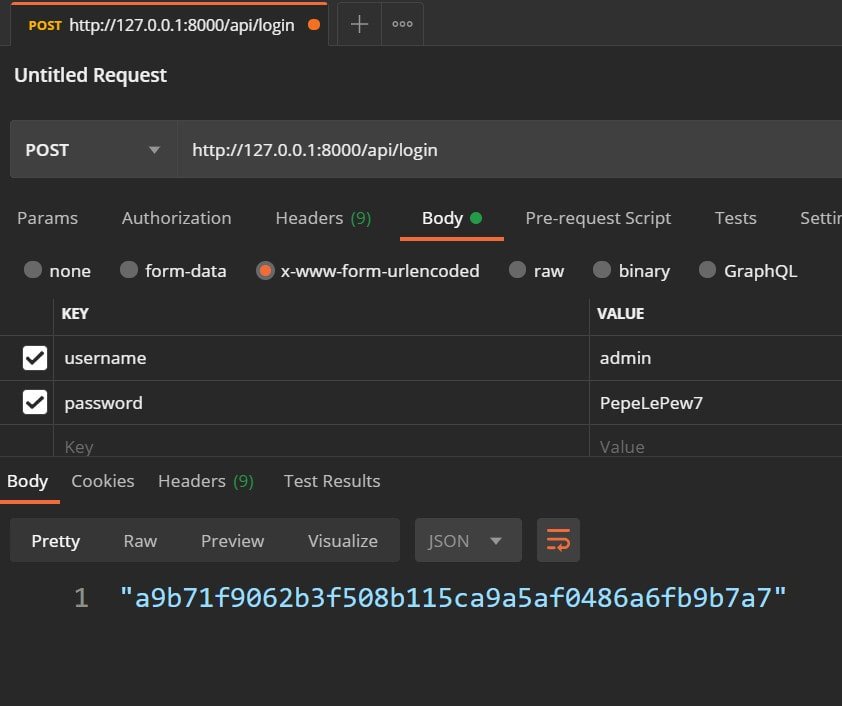
And if the login goes well, we create (in case it doesn't exist) and return the authentication token that our user has to use to make requests.
Then we create the route for this function:
urlpatterns = route.urls
urlpatterns += path('login',views.login),
And now, when we want to make a request, we have to send the token; for example, using Postman:
Protection of ModelViewSet
We can add the following configuration to our class (in case you want to make it local to a class, you can avoid the `DEFAULT_PERMISSION_CLASSES` configuration); one of the properties that any Rest class has is the following:
from rest_framework import viewsets
from rest_framework.permissions import IsAuthenticated
from .models import Category
from .serializers import CategorySerializer
class CategoryViewSet(viewsets.ModelViewSet):
    queryset = Category.objects.all()
    serializer_class = CategorySerializer
    permission_classes = [IsAuthenticated]  #  Only auth user
It is necessary to be authenticated `DEFAULT_PERMISSION_CLASSES` and the next is that we are going to use the token system as the backend; now, we also have to indicate that we are going to use the tokens application.
This is useful if we are NOT using Django's migration system, in cases - for example - where we are using MongoDB with Django, which at least for handling the tables/collections created by us, it should not be necessary to apply the migrations.
This means that all requests to /categories/ require authentication, that is:
If the user is not authenticated, they will receive:
{
   "detail": "Authentication credentials were not provided."
}
With HTTP code 401 Unauthorized.
If the user IS authenticated, they will be able to access and use the endpoint normally.
Next step, learn how to use Websockets in Django using Django Channels, wsgi and asgi servers