
Wanting to rename a project's package in Android Studio is more common than it seems. The reasons can vary: from a simple application name change —where the package name includes the app name— to a complete restructure before taking it to production or publishing it on the Google Play Store. Whatever the case, doing it incorrectly can make the project completely unusable.
The good news is that the process is much simpler than it appears, as long as you follow the steps in the correct order. Below I explain the two approaches depending on the project type: the modern one with Jetpack Compose and the traditional one based on XML and Views.
Modern Approach: Jetpack Compose, Namespace, and Application ID
Starting with recent versions of the Android Gradle Plugin (AGP), Android Studio separated two concepts that previously coexisted under the same package name:
namespace: defines the internal package where resource classes likeR.javaandBuildConfigare generated. It is the identifier for your resources within the code.applicationId: is the unique identifier for your application on the Google Play Store and on the device. It is what the operating system and the store use to distinguish your app from any other.
This has a huge advantage: it is no longer required for the project's physical folder structure to match the applicationId. Although it remains a good practice to keep them aligned to avoid confusion, the separation gives you much more flexibility when renaming.
To change the package name in a Compose project, simply update these two fields in the module-level build.gradle.kts file (the one in the app/ directory):
android {
    // The namespace controls where your R files and internal linking are generated
    namespace = "net.desarrollolibre.composeapp"

    defaultConfig {
        // The applicationId is what the user and the Play Store see
        applicationId = "net.desarrollolibre.composeapp"
        versionCode = 1
        versionName = "1.0"
    }
}
If the namespace changed compared to the previous value, you will need to update all imports of your R class in the Kotlin files that reference resources manually (for example, R.string.app_name or R.drawable.ic_launcher). Android Studio detects these conflicts automatically and offers a quick fix with Alt + Enter to resolve them across the entire project at once, without needing to do it file by file.
Finally, it is essential to run a Clean Project and then a Rebuild Project from the Build menu. This removes any trace of the previous name that might have remained in the compiler cache and prevents unexpected build errors.
Legacy Approach: Projects Based on XML and Views
Renaming the package in Android Studio (Dolphin and higher versions)
In older projects using the traditional Views and XML system, the package name is closely tied to the project's folder structure. For this reason, the process requires a couple of extra steps. The first is to disable an option in the project panel that, by default, hides the actual package structure.
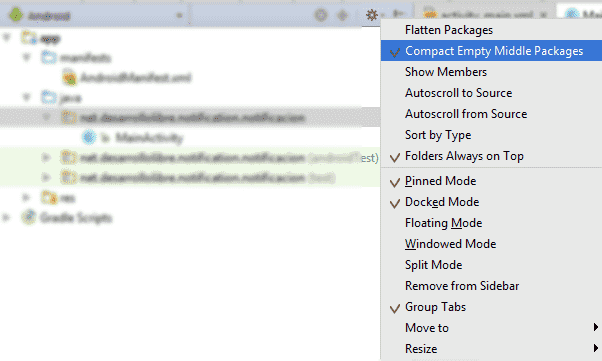
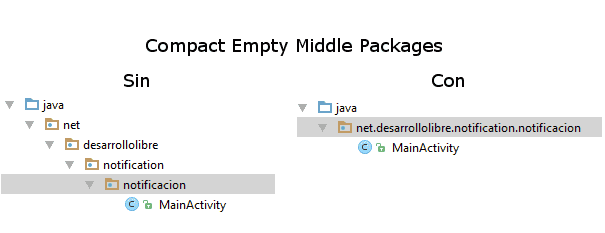
Go to the Project panel, right-click on the gear icon (⚙), and uncheck the Compact Middle Packages option (in earlier versions of Android Studio this option was called Compact Empty Middle Packages). This option, when active, visually collapses empty intermediate packages into a single node, which prevents renaming them individually:
Once the option is disabled, the folder structure expands, and you will be able to see each segment of the package separately. If your package name consists of several segments (for example, com.example.miapp), you must rename each folder individually: right-click on the folder of the segment you want to change, select Refactor, and then Rename.
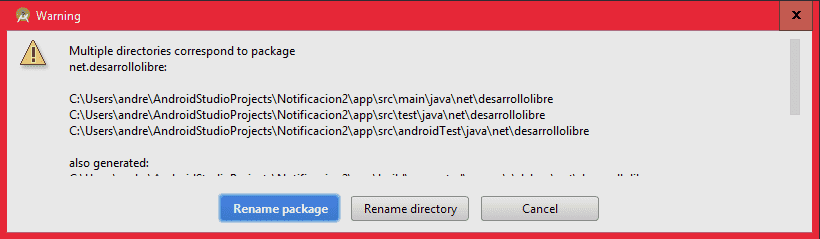
In the dialog that appears, Android Studio will ask you what you want to rename. It is critical that you choose the Rename package option and not just the directory. By doing so, the IDE automatically updates all references in the AndroidManifest.xml, the package declarations at the beginning of each .java or .kt file, and any other internal reference. When the analysis is ready, press the Do Refactor button to apply all changes:
With the refactor completed, the last step is to manually update the applicationId in the module-level build.gradle.kts (or build.gradle) file. This value is not updated automatically with the refactor, so it is essential to change it so that the app identifier remains completely synchronized:
// build.gradle.kts
android {
    defaultConfig {
        applicationId = "net.desarrollolibre.nueva.app"
        // ...
    }
}
Just like with the modern approach, always finish with a Clean Project and a Rebuild Project to ensure that the build starts from scratch with the new name. If after rebuilding you still see errors related to the previous package, try invalidating the caches from File → Invalidate Caches / Restart…