As has been discussed in previous posts such as Means to undertake: freelance websites and electronic wallets, Paypal is an electronic wallet widely used today, very safe and that can be integrated into various development platforms as we saw previously Creating a payment platform with PayPal and CodeIgniter (part 1) and it is almost the favorite e-wallet par excellence.

As it could not be missing, PayPal has an SDK for Android from which we can carry out many operations, but for this post we are interested in...
Create the sale of a simple product, process it via PayPal and notify the user.
This simple integration and use allows us to use a whole system as robust as PayPal to process something as delicate as payments and integrate them into our applications; As we will see, payments via
- PayPal for this platform are of two types:
- Based on the balance you have in PayPal.
- Based on the credit card configured in PayPal.
Development accounts for PayPal
As previously mentioned, there are some accounts for developers called Sandbox, which are the ones used to develop since they handle fictitious amounts but can be treated as if it were a genuine PayPal account; It has already been discussed how we can obtain one of these accounts in the previous link, therefore its explanation will be ignored.
Development accounts for PayPal
Once we have our account, the first thing we must do is create our accounts:
- Personal Account: For those who buy.
- Business Account: For those who sell on the Internet.
Through the following link: PayPal Developer; the Business Account account is the one we use to receive payments, and the Personal Account account is the one we use to buy in the Android App that we are going to create.
Creating our application in PayPal
Like almost all platforms, we have to create an App in PayPal associated with our developer/Sandbox account, obtain the client_id and associate it with the future Android application; For that we click on "My Apps & Credentials":

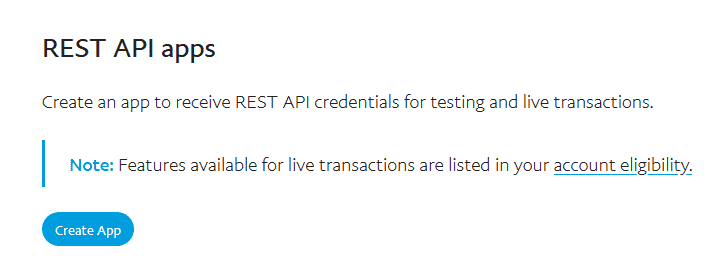
Then click on the "Create App" button:

We fill in the information requested and create our application on the PayPal platform.
Creating our application on Android
Finally, once we have almost everything in order, we can start creating our application in Android, as it has been done in previous posts, we use Android Studio instead of the old Eclipse with the ADT; We associate the PayPal SDK dependency in our gradle file:
compile 'com.paypal.sdk:paypal-android-sdk:2.14.4'You can get more information at the link above.
(optional) Generating the layout
Now we create our layout promoting a simple product; it will look as follows:

<LinearLayout xmlns:android="http://schemas.android.com/apk/res/android"
    android:layout_width="fill_parent"
    android:layout_height="fill_parent"
    android:orientation="vertical">

    <LinearLayout
        android:layout_width="match_parent"
        android:layout_height="match_parent"
        android:orientation="vertical">

        <LinearLayout
            android:layout_width="match_parent"
            android:layout_height="wrap_content"
            android:layout_weight="1"
            android:gravity="center"
            android:orientation="vertical">

            <ImageView
                android:id="@+id/imageView1"
                android:layout_width="wrap_content"
                android:layout_height="wrap_content"
                android:layout_gravity="center"
                android:src="@drawable/batman_superman" />
        </LinearLayout>

        <LinearLayout
            android:layout_width="match_parent"
            android:layout_height="wrap_content"
            android:gravity="center"
            android:orientation="vertical">

            <TextView
                android:id="@+id/textView1"
                android:layout_width="wrap_content"
                android:layout_height="wrap_content"
                android:layout_weight="1"
                android:text="50 $"
                android:textAppearance="?android:attr/textAppearanceSmall" />

            <Button
                android:id="@+id/order"
                android:layout_width="wrap_content"
                android:layout_height="wrap_content"
                android:layout_weight="1"
                android:text="Procesar orden" />
        </LinearLayout>
    </LinearLayout>
</LinearLayout>
Obviously, to use the PayPal API we don't need a layout and only the source code generated in our activity, but to give the situation a bit of realism, a simple layout like the one above was created.
Generating the code in the activity
Making a payment in PayPal consists of several steps as we will see below:
- Creating the environment to process payments
- Creating the payment
- Getting the result
Creating the environment to process payments
Do you remember the client_id generated earlier? now is the time to use it in a global variable:
private static final String CONFIG_CLIENT_ID = "...";We also need a minimum configuration about the company or entity behind the product, such as legal use, privacy, and the name of the entity or store:
            .environment(CONFIG_ENVIRONMENT)
            .clientId(CONFIG_CLIENT_ID)
            // The following are only used in PayPalFuturePaymentActivity.
            .merchantName("Mi tienda")
            .merchantPrivacyPolicyUri(
                    Uri.parse("https://www.mi_tienda.com/privacy"))
            .merchantUserAgreementUri(
                    Uri.parse("https://www.mi_tienda.com/legal"));
Creating the payment
As with any third-party API or application, Intents are used to create the payment:
        Intent intent = new Intent(this, PayPalService.class);
        intent.putExtra(PayPalService.EXTRA_PAYPAL_CONFIGURATION, config);
        startService(intent);
        findViewById(R.id.order).setOnClickListener(new OnClickListener() {

            @Override
            public void onClick(View v) {
                thingToBuy = new PayPalPayment(new BigDecimal("10"), "USD",
                        "HeadSet", PayPalPayment.PAYMENT_INTENT_SALE);
                Intent intent = new Intent(MainActivity.this,
                        PaymentActivity.class);

                intent.putExtra(PaymentActivity.EXTRA_PAYMENT, thingToBuy);

                startActivityForResult(intent, REQUEST_CODE_PAYMENT);
            }
        });
Getting the result
Within the onActivityResult method we define all the logic of the response obtained from the PayPal operation that can be easily validated through the codes that PayPal sends; as you can see, there are basically two situations, that the operation was processed or the operation was not processed:
protected void onActivityResult(int requestCode, int resultCode, Intent data) {}First we validate if everything was OK, which in other words means that the payment was made:
if (resultCode == Activity.RESULT_OK) {
// TODO
}
Or if the user canceled the payment:
if (resultCode == Activity.RESULT_CANCELED) {}And this is the main thing you need to know :) quite easy no.
This is the complete code of the application:
import java.math.BigDecimal;

import org.json.JSONException;

import android.app.Activity;
import android.content.Intent;
import android.net.Uri;
import android.os.Bundle;
import android.view.View;
import android.view.View.OnClickListener;
import android.widget.TextView;
import android.widget.Toast;

import com.paypal.android.sdk.payments.PayPalConfiguration;
import com.paypal.android.sdk.payments.PayPalPayment;
import com.paypal.android.sdk.payments.PayPalService;
import com.paypal.android.sdk.payments.PaymentActivity;
import com.paypal.android.sdk.payments.PaymentConfirmation;

public class MainActivity extends Activity {


   private static final String CONFIG_ENVIRONMENT = PayPalConfiguration.ENVIRONMENT_SANDBOX;

   private static final String CONFIG_CLIENT_ID = "AWfB5He94tzPXwWqSlgWPEFW9ssWRK858J9G9tnE8Bc_VFXVMXiyrN-i1_CpGME_T6iVstME5X2rNCs3";
   private static final int REQUEST_CODE_PAYMENT = 1;

   private static PayPalConfiguration config = new PayPalConfiguration()
           .environment(CONFIG_ENVIRONMENT)
           .clientId(CONFIG_CLIENT_ID)

           // configuracion minima del ente
           .merchantName("Mi tienda")
           .merchantPrivacyPolicyUri(
                   Uri.parse("https://www.mi_tienda.com/privacy"))
           .merchantUserAgreementUri(
                   Uri.parse("https://www.mi_tienda.com/legal"));

   PayPalPayment thingToBuy;

   @Override
   protected void onCreate(Bundle savedInstanceState) {
       super.onCreate(savedInstanceState);
       setContentView(R.layout.activity_main);

       Intent intent = new Intent(this, PayPalService.class);
       intent.putExtra(PayPalService.EXTRA_PAYPAL_CONFIGURATION, config);
       startService(intent);
       findViewById(R.id.order).setOnClickListener(new OnClickListener() {

           @Override
           public void onClick(View v) {
               thingToBuy = new PayPalPayment(new BigDecimal("50"), "USD",
                       "pelicula", PayPalPayment.PAYMENT_INTENT_SALE);
               Intent intent = new Intent(MainActivity.this,
                       PaymentActivity.class);

               intent.putExtra(PaymentActivity.EXTRA_PAYMENT, thingToBuy);

               startActivityForResult(intent, REQUEST_CODE_PAYMENT);
           }
       });

   }

   @Override
   protected void onActivityResult(int requestCode, int resultCode, Intent data) {

       if (resultCode == Activity.RESULT_OK) {
           PaymentConfirmation confirm = data
                   .getParcelableExtra(PaymentActivity.EXTRA_RESULT_CONFIRMATION);
           if (confirm != NULL) {
               try {

                   // informacion extra del pedido
                   System.out.println(confirm.toJSONObject().toString(4));
                   System.out.println(confirm.getPayment().toJSONObject()
                           .toString(4));

                   Toast.makeText(getApplicationContext(), "Orden procesada",
                           Toast.LENGTH_LONG).show();

               } catch (JSONException e) {
                   e.printStackTrace();
               }
           }
       } else if (resultCode == Activity.RESULT_CANCELED) {
           System.out.println("El usuario canceló el pago");
       }
   }

   @Override
   public void onDestroy() {
       super.onDestroy();
   }
}
This is the final result of the application in a simple animation:

You can see this example and others in the PayPal Docs at the following link: Future Payments Mobile Integration.
I agree to receive announcements of interest about this Blog.
This post explains how to integrate the official PayPal SDK in Android, make a payment and notify the user using Sandbox accounts.
