")
In this second installment we will create our first functional application that uses Augmented Reality and Image Recognition as key technologies in the development of the application; this entry is the continuation of Developing Augmented Reality Applications with Wikitude (part 1) where we explain how to integrate the Wikitude API with an Android project.
Image Recognition through Wikitude
In this first part we will explain how we can recognize several images using the Image Recognition that Wikitude SDK offers us; but first let's see a series of basic concepts:
- Target: It is nothing more than the destination image that will be used by the Tracker to recognize an image.
- Target collection: It is a special file that stores within itself a collection of Targets to be recognized by the Tracker.
- Tracker: Analyzes the camera image and detects the Targets stored in the Target collection.
Creating the Wikitude Target collection
In the last article we explained how to create a Target collection to be able to use it in our project.
Referencing Wikitude's Target collection
After we have created our Target collection, the next step will be to save it within our android project, although it can also be hosted within a server and be referenced via HTTP as we explained in the following post:
<OurProject>/assets/base/assets/<targetcollection.wtc>In our example we will use the following image in the Target collection:

Writing our ARchitect World (JavaScript)
var World = {
	loaded: false,

	init: function initFn() {
		this.createOverlays();
	},

	createOverlays: function createOverlaysFn() {

		// inicializamos el Tracker con el Target collection
		this.tracker = new AR.Tracker("assets/targetcollection.wtc", {
			onLoaded: this.worldLoaded
		});

		// creamos un overlay
		var javaDeitel = new AR.ImageResource("assets/javaDeitel.jpg");
		var overlay = new AR.ImageDrawable(javaDeitel, 0.2, {
			offsetX: -0.15,
			offsetY: 0
		});

 // indicamos el nombre del Target en el Tracker
		var javaLibro = new AR.Trackable2DObject(this.tracker, "javaLibro", {
			drawables: {
				cam: overlay
			}
		});
	}
};

// principal
World.init();
First we create the Tracker by calling the AR.Tracker method passing as a parameter the Target collection that we created in the previous step.
The next thing will be to indicate the image that it will show when the Tracker recognizes the Target in question; by calling the AR.ImageResource method.
The image to display is:

Finally we combine the two previous steps creating the Trackable object by calling the Trackable2DObject method, the parameters they receive are:
- The Tracker.
- The name of the Target in the Tracker.
- Other options.
Adding the ARchitectView (native code) to our project:
We must notify the ArchitectView about the life cycle in our activity; for that we can do something like the following:
ArchitectView architectView;

	@Override
	protected void onCreate(Bundle savedInstanceState) {
		super.onCreate(savedInstanceState);
		setContentView(R.layout.activity_main);

		// la ruta del architectView en nuestro XML
		this.architectView = (ArchitectView) this
				.findViewById(R.id.architectView);
		final ArchitectConfig config = new ArchitectConfig("" /* license key */);
		this.architectView.onCreate(config);


	}

	/*
	 * Ciclo de vida en nuestra actividad
	 */

	@Override
	protected void onResume() {
		super.onResume();
		if ( this.architectView != NULL ) {
			this.architectView.onResume();
		}

	}

	@Override
	protected void onPause() {
		super.onPause();
		if ( this.architectView != NULL ) {
			this.architectView.onPause();
		}
	}

	@Override
	protected void onStop() {
		super.onStop();
	}

	@Override
	protected void onDestroy() {
		super.onDestroy();
		if ( this.architectView != NULL ) {
			this.architectView.onDestroy();
		}
	}

	@Override
	public void onLowMemory() {
		super.onLowMemory();
		if ( this.architectView != NULL ) {
			this.architectView.onLowMemory();
		}
	}


	@Override
	protected void onPostCreate( final Bundle savedInstanceState ) {
		super.onPostCreate( savedInstanceState );

		// IMPORTANTE cargamos el ARchitect worlds (codigo web: HTML CSS javaScript)
		this.architectView.onPostCreate();
		try {
			this.architectView.load("base/index.html");
			this.architectView.onResume();
		} catch (IOException e) {

			// TODO Auto-generated catch block
			e.printStackTrace();
		}

	}

	@Override
	public boolean onCreateOptionsMenu(Menu menu) {
		// Inflate the menu; this adds items to the action bar if it is present.
		getMenuInflater().inflate(R.menu.main, menu);
		return true;
	}
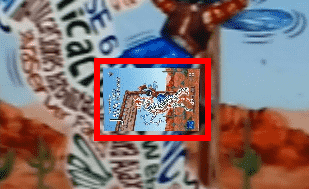
Running the application based on Augmented Reality and Image Recognition
Now we will run our example on some supported device; after we "roll the camera" over the following image (or the book cover if you have it):
We will see something like the following.

What happened?
It has simply recognized the image and "done something", in this case displaying an overlay; for this entry the overlay is nothing more than an image of the title page of the recognized book:
You can find the complete application in our github repository Android/WikitudePartTwo or by clicking here.
I agree to receive announcements of interest about this Blog.
In this second installment we will make a functional application using augmented reality and image recognition using the Wikitude API.