Testing is a crucial part of any application we are going to create, regardless of the technology, it is always advisable to perform automatic tests to test the system when new changes are implemented; in this way we save a lot of time since there is no need to perform many of the tests manually but by executing a simple command.
Unit testing consists of testing components individually; in the case of the application we have built, they would be each of the API methods, as well as any other dependency on these methods; this way, when these automated tests are run, if the application passes all the tests, it means that no errors were found, but, if it does not pass the tests, it means that changes have to be made at the application level or unit tests implemented.
Once we have our ENTIRE application ready, from the Hello World we started in this guide to the creation of the REST and the enabling of CORS in Flask, the next step is to test the app.
Why test?
Content Index
Testing helps ensure that your application will function as expected, and as the application grows in modules and complexity, new tests can be implemented and current tests adapted.
It is important to mention that the tests are not perfect, that is, even if the application passes all the tests it does not mean that the application is error-free, but it is a good initial indicator of the quality of the software. Additionally, testable code is generally a sign of good software architecture.
Testing must be part of the application development cycle to guarantee its proper functioning by running them constantly.
What to test?
Unit testing should focus on testing small units of code in isolation or individually.
For example, in a Flask application or a web application in general:
- Controllers:
- View Responses
- State codes
- Nominal conditions (GET, POST, etc.) for a view function
- Forms
- Individual help functions
pytest, for unit testing
To perform the unit tests, we will use the pytest library, which is a library for performing unit tests for Python (and not exclusive to Flask).
https://flask.palletsprojects.com/en/latest/testing/
Let's install pytest in our project using:
$ pip install pytestCreating the first unit tests
As a good practice, we will create a folder called tests to perform the unit tests, which is also the default location that pytest will use to search for the unit tests; also, we create a file to perform the first tests whose names usually contain the test_ prefix to indicate that it is a unit test:
my_app\tests\test_math_operations.py
In which, we create some functions with which to solve the mathematical operations:
my_app\tests\test_math_operations.py
def add(a: int , b: int) -> int:
    return a + b
def subtract(a: int, b: int) -> int:
    return b - a
def multiply(a: int, b: int) -> int:
    return a * b
def divide(a: int, b: int) -> int:
    return b / a
At the moment, they are not tests intended for application, but rather basic mathematical operations, but with them we will be able to better understand how unit tests work; now, in the previous file, we define the following functions, which correspond to the unit tests:
my_app\tests\test_math_operations.py
***
# test
def test_add() -> None:
    assert add(1,2) == 3
def test_subtract() -> None:
    assert subtract(5,2) == -3
def test_multiply() -> None:
    assert multiply(10,10) == 100
def test_divide() -> None:
    assert divide(25,100) == 4
As you can see, they are only Python functions, but, using the assert keyword that is used to verify the outputs; specifically, we will be testing that the arithmetic operations are equal to the expected values, that is, if for the addition operation, we add 1+1, the expected result is 2.
Finally, to test the previous tests we run:
pytest my_app\tests\test_math_operations.py
You can also simply run:
$ pytestOr run a particular function:
$ pytest .\my_app\tests\test_task.py::<FUNCTION>For example:
$ pytest .\my_app\tests\test_task.py::test_addTo run all the unit tests, which in this case corresponds to only one file; in any of the cases we will have an output like the following:
========================================= test session starts =========================================
platform darwin -- Python 3.11.2, pytest-7.4.0, pluggy-1.2.0
rootdir: ***
plugins: anyio-3.7.1
collected 4 items

tests/test_math_operations.py ....                                                              [100%]

========================================== 4 passed in 0.01s ==========================================
In which, as you can see, all operations were executed satisfactorily, therefore, the application passed the tests; one factor that you must take into account is that, although the application passes the tests, it does not guarantee that it does not have errors, simply that not enough tests were done or defined to test all possible scenarios; even so, it is a good meter to know the status of the application and repair possible problems.
If, for example, we place an invalid output when doing the unit tests:
def test_add() -> None:
    assert add(1, 2) == 4
We will see an output like the following:
============================================================================= FAILURES ==============================================================================
_____________________________________________________________________________ test_add ______________________________________________________________________________

    def test_add() -> None:
>       assert add(1, 2) == 4
E       assert 3 == 4
E        +  where 3 = add(1, 2)

tests/test_math_operations.py:17: AssertionError
====================================================================== short test summary info ======================================================================
FAILED tests/test_math_operations.py::test_add - assert 3 == 4
==================================================================== 1 failed, 3 passed in 0.02s ====================================================================
En la cual te indica claramente que ocurrió un error y que corresponde a la operación de suma:
FAILED tests/test_math_operations.py::test_add - assert 3 == 4
If, on the other hand, the error is at the application level, for example, in the addition function, instead of adding a+b, we add a+a:
def add(a: int , b: int) -> int:
    return a + a
We will have as output:
FAILED tests/test_math_operations.py::test_add - assert 2 == 4
But, if the output function were like the following:
def test_add() -> None:
    assert add(1, 1) == 2
We will see that the unit test is accepted, although we clearly have problems at the application level; therefore, it is not a sufficient condition that the application passes the tests to indicate that it has no problems, simply not enough tests were created or the tests were not implemented correctly.
conftest.py, generate a client for testing
We must create a file called conftest.py that will be responsible for creating an instance of the application, which is required by the test files that are going to connect to our API:
tests\conftest.py
Let's start by defining the loop session fixture:
my_app\tests\conftest.py
import pytest
from my_app import app as flask_app

@pytest.fixture
def app():
    yield flask_app

@pytest.fixture
def client(app):
    return app.test_client()
This file will initialize our Flask application and all the devices it needs and we can make any customization to the client/app that we need, such as going into testing mode, changing the database, etc. We will see this in more detail a little later.
Now, Pytest will discover all your test files, let's create some test files with test_ prefix in the same directory. In this case, we will test that the route responds with the expected hello world dict.
In the previous code, they use yields to return the value (client) and it stays alive until the unit test finishes executing; it is exactly the same scenario when we injected the database as arguments to the API methods and a connection was created for each user request and this request was automatically closed when sending the response to the client; this structure is useful in case you need to do some additional processing after the yield is released:
@pytest.fixture
def app():
    yield flask_app
    // TO DO Release resource, clean BD...
When executing the unit tests that use the client that we configured before, the terminal will probably throw an error like:
my_app/tests/conftest.py:3: in <module>
    from my_app import app as flask_app
E   ModuleNotFoundError: No module named 'my_app'
To solve this, convert the tests folder into a module including the __init__.py file:
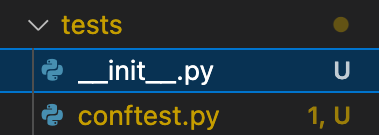
Figura 11-1: Módulo de pruebas unitarias
Unit tests for Hello World
We already know how unit tests work, we made the first contact using the mathematical operations presented before and created the configuration file necessary for Pytest to create a client for our application, specifically the variable called app, which as we know is the one that maintains all the application, such as connection to extensions, database, packages such as Login Manager, Blueprint, etc.
For this first test, we define a hello world return in JSON as:
my_app\__init__.py
@app.route('/')
@app.route('/hello')
def hello_world():
    name = request.args.get('name', 'DesarrolloLibre')
    return {'hello': 'world'}
With this example, we will be able to understand in a simpler way the implementation of a simple unit test without going into details of other elements such as evaluating a complete web page, evaluating the database, etc. This example serves as another "Hello World" but with a more realistic approach.
The unit test looks like:
my_app\tests\test_index.py
import json
def test_index(app, client):
    response = client.get('/')
    assert response.status_code == 200
    expected = {'hello': 'world'}
    assert expected == json.loads(response.get_data(as_text=True))
With:
response.get_data(as_text=False)Returns the response in bytes.
With:
response.get_data(as_text=True)Returns the response in a string.
You can get the complete documentation on the answers at:
https://tedboy.github.io/flask/generated/generated/flask.Response.html
Next step, learn how to deploy your app on Railway.