
Content Index
In most scenarios we will want to at least protect parts of the API; whether you're using a templating engine like Jinja or not, you'll almost always need to protect your API methods; for this, the most basic way is to use an authentication system, either based on session or authentication tokens; with these mechanisms, the user is granted rights so that he can access the private methods of the API and we can know at all times (done this implementation) when the user manipulates the data and at what level.
In this section we will see some authentication methods that are directly integrated into the automatic documentation and other custom schemes that consist of a username and password, integrating with the database and the generation of authentication or access tokens.
Basic authentication
The most basic authentication scheme that can be considered is where the user's credentials are managed based on a token established in the request header, specifically in the header called Authorization to be later consulted and evaluated by the request application:
api.py
from fastapi.security import APIKeyHeader
from fastapi import Depends, FastAPI, HTTPException, status

API_KEY_TOKEN = "SECRET_PASSWORD"

api_key_header = APIKeyHeader(name="Token")
@app.get("/protected-route")
async def protected_route(token: str = Depends(api_key_header)):
    if token != API_KEY_TOKEN:
        raise HTTPException(status_code=status.HTTP_403_FORBIDDEN)
    return {"hello": "FASTAPI"}
Tests in the Interactive Documentation (Swagger UI)
In the example above, a generic token is set using API_KEY_TOKEN and it is checked if the token supplied in the request header is equal to the token; the APIKeyHeader class (which returns a 403 error when the token is not supplied) is used to retrieve a header value (in the above example the variable called token). Finally, it is established as one more dependency of the request.
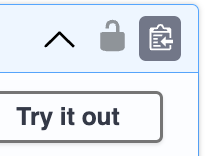
If we go to the documentation, in the method created previously, we will see a lock, which indicates that it is protected:
If we make the request without authenticating ourselves, we will see a 403 error (the one established above):
Code Details
403
Undocumented
Error: Forbidden
Response body
Download
{
"detail": "Not authenticated"
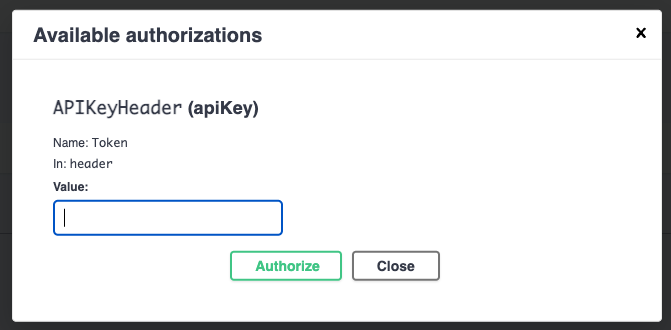
}If we click on the lock and set the token correctly (a valid token):
The request will be successfully processed with a status code of type 200.
The problem with this approach is that we can only protect one route; we can create a function that performs the above check:
from fastapi.security import APIKeyHeader
from fastapi import Depends, FastAPI, HTTPException, status

API_KEY_TOKEN = "SECRET_PASSWORD"

async def authenticate(token: str = Depends(APIKeyHeader(name="Token"))):
    if token != API_KEY_TOKEN:
        raise HTTPException(status_code=status.HTTP_403_FORBIDDEN)
    return token
And it is injected into each of the API methods in which we require the user to be authenticated; for example:
@app.get("/page/")
def page(db: Session = Depends(get_database_session), dependencies=Depends(authenticate)):
    print(getAll(db))
    #create_user(db)
    print(dependencies)
    return {"page": 1}
These examples offer a very basic authentication scheme where the received token is verified against a constant; authenticated users are not handled and there is no way to know which user is making the request.
Summary
When you reload the documentation, you will notice something interesting; a lock icon appears next to the route. Swagger automatically detects that this method requires authentication.
- Request without token: If we try to execute the request without being "logged in", FastAPI will return a 403 Forbidden error.
- Invalid token: If we click on the lock and enter an incorrect value (for example, "hello"), the system will maintain the block and continue to return the 403 error.
- Correct token: By entering exactly the value SecretPassword, the window will close indicating that we are authorized. When executing again, we will receive a 200 OK response.
Usage
This is a minimal, but very powerful example. Imagine you sell a service: the user makes a purchase, you generate a unique token, save it in the database and deliver it. Instead of comparing against a fixed text, you would simply validate the token against your database.
Thanks to the power of FastAPI's dependencies, we can protect any method of our API in an extremely clean way. Later, we will use this scheme to implement a real system with user management, hash passwords and advanced protected methods.
️ Database authentication
The previous authentication can be used to define simple schemes, but, in most cases, it is necessary to handle more complete schemes, in which we will have multiple users with the already known username/password combination to be able to enter the application, for these cases, we can use the following scheme.
Installing bcrypt for Security Management
For this development, we will need to install a package to the project with which we can convert plain texts into hash, specifically we will use it to generate a hash of the user's password:
$ pip install bcryptData Models and Entities
Next, we will modify the user model to specify the password column (in hash format) and create a relational entity to the user with which we will manage the access tokens:
database\models.py
class User(Base):
    ***
    hashed_password = Column(String(255))

class AccessToken(Base):
    __tablename__ = 'access_tokens'
    user_id = Column(Integer, ForeignKey('users.id'), primary_key=True)
    access_token = Column(String(255))
    expiration_date = Column(DateTime(timezone=True))
    user = relationship('User',lazy="joined")
With each of the columns of the previous relationship, we have:
- user_id allows handling the foreign relationship with the users, it is important to note the primary key for this column, which means that there can only be one access token per user.
- access_token maintains the access token of the authenticated user.
- expiration_date specifies the duration of the token.
Remember to delete all the tables from the database to create the new relationship and see the change reflected in the user model.
Next, we will modify the users model to specify the password column (in hash format) and create a relational entity to the user with which we will manage the access tokens:
database\models.py
class User(Base):
    ***
    hashed_password = Column(String(255))

class AccessToken(Base):
    __tablename__ = 'access_tokens'
    user_id = Column(Integer, ForeignKey('users.id'), primary_key=True)
    access_token = Column(String(255))
    expiration_date = Column(DateTime(timezone=True))
    user = relationship('User',lazy="joined")
With each of the columns of the previous relation, we have:
- user_id allows you to handle the foreign relationship with users. It is important to note the primary key for this column, which means that there can only be one access token per user.
- access_token holds the access token of the authenticated user.
- expiration_date specifies the lifetime of the token.
Remember to delete all the tables in the database to create the new relationship and see the change reflected in the user model.
We create a schema of the new entity and modify the user entity to indicate the password field:
schemas.py
class User(BaseModel):
    name: str = Field(min_length=5)
    surname: str
    email: EmailStr
    website: str #HttpUrl
    class Config:
        from_attributes = True

class UserCreate(User):
    password: str

class UserDB(User):
    hashed_password: str

class AccessToken(BaseModel):
    user_id: int
    access_token: str
    expiration_date: datetime
    class Config:
        from_attributes = True
For the user, if a user is going to be created, then the password is in plain text, since it is introduced by the user (UserCreate.password), but, when it comes to the user obtained from the database, the password is in hash format (UserDB.hashed_password).
Database Schema
Subsequently, we create UserDB. This schema is directly related to persistence in the database.
- hashed_password: Here the field name changes to reflect that what we store is the hash of the password and not the plain text, for security reasons.
Schema for the Access Token
Now we will define the AccessToken class. This class will inherit from BaseModel and will contain the necessary configuration to manage the sessions:
- user_id: Of integer type, to link the token with the user.
- access_token: Of text type, which will contain the token string.
- expiration_date: Of datetime type, to control the expiration date.
Helper Files
We are going to create the file to handle passwords and token generation. To avoid saturating the future user routes file (where the login, registration, etc. will go), we will separate this logic.
In the root of the project, we will create a folder called authentication. I have decided to use a folder because later we will add other files in this same location. Inside it, we create the password.py file:
authentication\password.py
import bcrypt
import secrets

def get_password_hash(password: str) -> str:
    # Convertimos la contraseña a bytes
    pwd_bytes = password.encode('utf-8')
    # Generamos el salt y el hash
    salt = bcrypt.gensalt()
    hashed_password = bcrypt.hashpw(pwd_bytes, salt)
    # Retornamos como string para guardar en la BD
    return hashed_password.decode('utf-8')

def verify_password(plain_password: str, hashed_password: str) -> bool:
    password_byte_enc = plain_password.encode('utf-8')
    hashed_password_enc = hashed_password.encode('utf-8')
    return bcrypt.checkpw(password_byte_enc, hashed_password_enc)

def generate_token() -> str:
    return secrets.token_urlsafe(32)
Explanation of the previous functions
- With schemes=["bcrypt"] the encryption algorithm to be used is specified.
- With the get_password_hash() function, it allows creating a hash of the password in plain text; this function will be used later when registering a user.
- With the verify_password() function, it allows verifying a password; the main characteristic of hashes is that they cannot be reversed to plain text once converted, therefore, there is a function to compare if a hash corresponds to a plain text, in this case, the plain text corresponds to the password in plain text; this function will be used later to perform the login.
- With the generate_token() function, it allows generating a token using the Python function token_urlsafe() which allows generating secure tokens of 32 bytes.
To carry out the user authentication process and generate the access token, we will use a new file:
authentication\authentication.py
from sqlalchemy.orm import Session
from datetime import datetime, timedelta

# from time
from database.models import User, AccessToken
from authentication.password import verify_password, generate_token

def authenticate(email: str, password: str, db: Session) -> User|None:
    user = db.query(User).filter(User.email == email).first()

    if user is None:
        return None

    if not verify_password(password, user.hashed_password):
        return None

    return user

def create_access_token(user:User, db: Session) -> AccessToken:
    tomorrow = datetime.now() + timedelta(days=1) # time.time + 60 * 60 * 24

    accessToken = AccessToken(user_id=user.id, expiration_date=tomorrow, access_token=generate_token())

    db.add(accessToken)
    db.commit()
    db.refresh(accessToken)

    return accessToken
Explanation of the above functions
- The authentification() function is not very complicated, it simply looks up the user by email and checks the plaintext password against the hash of the password stored in the database.
- The create_access_token() function allows you to generate an access token, for this, a record is inserted in the access_tokens table specifying the user id, the date (tomorrow to indicate the expiration date of the token) and generate the token for this, the generate_token() function created in the previous section is used.
Methods for the API
We will create a new file where we implement the options to register a user and create the user's token (login):
user.py
from fastapi import APIRouter, HTTPException, status, Depends
from fastapi.security import OAuth2PasswordRequestForm
from sqlalchemy.orm import Session

from schemes import UserCreate
from authentication import password, authentication
from database import database, models

user_router = APIRouter()

@user_router.post('/token')
def create_token(form_data : OAuth2PasswordRequestForm = Depends(OAuth2PasswordRequestForm), db: Session = Depends(database.get_database_session)):
    email = form_data.username
    password = form_data.password

    user = authentication.authenticate(email,password,db)

    if user is None:
        raise HTTPException(status_code=status.HTTP_401_UNAUTHORIZED)

    token = authentication.create_access_token(user, db)
    return {"access_token": token.access_token}

@user_router.post('/register', status_code=status.HTTP_201_CREATED)
def register(user: UserCreate, db:Session = Depends(database.get_database_session)): #  -> models.User

    user_exist = db.query(models.User).filter(models.User.email == user.email).first()
    if user_exist:
        raise HTTPException(status_code=status.HTTP_409_CONFLICT,
                            detail="User email already exist")

    hashed_password = password.get_password_hash(user.password)
    print(hashed_password)

    userdb = models.User(name=user.name,
                         email= user.email,
                         surname = user.surname,
                         website= user.website,
                         hashed_password=hashed_password)

    db.add(userdb)
    db.commit()
    db.refresh(userdb)

    return userdb
With the OAuth2PasswordRequestForm class, it is injected as a dependency of the function to generate the token and allows to declare in a form body with the following fields:
- Username.
- Password.
- An optional scope field.
- A key for the public and private client is also optional.
Of course, you could use the similar Pydantic classes or the
Body, Form, or classes instead, something like:
create_token(email: str = Form(), password: str = Form())Finally, the previous routes are included in the application:
api.py
from user import user_router
***
app.include_router(user_router)
***
Test in Swagger
When reloading the interactive documentation, we will see our new /register route. When performing a test with real data (name, email, website and password), the system will process the request.
If we check the database, you will see the new user inserted correctly with their encrypted password. The process has worked perfectly.
And with this we will have:

This material is part of my complete course and book on FastAPI.