
Adobe PhoneGap is a framework for mobile applications owned by Adobe with which we can use web tools such as HTML, CSS and JavaScript along with its entire ecosystem to create hybrid level applications, which, although not native to Android, IOS and Windows Phone (since they are web pages rendered for example with Webview as in the case of Android) are not web applications either since they are packaged for each Operating System (apk in the case of Android) from a processor on the Adobe platform.
In this tutorial we will see a simple introduction to this hybrid application development framework, we will see how to install the Adobe PhoneGap Windows development environment, its mobile installer which is available for IOS, Windows Phone and of course Android.
As we have mentioned before, PhoneGap allows us to encapsulate an application developed in web technologies; understand HTML5, JavaScript and CSS3 is a native app, encapsulating this web module within another layer that allows you to use the benefits of native applications, such as uploading them to the Android or iOS application store and this is what a hybrid application consists of.
So, in short we have a web application developed with HTML5, CSS3 and JavaScript encapsulated with PhoneGap, we can connect to servers through AJAX and any other technology and from the backend (PHP, Java, etc.) do what we have to do and bring us all this data and apply the logic we want to it.
2 Getting started with Adobe PhoneGap on Windows and Android for developing hybrid apps
Apart from this, PhoneGap has certain features that allow us to use other functionalities of the framework such as:
- Camera: access to the device's camera and gallery.
- Battery Status: View the status and query of the battery.
- Contacts: View, create and modify contacts on the device.
- Device: Device information.
- Device Orientation: Device compass.
- Device Motion: Device accelerometer.
- Geolocation: GPS position query
- Globalization: Location of the device.
- Dialogs: Create notifications in the form of dialogs.
- FileSystem: Device file system.
- File Transfer: Support for downloading and uploading files or archives
- Media: Recording and playback of files.
- Media Capture: Capture media files using pre-installed applications.
- Network Information: Information about the device connection status: Wifi, 3G, etc.
- Vibration: Device vibration.
Although we can use it via HTML5, when using a framework like PhoneGap we do not have to worry about the support of said feature.
PhoneGap vs Apache Cordova
Before starting, I consider it crucial to know the difference between these two technologies, which although they may seem the same, they are actually not.
PhoneGap was developed as free software by a company called Nitobi in 2009 and in 2011 Adobe acquired the company that developed this technology and therefore the software as such; Being a well-received technology, Adobe kept this branch of the software as free code, but they developed another branch with the same code called Apache Cordova and it offers a plus of services that are private to perform other tasks such as compiling the app. so that it runs on iOS without the need to have a Mac.
Installing the PhoneGap application on Windows/desktop
Once all this information has been explained, which is important for you to know how it works and what this framework consists of, we are going to get down to business and start installing PhoneGap and then create our app.
The steps to install Adobe PhoneGap are very well indicated on the official Adobe PhoneGap page in Get Started; First we must install the Adobe PhoneGap development environment for Mac or Windows, for Windows which is a simple exe that practically installs itself like everything else in Windows.
We can even install Adobe PhoneGap via Node.js if you prefer and we get the possibility of installing more components via the same Node.js
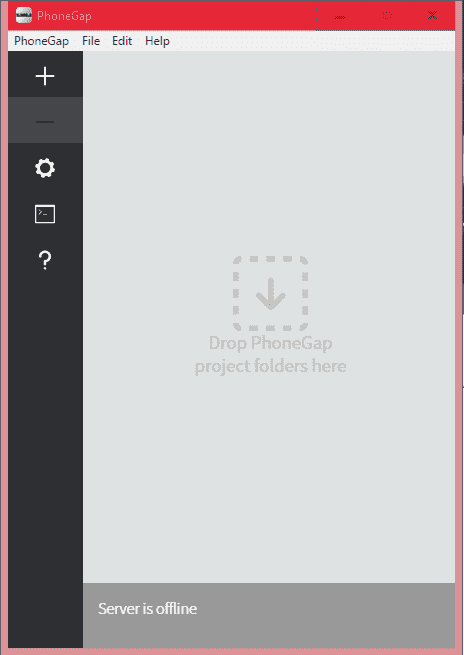
Once Adobe PhoneGap is installed on our desktop, we run the application:
And we will see a screen like this:
We can also download a .zip from the github website, this has the advantage that it is not necessary to install and continue with the rest of the tutorial.
Creating an app in Phonegap
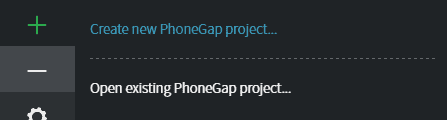
Once everything is installed, the next thing we have to do is Create an app, to do this by clicking on a plus and then "Create new PhoneGap project...":
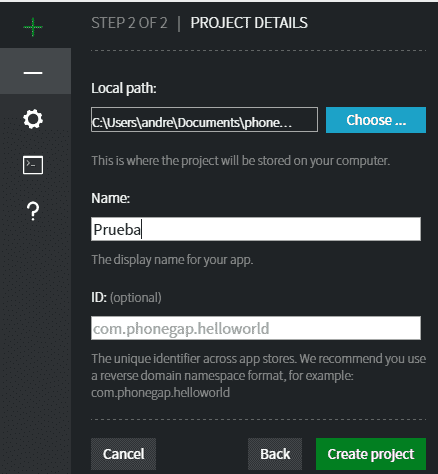
We enter the basic data of our project such as location and name:
And with this we have our project ready to work with it; To see the source and open it in our favorite IDE we have to go to the location of our project in the www folder; in my case it would be:
C:\Users\andre\Documents\phonegap\Test\www
And it is there that we must add our plugins, JavaScript, CSS, images and other files of our project.
If we go to the address C:\Users\andre\Documents\phonegap\Test we will see other elements of the project such as the plugins and the platforms folder where our project is generated when we execute it; Finally we execute our project by clicking on:

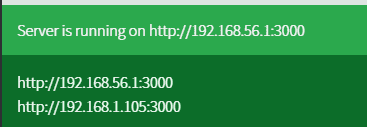
And it will give us an IP address that we must configure on our mobile:
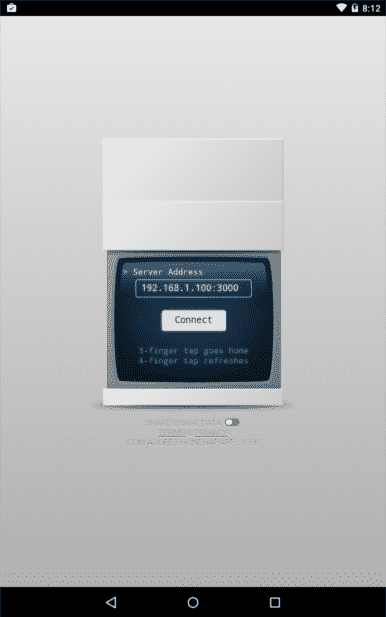
Now from our Android we have to go to Google Play at the following address:
PhoneGap Developer
Or search for "PhoneGap Developer" in Google Play and install on our device; Once this is done we configure the previous IP and see our application on our Android and we can start working on our PhoneGap project:
And this is all, you can consult the following tutorials to get started in developing hybrid applications with PhoneGap.
2 How to use the camera and gallery with Phonegap
In this entry we will see how to use the camera of a device with PhoneGap and also how to select a photo or image that we have on our device using the gallery provided by the operating system itself or installed from the application store manually by the user and paint the image or photograph in an img element.
Why use PhoneGap to use the device's camera and not native JavaScript / HTML5?
We might ask ourselves why use PhoneGap if we can do the same operation without using PhoneGap with native JavaScript code; The reason for this is that many times this type of operations are developing technologies, it does not have great support with browsers, or it is very recent or each browser handles the named one in its operations and that is why we use PhoneGap that allows us to use this technology in a unified manner without worrying about these previous statements.
We already explained in a previous post how to get started with Adobe PhoneGap on Windows and Android where we explained how to install PhoneGap on Windows and the testing tool on Android; Therefore we go directly to the development of the little experiment.
If we follow the above tutorial, then you don't need to install the cordova-plugin-camera
Taking the photo from the device and using the gallery application
Without going any further, we will create some functions that will allow us to do what we want, which is to select a photo from the gallery or take a photo through the device's camera, although they are different processes, for the purposes of the application they are very similar, since in both cases it is based on obtaining an image, whether it is the product of a photograph or the selection of an image from the gallery; we first define the main function of our JavaScript project:
cargarFoto: function(pictureSourceType){
        var options = {
                sourceType: pictureSourceType,
                destinationType: Camera.DestinationType.FILE_URI,
                targetWidth: 300,
                targetHeight: 300,
                quality:100,
                correctOrientation: true,
                saveToPhotoAlbum: true,
                cameraDirection: 1,
        };
        navigator.camera.getPicture(app.fotoCargada, app.errorAlTomarFoto,options)
},
The getPicture() function allows you to take photographs through one of the cameras that the device has or select photographs from the gallery application that the device has; The function receives three parameters consisting of a function when the upload of the photo or image was successful, the next parameter when an error occurred in the upload and the last or third parameter corresponds to a group of options that we specify below:
- sourceType Allows you to specify the type of source of the image, as specified in the title of this entry, it can be through the device's camera or through the selection of the image through the gallery.
- destinationType Configured with Camera.DestinationType.FILE_URI allows us to indicate that it copies the image to the device and in this way when processing the image, whether as a result of the
- selection in the gallery or the photograph taken, it returns a URI that we process from the JavaScript
- targetWidth Indicates the scaling (width) of the image in pixels.
- targetHeight Indicates the scaling (length) of the image in pixels.
- quality The quality of the image expressed in a range of 0-100.
- correctOrientationRotates the image based on the rotation of the device when the photo was taken.
- saveToPhotoAlbum Indicates whether the photo is recorded within the device.
Once the photograph has been taken or selected, if no error occurs, the following function is executed:
fotoCargada: function(imageURI){ var img = document.createElement('img'); img.onload = function(){ app.pintarFoto(img) } img.src=imageURI },This is already optional, but in this method we must perform some operation with the loaded image, in this case we limit ourselves to creating an img type element from JavaScript to then include the URI product of the selection or taking of the photo.
We also specify a method in case an error occurs:
errorAlTomarFoto: function(message){ console.log('Fallo al tomar la foto o toma candelada: '+message); },Finally, we create the onclick events of a couple of buttons depending on the action the user wants to perform, that is, taking a photo or selecting an image from the gallery:
var buttonAction = document.querySelector('#button-action'); buttonAction.addEventListener('click', function(){ app.cargarFoto(Camera.PictureSourceType.CAMERA)}); var buttonGallery = document.querySelector('#button-gallery'); buttonGallery.addEventListener('click', function(){ app.cargarFoto(Camera.PictureSourceType.PHOTOLIBRARY)});For this we simply have to change the properties
- Camera.PictureSourceType.CAMERA Takes a photo from the device's camera.
- Camera.PictureSourceType.PHOTOLIBRARY Open the device's gallery application to select the image.
The HTML code for this experiment is as follows:
<html>
<head>
    <meta charset="utf-8" />
    <meta name="format-detection" content="telephone=no" />
    <meta name="msapplication-tap-highlight" content="no" />
    <meta name="viewport" content="user-scalable=no, initial-scale=1, maximum-scale=1, minimum-scale=1, width=device-width" />
    <!-- This is a wide open CSP declaration. To lock this down for production, see below. -->
    <meta http-equiv="Content-Security-Policy" content="default-src * 'unsafe-inline'; style-src 'self' 'unsafe-inline'; media-src *" />

    <title>Camara</title>
</head>

<body>
    <div class="header">
        <span>Camara</span>
    </div>

    <canvas id="foto"></canvas>

    <div class="button-container">
        <button id="button-action" class="button">Tomar Foto</button>
        <button id="button-gallery" class="button">Imagen de Galería</button>
    </div>

    <script type="text/javascript" src="cordova.js"></script>
    <script type="text/javascript" src="js/camera.js"></script>
</body>

</html>
Where camera.js represents all the JavaScript code explained in this post.
The official documentation can be found at the following link: Cordova
3 How to capture videos from the camera with PhoneGap using a hybrid app
The camera is a fundamental means to obtain photographs and videos of everything that surrounds us through the phone and as developers it is a means that we can use even in applications that are not native, hybrid and our case of interest the PhoneGap development framework allows us carry out this work and many more.
In a previous entry we saw how to capture an image by selecting the gallery application and how to take a photo using the device's camera with PhoneGap, now we will see an extension of the above and we will see how to capture videos with PhoneGap using the same scheme. hybrid applications; the procedure is very similar to the one we saw previously since it has a very similar structure but invoking a new method.
Defining the navigator.device.capture.captureVideo method to capture the video
First we create the method that will be in charge of handling all the video capture, which would be the method navigator.camera.getPicture(app.fotoLoaded, app.errorAlTomarFoto,options) in taking the image but this is used to capture a video via device camera:
navigator.device.capture.captureVideo(captureSuccess, captureError, {limit: 2});We will define the above method in a JavaScript function for easy access:
    function capture() {
        navigator.device.capture.captureVideo(captureSuccess, captureError, {limit: 2});
    }
As we can realize, the function receives three parameters consisting of a function when the upload of the video shot was successful, the next parameter when an error occurred in the video shot and the last or third parameter corresponds to the number of captures of videos that we will make, in this case there are two, by default the limit is one.
Success and error method
The next step is to define the success and error methods of capturing the video:
    function captureSuccess(mediaFiles) {
        var i, len;
        for (i = 0, len = mediaFiles.length; i < len; i += 1) {
            uploadFile(mediaFiles[i]);
        }
    }

    function captureError(error) {
        var msg = 'An error occurred during capture: ' + error.code;
        navigator.notification.alert(msg, NULL, 'Uh oh!');
    }
The uploadFile method would be responsible for uploading the video to a server using PHP, but this is another story; We have already talked about uploading files with CodeIgniter in case you want to consult this section; finally, the load function in JavaScript:
    function uploadFile(mediaFile) {
        var ft = new FileTransfer(),
            path = mediaFile.fullPath,
            name = mediaFile.name;

        ft.upload(path,
            "http://my.domain.com/upload.php",
            function(result) {
                console.log('Upload success: ' + result.responseCode);
                console.log(result.bytesSent + ' bytes sent');
            },
            function(error) {
                console.log('Error uploading file ' + path + ': ' + error.code);
            },
            { fileName: name });
    }
Now the only thing left for us to do is associate a button with the method we initially created to take the video:
<button onclick="capture();">Capture Image</button>And this is it, with these simple steps we can use the camera of a device, take a video and even send it to the server with an application that we already have configured, all this with a hybrid app.