
Content Index
It's time for another practice to expand our capabilities through Artificial Intelligence. This time, we will use Google Antigravity, a modified version of VS Code designed to boost workflow with intelligent agents.
If you want to follow this practice, you can download the tool directly from its official page. The fundamental difference with the traditional editor is that it includes an Agent tab and a Planning tool, which is what we will explore today.
I believe that the current way of programming involves using an AI. If you don't use it, your competition will, and you will lose ground. In this course, we balance traditional teaching with these tools to streamline developments we've already covered previously, such as creating listings and details.
The Project: Blog Module with Django
For this practice, I asked the AI to develop a Blog module that we were missing. The goal was to create:
- Post listing: With filters by categories, types, and pagination.
- Detail page: Layouted with Bootstrap.
- Existing models: Instead of creating a new model from scratch, I instructed it to use our "elementos" model (which simulates posts) and its relations with category and type.
This is the prompt:
Create a module in the elements app to have a Blog with filters by types, category, pagination, and layouted with Bootstrap, containing both the listing and the detail view.
It's a prompt that could be much improved since we did NOT specify aspects like whether we want it to create a model (in our case, we want it to use the Elements relationship):
class Category(models.Model):
    title = models.CharField(max_length=255)
    slug = models.SlugField(max_length=255,blank=True)

    def __str__(self):
        return self.title

class Type(models.Model):
    title = models.CharField(max_length=255)
    slug = models.SlugField(max_length=255,blank=True)

    def __str__(self):
        return self.title
class ElementManager(models.Manager):
    def get_queryset(self):
        # Siempre que usemos Element.objects.all(), incluirá el select_related
        return super().get_queryset().select_related('category', 'type')

class Element(models.Model):
    title = models.CharField(max_length=255)
    slug = models.SlugField(max_length=255,blank=True)
    description = models.TextField() # blank=True, null=True
    price = models.DecimalField(max_digits=10,decimal_places=2, default=6.10) # 12345678.10
    category = models.ForeignKey(Category, on_delete=models.CASCADE) #, related_name='elements'
    created = models.DateTimeField(auto_now_add=True)
    updated = models.DateTimeField(auto_now=True)
    type = models.ForeignKey(Type, on_delete=models.CASCADE)
We didn't provide screenshots of how we want the development to look, among other aspects you might want to add. However, by indicating which app it needs to inspect (the elements app), we save some tokens and time when Google Antigravity begins to evaluate the project.
Even so, with this, we can interact with the tool and learn how it works.
The Planning Tool
This is the main advantage of Antigravity compared to other tools like Gemini CLI or Agent. Before executing any code, the agent generates a Roadmap.
The AI tells you exactly which files it is going to modify or create:
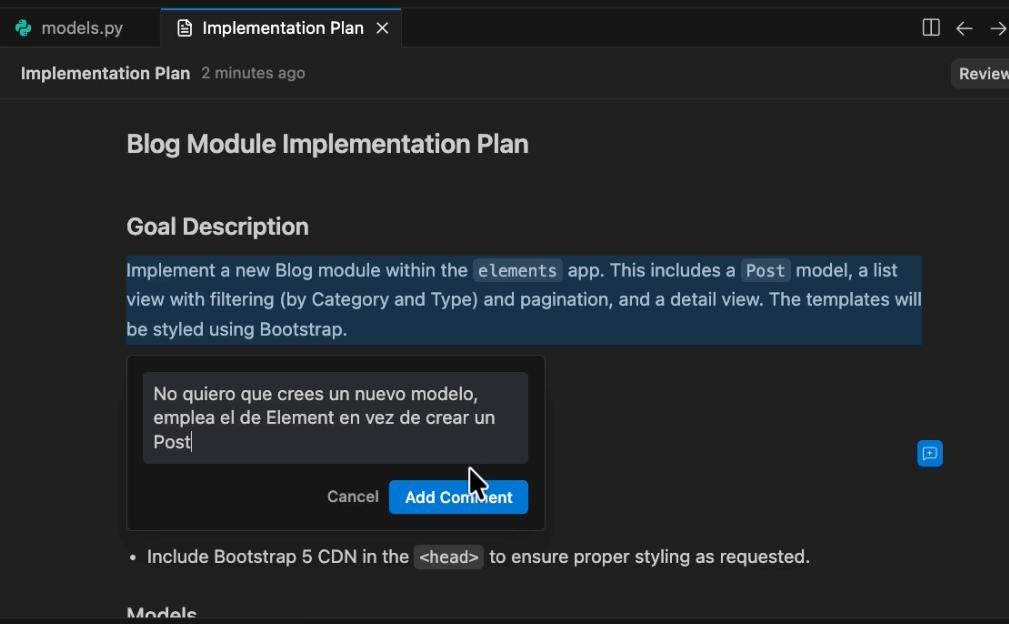
Figure 18-4: Roadmap generated by Google Antigravity
As you can see in the Roadmap, the AI wants to generate a new model, which is not what we want (and this is because we gave it a poor prompt), but we have the opportunity to correct it and tell it to "Not create a new model, use the Element one instead."
If the AI tries to create a model named Post and you want it to use Elements, you can add a comment in the planning. It will readjust its plan before touching a single line of code.
As a security recommendation, always sync your project with Git before accepting changes. If the result is not as expected, you can easily go back with a git reset --hard HEAD.
Additionally, the editor once got stuck "Thinking..." indefinitely, because it encountered an error while trying to start the virtual environment and run the command to generate the migrations:
python manage.py makemigrations
zsh: command not found: pythonfrom django.core.management import execute_from_command_line
ModuleNotFoundError: No module named 'django'ImportError: Couldn't import Django. Are you sure it's installed and available on your PYTHONPATH environment variable? Did you forget to activate a virtual environment?
I executed the command manually and told the AI Agent to run the command for it, but the Agent still did not respond, so I had to finish its execution and restart it to tell it to continue with the execution of generating the views and templates (which was the next task to perform).
Implementation and Results
After a few iterations in which you must do the same as before, view the Roadmap and if one of the developments suggested by the AI doesn't match what you want to do, add a comment and click the "Proceed" button in the upper right corner until you have a clear Roadmap for your application.
In the end, the AI generated a functional layout based on Bootstrap cards with filters for categories and listings, and a detail page:
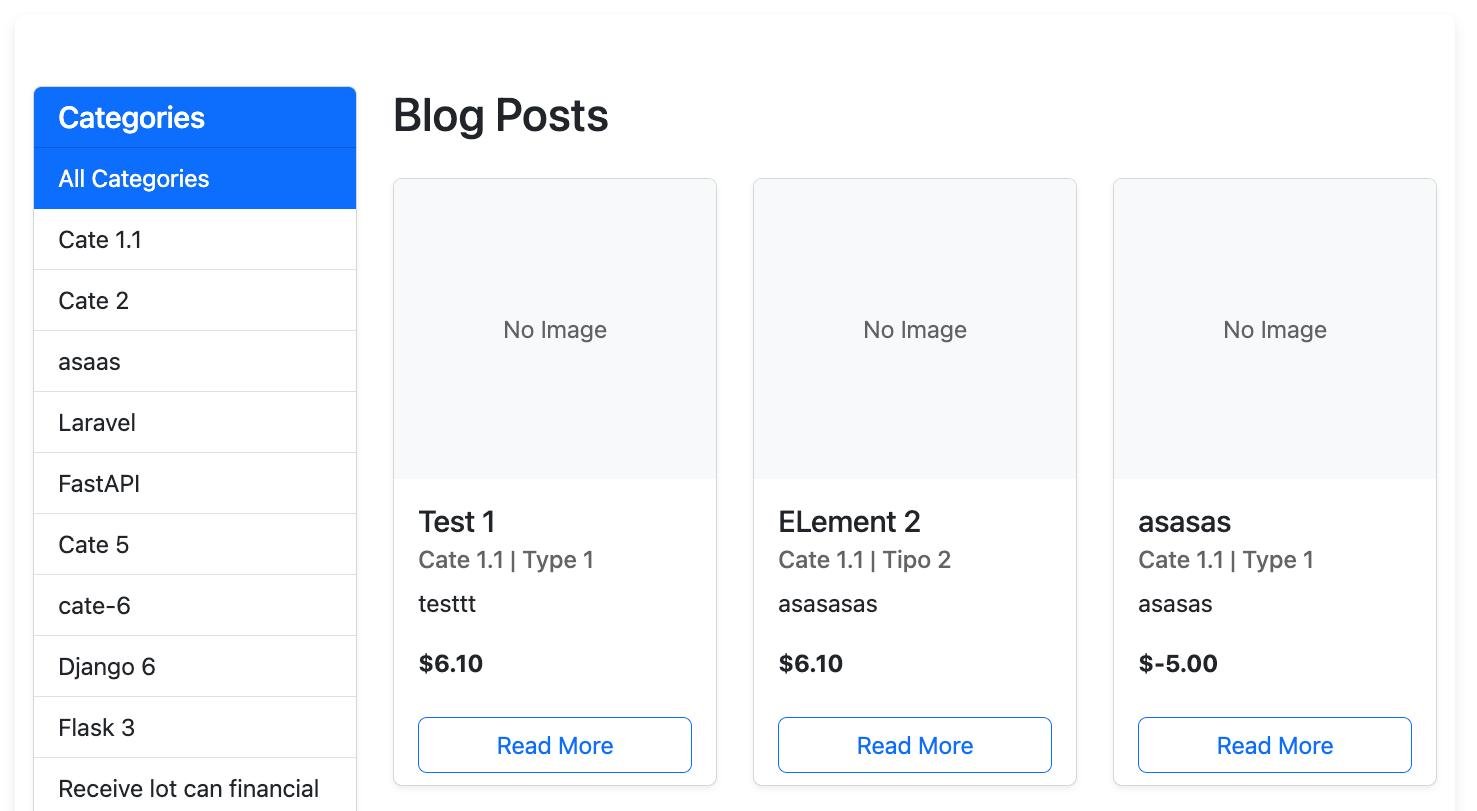
Figure 18-5: Obtained design
Features of the generated development
Dynamic Filters: The view optionally checks if a category or type parameter exists in the URL and adjusts the initial query:
elements\views.py
def blog_list(request):
    elements = Element.objects.select_related('category', 'type').all()

    # Filters
    type_slug = request.GET.get('type')
    category_slug = request.GET.get('category')
    if type_slug:
        elements = elements.filter(type__slug=type_slug)

    if category_slug:
        elements = elements.filter(category__slug=category_slug)
Query Optimization: It used select_related to fetch category and type relationships, avoiding the N+1 query problem (a common error that slows down applications):
elements = Element.objects.select_related('category', 'type').all()elements\views.py
Slug Handling: It configured the routes to use the slug field instead of the ID (PK), which is much better for SEO:
elements\urls.py
path('blog/<slug:slug>/', blog_detail, name='blog_detail'),elements\views.py
def blog_detail(request, slug):
    element = get_object_or_404(Element, slug=slug)
    return render(request, 'elements/blog_detail.html', {'element': element})
Pagination: It implemented the logic to read the page parameter and pass the corresponding objects to the template.
Conclusions
As we can see, these types of tools give us many advantages in modern development, although you might not get the exact same result if you perform a similar interaction. For example, I did this test twice on the same base project and in the first interaction I had to make additional corrections, such as indicating to use the slug instead of the PK table. Additionally, I completed the development by telling it in a second prompt to apply a similar design and use a similar typography based on reference images for the listing and details:
elements\templates\base.html
<!-- Google Fonts -->
    <link
        href="https://fonts.googleapis.com/css2?family=Lora:ital,wght@0,400;0,700;1,400;1,700&family=Open+Sans:ital,wght@0,300;0,400;0,600;0,700;0,800;1,300;1,400;1,600;1,700;1,800&display=swap"
        rel="stylesheet">
    <!-- Font Awesome -->
    <link rel="stylesheet" href="https://cdnjs.cloudflare.com/ajax/libs/font-awesome/6.4.0/css/all.min.css">
    <link rel="stylesheet" href="{% static 'css/styles.css' %}">
    <style>
        body {
            font-family: 'Lora', 'Times New Roman', serif;
            font-size: 20px;
            color: #212529;
        }
        h1,
        h2,
        h3,
        h4,
        h5,
        h6 {
            font-family: 'Open Sans', 'Helvetica Neue', Helvetica, Arial, sans-serif;
            font-weight: 800;
        }
    </style>
In summary, although the AI can infer design from attached screenshots, manual adjustments are always necessary. For instance, in this practice, we had to fix minor syntax errors in the templates (like improperly closed tags). Remember that these are just tools and they do NOT replace a programmer.