We often turn to jQuery for the convenience it offers when selecting DOM elements and working with them. However, we can access those same elements in ways that are just as concise using vanilla JavaScript, utilizing the getElementById, getElementsByTagName, and getElementsByClassName selectors, as well as the widely useful —although less known— querySelector and querySelectorAll.
What is querySelector for and how do you use it?
If you have already worked with CSS selectors, using querySelector in JavaScript will feel natural, as it shares the exact same syntax we use when defining style rules. With this method, we obtain the first DOM element that matches the specified selector. Its behavior is equivalent to jQuery selectors, making it a direct alternative without the need for any external library.
Example of using querySelector
<ul id="ejemplo1">
  <li class="uno" id="uno"> one </li>
  <li class="dos" id="dos"> two </li>
  <li class="tres" id="tres"> three </li>
  <li class="cuatro" id="cuatro"> four </li>
</ul>

// Selects by tag inside the ul
document.querySelector('#ejemplo1 li');
// Returns <li class="uno" id="uno"> one </li>

// Selects by class
document.querySelector('#ejemplo1 .uno');
// Returns <li class="uno" id="uno"> one </li>

// Selects combining id and class
document.querySelector('#ejemplo1 #dos.dos');
// Returns <li class="dos" id="dos"> two </li>

// Selects direct child with the > operator
document.querySelector('#ejemplo1 > #dos.dos');
// Returns <li class="dos" id="dos"> two </li>
What is querySelectorAll for and how do you use it?
querySelectorAll works identically to querySelector, with one key difference: instead of returning only the first matching element, it returns all elements that meet the given condition. The result is a NodeList, which we can iterate over as if it were an array.
Example of using querySelectorAll
<ul id="ejemplo2">
  <li class="uno" id="uno"> one </li>
  <li class="dos" id="dos"> two </li>
  <li class="tres" id="tres"> three </li>
  <li class="cuatro" id="cuatro"> four </li>
</ul>

document.querySelectorAll('#ejemplo2 li');
/*
  Returns a NodeList with all matching <li> elements:
[
  <li class="uno" id="uno"> one </li>,
  <li class="dos" id="dos"> two </li>,
  <li class="tres" id="tres"> three </li>,
  <li class="cuatro" id="cuatro"> four </li>
]
*/
What is getElementById for and how do you use it?
This method allows us to retrieve a single DOM element based on the value of its id attribute. Since IDs must be unique on each HTML page, it will always return a single element (or null if it doesn't exist).
document.getElementById(<id_element>)Example of using getElementById
For the following element:
<div id='div_id'> div with id='div_id' </div>We retrieve it like this:
document.getElementById("div_id")What is getElementsByTagName for and how do you use it?
This method allows us to get all DOM elements that correspond to a specific tag name. The resulting collection is returned as an HTMLCollection, iterable similarly to an array.
document.getElementsByTagName(<element_tag_name>)Example of using getElementsByTagName
Given the following HTML:
<p> p tag 1 </p>
<h2> h2 tag </h2>
<p> p tag 2 </p>
We can obtain all paragraphs like this:
document.getElementsByTagName("p")
/*
  Returns an HTMLCollection with all elements whose tag is <p>:
[
  <p> p tag 1 </p>,
  <p> p tag 2 </p>
]
*/
What is getElementsByClassName for and how do you use it?
This method allows us to get all DOM elements that share the same value in their class attribute. Just like getElementsByTagName, the returned collection is an HTMLCollection.
document.getElementsByClassName(<element_class>)Example of using getElementsByClassName
<p class='myclass'> p with class='myclass' </p>
<h1 class='myclass'> h1 with class='myclass' </h1>
<p class='otherclass'> p with class='otherclass' </p>
<p class='myclass'> p with class='myclass' </p>
<p class='myclass'> p with class='myclass' </p>

document.getElementsByClassName("myclass")
/*
  Returns an HTMLCollection with all elements whose class is 'myclass':
[
  <p class='myclass'> p with class='myclass' </p>,
  <h1 class='myclass'> h1 with class='myclass' </h1>,
  <p class='myclass'> p with class='myclass' </p>,
  <p class='myclass'> p with class='myclass' </p>
]
*/
Conclusion: Native Selectors in JavaScript
As we can see, JavaScript offers us multiple ways to access DOM elements without needing to resort to external frameworks like jQuery. Each method has its ideal use case: getElementById for quick access by unique ID, getElementsByTagName and getElementsByClassName for collections by tag or class, and querySelector / querySelectorAll for any complex CSS selector.
Note: The
idattribute must be unique on each HTML page. Using duplicate IDs produces unpredictable behaviors when selecting elements.
4+1 Essential CSS Selectors When Programming
Below I show you the CSS selectors that I use the most when building a stylesheet. One way or another, they have become indispensable in my daily workflow.
Did you know that with CSS selectors we can save a lot of work and avoid inventing unnecessary class names or identifiers to reference elements?
4+1. a[href*="github.com"] — Attribute Selector
This selector is very useful when we want to apply different styles depending on the URL a link points to. For example, if we wanted to automatically add an icon at the beginning of each link based on the target domain:
a[href*="github.com"]:before {
  content: url("github-logo.png");
}
a[href*="google.com"]:before {
  content: url("google.png");
}
And with a little more CSS we can get something like the following:
4. A > B — Direct Child Selector
The direct child selector (>) is very useful when we need to apply styles to a specific level of the hierarchy, without affecting deeper elements. It is especially valuable when creating multi-level menus like the following:
For example, if we wanted to apply a red background exclusively to the innermost level <ul> lists (without affecting the parent <ul>):
ul > li > ul {
   padding: 10px;
   background: #F00;
}
And to define the style of the outermost <ul> independently:
ul {
    background: #CCC;
}
3. a:visited — Visited Link Selector
You have probably noticed it on Google: links you have already visited appear in a different color from those you haven't opened yet. That is precisely what this selector does: it allows identifying and styling links already visited by the user.
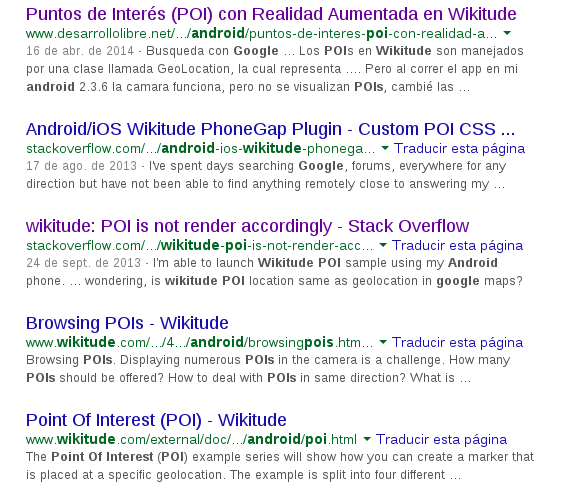
a:visited { color: #609; }2. A, B, C — Group Selector
This selector allows chaining multiple selectors to share common styles, saving lines of code and avoiding repetition. It is especially useful for defining base typography in headings:
h1, h2, h3 {
  color: #FF0000;
  font-family: Arial;
}
Then we can apply the individual styles of each one separately:
h1 { font-size: 2em; }
h2 { font-size: 1.5em; }
h3 { font-size: 1.2em; }
1. A:nth-child(N) — Position Selector
This is one of the most powerful selectors in CSS. It allows selecting elements based on their position within the parent container. For example, given the following HTML:
<ul>
  <li>First</li>
  <li>Second</li>
  <li>Third</li>
  <li>Fourth</li>
  <li>Fifth</li>
  <li>Sixth</li>
  <li>Seventh</li>
</ul>
It is ideal for applying alternating styles to table rows or list cells. Additionally, it supports formulas like 2n+1 to select elements following a mathematical pattern. For more details, visit: The nth-child pseudo-class in CSS.
ul.nth_numerica li:nth-child(1),
ul.nth_numerica li:nth-child(3) {
    background: #999;
}
Conclusions on CSS Selectors
In this post we have reviewed some of the CSS selectors that I consider most important and versatile, ordered by relevance. Of course, the CSS selector ecosystem is much broader; what we have seen here is merely the starting point for writing cleaner, more efficient stylesheets without unnecessary classes.
CSS Selector and JavaScript :has() — The Conditional Pseudoclass

Content Index
- What is querySelector for and how do you use it?
- Example of using querySelector
- What is querySelectorAll for and how do you use it?
- Example of using querySelectorAll
- What is getElementById for and how do you use it?
- Example of using getElementById
- What is getElementsByTagName for and how do you use it?
- Example of using getElementsByTagName
- What is getElementsByClassName for and how do you use it?
- Example of using getElementsByClassName
- Conclusion: Native Selectors in JavaScript
- 4+1 Essential CSS Selectors When Programming
- 4+1. a[href*="github.com"] — Attribute Selector
- 4. A > B — Direct Child Selector
- 3. a:visited — Visited Link Selector
- 2. A, B, C — Group Selector
- 1. A:nth-child(N) — Position Selector
- Conclusions on CSS Selectors
- CSS Selector and JavaScript :has() — The Conditional Pseudoclass
- ️ The Image Format and Caption Problem
- The problem: selecting an HTML element based on its preceding sibling
- How the :has() selector works
- The traditional selector (and its limitation)
- The solution: combining :has() with the adjacent sibling selector +
- Final Implementation
I am going to show you a practical implementation of the CSS :has() selector and how it allowed me to solve a small but real design problem. The advantage of this selector, relatively recent in the CSS specification, is its ability to simplify queries that previously required JavaScript or DOM manipulation.
️ The Image Format and Caption Problem
This case arises in the book reader of my Academia application. The book text was imported as clean HTML inherited from Google Docs, which resulted in a very specific structure: image and caption as two separate and consecutive paragraphs:
<p><span><img src="..." alt="" width="..." height="..." title=""></span></p>
<p><span>Figure 1-1: Laravel Herd Window in MacOS</span></p>
The objective: Center the paragraph containing the text "Figure 1-1: Laravel Herd Window in MacOS" (the caption), without modifying the generated HTML.
The problem: selecting an HTML element based on its preceding sibling
In the HTML, the image lives inside a <p> and the caption is in the following <p>. The problem is that the caption does not have any class or attribute that differentiates it from any other paragraph in the text. And CSS, in its traditional form, does not feature a selector that allows selecting an element based on the content of its preceding sibling.
What we need: Select the <p> that is the immediate sibling of the <p> containing an image.
How the :has() selector works
The :has() selector works like a conditional. It allows selecting a parent or container element based on whether it contains —or not— a specific child selector inside it.
The traditional selector (and its limitation)
If we used the traditional syntax to target the image, we get the most specific element in the chain, which is the <img> itself:
// Returns the <img> element directly
document.querySelector(".post p img")
<p><span><img src="/images/example/libros/laravel/image24.png" alt="" width="247" height="410" title=""></span></p>This is a problem: the image is not a sibling of the caption, its parent <p> is. But with traditional syntax we cannot "go up" to the parent from the child to then navigate to the sibling.
The solution: combining :has() with the adjacent sibling selector +
This is where :has() changes the rules of the game. Instead of returning the <img>, we ask it to return the <p> that contains the image. The :has(img) acts as a condition on the parent:
// Returns the <p> containing the <img>, not the <img> itself
document.querySelector(".post p:has(img)")
<p><span><img src="/images/example/libros/laravel/image24.png" alt="" width="247" height="410" title=""></span></p>Now our reference is the image's <p>, which is exactly the preceding sibling of the caption paragraph.
Final Implementation
With the image paragraph correctly selected, we can use the adjacent sibling selector (+) to target the caption paragraph that immediately follows it.
The adjacent sibling selector (+) selects the element that is immediately after a specific element, provided both share the same parent element.
// Returns the <p> that is immediately after the <p> containing an <img>
document.querySelector(".post p:has(img) + p")
The CSS style:
Finally, the complete CSS solution to automatically center the caption is:
<style>
.post p:has(img) + p {
  text-align: center;
}
</style>
This implementation successfully centers that specific paragraph without adding classes to the HTML or modifying the book's inherited structure. It is a perfect demonstration of how :has() allows writing much more elaborate queries and solving selection problems that were previously impossible to handle with native CSS —or that strictly required JavaScript to manipulate the DOM.