
It is well known that Flutter offers a very simple way to create beautiful cross-platform applications (Android and iOS, and Desktop and Web in the beta channel currently), and the use of animations comes in very handy to complete the design with themes, light/dark mode in Flutter.
From an Android and iOS developer perspective (like mine), this can be true on many levels, as you can create your user interface with declarative and functional code.
Using simple concepts like Column or Row, instead of diving into XML files (which are not code as such), or even the famous storyboards which is at the Graphical Interface level; all of which combined is a small hell, increasing the complexity of developing applications for both platforms that follow the same line (for example, an online store application for a client who wants their app for Android, iOS, and of course a website).
If you have worked with the Android animation API, you know they are a headache on many levels: a complex interface, many APIs (some of them deprecated), and in the end, you'll finish without knowing how to implement your animations aside from the support libraries... and not counting the animation process in iOS which is a world apart from its closest competitor Android with iOS.
This is not the case for Flutter animations, as there is only one way to implement them! and it's common for Android and iOS, since remember that Flutter does not use iOS primitives for example, if you want to implement a button, it does not use the Button primitives in Android and UIButton in iOS, but rather draws EVERYTHING from scratch for each platform; which is excellent since Flutter has total control and gains speed.
Why Flutter makes animations so easy
In Android, animations involve navigating between APIs, strange classes, and inconsistent behaviors. In iOS, the paradigm is completely different. I remember that keeping both versions synchronized in a multi-client project was insane.
With Flutter, that disappears. The animations are identical for Android, iOS, Web, and Desktop. Everything is drawn from scratch with the Flutter engine, so it doesn't depend on native primitives (UIButton, View, etc.). Total control, zero surprises.
Real advantages when animating widgets in Flutter
- Same behavior across all platforms
- Smooth animations because the framework controls the render
- Clean and consistent APIs
- Great variety of ready-made widgets
- Total control when you want to go further
Types of animations in Flutter
- Implicit animations
- They are the simplest. You change a value and Flutter handles the transition. Perfect for getting started.
- Explicit animations
- Here you control the animation in detail with AnimationController, Tween, Curves, and more.
- Interpolated vs. physics-based
- Interpolated: define start and end, and Flutter calculates the transition.
- Physics-based: use simulations like springs and gravity.
- When to choose each type according to your use case
- Implicit: micro-interactions, simplicity, smooth changes.
- Explicit: complex sequences, chained animations, 3D, coordinations.
- Physics: realistic effects, bouncing, and natural behaviors.
Introduction to Animations in Flutter
Flutter offers a very complete animation system that, in its most explicit form, requires understanding several components working together. Before using them on our authentication screen, we will practice them on a simpler example: a color box.
The Three Fundamental Elements
To animate anything in Flutter programmatically, we need three elements:
- AnimationController: The animation director. It controls when it starts, when it ends, when it reverses, and how long it lasts. It always needs a
vsyncthat synchronizes frames with the device screen. - Animation: Defines which value is animated and in what range. It is the representation of the value that changes over time.
- Tween: Specifies the starting point (
begin) and the ending point (end) of the animation. It allows working with any type:double,Offset,Color, etc.
For the AnimationController to have the necessary vsync, the state class must mix in the SingleTickerProviderStateMixin mixin:
class _BoxPageState extends State<BoxPage>
    with SingleTickerProviderStateMixin {

  late AnimationController _animationController;
  late Animation<double> _sizeAnimation;

  @override
  void initState() {
    _animationController = AnimationController(
      vsync: this,
      duration: Duration(milliseconds: 2000),
    );

    _sizeAnimation = Tween<double>(begin: 1.0, end: 6.0).animate(
      CurvedAnimation(
        parent: _animationController,
        curve: Curves.linear,
      ),
    );

    super.initState();
  }

  @override
  void dispose() {
    _animationController.dispose();
    super.dispose();
  }
}
The dispose() method is mandatory. If we do not release the controller when the widget is destroyed, the animation will continue to consume resources in the background.
AnimatedBuilder: The Widget That Connects Everything
For animation value changes to be reflected on the screen, we need to rebuild the part of the widget tree that depends on that value. The AnimatedBuilder widget is designed exactly for this: it listens to an Animation and rebuilds only its subtree in each frame.
AnimatedBuilder(
  animation: _animationController,
  child: Center(
    child: Container(width: 60, height: 60, color: Colors.blue),
  ),
  builder: (_, Widget? widget) {
    return Transform.scale(
      scale: _sizeAnimation.value,
      child: widget,
    );
  },
),
The child parameter is the widget that does not change with the animation. Passing it here prevents Flutter from rebuilding it in each frame, which improves performance. The builder parameter receives that same child and applies the animated transformation.
To start the animation, we call forward():
_animationController.forward();Infinite Animation: Forward and Reverse
An animation that only goes forward is not very eye-catching. To achieve a continuous back-and-forth effect, we listen to the animation state with a listener and automatically reverse it when it ends:
_animationController.addListener(() {
  if (_animationController.status == AnimationStatus.completed) {
    _animationController.reverse();
  } else if (_animationController.status == AnimationStatus.dismissed) {
    _animationController.forward();
  }
});
The four possible states of an AnimationController are:
forward: Moving from start to finish.completed: Reached the end.reverse: Moving back from end to start.dismissed: Returned to the starting point.
There is also the repeat() method which restarts the animation from zero upon finishing. The difference with the manual cycle is that repeat() always starts from the initial value, while the cycle with forward/reverse produces a smoother back-and-forth movement.
Rotation, Translation, and Opacity
Once the basic mechanics are understood, we can add more simultaneous animations. We simply declare more Animation type variables and initialize each one with its own Tween.
For rotation, the value we animate is the angle in radians. We multiply by math.pi to express it in terms of full turns:
import 'dart:math' as math;

_rotationAnimation = Tween<double>(begin: 0.0, end: 2.0 * math.pi).animate(
  CurvedAnimation(parent: _animationController, curve: Curves.linear),
);
For translation, we use a Tween<Offset> because we need to move along two axes:
_translateAnimate = Tween<Offset>(
  begin: Offset.zero,
  end: Offset(20.0, 200.0),
).animate(CurvedAnimation(parent: _animationController, curve: Curves.linear));
For opacity, the range goes from 1.0 (completely visible) to 0.0 (invisible):
_opacityAnimation = Tween<double>(begin: 1.0, end: 0.5).animate(
  CurvedAnimation(parent: _animationController, curve: Curves.linear),
);
In the builder of the AnimatedBuilder, we nest the transformation widgets:
builder: (_, Widget? widget) {
  return Opacity(
    opacity: _opacityAnimation.value,
    child: Transform.translate(
      offset: _translateAnimate.value,
      child: Transform.rotate(
        angle: _rotationAnimation.value,
        child: Transform.scale(
          scale: _sizeAnimation.value,
          child: Container(width: 60, height: 60, color: Colors.blue),
        ),
      ),
    ),
  );
},
The order of nesting matters: the innermost transformation is applied first. In this case, it is scaled first, then rotated, then translated, and finally opacity is applied.
Animating Colors with TweenSequence
To vary the background color through multiple tones, we use TweenSequence, which chains several Tweens one after another. Each element of the sequence has a weight that determines what proportion of the total time that transition occupies.
backgroundAnimate = TweenSequence<Color?>([
  TweenSequenceItem(
      weight: 2.0,
      tween: ColorTween(begin: Colors.red, end: Colors.green)),
  TweenSequenceItem(
      weight: 1.0, tween: ColorTween(begin: Colors.green, end: Colors.blue)),
  TweenSequenceItem(
      weight: 1.0, tween: ColorTween(begin: Colors.blue, end: Colors.purple))
]);
The type of this variable is Animatable<Color>. To obtain the color in each frame, we use the evaluate() method by passing the controller:
color: backgroundAnimate.evaluate(_animationController),A weight of 2.0 in the first transition means that it will go from red to green for twice as long as the other transitions. It is an intuitive way to control the visual rhythm of a color sequence.
Chaining Animations with Interval
So far, all animations occur at the same time. With the Interval class, we can indicate at what moment of the total cycle each individual animation begins and ends. Values range from 0.0 (start of the cycle) to 1.0 (end of the cycle).
The code in box_page.dart shows how to chain four animations so that they run sequentially:
_sizeAnimation = Tween<double>(begin: 1.0, end: 6.0).animate(
  CurvedAnimation(
    parent: _animationController,
    curve: Interval(0.0, 0.25, curve: Curves.linear),
  ),
);

_opacityAnimation = Tween<double>(begin: 1.0, end: 0.5).animate(
  CurvedAnimation(
    parent: _animationController,
    curve: Interval(0.25, 0.5, curve: Curves.linear),
  ),
);

_rotationAnimation = Tween<double>(begin: 0.0, end: 2.0 * math.pi).animate(
  CurvedAnimation(
    parent: _animationController,
    curve: Interval(0.3, 0.75, curve: Curves.linear),
  ),
);

_translateAnimate = Tween<Offset>(begin: Offset.zero, end: Offset(20.0, 200.0)).animate(
  CurvedAnimation(
    parent: _animationController,
    curve: Interval(0.75, 1.0, curve: Curves.linear),
  ),
);
With this configuration, during the first 25% of the time the box scales, between 25% and 50% its opacity varies, between 30% and 75% it rotates, and in the last quarter it translates. Intervals can overlap, which allows two animations to occur simultaneously at certain moments.
AnimatedContainer: Declarative Animations
The approach with AnimationController and AnimatedBuilder is powerful but verbose. For the most common cases —changing size, color, border radius, or container shadow— Flutter offers a much simpler alternative: AnimatedContainer.
The idea is very elegant: AnimatedContainer behaves exactly like a normal Container, with the difference that when any of its properties change value, the widget automatically interpolates between the previous value and the new one during the time specified in duration. We do not need a controller or Tween; simply calling setState() is enough.
class _Box2PageState extends State<Box2Page> {
  double _width = 50, _height = 50;
  Color _color = Colors.purple;
  final BorderRadius _borderRadius = BorderRadius.circular(8);
  Offset _offset = Offset(1.5, 2.0);

  @override
  Widget build(BuildContext context) {
    final random = math.Random();

    return Scaffold(
      floatingActionButton: FloatingActionButton(
        child: Icon(Icons.update),
        onPressed: () {
          _width  = random.nextInt(200).toDouble();
          _height = random.nextInt(200).toDouble();
          _color  = Color.fromRGBO(
            random.nextInt(256),
            random.nextInt(256),
            random.nextInt(256),
            random.nextDouble(),
          );
          _offset = Offset(
            random.nextInt(15).toDouble(),
            random.nextInt(15).toDouble(),
          );
          setState(() {});
        },
      ),
      body: Center(
        child: AnimatedContainer(
          duration: Duration(milliseconds: 500),
          decoration: BoxDecoration(
            color: _color,
            borderRadius: _borderRadius,
            boxShadow: [
              BoxShadow(
                offset: _offset,
                color: Colors.black38,
                blurRadius: random.nextInt(50).toDouble(),
              ),
            ],
          ),
          width: _width,
          height: _height,
          child: Text('$_width x $_height'),
        ),
      ),
    );
  }
}
Every time the user presses the floating action button, random values are generated for size, color, shadow radius, and offset. The AnimatedContainer detects the change and animates the transition in 500 milliseconds. The result is a box that changes shape, color, and shadow completely smoothly.
When to Use One or the Other?
AnimatedContainer is the right choice when we only need to animate visual properties of a container and the animation trigger is a direct consequence of a state change. AnimatedBuilder is necessary when we want total control: animations that start by external event, precise chaining with intervals, complex geometric transformations like rotation or translation, or multi-step color variations.
Implicit animations through Widgets
Implicit animations are nothing more than widgets that manage all the difficult part of the animation for you. In reality, these widgets are very similar to the ones you might have already implemented in your code. I'm talking about, for example:
- AnimatedPadding, the animated counterpart of the Padding widget.
- AnimatedOpacity, the animated counterpart of the Opacity widget.
- Among others.
These two examples are very specific, and their behavior corresponds closely to their name (THAT is a good class name!).
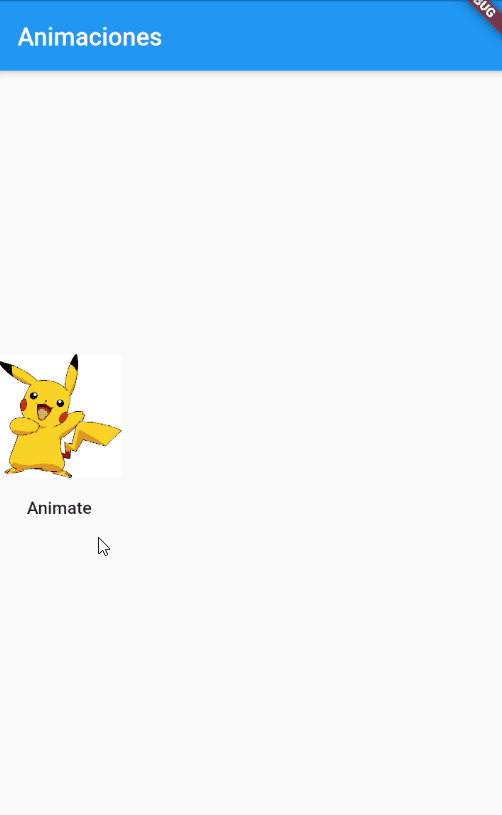
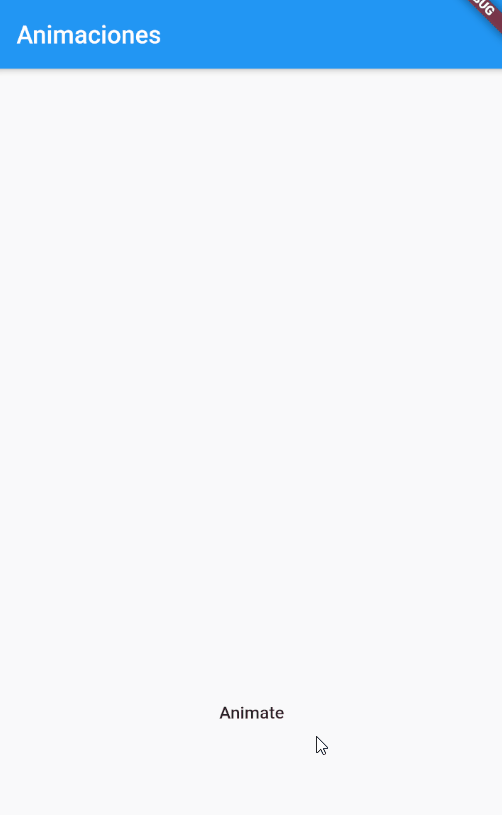
AnimatedOpacity(
 opacity: show ? 1 : 0,
 duration: Duration(milliseconds: 500),
 child: Image.asset('assets/logo.png'),
)
You change show and you have a smooth transition without doing anything else.
These widgets only need a few things to work:
- A child like almost everything in Flutter, it can be anything (which can be any widget),
- A duration (expressed in hours, minutes, seconds, milliseconds, etc.) and a value that must be managed by a StatefulWidget. This last point is very important, since every time the value is changed inside the setState function (therefore, the widget is rebuilt), the animation will automatically launch through an interpolation of the old and the new value, which in a nutshell means having a smooth transition from one state to another.
import 'package:flutter/material.dart';

class Animation1 extends StatefulWidget {
  @override
  _Animation1State createState() => _Animation1State();
}

class _Animation1State extends State<Animation1> {
  double opacity = 0.0;
  @override
  Widget build(BuildContext context) {
    return Column(
      mainAxisAlignment: MainAxisAlignment.center,
      children: [
        AnimatedOpacity(
          child: Image.asset(
            'assets/img.png',
            fit: BoxFit.fill,
          ),
          duration: Duration(seconds: 3),
          opacity: opacity,
        ),
        FlatButton(
          onPressed: _changeOpacity,
          child: Text('Animate'),
        )
      ],
    );
  }

  void _changeOpacity() {
    setState(() {
      opacity = 1.0;
    });
  }
} 
The code snippet above changed the value of the opacity variable inside a setState function, which translated into an easy and amazing fade-in transition for our image.
And, in the end, this widget handled all the animation stuff by itself. The only thing we had to do was change the state of our widget.
The power of AnimatedContainer to animate multiple properties
AnimatedContainer allows animating the most common elements such as width, height, color, borders, padding, radii... all by just updating the state.
AnimatedContainer(
 height: size,
 width: size,
 duration: Duration(seconds: 1),
 decoration: BoxDecoration(
   color: color,
   borderRadius: BorderRadius.circular(radius),
 ),
);
Limits of implicit animations
When you start chaining widgets or need sequences, reverses, pauses, or interval control, it gets complicated. I lived it: a hell of indentations and nested widgets. That's where explicit animations come in.
AnimatedContainer Widget
This is great, you can just use these widgets to start using animations in your app! But there's a problem: the animations seen so far only animate one property of our child. That's not very flexible and can cause many scalability problems if we just adjust the widgets without control, which obviously leads to poor and cryptic code (you know that Dart can be an indentation hell if not written correctly).
In short, we can use these animations for really simple things, without implementing a logic per se at the moment we want to start the animation, vary behaviors, durations, reverse or stop the animation, none of this and much more CANNOT be done with these containers.
The panacea: AnimatedContainer.
Its behavior is exactly the same as a common container, but the best part is that any of its properties can be animated. The only thing we have to do is decide what changes will be made to our child.
Let's say we want to change both the height and width of our container, and also its color (yes, colors can be interpolated). The first thing we should do is define the fields of our StatefulWidget:
  var imgHeight = 100.0;
  var imgWidth = 100.0;
  var backgroundColor = Colors.white;
And now, our container:
AnimatedContainer(
  height: imgHeight,
  width: imgWidth,
  color: backgroundColor,
  child: Image.asset('assets/img.png', fit: BoxFit.fill),
  duration: Duration(seconds: 3),
)
And decide what the new values will be assigned in our setState function:
  void _changeValues() {
    setState(() {
      // new values to interpolate
      imgWidth = 300;
      imgHeight = 300;
      backgroundColor = Colors.deepPurpleAccent;
    });
} 
As you can see, more than one property is animated at the same time using AnimatedContainer.
This is the source code:
I said that any property can be animated in this widget. Let's try and animate its decoration parameter following the previous steps:
import 'package:flutter/material.dart';

class Animation3 extends StatefulWidget {
  @override
  _Animation3State createState() => _Animation3State();
}

class _Animation3State extends State<Animation3> {
  var imgHeight = 100.0;
  var imgWidth = 100.0;
  var backgroundColor = Colors.white;
  var borderRadius = 0.0;

  @override
  Widget build(BuildContext context) {
    return Column(
      mainAxisAlignment: MainAxisAlignment.center,
      children: [
        AnimatedContainer(
          height: imgHeight,
          width: imgWidth,
          decoration: BoxDecoration(
            color: backgroundColor,
            borderRadius: BorderRadius.circular(borderRadius),
          ),
          child: Image.asset('assets/img.png', fit: BoxFit.fill),
          duration: Duration(seconds: 3),
        ),
        FlatButton(
          onPressed: _changeValues,
          child: Text('Animate'),
        )
      ],
    );
  }

  void _changeValues() {
    setState(() {
      // new values to interpolate
      imgWidth = 300;
      imgHeight = 300;
      borderRadius = 150.0;
      backgroundColor = Colors.deepPurple;
    });
  }
} 
As I said, ANY property of the Container widget can be animated. :) Finally, we can even create a small sequential choreography for our little friend Ditto. But this would involve tracking the state of the class fields, adding many new variables, many conditionals to set the new values, and doing so would lead us to a lot of repetition.
Other examples:
Animated opacity
AnimatedOpacity(
 opacity: visible ? 1 : 0,
 duration: Duration(milliseconds: 500),
)
Container with several animated properties:
AnimatedContainer(
 duration: Duration(seconds: 1),
 width: w,
 height: h,
 color: color,
)
Basic example with AnimationController
_controller.forward();Simple 3D Flip with Transform:
Transform(
 transform: Matrix4.identity()..rotateY(pi * value),
 alignment: Alignment.center,
 child: child,
)
Explicit animations: total control step-by-step
Unlike the previous ones where we only defined a widget, some properties, and more, with explicit ones, we have TOTAL control over when we start, stop, reverse... (you get it, right) the animations... BUT they are more complex to implement and require a controller to do all this.
The role of the AnimationController
It is the "brain" of the animation. It defines duration, status, repetition, direction, pauses, and more.
late final AnimationController _controller;
_controller = AnimationController(
 vsync: this,
 duration: Duration(seconds: 2),
)..forward();
Tween, Curved Animation and accelerations
final curve = CurvedAnimation(
 parent: _controller,
 curve: Curves.easeOut,
);
final animation = Tween<double>(
 begin: 0,
 end: 300,
).animate(curve);
They allow customizing how the animation progresses.
AnimatedBuilder and AnimatedWidget
They are used to rebuild only the affected part in each frame.
AnimatedBuilder(
 animation: animation,
 builder: (_, child) {
   return Transform.scale(
     scale: animation.value,
     child: child,
   );
 },
 child: Icon(Icons.star),
)
Cases where you really need explicit animations
- Complex sequences
- Synchronized animations
- 3D animations (like card flip)
- Games and highly dynamic elements
- Precise control over each frame
Common animation patterns in Flutter
- Hero animations (transitions between screens)
- The Hero widget allows moving an element between screens with visual continuity.
- Animated lists and grids (AnimatedList)
- Perfect for adding and removing items smoothly.
- Staggered animations
- Useful for animating elements in cascade.
- Advanced transitions with the animations package
Frequently Asked Questions
- Which widget to use to start animating?
- AnimatedContainer or AnimatedOpacity.
- How to make a 3D animation?
- With Transform and an AnimationController.
- Are implicit or explicit animations better?
- It depends: implicit are fast; explicit give you total control.
- How to prevent an animation from feeling slow?
- Adjust curves, reduce duration, or smooth calculations in the build.
Conclusion
This is just to get started with animations. You just want your app to look great without making a huge effort. The interface is simple and easy to use.
After trying implicit animations, explicit animations, animated containers, and patterns like Hero, you will see that Flutter lets you scale from the simplest to the most advanced without changing your mindset. That consistency was what I enjoyed the most when I switched from native Android/iOS to Flutter.
If you already master this, I recommend exploring:
- Advanced physics animations (SpringSimulation)
- TweenSequence for complex animations
- Shared Axis Transitions (animations package)
- Flutter Impeller for performance improvements
Learn the architecture in Flutter MVVM.