Content Index
- Django channels and websockets
- The Problem with Traditional "Real-Time"
- The Solution: Django Channels and WebSockets
- Synchronous applications using the WSGI Web Server Gateway Interface
- Asynchronous applications using ASGI Asynchronous Server Gateway Interface
- WSGI and ASGI
- WSGI: Classic connection
- ASGI: asynchronous bidirectional connection
- Consumer
- Set up project in Django with Django Channels
- Set up project in Django with Django Channels
- Basic installations and configurations
- Configure ASGI server
- What are Consumers in Django Channels?
- The difference from the traditional scheme
- The Lifecycle of a Consumer
- ⚡ Key Concepts: WebSocket, Consumer, and Asynchrony
- Why is it vital to be asynchronous?
- Analogy: Synchronous vs. Asynchronous
- Consumer
- Client: Consume Websocket
- Communication through channel layers (Multiple channels)
- Redis
- Install Redis on MacOS
- Channels Redis
- Key concepts
Today, there are multiple applications that require real-time communication functionality; messaging applications such as chats, this type of functionality is essential to keep customers connected and they can send and receive messages.
It is clear that this real-time functionality can be implemented in a common server with technologies like ajax with the approach we saw earlier of having a Rest API with Django Rest Framework, but obviously constantly sending requests to our server to know the status is extremely inefficient; For these cases there is a mechanism based on websocket that allows us to implement this feature, real-time efficiently and in Django for this, we have what is known as Django channels that through a layer of channels we can implement our websockets in our app.
Django channels and websockets
For this we have to change the server that we have by default based on WSGI to an ASGI-type server that is the one that our Django channels provide us.
The Problem with Traditional "Real-Time"
Imagine a chat like WhatsApp or Telegram. If you send a message, the server receives it (Request → Response). But how does the other person find out they have a new message? Under the traditional scheme, you would have to use an inefficient JavaScript "trick" called Polling (with setTimeout or setInterval):
- Client: "Are there new messages?" -> Server: "No".
- Client: "Are there new messages?" -> Server: "No".
- Client: "Are there new messages?" -> Server: "Yes, here is one".
This approach is a waste of resources: the client consumes battery and data, and the server processes thousands of useless requests.
The Solution: Django Channels and WebSockets
Django Channels allows the server and the client to maintain a permanently open "channel." Once the connection is established, the server can send data to the client at the exact moment it occurs (for example, when a message arrives from another user), without waiting for the client to ask.
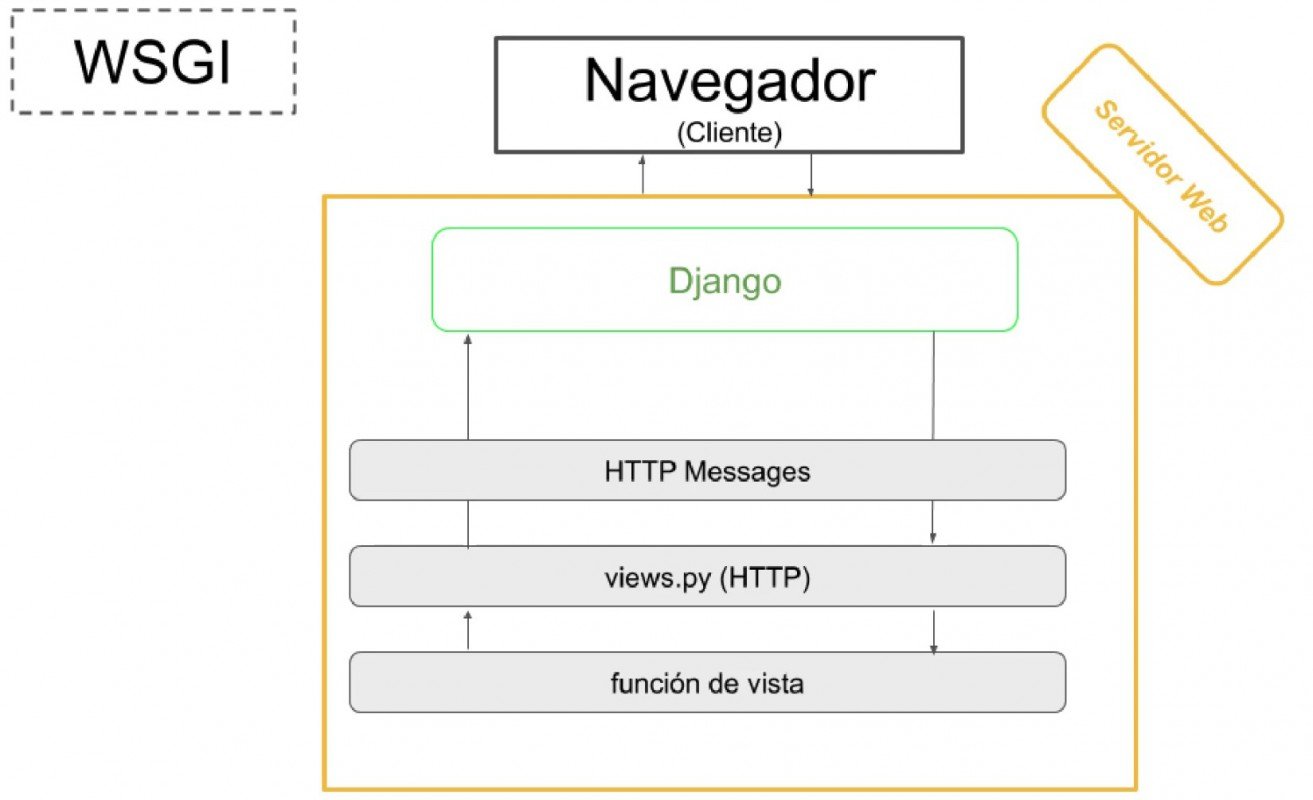
Synchronous applications using the WSGI Web Server Gateway Interface
The server that we have by default and the one that we use when deploying or publishing our application, is generally of the WSGI type, which is the definition that web servers take when we are developing in Django, in other words, the WSGI are being to Python what Apache is to PHP.
WSGI stands for Web Server Gateway Interface, which are synchronous type servers, therefore we CANNOT implement real-time type functionalities.
Asynchronous applications using ASGI Asynchronous Server Gateway Interface
The WSGI servers in Python, as with Apache, are used to handle HTTP requests and work synchronously with our request and they CANNOT work asynchronously and for these cases we need another type of server called ASGI.
As we mentioned before, the WSGI are the standard servers to develop in Python, however, to develop our asynchronous applications in Django we need an ASGI server that allows us to handle the traditional scheme of HTTP requests and also WebSockets through a channel layer.
Django Channels allows us to use an ASGI-type server and with this we can handle not only HTTP-type requests, but also protocols that require side-to-side communication, that is, full-duplex type persistently by opening a bidirectional channel to transmit messages using the protocol called TCP Transmission Control Protocol in such a way that this full-duplex communication allows us to connect between our client and server persistently without having to ask for status through ajax.
WSGI and ASGI
WSGI: Classic connection
When an HTTP request is sent by a client through the browser to our web server, Django handles the request by passing it to an object of type HttpRequest and sends it according to the view according to the route configured, the view processes the request and returns an HttpResponse type object and sends it back to our client, understood as our web browser using the following scheme:
ASGI: asynchronous bidirectional connection
Channels in Django replace the previously mentioned scheme, through messages that are passed from side to side in an asynchronous way in our application; HTTP requests are still mapped using the same routing scheme we have for a Django project, but to handle channel routes, i.e. webSockets, we need another layer, another set of routes to handle these types of requests. full duplex; therefore, we can simply use a synchronous or asynchronous type architecture and even both using the ASGI type servers through the channels in Django:
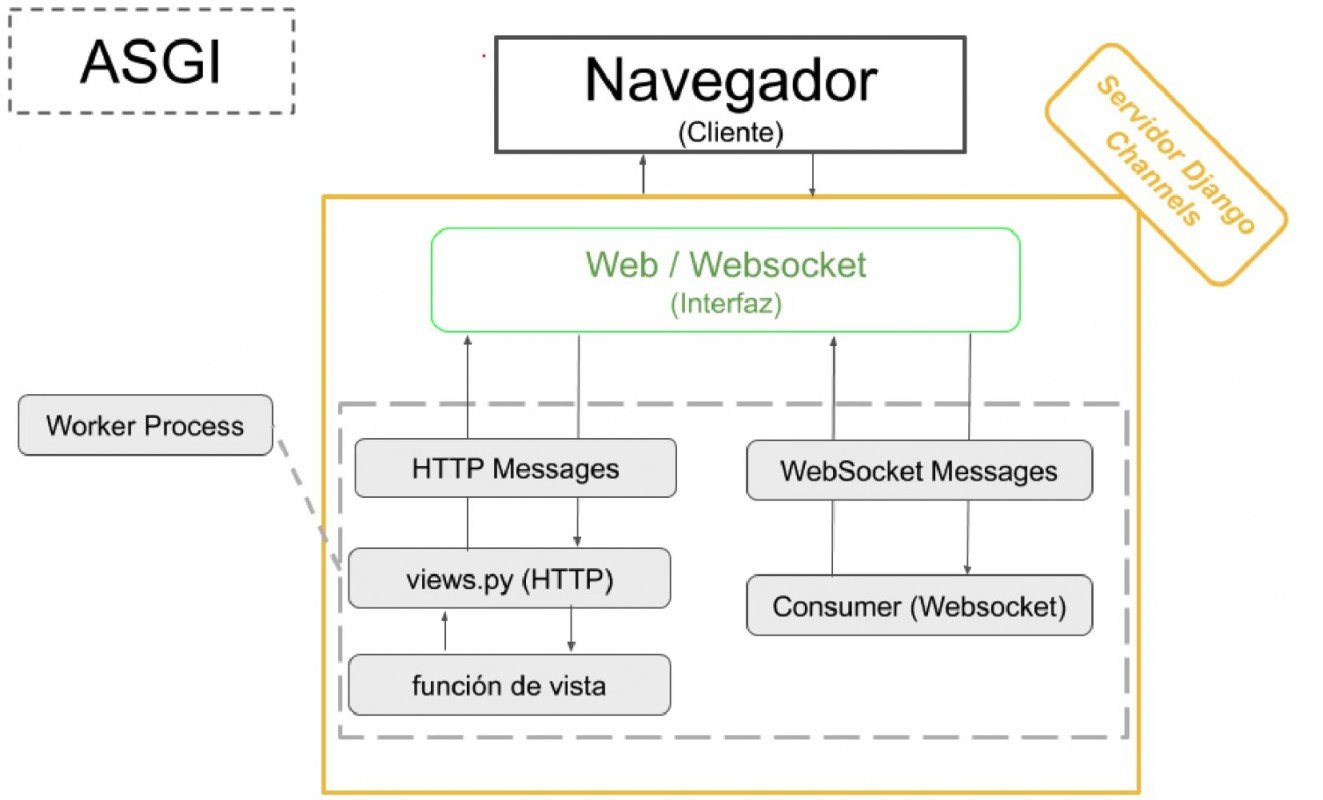
Since it will only see changes in the state of the server when messages are sent and/or received and it would not be necessary for us to use the ajax scheme, in WSGI-type asynchronous servers.
Consumer
Once channels are installed and configured in our Django project, in order to use the channel scheme in our application, we have to create what is known as consumers, these consumers are the ones that will handle asynchronous requests through our ASGI server. specifically the connection through websockets.
Consumers are individual pieces of code that allow us to read and write messages based on the full-duplex communication discussed above; these consumers have 3 important methods:
- The connect type, which is executed when a collection is created with the client.
- The type receive, whose function is executed when receiving a message from the client.
- The disconnect type, which allows us to have a mechanism when we disconnect from the client.
As you can see, if you've worked a bit with websockets, they have a similar structure, since in practice costumers are simply websockets on the server.
After creating the consumers, we have to create the routing corresponding to it:
from django.urls import path
from . import consumers

websocket_urlpatterns = [
    path('ws/alert/room/<room_id>', consumers.AlertConsumer.as_asgi()),
]
In our Django from scratch course we have several sections in which we work with this and with the basics and not so basics of Django.
Set up project in Django with Django Channels
Set up project in Django with Django Channels
In this section, we are going to create a minimal application with Django Channels to send messages between clients who will be registered in a room where they can communicate, therefore it will be a group chat as if it were a group on Whatsapp, Telegram or Discord; to do this, we will create a new project as discussed in chapter 3 that we will call mychannels.
Basic installations and configurations
The next section will be to install some necessary dependencies.
We install Django channels using:
$ python -m pip install -U 'channels[daphne]'Daphne is a purely ASGI server created in Python for UNIX environments, maintained by members of the Django project and is a reference server for ASGI and for these reasons is the server used by the Django Channels team.
We created an app to handle chat and alerts (messages):
$ python manage.py startapp chat
$ python manage.py startapp alert
The template for messages (alerts) consists of the content, the user who created the message and the creation date, typical for a text message:
alert/models.py
from django.contrib.auth.models import User

from django.db import models

# Create your models here.

class Alert(models.Model):
    content = models.CharField(max_length=200)
    user = models.ForeignKey(User, on_delete=models.CASCADE)
    create_at = models.DateTimeField(auto_now_add=True)

    def __str__(self):
        return self.content
And a model to manage the rooms, which is where the users will be able to communicate, it is important to note the inverse relationship of the rooms for the 'rooms_joined' users that we will use later when assigning a user to a room:
chat/models.py
class Room(models.Model):
    name = models.CharField(max_length=60, unique=True)
    users = models.ManyToManyField(User, related_name='rooms_joined', blank=True)

    def __str__(self):
        return self.name
We register the applications:
INSTALLED_APPS = [
    ***
    'daphne',
    'chat',
    'alert'
]
In the previous example, we installed the 'daphne' server, which is the application we are going to use.
We apply the migrations:
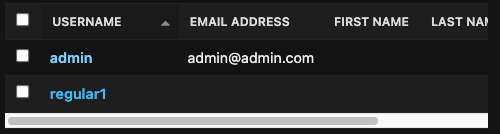
$ python manage.py migrateWe create a super administrator user to be able to use Django Admin:
$ python manage.py createsuperuserWe record the management of the rooms from Django Admin:
mychannels\chat\admin.py
from django.contrib import admin

from .models import Room

@admin.register(Room)
class RoomAdmin(admin.ModelAdmin):
    pass
We create some users from the Django Admin interface:
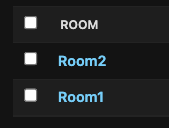
And rooms:
Configure ASGI server
As we mentioned previously, we will use Django Channels along with an ASGI type server that we must configure; In the official documentation, they specify the steps that we exemplify in this section:
https://channels.readthedocs.io/en/latest/installation.html
We prepare the project to use the ASGI type server and keep the HTTP channel:
mychannels/routing.py
from channels.auth import AuthMiddlewareStack
from channels.routing import ProtocolTypeRouter, URLRouter

import chat.routing


from django.core.asgi import get_asgi_application
django_asgi_app = get_asgi_application()

application = ProtocolTypeRouter({
    "http": django_asgi_app,
    'websocket' : AuthMiddlewareStack(
        URLRouter(chat.routing.websocket_urlpatterns)
    )
})
AuthMiddlewareStack is a class implemented in Django Channels that allows you to protect routes with required authentication.
With:
"http": django_asgi_app,We preserve the HTTP channel, therefore, we can use the same project in Django to communicate applications through websockets using the routes defined in:
chat\routing.py
And the traditional routes defined in the Django project of synchronous type that we define in urls.py at the level of the Django applications.
It is important to mention that the route files for consumers/wetsockets have not yet been configured, so you could comment the following line:
mychannels/routing.py
from channels.auth import AuthMiddlewareStack
from channels.routing import ProtocolTypeRouter, URLRouter

# import chat.routing
from django.core.asgi import get_asgi_application
django_asgi_app = get_asgi_application()

application = ProtocolTypeRouter({
    "http": django_asgi_app,
    # 'websocket' : AuthMiddlewareStack(
    #     URLRouter(chat.routing.websocket_urlpatterns)
    # )
})
We indicate that you use the configuration file generated above and with this, the ASGI type server:
mychannels/settings.py
ASGI_APPLICATION = "mychannels.routing.application"With this, if we run the server, which we can do normally using the same command as always:
$ python manage.py runserverWe will have an ASGI type server instead of the WSGI server, this server can also process WSGI type requests, which is how we have been using it until now:
Django version 5.X, using settings 'mychannels.settings'
Starting ASGI/Daphne version 4.1.0 development server at http://127.0.0.1:8000/
Instead of the WSGI type:
Django version 5.X, using settings 'mychannels.settings'
Starting development server at http://127.0.0.1:8000/
Quit the server with CONTROL-C.
This is essential to be able to continue with the rest of the chapter and be able to connect to the websockets; if you see output like the following:
django.core.exceptions.ImproperlyConfigured: Cannot find 'X' in ASGI_APPLICATION module mychannels.routingIt means that you have a problem referencing the routing file:
ASGI_APPLICATION = “mychannels.routing.application”What are Consumers in Django Channels?
To put it simply, Consumers are the equivalent of the Views we have used in Django so far. They are responsible for handling communication between the client and the server, but with an open-ended mindset, because communication is no longer just a simple request and response.
The difference from the traditional scheme
In classic views (HTTP), the client makes a request, the server processes it and returns a template or a JSON, and the matter ends there. In contrast, with Consumers, a permanent communication channel is established. This channel remains active until the client closes the browser or the server cuts the connection. It is constant Full Duplex communication.
The Lifecycle of a Consumer
In a Consumer, we mainly handle three key moments. Imagine entering a physical room:
Consumers are individual pieces of code that allow us to read and write messages according to the full-duplex communication mentioned earlier; these consumers have 3 important methods:
- The connect() (The Entry), which is executed when a connection is established with the client.
- The receive() (The Stay), whose function is executed the moment a message is received from the client.
- The disconnect() (The Exit), which allows us to have a mechanism for when we disconnect from the client.
And for sending messages? To send information to the client, the internal method send() is used. It is not an event that "happens" like the previous ones, but rather a tool that you use within your business logic when the server has something to communicate.
As you can see, if you have worked with WebSockets before, they have a similar structure, since in practice consumers are simply WebSockets on the server.
⚡ Key Concepts: WebSocket, Consumer, and Asynchrony
It is normal for these terms to sound similar, but each has its function:
- WebSocket: It is the protocol (just like HTTP). It is the technology that allows the channel to be Full Duplex. Instead of using http://, we use ws://.
- Consumer: It is the implementation in Django. It is the class we program to control that WebSocket protocol.
- Asynchrony (async): It is the way the server handles connections.
Why is it vital to be asynchronous?
Imagine a server with a single core and a single thread.
- In synchronous mode: If a user connects and keeps the channel open, the server would remain blocked attending only to that user. No one else could enter. It would be unfeasible.
- In asynchronous mode: The server can handle thousands of simultaneous connections in a single instance. It doesn't stay "waiting" and blocked; instead, it can jump from one task to another efficiently.
Analogy: Synchronous vs. Asynchronous
To understand the interaction of async and await, remember what we saw in JavaScript/Vue:
- Blocking (Synchronous): Like paying at a McDonald's and standing at the register until they give you your burger; no one else can pay while you wait.
- Non-blocking (Asynchronous): Like the processes we handle with .then() or async/await. You send the request and the program continues to flow. When the response is ready, it is processed, but in the meantime, the "server" continues to serve others.
Once channels have been installed and configured in our Django project, in order to use the channels scheme in our application, we have to create what is known as consumers. These consumers are the ones that will handle asynchronous requests through our ASGI server. specifically the connection through websockets.
Consumers are individual pieces of code that allow us to read and write messages based on the full-duplex communication discussed above; these consumers have 3 important methods:
- The connect() type, which is executed when a collection is created with the client.
- The receive() type, whose function is executed when receiving a message from the client.
- The disconnect() type, which allows us to have a mechanism when we disconnect from the client.
As you can see, if you have worked a little with websockets, they have a similar structure, since in practice consumers are simply websockets on the server.
Consumer
Once channels have been installed and configured in our Django project, in order to use the channels scheme in our application, we have to create what is known as consumers. These consumers are the ones that will handle asynchronous requests through our ASGI server. specifically the connection through websockets.
Consumers are individual pieces of code that allow us to read and write messages based on the full-duplex communication discussed above; these consumers have 3 important methods:
- The connect() type, which is executed when a collection is created with the client.
- The receive() type, whose function is executed when receiving a message from the client.
- The disconnect() type, which allows us to have a mechanism when we disconnect from the client.
As you can see, if you have worked a little with websockets, they have a similar structure, since in practice consumers are simply websockets on the server.
We create a consumer like the following:
chat/consumers.py
import json
from channels.generic.websocket import WebsocketConsumer

class ChatConsumer(WebsocketConsumer):

    def connect(self):
        print('Conectado')
        self.accept()
        # return super().connect()

    def disconnect(self, code):
        print("Desconectado")
        # return super().disconnect(code)

    def receive(self, text_data):
        print("Recibido")

        text_data_json = json.load(text_data)
        message = text_data_json['message']

        print(message)

        self.send(text_data=json.dumps({ 'message':message }))

        # return super().receive(text_data, bytes_data)
In the connection method we initialize the WebSocket and accept the connection:
self.accept()The most interesting method is receive(), which is the one that is executed when a message is received, in this method, we receive a message sent by another client:
text_data_json = json.loads(text_data)
message = text_data_json['message']
And we send again to all connected clients:
self.send(text_data=json.dumps({'message': message}))We could perform additional operations such as saving the message to the database, but we will deal with this later.
After creating the consumers, we have to create the routing corresponding to it:
chat/routing.py
from django.urls import path
from . import consumers

websocket_urlpatterns = [
    path('ws/chat/room/<room_id>', consumers.ChatConsumer.as_asgi()),
]
Remember to uncomment the import of the previously defined path from the project:
mychannels/routing.py
from channels.auth import AuthMiddlewareStack
from channels.routing import ProtocolTypeRouter, URLRouter

import chat.routing

from django.core.asgi import get_asgi_application
django_asgi_app = get_asgi_application()

application = ProtocolTypeRouter({
    "http": django_asgi_app,
    'websocket' : AuthMiddlewareStack(
        URLRouter(chat.routing.websocket_urlpatterns)
    )
})
Client: Consume Websocket
We create the view, which only returns a template and searches for the room with the inverse relationship:
channels/chat/views.py
@login_required
def room(request, room_id):
    try:
        room = request.user.rooms_joined.get(id=room_id)
    except:
        return HttpResponseForbidden()

    return render(request, 'chat/room.html', {'room':room})
And its route:
chat/urls.py
from django.urls import path
from . import views

app_name = 'chat'
urlpatterns = [
    path('room/<int:room_id>/', views.room, name='room')
]
We register the route at the project level:
mychannels/urls.py
urlpatterns = [
    path('admin/', admin.site.urls),
    path('chat/', include('chat.urls')),
]
As for the template, it looks like this.
Communication through channel layers (Multiple channels)
Currently, we have a full duplex asynchronous application with the limitation that it can only be consumed by one user, that is, in our chat-type application, only one user can talk to it as it is not possible for other clients to join in the room, which makes our application quite useless.
With Django Channels' channel layers, you can create channels to join multiple users to the same room; that is, now we can adapt our application so that multiple users can chat in real time in fullduplex communication.
To use these layers, we must make a configuration at the project level that indicates the backend that we are going to use to enable these layers, the layers can be in memory or the optimal one, using Redis, which is the option that we are going to use in the book; you can get more information at:
https://channels.readthedocs.io/en/stable/topics/channel_layers.html
Redis
Redis is an extremely fast NoSQL database, and that is why we see it used by services that require speed, such as to configure a cache, Redis stores the data in a key-value pair.
Install Redis on MacOS
To install Redis if you use MacOS, we can install it using Homebrew, which is nothing more than a package manager for MacOS; let's start by installing Homebrew:
$ /bin/bash -c “$(curl -fsSL https://raw.githubusercontent.com/Homebrew/install/HEAD/install.sh)”It provides an environment to develop in PHP, although we are interested in the section for database management, which would be the one we should install:
And from here, we can use Redis:
In the book, we will use DBngin for its ease.
Channels Redis
The following package allows you to use redis together with Django Channels and with this, be able to create the communication layer in the backend:
$ pip install channels-redishttps://pypi.org/project/channels-redis/
And we configure the project:
mychannels/settings.py
CHANNEL_LAYERS = {
    "default": {
        "BACKEND": "channels_redis.core.RedisChannelLayer",
        "CONFIG": {
            "hosts": [("localhost", 6379)],
        },
    },
}
In case you don't want to or can't use Redis, you can follow the rest of the chapter using the "In-Memory Channel Layer" instead:
CHANNEL_LAYERS = {
    "default": {
        "BACKEND": "channels.layers.InMemoryChannelLayer"
    }
}
Watch is recommended for development or testing environments.
Finally, with the channel layer configured above, it is possible to communicate between several clients that are consuming the same consumer and be able to listen to and send messages on said channel.
Key concepts
By default, the use of the functions send(), group_send(), group_add() among others, are asynchronous, which means you must wait for them. If you need to call them from synchronous code, you'll need to use a wrapper like the following asgiref.sync.async_to_sync:
Using the following object:
self.channel_layer
We can perform various operations such as:
- self.channel_layer.group_add Join a client to a group.
- self.channel_layer.group_discard Remove a customer from a group.
- self.channel_layer.group_send Send a message, this is the most interesting function since it allows you to fragment the process to send a message; for example, if we have the following message:
await self.channel_layer.group_send(
    room.group_name,
    {
        "type": "chat_message",
        "room_id": room_id,
        "username": self.scope["user"].username,
        "message": message,
    }
)
The parameter for the type corresponds to the name of the function that is going to send the message, the rest of the parameters correspond to the data sent to this function through the event:
async def chat_message(self, event):
    """
    Called when someone has messaged our chat.
    """
    # Send a message down to the client
    await self.send_json(
        {
            "msg_type": settings.MSG_TYPE_MESSAGE,
            "room_id": event["room_id"],
            "username": event["username"],
            "message": event["message"],
        },
    )
Unlike the first scheme that we presented (single channels) in the previous section, these functions allow us to use multi-channel, which means that we can connect more than one client to a single channel, otherwise, they have a logic similar to that used previously.
The objet:
self.channel_nameContains a reference to the layer (CHANNEL_LAYERS) configured previously.
Next step, learn how to send emails in Django.