
Content Index
- What is Railway and Why Use It with Django?
- 1 Prepare your Django project for deployment
- 2 Connect your GitHub repository to Railway
- 3 Optional, Configure database and environment variables
- 3.1 SQLite
- 4 Static files and production configuration
- 5 Configure domain and review final deployment
- 6 Web server
- Conclusion and final tips
- Frequently Asked Questions
How to Deploy a Django Project on Railway (Step-by-Step Guide)
If you've ever wondered how to deploy a Django project without complicating your life with servers or endless configurations, let me tell you about my experience with Railway, a platform that automates almost the entire deployment process.
In this guide, I'll show you how to upload a Django project to Railway step-by-step, using a GitHub repository and a few key configurations. It's the same method I use in my courses and personal projects, so I assure you it works.
Previously we saw how to configure logging in Django.
What is Railway and Why Use It with Django?
Railway is a cloud hosting platform that allows you to deploy applications in various languages just by connecting your repository. The best part is that it automatically detects the project type (Python, Node, etc.) and configures the environment for you.
Unlike other options like PythonAnywhere or Render, Railway stands out for its clean interface and automated deployment. When I first tried it, I was surprised how quickly it detected my Django environment just with the requirements.txt.
Additionally, it offers a free plan with a $5 initial credit, ideal for testing, demos, or educational projects.
1 Prepare your Django project for deployment
Before connecting anything, your project must be well-configured.
Create or update the requirements.txt file with all environment dependencies:
pip freeze > requirements.txtVerify settings.py:
DEBUG = False
ALLOWED_HOSTS = ["tu-dominio.railway.app"]
Create the Procfile (with no extension) in the project root:
web: uvicorn project_name.wsgi:application --host 0.0.0.0 --port 8000Railway automatically detects Django thanks to requirements.txt. But beware: if the repo is private, sometimes it doesn't sync correctly. I recommend making it public at least during deployment.2 Connect your GitHub repository to Railway
Once logged into your Railway account:
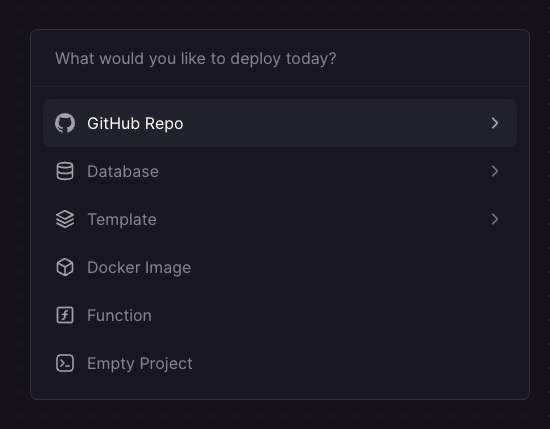
- Click on New Project.
- Choose Deploy from GitHub Repo.
- Authorize access and select the project repository.
- Railway will automatically detect Python and Django.
3 Optional, Configure database and environment variables
Django uses SQLite by default, but Railway allows adding external databases like PostgreSQL or MySQL with one click, therefore, if you want to use SQLite, you can skip this step and go to 3.1
- From the project panel, select Database.
- Copy the variables provided by Railway (host, user, password, database URL).
- Paste them in the Environment Variables section or in your settings.py.
In one of my projects, I used SQLite and discovered that Railway ignores the db.sqlite3 file due to .gitignore. I solved it by manually uploading it to the repo, although it's not ideal for production. Perfect for demos or testing.
3.1 SQLite
If you decide to use SQLite, remove the corresponding line from .gitignore, but remember that each commit will update the database.
You can use the database in SQLite but with important limitations such as the fact that it will be overwritten every time you make a new deploy from Railway; this is not a problem if you simply want to use the application as a demo or to present to a client, if you want to use it, remove the reference to sqlite from the .gitignore:
db.sqlite3And sync the database:
$ git add database/database.sqlite
$ git commit -m 'DB'
$ git push
4 Static files and production configuration
Handling static files usually causes headaches in Django, but with Railway, it's quite simple.
Execute:
$ python manage.py collectstaticMake sure you have this in your settings.py:
settings.py
#PRODUCTION******-
STATIC_ROOT = BASE_DIR / "staticfiles"
STATIC_URL = '/static/'
STATICFILES_DIRS = [BASE_DIR / "elements" / "static"]
#PRODUCTION******-
5 Configure domain and review final deployment
Railway automatically assigns a free domain of the type
https://app-name.up.railway.app.
- Go to Settings of the cloned GitHub project.
- Create and copy the domain and add it to ALLOWED_HOSTS.
- Save changes and Railway will redeploy your app.
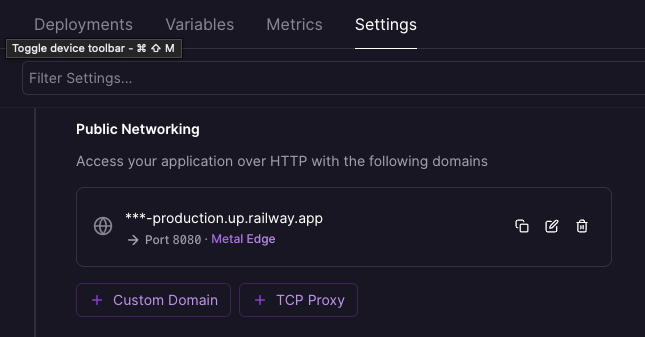
settings.py
ALLOWED_HOSTS = [ "***-production.up.railway.app", ]6 Web server
Until now, we have been using a development server, which is perfectly clear when running a Django application:
$ python manage.py runserver *** WARNING: This is a development server. Do not use it in a production setting. Use a production WSGI or ASGI server instead. ***We must install one for production; for Python web, gunicorn is usually an excellent choice:
$ pip install gunicornRailway needs a Procfile to know how to execute your app; this file tells deployment platforms like Railway or Heroku, to name a few, how to deploy the application, that is, how to start the app, in this case, the command for the installed web server:
Procfile
web: gunicorn myproject.wsgiChange myproject to the name of your Django folder that contains the wsgi.py file.
The Procfile must be located inside the project folder (at the same level as manage.py).
Conclusion and final tips
In summary, these are the essential steps to deploy a Django project on Railway:
- Prepare your requirements.txt and Procfile.
- Configure settings.py and ALLOWED_HOSTS.
- Connect your GitHub repo (preferably public).
- Configure database and environment variables.
- Adjust static files and verify the domain.
- Install and configure gunicorn.
With that, you'll have your Django app running on Railway in a few minutes.
I've tested it on several projects, and it remains one of the simplest and most efficient options for deploying without complications.
This is a project used to perform the deploy on Railway:
https://github.com/libredesarrollo/coruse-book-django-store/
The project:
https://course-book-django-store-production.up.railway.app/
Next, we'll cover Professional Authentication in Django: Email Login and Template Customization with Bootstrap 5
Frequently Asked Questions
- Is Railway free for Django?
Yes, it has a free plan with an initial $5 credit. Your app may then "sleep" if it doesn't receive traffic. - Can I use SQLite?
Yes, but it's not ideal for production. Railway ignores db.sqlite3 by default; you can upload it manually for testing. - What happens if my static files don't load?
Check STATIC_URL, STATIC_ROOT, and that you have run collectstatic. Use WhiteNoise to serve them correctly. - What's the difference between Railway and Render?
Railway is more automated and easier to set up; Render offers more control over production environments.