Content Index
- What is an application in Django and how does it differ from a project?
- Projects vs. Applications - What is the difference between a project and an application?
- ️ Basic Python Commands for Django
- 1. Package Management
- 2. Requirements Management (requirements.txt)
- Preparing the working environment in Django
- Running the project on a server
- Creating our first application with startapp
- Registering the application in the project
- Application Structure
- 1. Gemini Code Assistant (VS Code Extension)
- 2. Gemini CLI (Command Line Interface Tool)
- Creating our first "Hello World" function in the view
- Configuring the routes (URLs) for our view
- Seeing our Hello World in the browser
- Vistas, templates y rutas
- Templates
- Practical Case
- Pass parameters to template
- Container folders for templates
- Change Implementation
- Conclusion
- Frequently Asked Questions
When we start working with any technology like Django, one of the most exciting moments is seeing the classic "Hello World" message appear in the browser. It's the exact point where you realize your environment is working. Now that we know what Django is and what it's for, let's move on to the next point, which is creating a "Hello World" program.
In this post, we're going to see how to create our first application in Django, understand the difference with a project, and how to connect everything to see results in the browser.
We are going to learn how we can work with two layers of our MTV basically, which is the View and Template layer, in addition to another layer that allows us to route, which is an intermediate layer.
What is an application in Django and how does it differ from a project?
One of the first things we need to understand when starting with Django is the difference between a project and an application; since it's the only framework whose structure is organized by projects and applications.
In short:
- A project is the global container that defines the general configuration of your site.
- An application is a functional piece within that project; it can be responsible for handling users, a blog, an API, etc.
If we compare it with other frameworks like Laravel or CodeIgniter: the project would be the entire site and the applications would be the modules that make it up.
In Django, you can have many apps within the same project, each one independent and reusable.
A Django project consists of one or many applications, which is what we are going to create at this point; we will create at least one application to be able to do something interesting in our newly created project.
Projects vs. Applications - What is the difference between a project and an application?
An application is a web application that does something, for example, a web registration system, a public records database, a Rest API, an app for selling something, etc.
A project is a collection of configurations and applications for a particular website. A project can contain multiple applications. An application can be in multiple projects.
The use of Django to create applications is strongly linked to the modularization concept, and therefore, we can create multiple small applications that perform particular tasks, so that together, we can have the final application that we want; for example, for a blog type application:
- An application for the list and detail of the posts.
- An application to handle authentication, registration and derivatives.
- An application to manage contacts, as well as manage post comments and others.
- An application to handle a rest api.
- An application to manage basic information, such as contact and "about".
️ Basic Python Commands for Django
Don't think I forgot to record this video about the basic commands. Here I show you the essential features of the PIP package manager:
1. Package Management
Install (pip install): We already did this before. This command is used to install packages. You enter the name of the package you want to install: django, Flask, Tkinter, etc.
$ pip install <paquete>Uninstall (pip uninstall): Similarly, we have pip uninstall, which is used to uninstall the package. (I'm not going to run it now so as not to uninstall anything).
$ pip uninstall <paquete>View Installed Packages (pip freeze): We have already used this command several times, so I don't think we need to use it again.
$ pip freeze2. Requirements Management (requirements.txt)
We usually have a file called requirements.txt. This file lists the requirements or packages for our project (that is, what it needs to function), including their specific versions. For now, we only need Django.
This is important because when you use deployment services like Railway or others, the service automatically looks for this file, saving you time.
Generating the File (pip freeze > requirements.txt): This command generates the file. Instead of outputting to the terminal, the arrow (>) redirects the output to the file, which is conventionally called requirements.txt.
$ pip freeze > requirements.txtInstall from File (pip install -r requirements.txt): This command is used to install all packages listed in that file.
$ pip install -r requirements.txtPreparing the working environment in Django
Before creating the application, we need to have Django installed and a base project.
From the terminal, we execute:
$ django-admin startproject firstProjectThis creates a structure like this:
firstProject/
   manage.py
   firstProject/
       __init__.py
       settings.py
       urls.py
       asgi.py
       wsgi.py
Each file has its clear function. For example:
- manage.py: A command-line utility that allows you to interact with this Django project in different ways, and you can get more information in the official documentation.
- __init__.py: An empty file that tells Python that this directory should be considered a Python package.
- settings.py: Settings/configuration for this Django project; it defines a set of configurations that we can apply globally to the project.
- ALLOWED_HOSTS: Here we'll put the domain we'll use when we deploy our application to production.
- INSTALLED_APPS: Indicates the installed applications. Note that we already have several pre-installed Django components (again, the "batteries included" concept): django.contrib.admin: The beautiful Django Admin.
- django.contrib.auth: For authentication (we already have a basic user model ready).
- django.contrib.contenttypes, sessions, messages, and staticfiles.
- MIDDLEWARE: These are the intermediaries. We'll explain this later, but in short, when a user makes a request to our server, the middleware can be a class or function that runs in between to perform a task (for example, verifying access to an admin module).
- TEMPLATES: This is the template manager (Django's template engine) that allows us to manage the presentation.
- DATABASES: By default, we use SQLite as the database. (The database will be generated when we run the migrations later).
- urls.py: The URL declarations for this Django project; from here we can (for example) load more URL files from other applications or dependencies.
- For best practices, this file should only contain the URLs of the applications we're going to use (global paths), not the local paths of those applications. We create the local paths directly within each application.
- You can see an example of this, where the application is included:
admin:urlpatterns = [
path('admin/', admin.site.urls),]
- urlpatterns: This part is crucial. The urlpatterns list must have that name, because it's what Django will read internally to load those URLs.
- asgi.py: Entry file for working with ASGI servers and deployment.
- wsgi.py: Entry file for working with WSGI servers and deployment.
Running the project on a server
With a new project created, the next thing we need is to start viewing what we've done in the browser; for that, we need to start the development server; as we mentioned before, via the command line, we have a command to start the development server:
$ python manage.py runserverAnd we get a result like the following:
Nov 17, 2025 - 16:11:19
Django version 5.0.3, using settings 'mystore.settings'
Starting development server at http://127.0.0.1:8000/
Quit the server with CTRL-BREAK.
By default, Django uses a WSGI type server, which stands for Web Server Gateway Interface (WSGI), it's a standard interface between the web server and web applications written in Python that, in short, allows communication with our Django application.
Finally, if we go to the previously indicated URL, we will see:
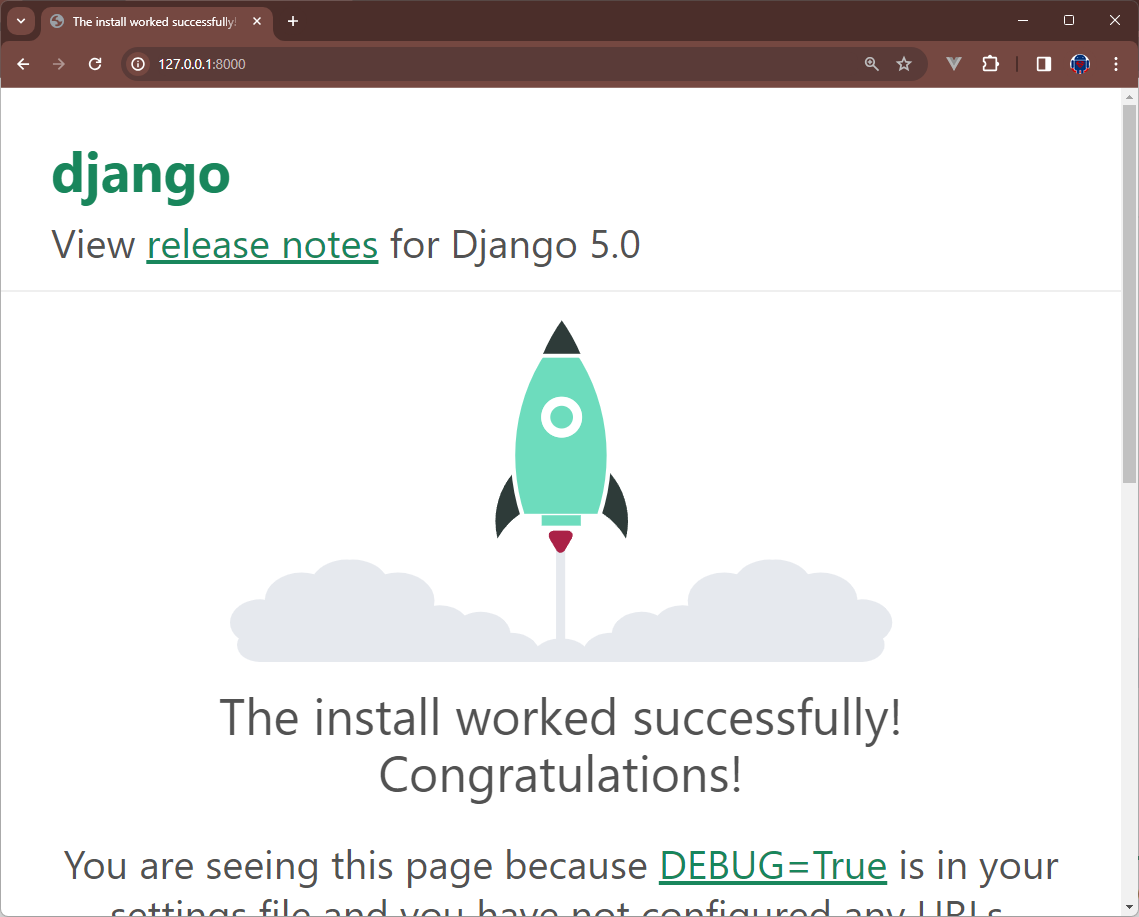
Obviously, we haven't implemented anything yet, but it's at least curious, in addition to being necessary to know if the project is functional to continue advancing in creating our first application.
Creating our first application with startapp
Inside the project, we create the application:
$ python manage.py startapp firstAppThis generates a new structure:
firstApp/
__init__.py
admin.py
apps.py
migrations/
models.py
tests.py
views.py
- python manage.py: The command line for our project.
- startapp: The command to start an application.
- firstApp: The name I'm giving the application. (I'm calling it comments because it will be used for simple CRUD operations; for me, CRUD operations are the fundamental tool for understanding any technology at a basic level.)
A Django application is nothing more than a Python package with a standard layout.
Inside this folder, we will place the business logic, the views, and the templates.
Registering the application in the project
As we discussed before, the project basically is the global element that allows containing one or many applications, like the one called firstProyect that we created earlier; therefore, to be able to use the application throughout our project, we have to register the application within our project; for this, we have to open the file called settings.py and locate the option called INSTALLED_APPS:
We open the project's settings.py file and look for the INSTALLED_APPS list.
There we add our application:
INSTALLED_APPS = [
   'django.contrib.admin',
   'django.contrib.auth',
   'django.contrib.contenttypes',
   'django.contrib.sessions',
   'django.contrib.messages',
   'django.contrib.staticfiles',
   'firstApp',  # nuestra app
]
Once registered, we can now use it within the project.
Application Structure
If we go inside the folder we created earlier named firstProyect (which is our application in Django and is nothing more than a Python module):
- __init__.py: Special Python file that indicates that this folder is a module.
- admin.py: Django file where we can register models to use them in an application that Django offers for data management.
- apps.py: Application configuration file.
- migrations/: Folder from which we can manage migrations.
- models.py: File from which we can create the application's models, and this is one of the layers of our MTV.
- tests.py: File for performing application tests.
- views.py: File for creating functions or views to perform the logic, and this is the business logic layer that is responsible for connecting the model layer with the template layer; this is the view layer or -part- the controller in our MVC.
Of course, these are the initial files and folders that we can extend to add more configurations such as forms, urls, etc.
1. Gemini Code Assistant (VS Code Extension)
We're going to quickly review two tools. I will leave the detailed information (step-by-step) in a video on my YouTube channel and on my blog.
First, I recommend you search in the Extensions section of VS Code:
Search for "Gemini".
You will see the assistant that you can install. You should always watch out for it to say "by Google" and have the verified checkmark (it's usually the first one):
https://marketplace.visualstudio.com/items?itemName=Google.geminicodeassist
Then, a window will appear for you to authenticate (with a large Login button).
Once authenticated, you will be able to ask anything associated with this project directly in VS Code.
2. Gemini CLI (Command Line Interface Tool)
Another tool that I like even more is the Gemini CLI (Command Line Interface).
https://www.desarrollolibre.net/blog/ia/gemini-cli-step-by-step-installation-and-use-for-developers
Recommendation and Modern Programming
If you have any questions or problems when creating the models (which is what we will do now), ask Gemini! It's that simple.
Creating our first "Hello World" function in the view
To do this, remember that you must previously have installed and created your project in Django and also created your application, which we already did previously.
We are going to go to:
firstProject -> firstApp
Which is inside your project and then inside the application we created in the previous post:
firstProject/firstApp/views.py
Here we have everything necessary to start the "Hello World" type web application with Python.
Inside the views.py file of our application, we write the following:
from django.http import HttpResponse
def index(request):
   return HttpResponse("Hello")
With the previous code, we can see how simple and elegant Django is: one function, one HTTP response, and that's it.
The HttpResponse class is responsible for returning content that the browser can interpret.
A Django application is simply a Python package that follows a specific file layout and base structure that we can use for our Django web projects.
Configuring the routes (URLs) for our view
Now, we have an example function that is ready to be consumed via our browser, specifically via a URL or route; so now we have to explain a new layer that will be what allows us to create this routing.
We are going to create the route so that it can be consumed via our browser specifically via a path or URL; for this, we are going to create a file called urls.py inside the urls.py file INSIDE our application:
firstApp/urls.py
from django.urls import path
from . import views

urlpatterns = [
    path('', views.index, name='index'),
]
If you have worked in other modern frameworks like Laravel or CodeIgniter 4, this will seem very familiar; first we are importing one of our layers represented by views.py and then we are creating an array of routes, which currently only has one route, so it is an array of one position; in which we are indicating the path, then the function in charge of resolving the path, and we are giving it a name which is completely optional, and in another post we will see what defining a name for a route is for.
Then, we register that file in the main project routes (firstProject/urls.py):
from django.contrib import admin
from django.urls import path, include
urlpatterns = [
path('admin/', admin.site.urls),
path('firstApp/', include('firstApp.urls')),
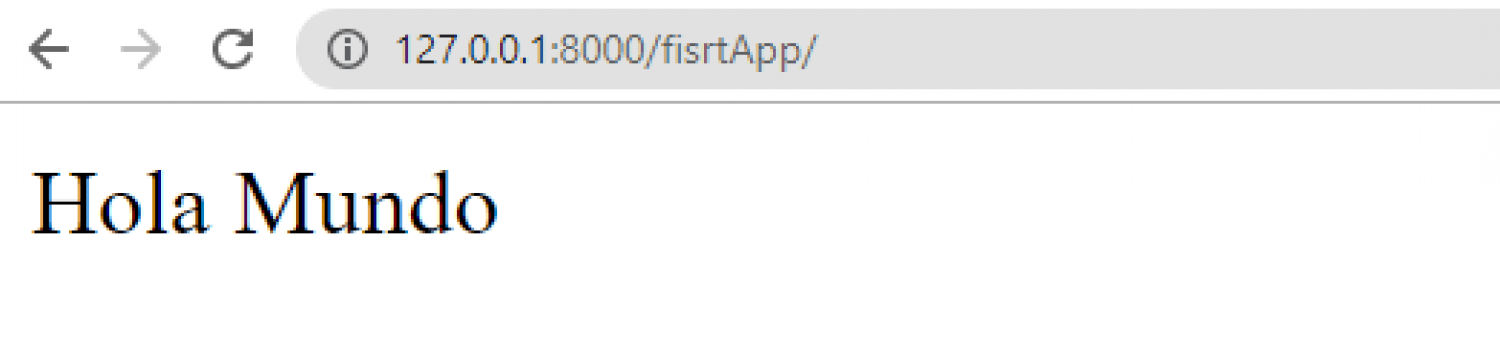
]Seeing our Hello World in the browser
To finally complete all our work, we have to execute the following command at the level of your project (where a file called manage.py is located):
$ python manage.py runserverAnd with this, if we go to:
http://127.0.0.1:8000/fisrtApp/
Django will start its development server and show you a local address, usually http://127.0.0.1:8000/.
If you visit http://127.0.0.1:8000/firstApp/, you will see something like this:
Vistas, templates y rutas
We no longer want to return a simple HttpResponse; we want Django to use an HTML file. For this, we use the helper method (shortcut) called render.
In the file:
comment/views.py
We are going to create a function named add(), to add comments; for the moment, the section for drawing a view:
def add(request):
    return render(request,'add.html')
Explanation of the above code
The previous function, called render() which is a shortcut, receives the template as its main parameter, which remember is the HTML page, a page that does not exist and therefore, we have to create it.
Shortcuts are simply a collection of helper functions and classes that exist for various application purposes.
Templates are stored in a folder at the application level called “templates,” templates that define the HTML pages with the content we want to present; since we used in the view:
return render(request,'add.html')Templates
Templates are the mechanism through which Django can dynamically generate HTML based on a special syntax that describes how the dynamic content will be inserted.
Each application can have its own templates folder to define the pages of those applications; this folder is not created by default in applications, as it is optional; the reason for this is that from the views, we do not necessarily have to return a template; we can return other formats like JSONs, XMLs, simple text, etc.
Practical Case
We have to create a page:
comments/templates/add.html
<!DOCTYPE html>
<html lang="en">
<head>
    <meta charset="UTF-8">
    <meta http-equiv="X-UA-Compatible" content="IE=edge">
    <meta name="viewport" content="width=device-width, initial-scale=1.0">
    <title>Document</title>
</head>
  <body>
    <h1>Page to add</h1>
  </body>
</html>
Now, to be able to display something in the browser, we need a mechanism with which we can link the previous view to a URI that we can consume through the browser; we need to create the route.
Pass parameters to template
The core idea of a framework like Django is that the content isn't static, but rather comes from a data source (usually the database).
We can pass parameters to templates; this is clearly useful for passing data between the view function and the template; for this, we indicate as second parameter:
return render(request,'comments/add.html',{'data':'Content'})Context Dictionary: A dictionary in Python consists of key-value pairs.
- The key ('data') will be the name of the variable we'll use in the template.
- The value ('Content') is the actual data we want to display.
From template:
<!DOCTYPE html>
<html lang="en">
    <head>
        <meta charset="UTF-8">
        <meta http-equiv="X-UA-Compatible" content="IE=edge">
        <meta name="viewport" content="width=device-width, initial-scale=1.0">
        <title>Document</title>
    </head>
    <body>
       {{ data }}
    </body>
</html>
Container folders for templates
As we discussed before, in the applications' views.py , we can have multiple view functions, therefore, it is always a good idea to modularize our application with folders; we can create a container folder for the add.html template.
And from render():
def add(request): return render(request,'comments/add.html')Of course, you can place a larger folder hierarchy if you deem it necessary.
Change Implementation
- Create Subfolder: Inside comments/templates/, we create a subfolder with the same name as the application: comments/.
- Move the Template: We move the add.html file to the new location: comments/templates/comments/add.html.
- Update the View: Obviously, if we now visit the page, the application will fail with the error: "TemplateDoesNotExist" (the template does not exist).
- Correct in views.py: We have to update the reference in the render function of our view as shown before.
Conclusion
In this first exercise, we learned the complete flow to start a Django application:
- Create a base project (startproject)
- Create an application within the project (startapp)
- Register the application in settings.py
- Create a view (views.py)
- Configure the routes (urls.py)
- Run the server and test in the browser
With this, we now have a completely functional app that responds to an HTTP request.
From here, the path continues with models, templates, and forms, but the important thing is that you've understood how the basic pieces of Django connect.
Frequently Asked Questions
- What is the difference between a project and an application in Django?
- A project is the general container; an application is a functional part within it.
- Where are applications registered?
- In the settings.py file, within the INSTALLED_APPS list.
- Why isn't my "Hello World" showing up?
- Make sure you have correctly created and linked the urls.py file in both the application and the project.
- Can I have multiple applications in the same project?
- Yes, and it's one of Django's great advantages: you can modularize your project into as many apps as you need.
The next step is to learn how to use models in Django.