
Apache is one of the most popular web servers today; when searching on Google for both paid and free hostings, we'll see that all of them use Apache as the web server.
When I started working with web servers, Apache was the first one I encountered... and also the one that gave me the most headaches initially. But, over time, I understood why it remains one of the most used servers in the world: it's flexible, stable, and you can configure it to your liking. In this guide, I'm going to tell you exactly what Apache is, how it works, and how you can master it with real-world examples that I've used myself in production and development.
What Exactly Is Apache and How Does It Work?
Apache—or more formally Apache HTTP Server—is a web server software responsible for receiving HTTP requests from users and delivering back pages, files, data, or whatever your application needs. You can use it on Linux, Windows, or macOS and with practically any backend language.
Apache's Role in Today's Web Ecosystem
Although alternatives like NGINX or LiteSpeed exist today, Apache is still widely used because it is modular, easy to extend, and tremendously configurable. From small systems to complex development environments, Apache adapts well.
Architecture and Modules: Why Apache is So Flexible
Apache operates through Modules (mod_rewrite, mod_ssl, mod_php, etc.). You can activate or deactivate these modules depending on what your project needs.
When I first activated mod_rewrite, I remember having to change all the AllowOverride None to AllowOverride All inside sites-available/default. That simple change unlocked the friendly URLs I needed for my project.
Difference Between Apache, NGINX, and Other Web Servers
- Apache: Very flexible, ideal for fine configurations and varied projects.
- NGINX: Huge performance for high-traffic sites.
- LiteSpeed: Compatible with Apache, but faster (paid in most cases).
Main Features of the Apache Server
Modular and extensible system
You can activate modules like:
- mod_ssl for HTTPS
- mod_rewrite for clean URLs
- mod_security for protection
- mod_php to execute PHP
I've worked with all of these, and the advantage is that you don't need to install the whole server again; you just enable what you need.
Full compatibility with PHP, databases, and operating systems
It doesn't matter if you use PHP 5, PHP 7, or PHP 8, MySQL or MariaDB: Apache adapts. I've even worked with multiple PHP versions on Windows by manually switching modules from httpd.conf.
Performance, security, and stability
- Stable for medium projects.
- Robust in handling errors.
- Perfectly compatible with SSL/TLS.
How Apache Is Configured (Overview)
Key files: httpd.conf, apache2.conf, and .htaccess
- On Linux: /etc/httpd/conf/httpd.conf
- On Debian/Ubuntu: /etc/apache2/apache2.conf
- Local configuration: .htaccess
Ports, processes, and how Apache serves HTTP requests
- Port 80 → HTTP
- Port 443 → HTTPS
- Uses MPMs (prefork, worker, event) to handle processes and performance.
Common Errors and How to Identify Them in the Logs
On more than one occasion, Apache wouldn't start until I checked:
/var/log/httpd/error_log /var/log/httpd/ssl_error_logEssential Apache Modules and How to Activate Them
Activating mod_rewrite for friendly URLs
On Linux, I activated it like this:
a2enmod rewriteThen I changed all AllowOverride None → AllowOverride All.
Mod_security, mod_php, and other frequent modules
Depending on your environment:
- a2enmod php8.2
- a2enmod ssl
- yum install mod_ssl on Fedora/CentOS
How to enable and disable modules according to your environment
With:
a2dismod <module> a2enmod <module>On Windows it's a bit more manual; you have to edit the httpd.conf and comment or uncomment the LoadModule lines.
Working with .htaccess files to control server behavior
URL rewriting: basic rules and real-world examples
This was the first .htaccess I tested:
RewriteEngine On RewriteRule prueba.html http://www.google.com [R]When I entered localhost/prueba.html, Apache sent me directly to Google. Pure magic for a novice!
Permanent, temporary redirects, and route handling
- 301 → Permanent
- 302 → Temporary
- Rewrites with regular expressions
- Total control over internal routes
Tips to avoid errors in .htaccess
- Never leave unnecessary spaces.
- Activate the rewrite in the VirtualHost.
- Watch out for infinite loops.
Apache is one of the most popular web servers today; when searching on Google for both paid and free hostings, we'll see that all of them use Apache as the web server.
As you well know, Apache is based on modules or components that are independent and we can configure them independently. One of these configurations is the Virtual Host, which allows assigning different websites through domains to the same IP address.
In this post, we will see what Virtual Hosts are and how to use them in our web applications with PHP.
Virtual Hosts are a very useful configuration when developing our applications, as they allow easy access to a PHP application hosted on an Apache web server through a simple domain that we configure on our machine or server.
Configuring Virtual Hosts
On Linux, specifically Fedora, we must enter the path:
sudo gedit /etc/httpd/conf/httpd.conf Of our folder where Apache is hosted, and after all the comments we can enter something like this:
<VirtualHost desarrollolibre2.net> ServerName desarrollolibre2.net DocumentRoot /var/www/html/desarrollolibre </VirtualHost>The first line <VirtualHost desarrollolibre2.net> simply indicates the IP (through the domain) of the virtual host and the port, which by default is 80; we could also use a configuration like the following:
<VirtualHost *:80> ServerName desarrollolibre2.net DocumentRoot /var/www/html/desarrollolibre </VirtualHost>The ServerName desarrollolibre2.net establishes the base or root of the domain, and this is the address we will use in the browser to access our application.
The DocumentRoot /var/www/html/desarrollolibre establishes the directory location, which in other words means the site that our domain configured with the Virtual Host points to.
This would be the minimum we need; there are other configuration directives such as ServerAdmin to specify the administrator's email, the alias with ServerAlias, etc.
We restart the Apache services with the commands:
sudo service httpd stop sudo service httpd start
Or from the interface of Xampp, Wampp, or any other if you are on Windows:
If we try to access the previous domain, we will see a screen like the following:
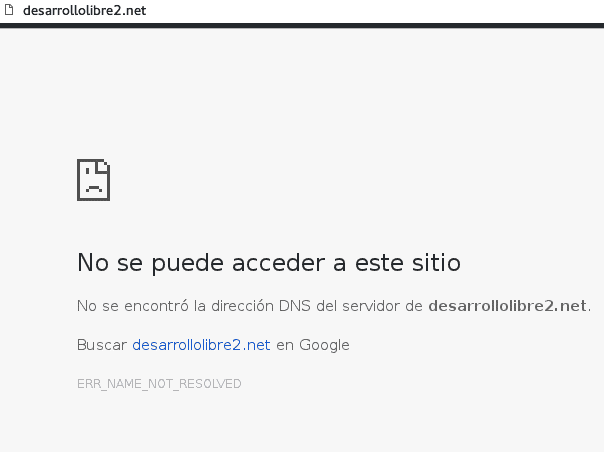
What's Wrong With Our Virtual Host?
The hosts file has several uses, such as establishing the site's IP to avoid passing through the DNS, blocking sites, etc. In our case, we are interested in it to indicate that the domain in question will be resolved by our own machine;
Virtual Hosts on Linux step by step
Typical example:
<VirtualHost *:80> ServerName midominio.net DocumentRoot /var/www/html/misitio </VirtualHost>For this, we must go to our machine's hosts file, which will be in Linux at:
sudo gedit /etc/hostsIn the case of Windows, it will be at:
C:WINDOWS\system32\drivers\etc\hostsWe add the previous domain:
127.0.0.1 localhost.localdomain localhost ::1 localhost6.localdomain6 localhost6 127.0.0.1 desarrollolibre2.netI configured many of these on Fedora for development environments, and they work wonderfully.
Virtual Hosts on Windows (XAMPP, UwAmp)
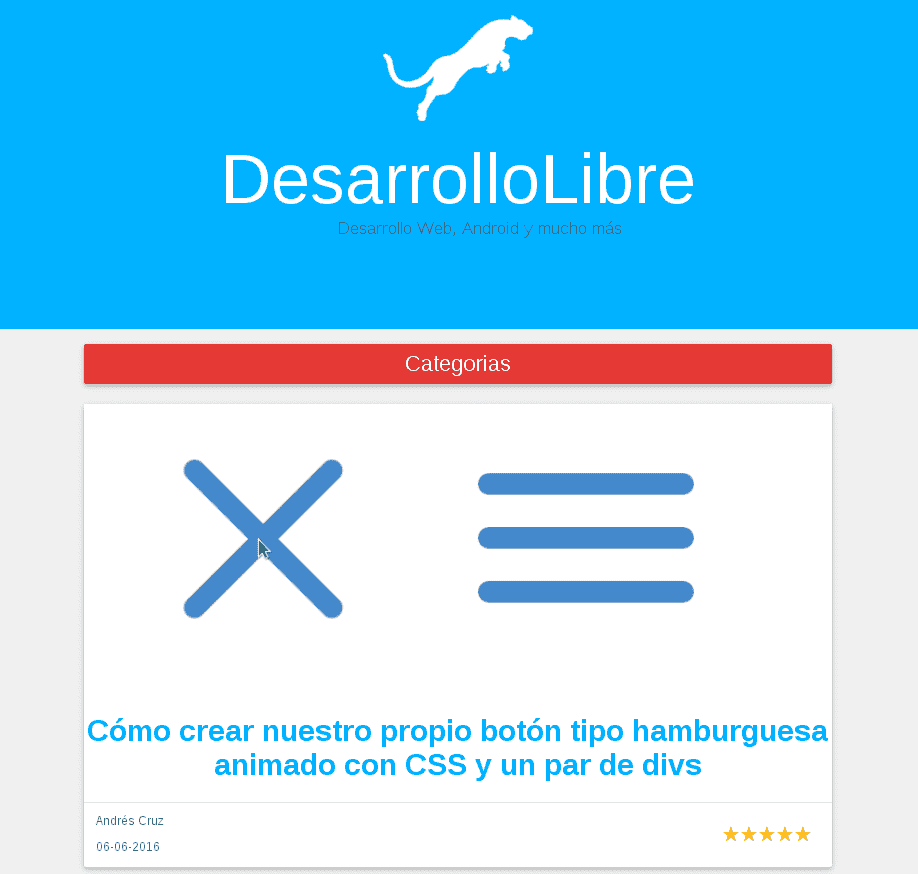
On Windows you must edit the file:
C:\WINDOWS\System32\drivers\etc\hostsNow, if we try to browse again, we will see a screen like the following, which corresponds to the DesarrolloLibre website that I have hosted locally:
Log Management in Apache: Access, Errors, and Custom Logs
What are logs?
Application logs are records generated by applications based on a series of events recorded at a particular time; they are used to record data such as:
- Application errors.
- Users accessing the application.
- Time in a specific module of the application.
Among other parameters; logs are important tools for detecting possible problems, errors, and bugs in the application.
Logs in Apache
Apache logs can be easily configured using the CustomLog directive within the VirtualHost using the following syntax:
CustomLog
Where:
`: Is the location of the ` `; that is, where the ` ` is referenced. `: Is the name you give to the log. `: (Optional) Is the file extension. `: Is the log configuration, which can be: - `combined`: `%h %l %u %t \"%r\" %>s %b \"%{Referer}i\" \"%{User-agent}i\"`
- `common`: `%h %l %u %t \"%r\" %>s %b`
Where each of the "format strings" means:
| Format String | Description |
|---|---|
| %h | Is the host accessing the server. |
| %l | Is the user's RFC 1413 identification protocol. |
| %u | Is the username (commonly the output will be a hyphen unless it is an authenticated user in the system). |
| %t | Is the date including time and UTC. |
| %r | Is the request made by the user. |
| %>s | Is the HTTP status response code. |
| %{Referer}i | Is the URI referring to the resource. |
| %{User-agent}i | Is the user's user-agent. |
The parameter table based on the official Apache documentation; mentioning some of the most used "Format Strings":
| Format String | Description |
|---|---|
| %% | Is the percentage sign. |
| %a | Is the remote IP address. |
| %A | Is the local IP address. |
| %B | Is the size of the "response" in bytes including the HTTP header. |
| %b | Is the size of the "response" in bytes including the HTTP header, in CLF format. |
| %{VARNAME}C | Is the cookie content in the request sent to the server. |
| %D | Is the time taken by the server to give a response. |
| %{VARNAME}e | Gives us the content of the variable. |
| %f | Is the file name. |
| %h | Is the Remote Host. |
| %H | Is the protocol. |
| %k | Is the number of "keepalive" requests handled in the connection. |
| %m | Is the request method. |
| %p | Is the canonical port of the server serving the request. |
| %q | Is the query string. |
| %u | Is the username. |
| %U | Is the request URL, does not include any query string. |
Furthermore, we can create a custom log format using the LogFormat directive; as we will see in the next section.
Multiple Access Logs in Apache
Apache allows managing multiple access logs; to create a log from Apache, it is enough to specify as many CustomLog directives as desired logs.
Creating a log with the CustomLog directive in Apache
For example, the following directives create three access logs.
- The first contains basic CLF information.
- The second contains information about the resources accessed and the user.
- The last "CustomLog" shows the agent used.
LogFormat "%h %l %u %t \"%r\" %>s %b" common CustomLog logs/access_log common CustomLog logs/referer_log "%{Referer}i -> %U" CustomLog logs/agent_log "%{User-agent}i"Conditional Logs in Apache
It may be convenient to exclude information from the logs; we can easily do this using environment variables. First, we must set the environment variable to indicate that the request meets certain conditions; This is generally achieved with
Example of Conditional Logs in Apache
SetEnvIf Remote_Addr "127\.0\.0\.1" dontlog SetEnvIf Request_URI "^/robots\.txt$" dontlog CustomLog logs/access_log common env=!dontlogAnother example consists of sending the requests of those who "speak English" to a different log file.
SetEnvIf Accept-Language "en" english CustomLog logs/english_log common env=english CustomLog logs/non_english_log common env=!englishVery useful for analyzing traffic and debugging.
Filtering or Excluding Requests using SetEnvIf
Real example I used:
SetEnvIf Remote_Addr "127\.0\.0\.1" dontlog CustomLog logs/access_log common env=!dontlogHow to Configure HTTPS and SSL Certificates in Apache
As you know, HTTPS is the secure version of HTTP and is used in all types of web applications such as Twitter, Gmail, different banking systems, etc.; it allows adding a layer of security to applications through encryption, which is supported by a certificate that allows "certifying" the identity of that entity (computer, company, or person).
Private and Public Keys in Certificates

These certificates contain a public key and a private key; the public key is the one we generate ourselves through the CSR and which is validated by another server (that would be the idea, that we don't self-sign the request).
The private key is simply a security password that we generate in later steps and remains on the server and should not be shared.
To be able to generate the private and public key, we will need some additional tools to be able to use HTTPS on our website, which we will see next.
Apache mod_ssl Module
The mod_ssl is simply an Apache module that provides SSL support and we must install it to be able to use HTTPS on our website.
On machines that use RPM repositories like Fedora, we can install the Apache mod_ssl module with the following command:
yum -y install mod_sslGenerating the SSL certificate
With our SSL support module installed, we can begin to generate the certificate for our site.
We open the console in Linux and locate ourselves in any directory (we will locate them in the specified path later); with this we can move on to the next step.
Generating the private key
First we must create the private key which will have a length of 1024 characters (there are other parameters like -des3 to specify a triple encryption algorithm but these are optional):
openssl genrsa -out ca.key 1024 Generating CSR
The CSR (Certificate Signing Request) is a file that contains information about the person or company (location, domain...); with this file we can ask another certified entity to sign it and thus confirm that the data we provide is correct, and in this way, a certification chain is built and our entity becomes certified.
openssl req -new -key ca.key -out ca.csr When you execute the previous command, you will see that it requests a series of information, the most important of which refers to the domain; this is our public key and is the one we must share with another server (under normal circumstances) for validation.
Self-signing the certificate
Although it would not be ideal for a production application, we will self-sign the certificate and set the validity period to 365 days:
openssl x509 -req -days 365 -in ca.csr -signkey ca.key -out ca.crtRelocating the previous files
Finally, we must relocate the files generated previously to their final location in our Apache directories:
mv ca.crt /etc/pki/tls/certs mv ca.key /etc/pki/tls/private/ca.key mv ca.csr /etc/pki/tls/private/ca.csrActivating SSL in Apache
Now we must locate the ssl.conf file, which is possibly located in /etc/httpd/conf.d/ssl.conf, and we must look for the following lines:
SSLCertificateFile /etc/pki/tls/certs/localhost.crt SSLCertificateKeyFile /etc/pki/tls/private/localhost.keyAnd change them to:
SSLCertificateFile /etc/pki/tls/certs/ca.crt SSLCertificateKeyFile /etc/pki/tls/private/ca.keyWe verify that Apache listens on the corresponding ports (SSL works with port 443 and port 80 is the default port used by Apache) in the file /etc/httpd/conf/httpd.conf the following lines must be present and uncommented:
Listen 80 Listen 443Configuring the VirtualHost in Apache
Now we locate the file /etc/httpd/conf/httpd.conf: and add/modify the VirtualHost of the site:
<VirtualHost crm.net> DocumentRoot /var/www/html/crm ServerName crm.net </VirtualHost>We restart the Apache service:
sudo service httpd stop sudo service httpd startOr:
service httpd restartAnd if everything went well; we will see a site like the following:
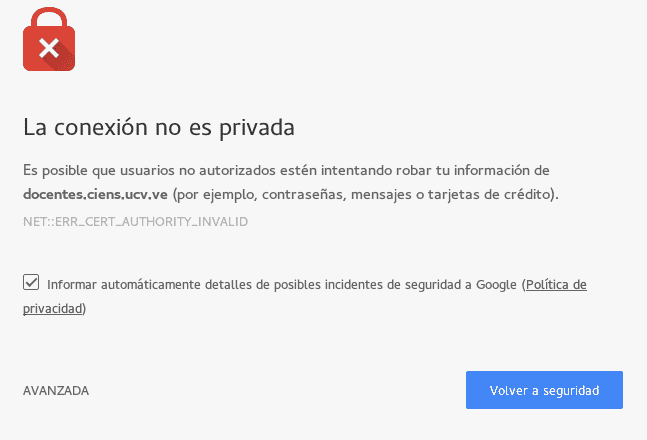
That error is because the signature is self-generated and is therefore considered an unreliable site.
Possible error:
If Apache does not start, we can check the apache log, in my case I checked the log located at:
gedit /var/log/httpd/ssl_error_logAnd at the end of the file there was an error like the following:
Permission denied: AH02574: Init: Can't open server private key file /etc/pki/tls/private/ca.key
This error is due to how these files were created (outside the Apache directory); in Linux, each file has a series of information called a context, depending on how this information is structured, certain processes may not execute correctly or simply deny execution (as is happening to us); we must restore the context of the files so that they can be executed, for that we must use the following command for each of the copied files:
sudo restorecon -RvF /etc/pki/tls/private sudo restorecon -RvF /etc/pki/tls/certs
You must keep in mind that the system also has the necessary permissions to execute.
Mod_ssl and requirements to activate HTTPS
On Fedora/CentOS:
yum -y install mod_sslCreate keys, CSR, and self-signed certificates with OpenSSL
I generated a self-signed certificate like this:
openssl genrsa -out ca.key 1024 openssl req -new -key ca.key -out ca.csr openssl x509 -req -days 365 -in ca.csr -signkey ca.key -out ca.crtThen I moved the files to:
/etc/pki/tls/certs /etc/pki/tls/privateCommon errors with SSL (including SELinux) and how to solve them
Apache once refused to start because SELinux blocked my private key:
Permission denied: AH02574: Init: Can't open server private key fileI fixed it with:
sudo restorecon -RvF /etc/pki/tls/private sudo restorecon -RvF /etc/pki/tls/certsApache in development environments: PHP, MySQL, and multiple versions

When we are going to develop web applications recently, or rather in the last (few) years since the emergence of PHP 7, life has become a bit more complicated for developers since PHP 5 is still current, in its version 5.6, 5.7 onwards, so there are frameworks, CMD, or other PHP systems that work with one version or another of PHP; for example, the oldest versions of Codeigniter only work with PHP version 5, they don't work with PHP 7, on the contrary, Laravel works with PHP version 7.1 onwards and therefore PHP version 5 doesn't work to work with this framework; this is just to mention a few particular cases, but there are many more.
As you can imagine, all this brings more complications to us since we have to see how we manage to work with several versions of PHP which sometimes and in certain cases even working with one of the many versions of PHP 5 brings us problems; here we can do several things; having our Web server installed on Windows, meaning WAMPP or another similar web server, we can download the versions of PHP we want and copy them into the directories and then we go to httpd.conf and copy a line similar to this:
LoadModule php7_module c:\php7\libphp7.so
So, to switch from one web version to another we have to do this change or switch ourselves manually:
Use PHP 5: LoadModule php5_module c:\php5\libphp5.so #LoadModule php7_module c:\php7\libphp7.so Use PHP 7: #LoadModule php5_module c:\php5\libphp5.so LoadModule php7_module c:\php7\libphp7.so Which is annoying but can work for us; the other option we have is to install multiple instances of XAMPP or whatever we use for web servers in different directories, of course, and have everything double, which is a more automated but "uglier" solution since we have the same app installed multiple times.
UwAmp to have several PHP instances installed on our PC
I recently found a web server that helps a lot in this process of having two or more versions of PHP installed on our web server, of course, this replaces XAMPP since it offers us the same thing, but the possibility of switching between one version of PHP and another using a selection field; it's that easy.
UwAmp is ideal for switching from PHP5 to PHP7 without problems, without installing multiple instances of WAMPP, XAMPP, or another similar web server and without the need to copy multiple instances of PHP to our web server and change them manually; we simply have to change the version from the web server's own interface:

To download the web server we are mentioning, we go to UwAmp, install it like everything else on Windows (next, next, next...) and we are ready to use it.
Activate mod_rewrite in UwAmp
The mod_rewrite is a mode that is available in Apache that helps us create dynamic URLs, which in other words are the clean, SEO-friendly URLs that we use in our applications and that we configure in our .htaccess to perform multiple operations; for example, it is the one used by CodeIgniter for