
Content Index
- Kotlin, the programming language of Android Studio
- Installation and configuration of Android Studio
- What is the Android SDK?
- Characteristics
- SDK Manager and main tools
- Android SDK versions
- Requirements to use Android Studio on our computer.
- Minimum requirements
- Recommended requirements
- Installing Android Studio
- How to create a project in Android Studio
- What does Android Studio offer us?
- Android Studio Interface
- What else does Android Studio offer us?
- Virtual devices (Emulators)
- Creating our device
- Virtual devices
- Physical devices
- Resources, tutorials and examples to develop in Android Studio:
- Project structure
- Lifecycle of an Activity
- MainActivity and Jetpack Compose
- Preview and composition
- XML the Legacy way
- Summary
- Fundamental keyboard shortcuts to use Android Studio like an expert
- Control + E: Pop-up window of recently opened files
- Quick project correction (show intention actions and quick fixes)
- Control + i: Implement methods
- Alt + Enter: Quick project correction (show intention actions and quick fixes)
- Search/Replace
- Ctrl+Alt+M: Extract method
- Reformat code and Comment/uncomment with line comment
- Creating/modifying our own keyboard and/or mouse shortcuts
- Basic structure of an Android project
- How to clone a project in Android Studio
- Creating the destination/cloned project in Android Studio
- Run multiple emulators in the same project
- Why it is important to run an Android application on several devices
- The bad thing about running multiple virtual devices simultaneously
- Configuring a real Android device to develop
- Enabling developer mode on our Android device
- From Android 4.2 and current versions
- If you lose count
With what we saw in Kotlin is more than enough to be able to start with Android Studio, so we are going to start here from scratch.
Kotlin, the programming language of Android Studio
The idea is to learn Kotlin so that we can create our first applications in Android Studio, which is the official way to develop for Android. I mark it as official because we can also develop with other technologies, such as React Native or Flutter, but Android Studio allows us to use the full power of the Android ecosystem.
If we develop in Flutter or other technologies, we always have certain aspects cut from the functionalities that we can implement. That is why, for example, in Flutter there is the Android folder so that we can incorporate native code in cases where the Flutter functions are not enough.
Kotlin is the official programming language of Android. A few years ago, between 5 and 8 approximately, the official language was Java, but then they decided to adopt Kotlin, which is more modern, simple and friendly, especially for the development of Android applications.
We are going to use Android Studio both to learn Kotlin and to develop our first applications during this course. You can also use IntelliJ IDEA, since Android Studio is based on this IDE. However, Android Studio is the best option if you want to create projects directly for Android.
Android Studio, our best ally for the development of Android apps
Android Studio is a powerful tool for building Android applications which should be the "norm" when developing Android applications as it already incorporates a large number of tools.
Installation and configuration of Android Studio
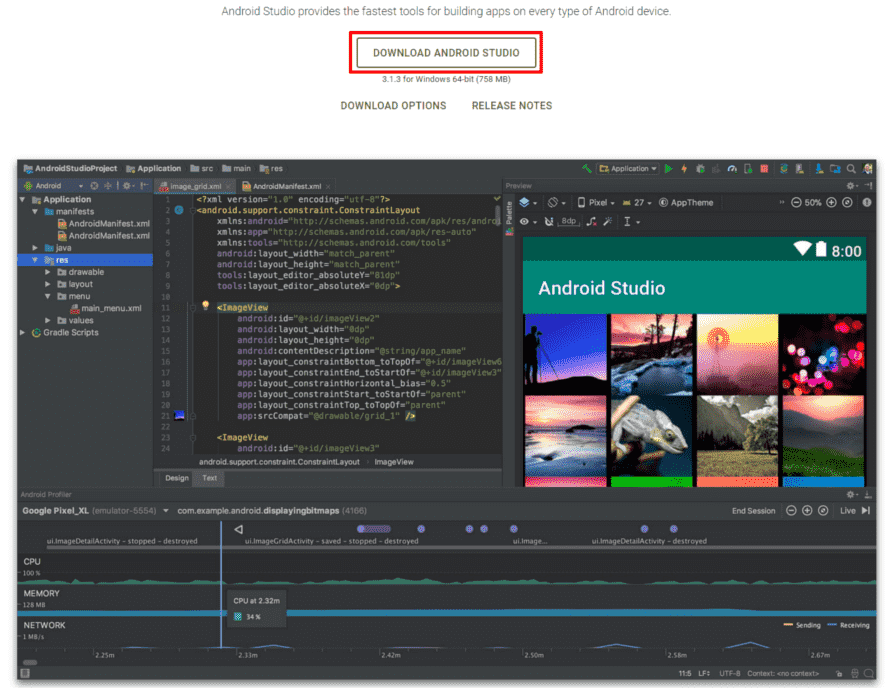
To start, I recommend you download Android Studio from its official page. Its size is considerable, approximately 700 MB, although it may vary depending on the version. When you install Android Studio, you will have access to:
- SDK Manager: to install the essential tools to develop and run Android applications.
- Device emulators: to test your applications on different virtual devices, such as phones or tablets.
- Updates and plugins: to keep the IDE and tools up to date.
What is the Android SDK?
The SDK for its acronym in English Software Development Kit provides the necessary development libraries to build, test and debug our applications for Android.
The Android SDK includes a mobile device emulator (AVD, Android Virtual Device) that we "run" on our computer. The emulator is a fundamental tool; since it allows us to test our applications.
Characteristics
- It is cross-platform Linux, Mac OS and Windows.
- The IDE for its acronym in English Integrated Development Environment (IDE) officially supports (Android Development Tools) and Android Studio.
SDK Manager and main tools
Here we have another very important part, which is that of virtual devices and also the SDK Manager.
I don't really remember exactly what appears here by default, but you can install any of these options. I recommend that you install only those that are not in preview, to avoid problems, that is, stable versions.
Here I have the usual installed. Normally we also install the Command Line Tools, which are sometimes necessary to install some packages. For example, Flutter requests them, for developers who work with Flutter.
With what you are seeing here marked (again, I don't remember exactly what comes by default) is usually more than enough. If you have any problem with this, I can also look for exactly what the error is and tell you which extension you need to install.
Android SDK versions
Otherwise, the versions of the Android SDK are handled here.
It is understood that Android usually releases a major version every year, and from here you can download and update it.
My recommendation is that you go through this window every week or every fifteen days, to update the packages. Right now I don't have any pending, but if I did, the corresponding action would appear here.
Depending on what you want to develop, you will see different options. For example, here we have Android Auto. In case you want to develop for Android Auto, you would have to enable this option and create the corresponding simulators. In our case, we are going for the traditional approach.
In short, this section is used to install what is the Android SDK, that is, the tool itself.
SDK stands for Software Development Kit, which is a set of tools and libraries designed by Google to develop Android applications.
Requirements to use Android Studio on our computer.
Like all software, the requirements as updates are released, which in a few words means that over time, their hardware and of course software requirements increase; to date these are the requirements that are needed:
Keep in mind that Android Studio and the SDK require disk space at the operating system level, so they cannot be installed on an external flash drive. The IDE installation takes up about 1 GB, the SDK between 1 and 2 GB, and each Android emulator can take up about 2 GB. In total, depending on the installed versions, the necessary space can range between 8 and 15 GB.
Once downloaded, the installation is the typical: next, next, next, or simply by dragging the IDE to the applications folder. After installation, you will be able to open Android Studio and familiarize yourself with its interface.
Minimum requirements
- Operating system: Windows 10 (64-bit), macOS or Linux
- CPU: x86_64 architecture; second generation Intel Core or compatible AMD processor
- RAM: 8 GB
- Disk space: 8 GB (IDE + Android SDK + Emulator)
- Screen resolution: 1280 x 800 pixels
Recommended requirements
- Operating system: Windows 10 (64-bit) or later, macOS 12 or higher, or Linux
- CPU: Latest Intel Core processor or AMD Zen Ryzen
- RAM: 16 GB or more
- Disk space: Solid state drive (SSD) with 16 GB or more
- Screen resolution: 1920 x 1080 pixels or higher
Installing Android Studio
Once downloaded, the installation is the typical: next, next, next, or simply by dragging the IDE to the applications folder. After installation, you will be able to open Android Studio and familiarize yourself with its interface.
To get our copy of Android Studio for its subsequent installation, we must go to the official Android portal at the following link Android Studio and click on the Download Android Studio button:
In Linux
In Linux we must unpack the downloaded file, we relocate it in the directory we want and execute the studio.sh located inside the bin folder of the IDE:
$ tar -xvzf android-studio-*.tar.gz
Navigate to the bin directory inside the Android Studio folder and execute the script:
$ cd //android-studio/bin
$ ./studio.sh
Or you can also install it using a command:
$ sudo snap install android-studio --classicHow to create a project in Android Studio
Once Android Studio is configured, we can create our first project:
- Select New project.
- Choose a basic Activity.
- Configure the project name, for example: "First steps with Kotlin".
- Select the minimum SDK, which determines the oldest version of Android that your application can support. This is important to ensure that your app is compatible with most devices.
- Leave the destination folder and other settings by default.
- Make sure that the selected language is Kotlin and finish creating the project.
With this, you will have your first project ready for Android. Later we will explore how to run the application in an emulator and how to use all the IDE tools.
We will be presented with a new window where we will have to indicate the data of the application that we are creating by Android Studio:
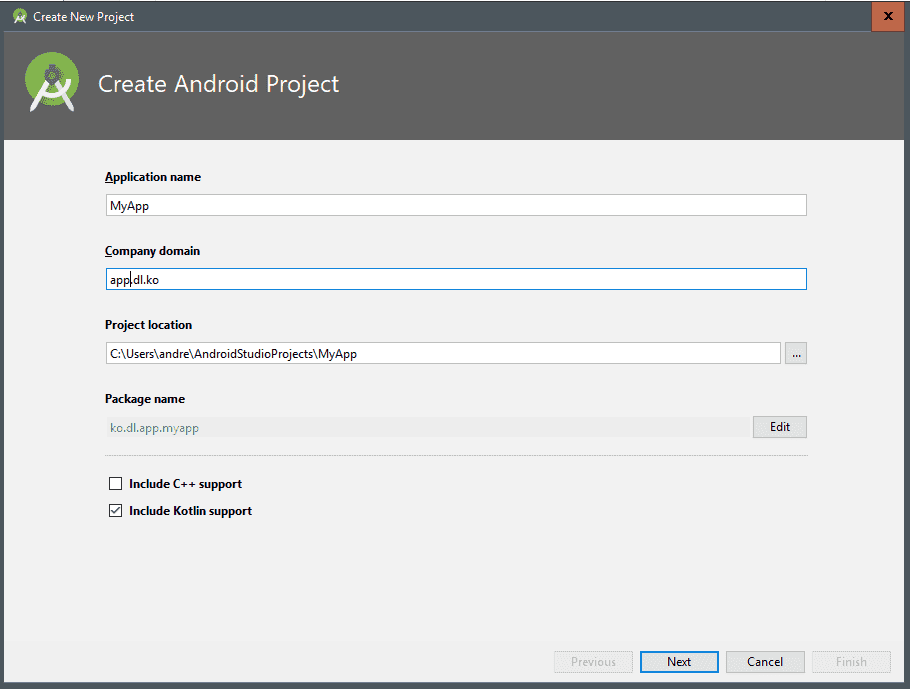
- Application name: this is the name of the application that we are going to create.
- Company domain: it is simply to indicate the structure or hierarchy of folders that the project will have, where each point (.) is a separator; for the previous example we would have a folder tree like the following:
app | dl | ko. - Project location: It refers to the location where our project will be.
When you click on the Next button, we will be presented with the selection of the SDK as well as the selection of the environment to develop, Android for phones and tablets, for watches (or wear, at the moment it does not have much market), for TV (it is being reinvented, but it does not have much market either) among others; generally we are interested in developing for mobiles and tablets, which is the option that comes by default:

In addition to being able to vary the SDK level or support that the application will have, although we can change this at any time from the Gradle files that we define a little further down.
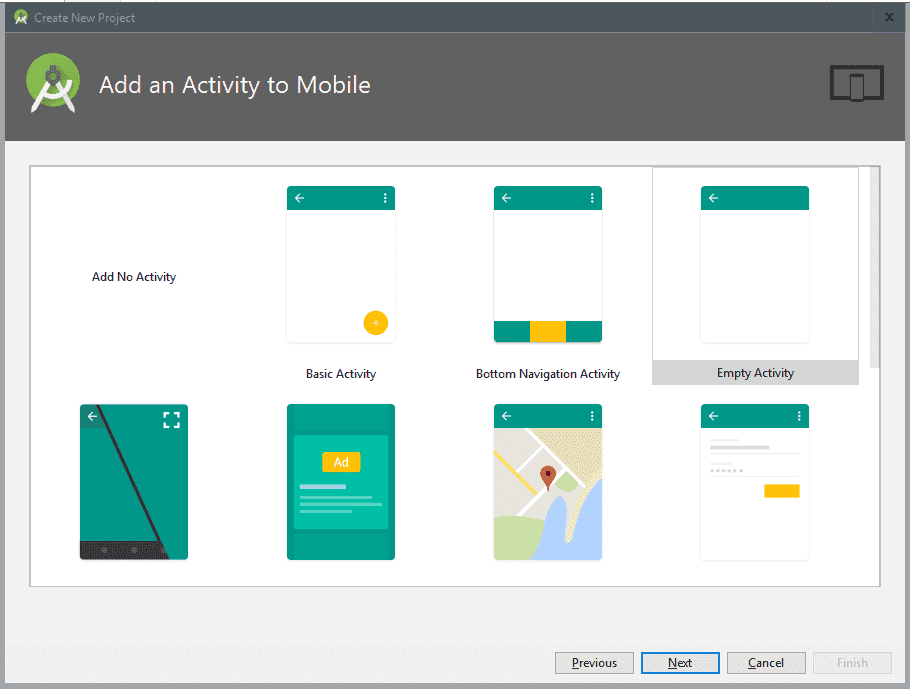
Then we get to the part of selecting the features that the application to be created will have, we generally leave it in Empty Activity:
Finally, we select the name of the main activity, as well as that of the layout that accompanies it (The development of applications in Android is based on a variant of the MVC model and therefore there is a separation between the controller, which is the Activity Name with the view that is the Layout Name of the following image):
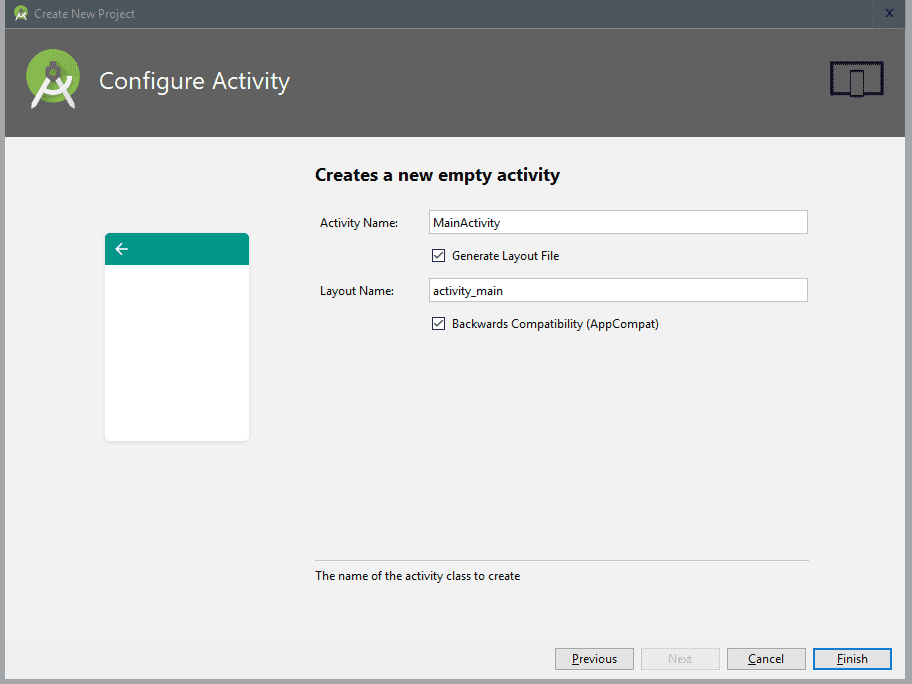
And then we press Finish and with this our project will be created.
What does Android Studio offer us?
Once installed and created our project in Android Studio we will see a somewhat loaded interface like the following:

If we go to the AndroidManifest.xml:
We will see that it is quite small and information about the project configuration is missing; for example, the level of targetSdkVersion and minSdkVersion -to name a few-; these configurations now we must handle them from the Gradle files:
Gradle files are plain text files to edit the different modules, libraries and configurations to incorporate into our project.
Most of the time it is enough to edit the /app/build.gradle.kts:
android {
    namespace = "com.example.myproyectandroid"
    compileSdk {
        version = release(36)
    }
    defaultConfig {
        applicationId = "com.example.myproyectandroid"
        minSdk = 24
        targetSdk = 36
        versionCode = 1
        versionName = "1.0"
In which are the dependencies (modules) and part of the basic configurations of Android (targetSdk and minSdk).
Android Studio Interface
Once the project is loaded, we have the main interface.
Up here we have the button to run the application, the debug button, the Gradle file synchronization, the search and the settings.
On the left we have the project structure, that is, the file tree.
In settings you can change things like the font size of the editor. For example, I have it at 18 to make it look bigger.
Here we have the preview part, where you can switch between:
- Code only
- Code + design
- Design only
This is very useful to see the changes in real time.
You also have the notifications, the connected devices and the AI part, which is quite interesting. This AI allows you to automate tasks, create screens, correct code and update parts of the project directly.
What else does Android Studio offer us?
There are a few quite interesting tools that allow us to know more in depth how our applications work, which results in a very useful resource to test our applications before publishing them somewhere like Google Play; one of them is Android Device Monitor.

The tool can be found in:
Tools > Android > Android Device Monitor
We will also see that there are very useful windows like the ones presented for our layout with its design/code modality that we saw in other applications like DreamWeaver.
Virtual devices (Emulators)
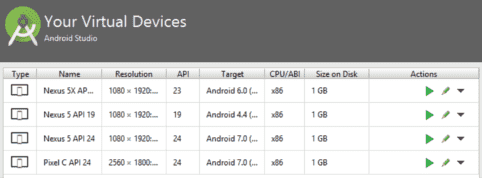
Once this is clarified, the next thing is the use of simulators, which at the moment may be a bit optional. If you want, you can create them later, but I am introducing them to you in case the options do not appear.
From here you can create virtual devices. At the beginning you will surely not have any. These devices are used to virtualize your application.
To create one, you simply go to Virtual Devise Manager and click the “+” button.
Here it tells you what device you want to create; you can use whichever you want. For example, you can select a Pixel 9a, click Next, and then choose the system image. If no image appears, you will have to download it.
I recommend that you include Google Play services, in case you later want to link your application with other services. Then you can change the name and leave the rest of the options as they are for now. Finally, you click Finish and the device is created.
From that moment on, it will appear here and you can start it whenever you want. With this we have already covered the part of virtual devices.
Creating our device
Virtual devices
We must have at least one device configured to test our applications from the computer; the tool in question is still called AVD (Android Virtual Device); to access the AVD we must go to:
Tools > Android > AVD Manager
Physical devices
You can also use physical devices; for this we must enable the developer options on our Android device (at the end of the post I show you how), once this is done, we connect our device and we will see a screen like the following:
In this way, although the process of running an application on the device will surely take a little longer (in comparison with a virtual one), the system will have fewer processes to perform because it does not have to maintain a virtual device for our applications.
Resources, tutorials and examples to develop in Android Studio:
We currently have more than 78 entries in DesarrolloLibre with which you can start in the development of applications for Android; starting from its basic components:
Among many others that you can consult in the section corresponding to Android in our blog:
One of the latest additions (or one of the most transcendental) is the incorporation of Kotlin, as a programming language that we can use in parallel (or only) when developing applications for Android; Kotlin has many advantages over Java for the development of applications in Android, being a modern, concise language that can even be run on the Java virtual machine:
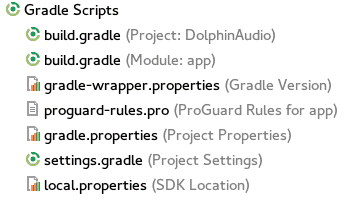
Project structure
Within the project we have several important files:
- Gradle: configuration files (SDK versions, dependencies, etc.).
- res: application resources (colors, themes, strings, styles, icons).
- AndroidManifest.xml: main configuration file.
- java/kotlin: where the application code lives.
In res we place:
- Colors
- Themes
- Strings (for internationalization)
- Icons (launcher)
The AndroidManifest defines, among other things, what the main activity of the application is.
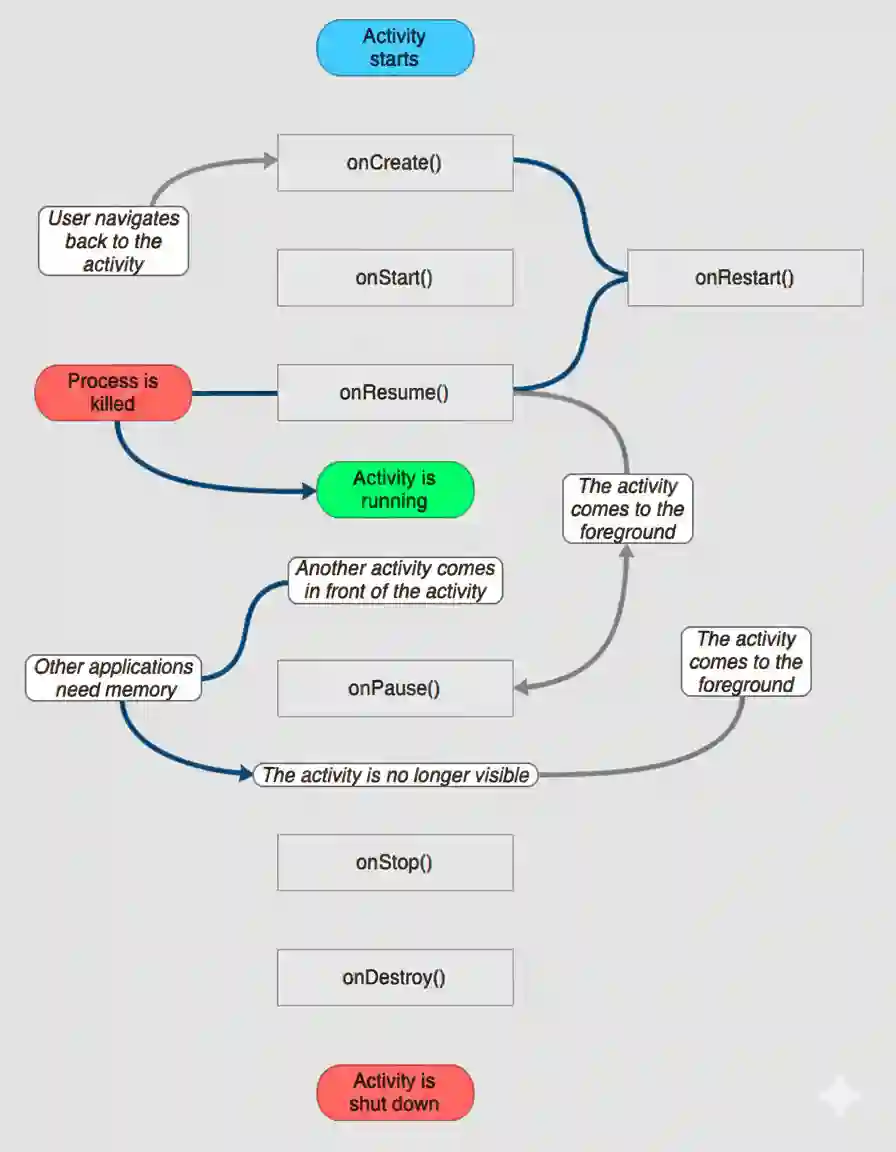
Lifecycle of an Activity
MainActivity inherits from ComponentActivity, which has a lifecycle.
This means that there are methods that are executed when the activity is created, displayed, paused or destroyed.
For example:
- The graphical interface is drawn in onCreate.
- In other methods you can save the state before the activity is destroyed.
- You can load data when the user enters the screen.
This is very important and we will see it in more detail later.
MainActivity and Jetpack Compose
The jewel in the crown is the MainActivity file:
app\src\main\java\com\example\myproyectandroid\MainActivity.kt
Before, in Android, XML was used a lot to define graphical interfaces. That still exists, but now we have a much more modern way called Jetpack Compose.
Compose uses functions marked with the @Composable annotation.
An annotation is something similar to decorators in Python: it is placed on top of a function to give it a special behavior:
@Composable
fun Greeting(name: String, modifier: Modifier = Modifier) {
    Text(
        text = "Hello $name!",
        modifier = modifier
    )
}
A @Composable function returns a graphical interface element. This is based on the Jetpack Compose package, which is the modern and recommended way to create native interfaces in Android.
Preview and composition
Here we also have the Preview, which allows us to see the interface without running the application. This is extremely useful for quick layout and testing.
The preview does not run the app, it only shows a preview of the current interface. If you do not place a preview, you will not see anything in that section.
XML the Legacy way
Before, the interface was defined in XML (something similar to HTML in the web world):
main/res/layout/activity_main.xml
<RelativeLayout xmlns:android="http://schemas.android.com/apk/res/android"
    xmlns:app="http://schemas.android.com/apk/res-auto"
    xmlns:tools="http://schemas.android.com/tools"
    android:id="@+id/rlContainer"
    android:layout_width="match_parent"
    android:layout_height="match_parent"
    android:orientation="vertical"
    tools:context=".MainActivity">
    <include
        android:id="@+id/appbar"
        layout="@layout/toolbar" />
    <FrameLayout
        android:id="@+id/frameLayout"
        android:layout_width="wrap_content"
        android:layout_height="wrap_content"
        android:paddingTop="50dp">
        <android.support.v4.view.ViewPager
            android:id="@+id/viewpager"
            android:layout_width="match_parent"
            android:layout_height="match_parent" />
Now everything is defined directly in Kotlin, in a much more expressive way.
Summary
In this class we saw:
- The Android Studio interface
- The SDK Manager
- The virtual devices
- The project structure
- Jetpack Compose
- The lifecycle of an Activity
Fundamental keyboard shortcuts to use Android Studio like an expert
In this entry we will see some keyboard shortcuts of all that exist that you can see in the following link:
Android Studio: Keyboard shortcuts
These keyboard shortcuts indicated in this entry, we can use them for the most common situations that may arise when we are coding in Android Studio; in such a way, that by using these shortcuts we avoid using other means such as the mouse and we can save a few seconds per operation, which gives us at the end, a considerable saving of time (!and less wear for our hands!).
Control + E: Pop-up window of recently opened files
The first shortcut that we will see, is one of the most general since it allows us to navigate between the files that we are editing or that are more common:
The shortcut in question is called "Pop-up window of recently opened files" and said shortcut is Control + E:
And using the cursors we can quickly navigate from one file to another once this small but useful window is open.
Quick project correction (show intention actions and quick fixes)
Many times Android Studio gives us a warning in our code, which are very useful since it allows us to improve the quality of our code, this is very common for example when we add texts directly in our Java/Kotlin file, to see the warnings it would be enough to click on the small icon that is positioned next to the line of code that has said warning, but we can also do it with a keyboard shortcut we can press Alt + Enter:

Control + i: Implement methods
Another very common problem is that when inheriting from other classes we will probably have to overwrite several methods that these classes define, so that Android Studio defines the basic scheme of these functions we must press Control + i.
Alt + Enter: Quick project correction (show intention actions and quick fixes)
Next with the implementation of methods, when we are writing our code it is very likely that we want to create or use methods that do not yet exist within the class whose code we have selected, for this we press Control + Alt + M:
Search/Replace
This keyboard shortcut allows us to search for code fragments or letters in the file that we are viewing at a given time: Control + F; we also have another function that allows us to search and replace texts: Control + R.
Ctrl+Alt+M: Extract method
This shortcut allows us to place a code that we have selected and place it within the scope of a function that the same option creates (Extract method); the keyboard shortcut may not work for you in Windows, but you can also find said functionality from Refactor | Extract | Funtion or simply change the keyboard shortcut for another; the keyboard shortcut is Ctrl+Alt+M:
Reformat code and Comment/uncomment with line comment
Other already a little more known keyboard shortcuts are those that allow you to indent the selected code or all the code of a file in question; for this we press Control + Alt + L and the method to comment the selected line(s) of code; for this we press Control + /.
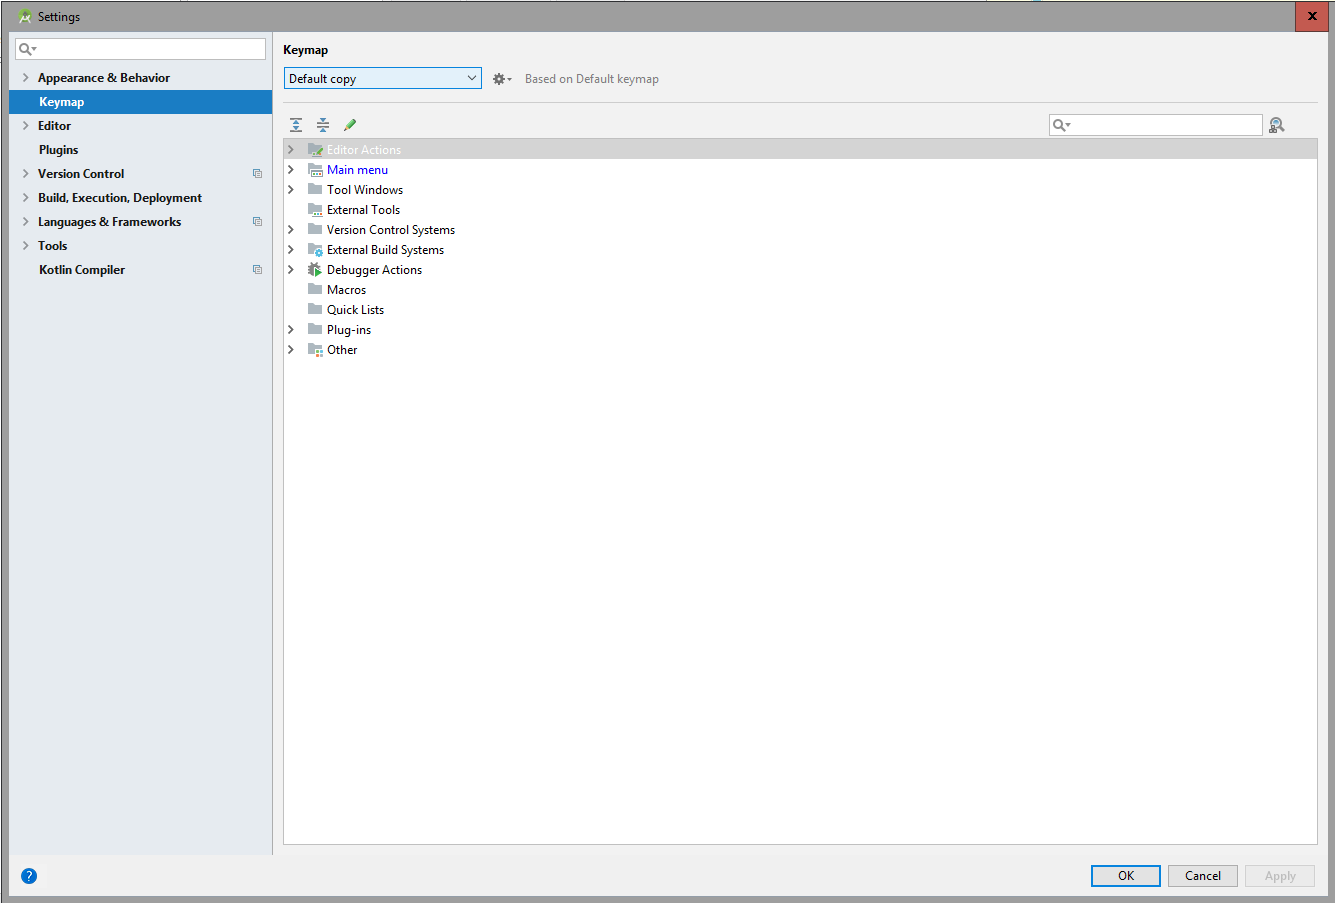
Creating/modifying our own keyboard and/or mouse shortcuts
It is likely that we have a problem with some keyboard shortcuts in our operating system, in the personal case the keyboard shortcut Control + Alt + L does not work, for those cases we can vary the assignment; for this we press Control + Alt + S or File | Setting and from Keymap we can customize the keyboard shortcuts:
You can review the official documentation at the following link: Android Studio: Keyboard shortcuts.
To indent our code we must use Control+ Alt + L.
To use the Search/Replace option we must use the key combination Control + F.
To see a more extensive list of keyboard shortcuts.
To complete code Control + Spacebar.
Basic structure of an Android project
All Android projects are eventually built within an .apk which is the file that is installed on the device; it contains things like the source code and resources; some are created by default and others are added as needed. The following files and folders make up an Android project:
src folder:
Contains all the source code (java) of the application, including our main activity; which are stored in src/package/Activity.java.
bin folder:
Output directory; here is the .apk and other resources from the project compilation.
libs folder:
Contains private libraries.
res folder:
Contains the resources (images, videos, audio, etc.) necessary to generate an Android application, also the different types of resources that should be distributed among the following folders:
res/drawable/:
Saves the images and is divided into: drawable-ldpi, drawable-mdpi and drawable-hdpi, which will depend on the resolution of the device.
res/raw/:
Contains general purpose files, the only difference with the assets directory is that they can be referenced using the R file.
res/layout/:
Includes the files that define the design of the graphical interface, always in XML.
res/values/:
Saves the data and types that the application uses, such as colors, text strings, styles, dimensions, etc.
gen folder:
This folder saves a set of files (of Java code) created automatically when the project is compiled, in order to direct the application's resources. The R file automatically adjusts all references to files and values of the application (saved in the res folder).
assets folder:
Saves the rest of the files necessary for the correct functioning of the application, such as data or configuration files. The main difference between the resources that this folder stores and those that the res folder stores, is that the resources of the latter generate an identifier per resource, which will be managed by the R file and can only be accessed through certain access methods, while the resources stored in the assets folder do not generate any identifier and are accessed through their path, as is done with any other file.
AndroidManifest.xml file:
This file is one of the most important in any Android application. It is generated automatically when creating the project, and in it is defined the configuration of the project in XML.
How to clone a project in Android Studio

A fairly common process when developing software is that at some point we want to clone it to easily and quickly reuse its components, in PHP it is relatively easy, we just need to copy and paste the project, rename the root folder, change the path settings, maybe the database and we are practically ready to start working with our copied or cloned project.
In Android Studio, such cloning is not so simple; so if we want to open for example an android studio project on another computer or we re-install our Android Studio or something like that, we must perform some previous steps and copy certain key sections of the source project (project to be copied) in our new project (destination or cloned project) and perform some extra steps.
Creating the destination/cloned project in Android Studio
The first difference between the copy and paste that we would do with a PHP project, is that first we must create a new project in Android Studio doing the traditional steps:
File - New - New Proyect
Pay close attention to the name of the package or package which you can get from the AndroidManifest of the project which we will use later.
And this newly created project would be our destination project.
Once our destination project is created, the best we can do is close Android Studio to avoid any generation of a process by it to the base project or that it blocks any file that we want to replace.
Now we must replace the key files, first the application resources which are in the folder:
/app/src/main
We copy them from the project to be cloned to our destination or base project.
Now let's go with the libraries in case they exist, we copy and paste them:
Copy /app/libs
Like these two files:
Replace /build.gradle Replace /gradle.properties
And the folder:
Replace /gradle/wrapper
And of course, the AndroidManifest.xml:
Replace /app/src/main/AndroidManifest.xml
We are almost ready, now we can open our Android Studio along with the base project to which we copy all the sources.
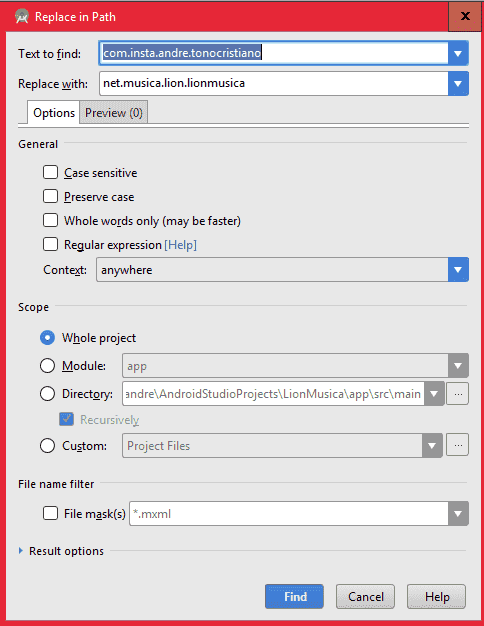
It will surely give many errors, for the moment do not worry, first we must replace the name of the package with that of our new project (destination project) in each of the files including our manifest, for this we use the combination CONTROL + SHIFT + R and a window will open in which we must copy indicate the text to replace:
Then we go to the grandle file and synchronize it.
Now from the menu of our Android Studio:
Build -> Clean Project Build -> Rebuild Project
If everything has gone well, we would already have our cloned project, in case there is an error it is probable that you were missing to copy some more file or some folder that you created manually in the destination project.
In summary:
Create a project Replace /app/src/main Copy /app/libs Replace /app/src/main/AndroidManifest.xml Replace /app/build.gradle Replace /build.gradle Replace /gradle.properties Replace /gradle/wrapper Replace the package name Build -> Clean Project Build -> Rebuild Project
The order in which you want to replace the source files to the destination is up to you and logically it does not influence anything.
Run multiple emulators in the same project
In this entry we will see how to run multiple emulators in Android Studio; in general it is a very simple process that practically does not require the help of a tutorial or something like that although I think it is important to point out and show how we can have multiple emulators open and running at the same time for the same project.
Why it is important to run an Android application on several devices
When we are developing for Android it is important to test the application on screens of various sizes and in various versions of the popular mobile operating system; the reason, the terrible and fearsome fragmentation that Android has both in versions and in screen sizes, resolutions screen densities... resulting in a real headache when developing; but, at least you have the possibility of being able to simultaneously test the Android application that we are developing on multiple devices is a great help.
Once this is explained, we can indicate what we must do to run multiple emulators on our computer.
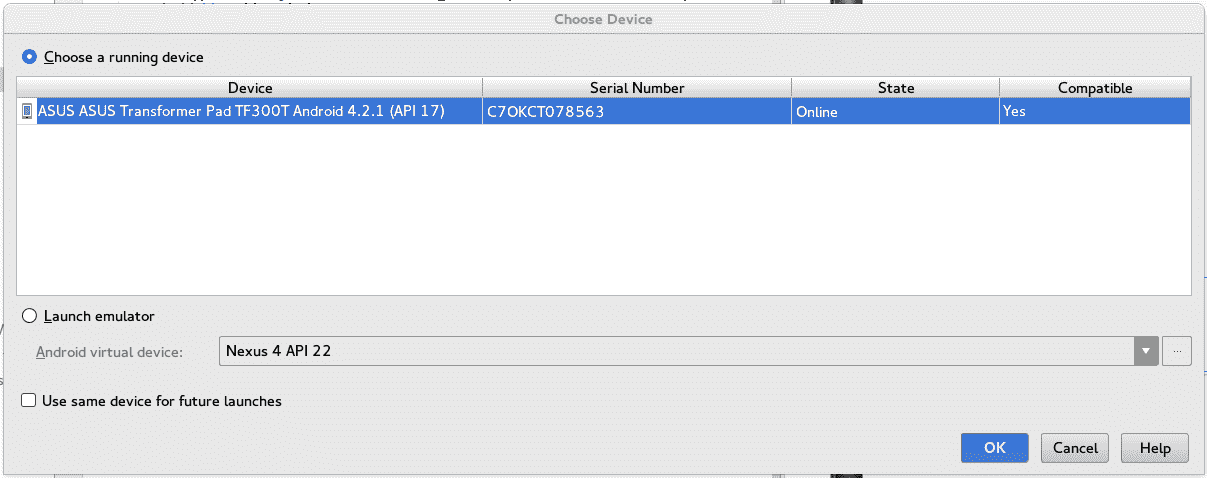
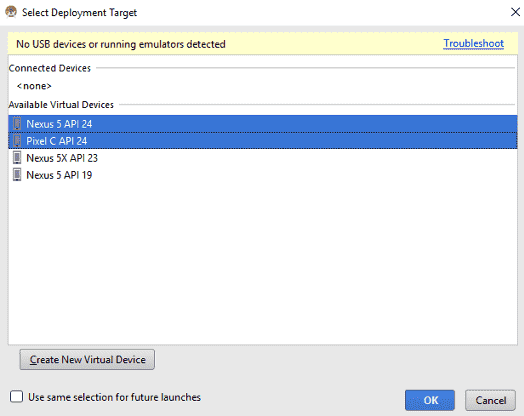
When running the application for the first time, we will see a screen like this:
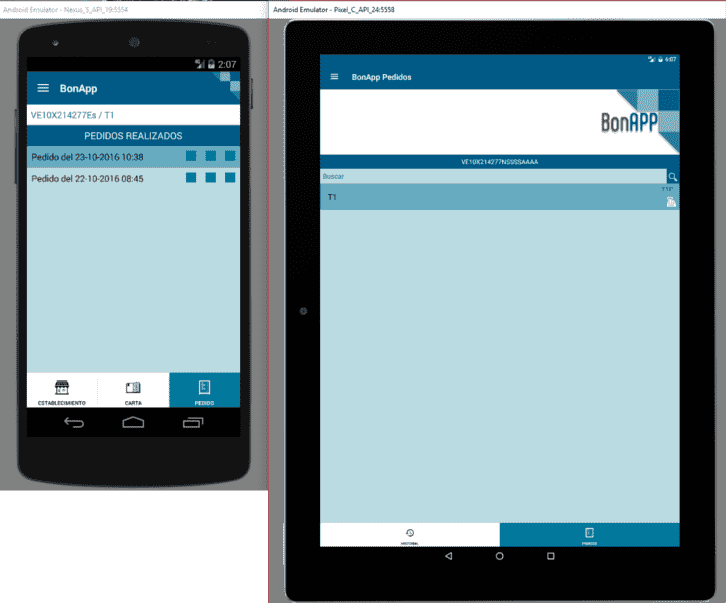
Of course the window may vary depending on the virtual devices you have in the Android Device Manager:
Guess what, in it you can select multiple devices if you leave the "Control" key pressed!, that easy; to be honest it took me a while to realize this since nowhere is there a tick that indicates that we can use the Control key for this, besides that generally this screen only appears the first time we launch the application:
The bad thing about running multiple virtual devices simultaneously
The ram memory; as a good developer you will know that Android consumes a lot of ram and its emulators are no exception; if you open the Windows process application or the one that exists in your operating system, you will see some processes like these:
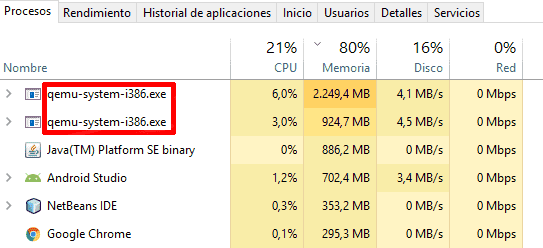
Sometimes they consume a little less resources and other times a little more but as you can see a single emulator (tablet) can consume up to 2 Gb, the other (phone) about 1 Gb plus Android Studio itself giving the chilling figure of 6 Gb just to develop for Android; without counting the fact that we have other applications open like Google Chrome -which does not help too much in this situation-, so, if you do not have a computer with a lot of ram memory you may want to do without running multiple emulators for a project.
Configuring a real Android device to develop
Usually, when developing an Android application, we start by using the Android emulator that comes by default with the Android SDK:
But in the life cycle for the construction of an Android mobile application, it is necessary, or rather, important, to add the performance of some tests of the application on a real device or physical device.
This article will explain how to enable this functionality on a physical device to establish a development environment; in other words; it will explain how to configure an Android device so that when connected to a computer via USB, the Android device can be used to "run" or install our applications in development.
As you may have noticed when reading the previous paragraph; this function is disabled by default; in fact, the developer menu is hidden since Android version 4.2 Jelly Bean and remains so until the latest versions of Android that to date is already on version 14. The reason, to prevent an Android user who does not have knowledge (or is not interested or is an Android developer) from being able to make important modifications to the system or slow down its operation.
Enabling developer mode on our Android device
From Android 4.2 and current versions
As an additional note; in Android 4.2 or higher, this option is hidden by default; that is, it does not appear in the menu. To make it appear, go to Settings >> About phone/tablet (Image 3 (1)) and press seven times on the Build number section (Image 3 (2)); yes, you have read correctly, you must press seven times on said section.
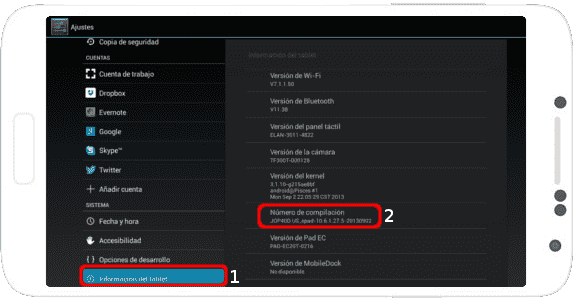
Image 3: Tablet information (1) >> Build number (2) (in Android 4.2).
If you lose count
Or you simply do not want to count the number of presses you have on the Build number section; Android places a message that indicates the number of missing presses; until a message appears that will inform you that the developer mode has already been activated and therefore a new option has appeared in the menu called Development options (Image 2 (1)).
Once you have reached this point, you only have to press the USB debugging check in the Debugging menu >> USB debugging (Image 2 (2)).
The next step is to learn about the buttons in Android Studio: FilledTonalButton, OutlinedButton, TextButton, Column Click Icons.