")
The purpose of programming applications is to place them into production; in Android, this means publishing them in the official store. To upload an app to Google Play, it is mandatory to sign the binary. But what exactly does this mean?
What is it and why do we sign our application?
Android requires all applications to be digitally signed so they can be installed on an Android device; as we will see later in this entry, the process of signing an application is nothing more than providing a private key generated by the developer, and with this, it indicates who is responsible for the application; in summary, we sign our applications:
- To meet a requirement to be able to upload our application to Google Play.
- To be able to install it on other devices and distribute it without any problems.
- As a security measure.
- So that only the developer can update it.
When we want to develop an Android application (not to say any general system), you first conceive the application, it is designed, tested on emulators and physical devices, bugs are fixed, the rest of the features are finished, and the application is tested again (you repeat this cycle n times, where n tends to infinity...) and then you try to upload the Debug APK to your Google Play account and see an error like the following:
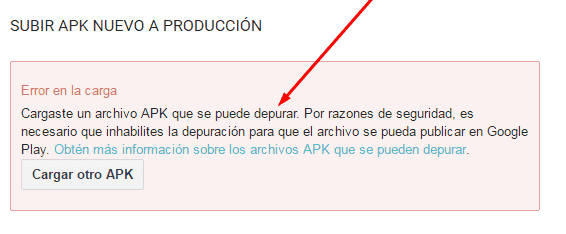
This is a situation that can be regular for people who are starting out in Android development; to upload an APK to Google Play, it must be signed using a digital certificate that is very easy to generate with Android Studio.
The APK we generally use is a file we can use to perform tests on physical and virtual devices, but nothing more—we cannot use it to upload it to Google Play for security reasons (imagine if just by getting the APK of famous apps like Twitter or Facebook, we could quietly upload it to a Google Play account...).
In this entry, we will explain how to automatically generate a signed APK at the moment of compiling our project in Android Studio; this is highly important when using third-party services where we provide the SHA1 certificate of our application, services such as authentication or service utilization, or any service within Firebase or the Google Console.
How to generate a signed APK in Android Studio for Google Play (includes keystore)
Generating the signed APK in Android Studio
As explained, the signed APK is the same as the debug APK, but it features a digital certificate, ensuring its authorship; that is, the person uploading the APK to Google Play is the one who developed it, meaning they possess the application's source code.
Google's Google Play requires that all APKs stored in its application repository must be digitally signed, and we can do this perfectly from Android Studio using the keystore, which is a file used to store repositories of primary keys.
Understanding certificates and keystores
Digital certificates are nothing new; we use them in countless elements, for example in PUSH notifications, which use digital certificates consisting of a public key and a private key that is saved and restricted—it's like a username and password pair. Generally, data or metadata from these certificates is saved to have owner information; details like first name, last name, location, and description are common elements. These keys are an instrument to protect your applications, to leave your "fingerprint" which is unique, and since it is digital, it is known as a digital signature; this way, your Android application will be well protected and allows Google via Google Play to know who owns the APK being uploaded, taking appropriate action in case a different certificate from the one initially uploaded appears.
The Keystore to store keys
You might wonder where the keystore fits into all of this; keystores are files that, as their name indicates, contain keys—it's like a key store or a key repository; here is where your private key is located, which you must not share with anyone who should not have access to your application. When we create our signed Android application a bit later, you will see that Android Studio asks us via a form where the key repository or keystore is located.
Enfoque Moderno: Android App Bundle (.aab) y Play Integrity
For modern applications developed with Jetpack Compose, Google Play now requires the Android App Bundle (.aab) format instead of the traditional APK.
Unlike the APK, the App Bundle allows Google Play to generate optimized versions for each device, reducing the download size. Furthermore, nowadays Play App Signing is used, where Google manages the final signing key for you, although you still need an "Upload Key" to upload the file.
Generating the signed Bundle in Android Studio
To generate the modern file, go to Build > Generate Signed Bundle / APK..., select Android App Bundle and follow the wizard steps to create or use your Keystore.
How to get the SHA1 certificate from Android Studio
Many modern services (like Firebase or Google Maps) request your SHA1 fingerprint. To get it without using external commands:
- Open the Gradle panel (top right corner).
- Navigate to:
app > Tasks > android > signingReport. - Run the task and check the Run console at the bottom.
Important! Save your Keystore file (.jks) and its passwords in a safe place. If you lose this file, you will not be able to update your application on Google Play under the same identifier.
What is it and why do we sign our application?
Android requires all applications to be digitally signed to be installed. The process consists of applying a private key generated by the developer to identify the person responsible for the application.
- Mandatory requirement for the Google Play Store.
- Guarantees the authorship and security of the software.
- Allows only the original developer to upload updates.
Legacy Approach: Generating a signed APK
If you are working with the traditional view system (XML), the final output is usually an .apk file. To generate it automatically when compiling, you can configure the process in Android Studio:
- Right-click on the
appmodule and select Open Module Settings. - In the Signing Configs section, create a new configuration and select your
.jksfile (Keystore). - In the Build Types tab, assign this configuration to the
releasemode.
// Example configuration in build.gradle.kts android { signingConfigs { create("release") { storeFile = file("my_key.jks") storePassword = "password" keyAlias = "my_alias" keyPassword = "password" } } }As this is possibly the first time you are exporting the APK this way, we will have to enter a path, a pair of passwords, and an alias, as we will see below in the following window:
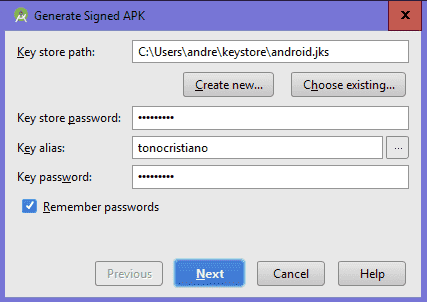
If you do not have a Key Store already created, you must click the "Create new..." button and fill out the form.
Where is the signed APK located?
If you did not modify the default location, the signed APK will be exported to:
Your_app_name > App > app-release.apk.
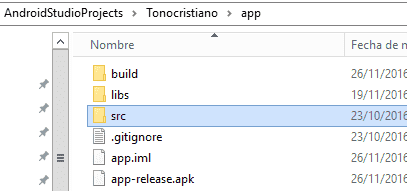
We can name it whatever we want, and that's it—we can use this APK to upload it to Google Play; it doesn't matter what name you give to the file, it only matters that the previous procedure doesn't give you any kind of error.
These types of procedures can be generated using command lines or the console in Windows, Linux, Mac, or wherever you run your Android development environment; in this entry, we showed you the most direct and simple way, which consists of filling out simple forms as we saw previously; if you need to get the SHA1 certificate from Android Studio: