
Content Index
- Is the WebView class a browser?
- Building Web Apps with WebView
- Enable Internet permission in the AndroidManifest
- The modern way with Jetpack Compose
- Enable Internet permission in the AndroidManifest
- Creating the Composable for the WebView
- 1. Factory Configuration
- 2. The Update Block
- Event Control with WebViewClient
- The WebViewClient allows us to define specific client events and behaviors. For example:
- Using the WebView in your Activity (Legacy Method)
- Loading the web page in the WebView: Layout and Activity
- Managing page navigation
- The WebViewClient class
- Enabling JavaScript
Previously, we saw how to display a YouTube video in the Android emulator. Following that same philosophy, we will now learn how to view the content of a web page directly on our device, functioning as a kind of integrated browser.
Is the WebView class a browser?
WebView is not a browser since it does not have elements found in browsers like an address bar or other navigation controls; it only allows displaying a web page within a native Android application.
However, with the WebView class, we can decide whether we want to show the content inside the application or in a web browser, as we will see later.
Building Web Apps with WebView
To add a WebView to our Android application, we must perform a series of configurations that we will see below:
Enable Internet permission in the AndroidManifest
One of the first things we must do is request the necessary permission in our AndroidManifest so that the application can connect to the Internet and download HTML content:
<manifest ... >
<uses-permission android:name="android.permission.INTERNET" />
***
</manifest>
The modern way with Jetpack Compose
With the arrival of Jetpack Compose, the way to build user interfaces in Android has shifted to a declarative approach. To integrate a WebView into this new world, we use the AndroidView composable, which allows us to embed traditional Android views (XML-based) within a Compose UI.
app/src/main/AndroidManifest.xml
Enable Internet permission in the AndroidManifest
Just like in the traditional method, it is essential to request INTERNET permission in the AndroidManifest.xml file:
<manifest ... >
<uses-permission android:name="android.permission.INTERNET" />
...
</manifest>
Creating the Composable for the WebView
Now, we create a Composable function that encapsulates the WebView. This allows us to easily reuse it anywhere in our application.
1. Factory Configuration
We use AndroidView to inject the classic Android view into the Compose environment. We specify that it occupies the full screen size using a Modifier.
JavaScript: It is fundamental to enable JavaScript (settings.javaScriptEnabled = true) so that the page functions correctly if it has interactive elements or script-dependent layouts.
URL Loading: We use the loadUrl function, passing the parameter received by our Composable.
package com.example.myproyectandroid

import android.os.Bundle
import android.webkit.WebView
import android.webkit.WebViewClient
import androidx.activity.ComponentActivity
import androidx.activity.compose.setContent
import androidx.activity.enableEdgeToEdge
import androidx.compose.foundation.layout.Column
import androidx.compose.foundation.layout.fillMaxSize
import androidx.compose.foundation.layout.padding
import androidx.compose.material3.ExperimentalMaterial3Api
import androidx.compose.material3.Scaffold
import androidx.compose.material3.Text
import androidx.compose.runtime.Composable
import androidx.compose.ui.Modifier
import androidx.compose.ui.tooling.preview.Preview
import androidx.compose.ui.unit.dp
import androidx.compose.ui.viewinterop.AndroidView
import com.example.myproyectandroid.ui.theme.MyProyectAndroidTheme

class MainActivity : ComponentActivity() {
    @OptIn(ExperimentalMaterial3Api::class)
    override fun onCreate(savedInstanceState: Bundle?) {
        super.onCreate(savedInstanceState)
        enableEdgeToEdge()
        setContent {
            MyProyectAndroidTheme {
                Scaffold(modifier = Modifier.fillMaxSize()) { innerPadding ->
                    Column(modifier = Modifier.padding(innerPadding)) {
                        Greeting(
                            name = "Android",
                            modifier = Modifier.padding(innerPadding)
                        )
                        MyWebView(url = "https://www.desarrollolibre.net/")
                    }
                }
            }
        }
    }
}

@Composable
fun Greeting(name: String, modifier: Modifier = Modifier) {
    Text(
        text = "Hello $name!",
        modifier = modifier.padding(8.dp)
    )
}

@Composable
fun MyWebView(url: String) {
    AndroidView(
        modifier = Modifier.fillMaxSize(), // Ocupa toda la pantalla
        factory = { context ->
            WebView(context).apply {
                // Configuración necesaria
                settings.javaScriptEnabled = true // Permite que funcionen sitios modernos
                webViewClient =
                    WebViewClient() // Abre los enlaces dentro de la app, no en el navegador

                loadUrl(url)
            }
        },
        update = { webView ->
            // Si la URL cambia, la cargamos aquí
            webView.loadUrl(url)
        }
    )
}
2. The Update Block
The update parameter is very useful (though optional). If the URL changes dynamically in your application, this block will handle updating the content automatically without needing to recreate the entire view.
update = { webView ->
            // Si la URL cambia, la cargamos aquí
            webView.loadUrl(url)
        }
Event Control with WebViewClient
The WebViewClient allows us to define specific client events and behaviors. For example:
- Internal navigation: Prevent the system from opening the phone's external browser when a link is clicked, keeping the user within our app.
- Loading cycle: Execute actions when the page starts loading or when it finishes (ideal for showing a loading spinner or progress bar).
- Error management: Handle connection failures or block access to specific URLs through custom checks.
1. Prevent links from opening in Chrome
webViewClient = object : WebViewClient() {
   override fun shouldOverrideUrlLoading(view: WebView?, request: WebResourceRequest?): Boolean {
       // Retornar 'false' significa: "Yo me encargo, cárgalo aquí mismo"
       return false
   }
}
2. Show "Loading" (ProgressBar)
webViewClient = object : WebViewClient() {
   override fun onPageStarted(view: WebView?, url: String?, favicon: Bitmap?) {
       super.onPageStarted(view, url, favicon)
       // Aquí podrías poner: isLoading = true
   }
   override fun onPageFinished(view: WebView?, url: String?) {
       super.onPageFinished(view, url)
       // Aquí podrías poner: isLoading = false
   }
}
3. Handle connection errors
override fun onReceivedError(
   view: WebView?,
   request: WebResourceRequest?,
   error: WebResourceError?
) {
   // Aquí puedes cargar un archivo HTML local de error:
   view?.loadUrl("file:///android_asset/error.html")
}
4. Block specific URLs
override fun shouldOverrideUrlLoading(view: WebView?, request: WebResourceRequest?): Boolean {
   val url = request?.url.toString()
   return if (url.contains("misitio.com")) {
       false // Permitir
   } else {
       true // Bloquear (no hace nada al hacer clic)
   }
}
⚙️ Advanced Settings (Settings)
Through settings, you can customize the browsing experience according to your needs:
- Desktop view: Force the "Desktop" version of the site.
- Screen fitting: Scale content to occupy exactly the mobile width.
- Zoom Control: Enable or remove "pinch" gestures to zoom in/out, or hide zoom control buttons.
- Cache and Storage: Enable local cache storage to improve speed.
- Security: Prevent scripts from opening pop-up windows automatically.
1. Display and Zoom Optimization
settings.apply {
   // Hace que la página se vea como en un navegador de escritorio si es muy grande
   useWideViewPort = true

   // Ajusta el contenido al ancho de la pantalla del móvil automáticamente
   loadWithOverviewMode = true

   // Habilita los controles de zoom (los botones + y -)
   builtInZoomControls = true

   // Oculta esos botones de zoom feos pero permite el gesto de "pinza" con los dedos
   displayZoomControls = false
}
2. Storage and Performance (Cache)
settings.apply {
   // Habilita el almacenamiento local (como las bases de datos de las webs modernas)
   domStorageEnabled = true

   // Permite que la web guarde archivos en el dispositivo (cache)
   databaseEnabled = true

   // Define cómo se comporta el cache (cargar desde internet o desde el disco)
   cacheMode = WebSettings.LOAD_DEFAULT
}
3. Security and Privacy
settings.apply {
   // Bloquea que la web cargue imágenes desde sitios "http" si la web es "https"
   mixedContentMode = WebSettings.MIXED_CONTENT_NEVER_ALLOW

   // Permite o deniega que el JavaScript abra ventanas nuevas (pop-ups) automáticamente
   javaScriptCanOpenWindowsAutomatically = false
}
4. Access to Files and Camera
settings.apply { // Allows web JS to access files inside the app (Be careful with this) allowFileAccess = true // Allows content loaded from a file to access other files allowContentAccess = true }Example of "All-Terrain" configuration
settings.apply {
   // Permite que el JS de la web acceda a archivos dentro de la app (Cuidado con esto)
   allowFileAccess = true

   // Permite que el contenido cargado desde un archivo acceda a otros archivos
   allowContentAccess = true
}
Using the WebView in your Activity (Legacy Method)
Let's look at the XML way, which is the legacy method. We call our WebViewPage composable from our MainActivity or any other screen in our application.
AndroidView(
   factory = { context ->
       WebView(context).apply {
           settings.apply {
               javaScriptEnabled = true
               domStorageEnabled = true // Clave para sitios modernos como Spotify o YouTube
               loadWithOverviewMode = true
               useWideViewPort = true
               builtInZoomControls = true
               displayZoomControls = false
               setSupportZoom(true)
               mixedContentMode = WebSettings.MIXED_CONTENT_ALWAYS_ALLOW
           }
           webViewClient = WebViewClient()
       }
   },
   update = { webView -> webView.loadUrl(url) }
)
Code explanation:
- AndroidView: Is the key composable that allows us to use a traditional Android View inside Compose.
- factory: This block executes only once to create the WebView. Here we configure its initial parameters, such as layoutParams, webViewClient, and enabling JavaScript.
- update: This block is called every time the composable recomposes. We use it to update the view, in this case, to load a new URL if it has changed.
- WebViewClient: Just like in the traditional approach, it is crucial for handling navigation within the WebView and preventing external browsers from opening.
With these steps, you now have a functional WebView in your Jetpack Compose application, following modern Android development practices.
Loading the web page in the WebView: Layout and Activity
Once the permission is requested, we add the WebView tag in the Android activity layout:
<WebView xmlns:android="http://schemas.android.com/apk/res/android" android:id="@+id/webview" android:layout_width="fill_parent" android:layout_height="fill_parent"/>Finally, we can add the URL of the web page we want to display using the loadUrl() method:
WebView webView = (WebView) this.findViewById(R.id.webview); webView.loadUrl("");In our application, we will add the following URL referenced in the code:
webView.loadUrl("http://desarrollolibre.net/blog/javascript/como-hacer-una-sencilla-galeria-con-css-y-6-lineas-de-javascript");Managing page navigation
At this point, we can run our Android application; but upon running it, we will see a screen like the following:
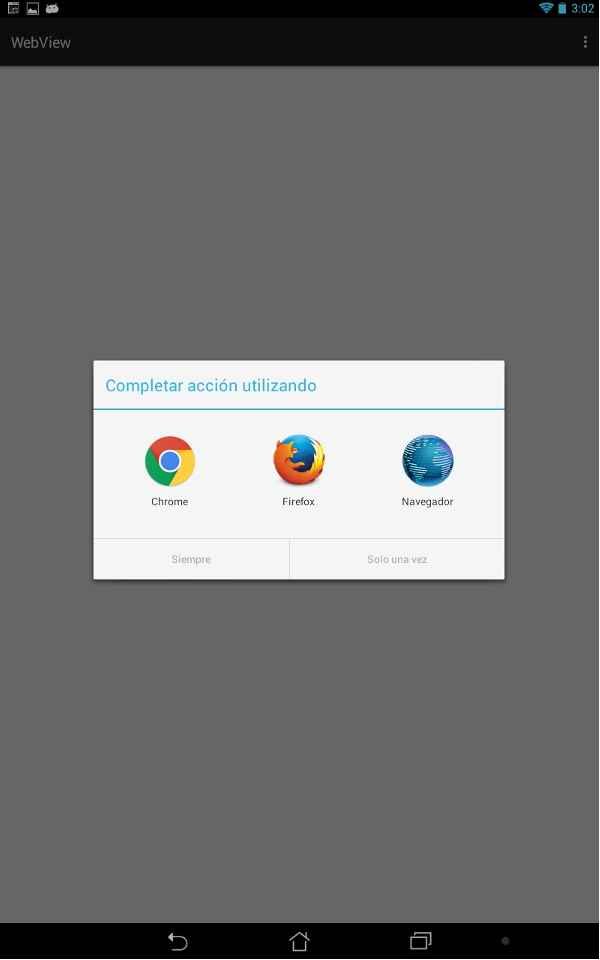
The idea of creating a Web App with the WebView class is not just to open the content in any of the web browsers installed on the Android device, but for it to execute within our application; for this, we will see the following block.
The WebViewClient class
As we mentioned before; by default, Android launches an application (like web browsers) to handle the previously set URL; but we can customize this behavior so that our application handles it internally; in other words, that the web page executes directly in our application.
We simply create an instance of the WebViewClient class, which is the minimum we need to display a web page inside our application:
webView.setWebViewClient(new WebViewClient());But if we want more control, we can create our own class that extends from WebViewClient and override certain methods:
private class MyWebViewClient extends WebViewClient { @Override public boolean shouldOverrideUrlLoading(WebView view, String url) { return true; } }Enabling JavaScript
JavaScript is disabled by default in the WebView, which can be a problem depending on the type of web page you want to load; that is, if our page to be loaded via the loadUrl() method needs JavaScript; we can easily enable it through the setJavaScriptEnabled() method; let's see how to use it:
First, we create a WebSettings object that allows various configurations, although in our case, we are simply interested in enabling JavaScript:
WebSettings webSettings = myWebView.getSettings();Now we can use the setJavaScriptEnabled() method passing the boolean true as a parameter.
webSettings.setJavaScriptEnabled(true);When running the code:

Next step, create a notification in Android.