
Content Index
- Create a menu with Jetpack Compose (modern way)
- Creating the Reusable Composable
- Structure of the DropdownMenu
- Interface Integration
- In a List Item (TaskItem)
- Note on function parameters
- Displaying a menu in Android
- Ways to create a menu in Android
- Defining an XML-based menu
- Elements of a menu in XML
-
Attributes of menu elements (
- )
- Example of a basic menu in Android
- Creating the options menu in Android
- The onCreateOptionsMenu method
- The onMenuItemSelected method
Menus are key User Interface components for any system; in Android, menus present options that allow performing actions such as navigating between the different Activities that make up an Android application.
Previously, we saw how to create a system of Tabs with TabRow HorizontalPager.
Create a menu with Jetpack Compose (modern way)
With the arrival of Jetpack Compose, the way to create user interfaces in Android has changed significantly. Jetpack Compose uses a declarative approach to build interfaces, which means you describe what your UI should look like at any given time, and the framework takes care of updating it when the data changes.
The way we have seen previously using XML is now considered the "Legacy" approach. Although it remains functional, Google recommends using Jetpack Compose for new developments.
Another component that cannot be missing, and which despite being a classic is still extremely useful, is the traditional menu (not the Navigation Drawer, but the lifelong menu). We will see two common implementations: one in the TopAppBar and another within a list item, such as an options button.
Creating the Reusable Composable
For this example, we are going to create a @Composable component called MyMenu. To make it flexible, it will receive as parameters the functions that will be executed when clicking on the edit and delete options:
@Composable
fun MyMenu(
    onEdit: () -> Unit,    // Acción para editar
    onDelete: () -> Unit   // Acción para eliminar
) {
    var expanded by remember { mutableStateOf(false) }

    Box(modifier = Modifier.wrapContentSize(Alignment.TopEnd)) {
        IconButton(onClick = { expanded = true }) {
            Icon(Icons.Default.MoreVert, contentDescription = "Menú")
        }

        DropdownMenu(
            expanded = expanded,
            onDismissRequest = { expanded = false }
        ) {
            DropdownMenuItem(
                text = { Text("Editar") },
                leadingIcon = { Icon(Icons.Default.Edit, contentDescription = null) },
                onClick = {
                    expanded = false // Cerramos el menú
                    onEdit()        // Ejecutamos la función que nos pasaron
                }
            )
            DropdownMenuItem(
                text = { Text("Eliminar") },
                leadingIcon = { Icon(Icons.Default.Delete, contentDescription = null) },
                onClick = {
                    expanded = false
                    onDelete()
                }
            )
        }
    }
}
Structure of the DropdownMenu
The DropdownMenu is the container (wrapper) that surrounds the items. Its operation is based on Compose reactivity:
- expanded: It is the boolean state that determines if the menu is shown. We use remember and mutableStateOf so that Compose knows when to redraw.
- onDismissRequest: It is triggered when the user taps outside the menu or presses "back". In this case, we simply set expanded = false.
The DropdownMenuItem. In this example:
- We use an
IconButtonto show the menu icon (three vertical dots). - The
expandedstate controls whether the menu is visible or not. DropdownMenuis the composable that displays the list of options.DropdownMenuItemdefines each of the menu options.- text: The name of the action (e.g., "Edit").
- leadingIcon: A representative icon on the left.
- onClick: The action to execute. It is vital that, in addition to calling the function (like onEdit()), we set expanded = false again so that the menu closes after selection.
This modern approach is more intuitive and integrates better with the rest of your application if you are using Jetpack Compose.
Interface Integration
Once our menu is created, we can use it in different parts of the application:
In the TopAppBar
We can pass it within the actions of the Scaffold so that it appears in the top right part of the screen:
Scaffold(modifier = Modifier.fillMaxSize(),

    topBar = {
        TopAppBar(
            title = { Text("Mi Aplicación") },
            actions = {
                // Simplemente llamas a tu función aquí
                MyMenu(
                    onEdit = { println("¡Abriendo editor!") },
                    onDelete = { println("¡Borrando elemento!") }
                )
            }
        )
    }
In a List Item (TaskItem)
As mentioned, we have also included it in a component called TaskItem. Here, the menu is placed inside a Row along with the task text. We have adjusted the VerticalAlignment so that the three dots icon remains perfectly centered with respect to the content:
Scaffold(modifier = Modifier.fillMaxSize(),

    topBar = {
        TopAppBar(
            title = { Text("Mi Aplicación") },
            actions = {
                // Simplemente llamas a tu función aquí
                MyMenu(
                    onEdit = { println("¡Abriendo editor!") },
                    onDelete = { println("¡Borrando elemento!") }
                )
            }
        )
    }
) { innerPadding ->
    Column() {
        Greeting(
            name = "Android",
            modifier = Modifier.padding(innerPadding)
        )
        TaskItem()
    }
}

@Composable
fun TaskItem() {
    Card(modifier = Modifier.fillMaxWidth().padding(8.dp)) {
        Row(
            modifier = Modifier.padding(16.dp),
            verticalAlignment = Alignment.CenterVertically
        ) {
            Text(text = "Test", modifier = Modifier.weight(1f))

            // El menú aparecerá pegado al icono dentro de la tarjeta
            MyMenu(
                onEdit = { println("¡Abriendo editor!") },
                onDelete = { println("¡Borrando elemento!") }
            )
        }
    }
}
Note on function parameters
Notice that in the definition we use () -> Unit. This means that the parameter is a function that receives nothing and returns nothing (Unit). When calling the component, we pass the logic inside curly braces:
MyMenu(onEdit = { /* edit logic */ }, onDelete = { /* delete logic */ }).Displaying a menu in Android
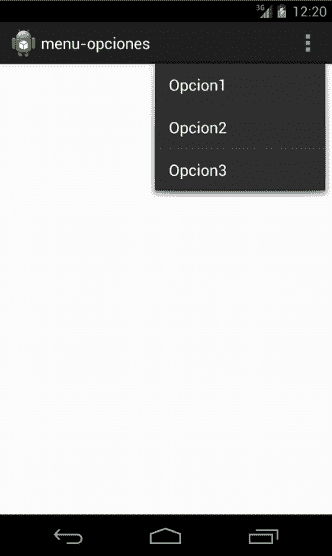
The menu of Android applications is displayed by pressing the icon corresponding to the menu, generally located in the upper right corner of the screen:
In this entry, we will see how to create a basic options menu for Android
Ways to create a menu in Android
Historically, there were two ways to create an options menu in Android: through an XML file (the "Legacy" way that we will detail first) and through code. However, with the modernization of Android development, the recommended way is to use Jetpack Compose and its "composable" functions. In this entry, we will cover the Legacy approach based on XML and then present the new way with Jetpack Compose.
Defining an XML-based menu
For all types of menus, Android provides an XML format to define its elements instead of building a menu with code in an activity; creating a menu this way has the main advantage that it is easier to visualize its structure and avoids creating visual elements from the view since the menu definition is separated into a file apart from the application's main code.
Elements of a menu in XML
- <menu>: It is the container for menu elements; we can say it is what defines a menu; therefore it must be the root node and can contain one or more of the following elements:
- <item>: Represents a menu element; it can contain a menu element to make a sub-menu.
- <group>: (optional) Simply allows us to categorize our menu elements (<item>); therefore it can only contain <item> inside it.
Attributes of menu elements (<item>)
- <android:id>: Like any element; it is a unique resource identifier within our menu; which allows the application to recognize it when the user presses it.
- <android:title>: The title of the menu; and it will be the text reflected in the menu.
- <android:icon>: Place an icon on the element; the icons used should be in the folders: res\drawable
- <android:showAsAction>:
Specifies when and how the menu element (<item>) should appear.
Example of a basic menu in Android
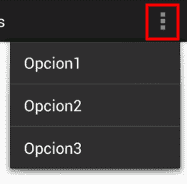
Once we have seen how a menu is formed; we can create a basic example menu; which will consist of three options:
- Option 1
- Option 2
- Option 3
And it will look like this:
Creating the options menu in Android
To create the previous menu through its XML definition, we must create an XML that we will call "menu.xml" located in the directory:
res\menu
And we add the following content:
<?xml version="1.0" encoding="utf-8"?>
<menu
xmlns:android="http://schemas.android.com/apk/res/android">
<item android:id="@+id/opcion1" android:title="Opcion1"></item>
<item android:id="@+id/opcion2" android:title="Opcion2"></item>
<item android:id="@+id/opcion3" android:title="Opcion3"></item>
</menu>
The <menu> menu is formed by <item>; each of them with a unique android:id identifier and an android:title title.
Finally, we must override the onCreateOptionsMenu and onOptionsItemSelected methods in our Activity:
The onCreateOptionsMenu method
  @Override
    public boolean onCreateOptionsMenu(Menu menu) {
        // Inflate the menu; this adds items to the action bar if it is present.
        getMenuInflater().inflate(R.menu.menu, menu);
        return true;
    }
The onCreateOptionsMenu method within the activity that implements the menu allows inflating (converting an XML resource, in our case the menu, into an object, in this case a Menu) the XML that defines the menu through R.menu.menu which corresponds to the XML we defined in the previous steps and which is located in the res/menu directory; we return true to show the menu.
The onMenuItemSelected method
@Override
  public boolean onMenuItemSelected(int featureId, MenuItem item) {

        switch(item.getItemId()) {
        case R.id.opcion1:
              return true;
         case R.id.opcion3:
              return true;

         case R.id.opcion2:
              return true;

        }
        return super.onMenuItemSelected(featureId, item);
  }
Now we override the onMenuItemSelected method to verify which of the MenuItem (<item>) that we have created has been pressed; the MenuItem parameter has a reference to the element that has been pressed by the user; obtaining the id by calling the getItemId method; through the switch we verify which resource the user has selected to perform a specific task.
The "Legacy" approach we saw is useful for maintaining old projects, but for new developments, Jetpack Compose is the way to go. You can find the full example of the legacy menu in our GitHub repository Android/menu-opciones or by clicking here.
The next step is to learn how to use ProgressBars in Android Studio.