
Content Index
- Creating Notifications with Jetpack Compose (The New Approach)
- The Limitation: RemoteViews
- The Workaround: Render to Bitmap
- ️ Initial Setup and Activities
- Creating the Notification Channel
- Configure the channel
- ️ Permission Management and Simple Sending
- First Simple Notification
- Notifications with Navigation (PendingIntent)
- Creating the custom notification Legacy way with XML
- Intents in data passing
- Defining the actions of the custom view
- Launching the custom notification
- Replicating notifications in Android
- Compatibility and the transition to AndroidX
- Creating the means for passing data between components: PendingIntent
- Creating the reply notification
- Creating the reply notification
Notifications are those components that appear at the top when we swipe down the taskbar. As you may have noticed when using Android, it is an extremely customizable and powerful element. Any modern application uses them in different ways, which demonstrates the high level of customization we can achieve.
In this guide we will see two examples:
- A simple notification.
- A notification that redirects us to a specific screen of our app.
In this post we will see how to create a custom notification in Android. We will explore two approaches: the traditional (Legacy) method based on XML layouts and the modern approach using Jetpack Compose to design the user interface of the notification.
Before we saw how to display a web page with WebView in Android Studio | Jetpack Compose
What do we mean by custom notification?
That we will use a view developed from scratch for this purpose; we will even use a series of buttons which can exert their actions on the activity that creates said notification, services or Broadcast that we define.
Creating Notifications with Jetpack Compose (The New Approach)
With the arrival of Jetpack Compose, the way of building user interfaces in Android has changed radically. Naturally, one would want to use Compose for the design of custom notifications. However, this is where things get complicated.
The Limitation: RemoteViews
The Android notification system has not been redesigned (yet) to support Composables natively. The custom notifications necessarily depend on a RemoteViews object, which is designed to inflate layouts defined in XML. It cannot process a Composable function directly.
The Workaround: Render to Bitmap
The current approach to using Compose in a notification is a workaround:
- Create the UI with Compose: You design the appearance of your notification in an isolated
@Composablefunction. - Render to a Bitmap: In your code, you inflate this Composable off-screen and capture its graphic representation as a
Bitmapobject. This is a complex process that involves creating a temporary view to host the Composable. - Use the Bitmap in an XML: You create a simple XML layout for the
RemoteViewsthat contains only anImageView. - Build the Notification: You assign the Bitmap generated from your Composable to the
ImageViewof theRemoteViewsand build the notification as usual.
️ Initial Setup and Activities
Before starting, the first thing is to enable the POST_NOTIFICATIONS permissions in the AndroidManifest file.
For the second demonstration, we will need a secondary activity. In my case, I have created an activity called Menu. Remember that the source code is in the repository; what I did was duplicate the main activity, change the name of the class and the file, and register it in the Manifest at the same level as the main activity so that the system can recognize it.
app/src/main/AndroidManifest.xml
<?xml version="1.0" encoding="utf-8"?>
<manifest xmlns:android="http://schemas.android.com/apk/res/android"
    xmlns:tools="http://schemas.android.com/tools">
    <uses-permission android:name="android.permission.POST_NOTIFICATIONS" />
    <application
        ***
        </activity>
        <activity
            android:name=".MenuActivity"
            android:exported="false"> </activity>
    </application>
</manifest>
Creating the Notification Channel
Since Android 8.0 (API 26), it is mandatory to create a channel to be able to send notifications. The purpose is to improve the user experience and avoid advertising "bombardment".
Example: A banking application can have a Security channel (essential to notify about consumption) and another of Promotions (advertising). If the user gets tired of the advertising, they can deactivate that specific channel from the system settings without stopping receiving security alerts.
To create the channel, we follow these steps:
- Check the version: It is only necessary for Android 8 or higher.
- Configure the channel: We assign an ID, a name and a description that the user will see in the settings.
- Importance level: We define the priority. This determines if the notification will emit a sound, vibrate or appear silently. Thinking about the user, if it is not urgent, we should not be intrusive.
Once the channel is created, the operating system will allow the notifications we send through it to be displayed.
app/src/main/java/com/example/myproyectandroid/MainActivity.kt
class MainActivity : ComponentActivity() {
    override fun onCreate(savedInstanceState: Bundle?) {
        super.onCreate(savedInstanceState)
        createNotificationChannel(context = this);
        enableEdgeToEdge()
        ***
    }

    private fun createNotificationChannel(context: Context) {
        // Only necessary for API 26+ (Android 8.0)
        if (Build.VERSION.SDK_INT >= Build.VERSION_CODES.O) {
            val name = "My App Notifications"
            val descriptionText = "This channel is used for general alerts"
            val importance = NotificationManager.IMPORTANCE_DEFAULT
            // THE ID MUST BE THE SAME AS YOU USE IN THE BUILDER ("CHANNEL_ID_EJEMPLO")
            val channel = NotificationChannel("CHANNEL_ID_EJEMPLO", name, importance).apply {
                description = descriptionText
            }
            // Register the channel with the system
            val notificationManager = context.getSystemService(Context.NOTIFICATION_SERVICE) as NotificationManager
            notificationManager.createNotificationChannel(channel)
        }
    }
}
Configure the channel
That Logcat error is the most common with notifications in modern Android. The system is telling you clearly: "You tried to send a notification to a box called 'CHANNEL_ID_EJEMPLO', but that box does not exist in my system".
In Android 8.0 (Oreo) and higher, it is not enough to define the ID in the notification; you have to register the channel in the operating system before sending any message. If you don't, Android blocks the notification for security.
No Channel found for pkg=com.example.myproyectandroid, channelId=CHANNEL_ID_EJEMPLO, id=101, tag=null, opPkg=com.example.myproyectandroid, callingUid=10217, userId=0, incomingUserId=0, notificationUid=10217, notification=Notification(channel=CHANNEL_ID_EJEMPLO shortcut=null contentView=null vibrate=null sound=null defaults=0 flags=AUTO_CANCEL color=0x00000000 vis=PRIVATE)️ Permission Management and Simple Sending
In recent versions (Android 13+), the system shows a dialog asking if the user allows the application to send notifications. We must handle three scenarios:
- Permission granted: We simply launch the notification.
- Permission denied: We must request it through a launcher.
- Old versions: The system shows them by default.
app/src/main/java/com/example/myproyectandroid/MainActivity.kt
class MainActivity : ComponentActivity() {
    @OptIn(ExperimentalMaterial3Api::class)
    override fun onCreate(savedInstanceState: Bundle?) {
        super.onCreate(savedInstanceState)
        createNotificationChannel(context = this);
        enableEdgeToEdge()
        setContent {
            MyProyectAndroidTheme {
                Scaffold(modifier = Modifier.fillMaxSize()) { innerPadding ->
                    Column(modifier = Modifier.padding(innerPadding)) {
                        Greeting(
                            name = "Android",
                            modifier = Modifier.padding(innerPadding)
                        )
                        NotificationButton()
                    }
                }
            }
        }
    }
}
@Composable
fun NotificationButton() {
    val context = LocalContext.current
    // 1. We configure the permission "requester"
    val permissionLauncher = rememberLauncherForActivityResult(
        contract = ActivityResultContracts.RequestPermission()
    ) { isGranted ->
        if (isGranted) {
            // The user said yes, we launch the notification
            showSimpleNotification(context)
        } else {
            // The user said no, you could show an informative Toast
        }
    }
    Button(onClick = {
        if (Build.VERSION.SDK_INT >= Build.VERSION_CODES.TIRAMISU) {
            // 2. Before launching, we check if we already have it
            val hasPermission = ContextCompat.checkSelfPermission(
                context, Manifest.permission.POST_NOTIFICATIONS
            ) == PackageManager.PERMISSION_GRANTED
            showSimpleNotification(context)
            if (hasPermission) {
                 showSimpleNotificationOpenActivity(context)
                //showSimpleNotification(context)
            } else {
                // 3. If not, we trigger the system dialog
                permissionLauncher.launch(Manifest.permission.POST_NOTIFICATIONS)
            }
        } else {
            showSimpleNotificationOpenActivity(context)
            //showSimpleNotification(context)
        }
    }) {
        Text("Notify with security")
    }
}
First Simple Notification
We use NotificationCompat.Builder to define:
- Icon and Title: What the user will see first.
- Text: The body of the message.
- AutoCancel: So that the notification disappears when touched.
- Unique ID: We use an identifier (e.g. 101) that will allow us to update the notification more later if necessary.
app/src/main/java/com/example/myproyectandroid/MainActivity.kt
fun showSimpleNotification(context: Context) {
    val builder = NotificationCompat.Builder(context, "CHANNEL_ID_EJEMPLO")
        .setSmallIcon(android.R.drawable.ic_dialog_info) // Mandatory icon
        .setContentTitle("Hello!")
        .setContentText("This is a notification from Jetpack Compose")
        .setPriority(NotificationCompat.PRIORITY_DEFAULT)
        .setAutoCancel(true) // Closes when touched
    with(NotificationManagerCompat.from(context)) {
        // ID 101 is unique to this notification (you can use it to update it later)
        try {
            with(NotificationManagerCompat.from(context)) {
                notify(101, builder.build())
            }
        } catch (e: SecurityException) {
            // Handle the error: log it or notify the user
            Log.e("Notification", "Security error: missing permission", e)
        }
    }
}
Notifications with Navigation (PendingIntent)
The second example is that, when clicking on the notification, the user is directed to the Menu screen.
The use of Intents and PendingIntent
For this we use an Intent, which is the object that transports the data between activities.
You will see that we use MenuActivity::class.java. This is because, internally, Android Intents still expect Java-type references (bytecode) to manage navigation between classes.
We encapsulate this Intent in a PendingIntent. This object gives the operating system permission to execute a action on behalf of our application (open the activity) even if our app is closed. Finally, we use .setContentIntent(pendingIntent) in our notification constructor and launch it.
app/src/main/java/com/example/myproyectandroid/MainActivity.kt
fun showSimpleNotificationOpenActivity(context: Context) {
    // 1. THE DESTINATION: This is where you specify MenuActivity
    val intent = Intent(context, MenuActivity::class.java).apply {
        flags = Intent.FLAG_ACTIVITY_NEW_TASK or Intent.FLAG_ACTIVITY_CLEAR_TASK
    }
    // 2. THE PENDING INTENT: The "permission" for the system to open the activity
    val pendingIntent = PendingIntent.getActivity(
        context,
        0,
        intent,
        PendingIntent.FLAG_IMMUTABLE // Mandatory in modern Android
    )
    // 3. BUILD THE NOTIFICATION
    val builder = NotificationCompat.Builder(context, "CHANNEL_ID_EJEMPLO")
        .setSmallIcon(android.R.drawable.ic_dialog_info)
        .setContentTitle("Menu Access")
        .setContentText("Click here to go to MenuActivity")
        .setPriority(NotificationCompat.PRIORITY_DEFAULT)
        .setContentIntent(pendingIntent) // <--- Link the click with the destination
        .setAutoCancel(true) // Deleted when touched
    // 4. LAUNCH (With permission check to avoid errors)
    if (ActivityCompat.checkSelfPermission(context, Manifest.permission.POST_NOTIFICATIONS) == PackageManager.PERMISSION_GRANTED) {
        NotificationManagerCompat.from(context).notify(101, builder.build())
    }
}
Creating the custom notification Legacy way with XML
Intents in data passing
The view code is a little further down in the post, but for now we will indicate the first steps to create a notification in Android.
Intent intent = new Intent(getApplicationContext(), MusicService.class); noBundle.putInt("accion", 1);//This is the value I want to pass intent.putExtras(noBundle); PendingIntent pendingIntent = PendingIntent.getService(ListActivity.this, 1, intent, PendingIntent.FLAG_UPDATE_CURRENT); view.setOnClickPendingIntent(R.id.ibAccion, pendingIntent);
Let's explain the purpose of each component of the code presented above:
- The
Bundleis generally used to pass data between components such as activities and fragments through numbers, texts or booleans. - The
Intentis the component used to initiate communication between components such as starting an activity or service (more information in the official documentation). - The
PendingIntentis an object that contains an intent; thisPendingIntentobject allows theNotificationManagerto send the action to be executed to the system (such as opening an activity).
The PendingIntent.FLAG_UPDATE_CURRENT flag is very important, which in conjunction with:
<activity android:name=".MainActivity" android:configChanges="orientation|keyboardHidden|screenSize" android:launchMode="singleTop" android:screenOrientation="portrait"> ... </activity>Indicates that the activity currently exists (by default MainActivity is the first activity that started) and the android:launchMode="singleTop" and is a way of indicating that the instance of the activity is unique, although there are other ways as you can see in the following link (in other words it means updating the instance of the currently running activity).
Defining the actions of the custom view
As there are three buttons, we need three different Intents and everything that this entails, so now we multiply this by three:
Intent intent = new Intent(getApplicationContext(), MusicService.class);
noBundle.putInt("accion", 1);//This is the value I want to pass
intent.putExtras(noBundle);
PendingIntent pendingIntent = PendingIntent.getService(ListActivity.this, 1, intent, PendingIntent.FLAG_UPDATE_CURRENT);
view.setOnClickPendingIntent(R.id.ibAccion, pendingIntent);
Bundle noBundle2 = new Bundle();
noBundle2.putInt("accion", 2);//This is the value I want to pass
Intent intent2 = new Intent(getApplicationContext(), ListActivity.class);
intent2.putExtras(noBundle2);
PendingIntent pendingIntent2 = PendingIntent.getActivity(ListActivity.this, 2, intent2, PendingIntent.FLAG_UPDATE_CURRENT);
view.setOnClickPendingIntent(R.id.ibQuitar, pendingIntent2);
Bundle noBundle3 = new Bundle();
noBundle3.putInt("accion", 3);//This is the value I want to pass
Intent intent3 = new Intent(getApplicationContext(), ListActivity.class);
intent3.putExtras(noBundle3);
PendingIntent pendingIntent3 = PendingIntent.getActivity(ListActivity.this, 3, intent3, PendingIntent.FLAG_UPDATE_CURRENT);
view.setOnClickPendingIntent(R.id.ibSiguiente, pendingIntent3);
Launching the custom notification
Now we can create our notification; first the notification manager (NotificationManager) that as its name indicates and through an instance of this class we can launch the notification with the NotificationCompat.Builde we can establish the properties of the notification and create the notification itself; for example we indicate the title, subtitle, the icon and the PendingIntent whose action will be exercised at the moment the user clicks on the notification:
NotificationManager nManager;
NotificationCompat.Builder nBuilder;
RemoteViews remoteView;
PendingIntent contentIntent = PendingIntent.getActivity(this, 0,
        new Intent(this, ListActivity.class), PendingIntent.FLAG_UPDATE_CURRENT);
nBuilder = new NotificationCompat.Builder(this)
        .setContentTitle(getString(R.string.app_name))
        .setTicker(getString(R.string.app_name))
        .setSmallIcon(R.mipmap.ic_launcher)
        .setContentIntent(contentIntent)
        .setOngoing(false)
        .setAutoCancel(false);
As we can see, when creating the notification we establish several parameters such as the content (title), icon and the same Intent that we defined previously.
Now we need to specify which is the view in question (the one that has the design we created with the three buttons), this we do it through a RemoteViews:
remoteView = new RemoteViews(getPackageName(), R.layout.notification_layout);
remoteView.setImageViewResource(R.id.image, R.mipmap.ic_launcher);
remoteView.setTextViewText(R.id.title, "Title");
remoteView.setTextViewText(R.id.text,"Name");
As we can see in the previous code, we access each of its components and establish a value that for the purposes of this tutorial are fixed.
In our case the view has the following content:
<?xml version="1.0" encoding="UTF-8"?>
<LinearLayout xmlns:android="http://schemas.android.com/apk/res/android"
    android:layout_width="fill_parent"
    android:layout_height="wrap_content"
    android:background="#333333"
    android:orientation="vertical"
    android:weightSum="1">
    <LinearLayout
        android:id="@+id/right"
        android:layout_width="fill_parent"
        android:layout_height="wrap_content"
        android:orientation="horizontal">
        <ImageView
            android:id="@+id/imagenotileft"
            android:layout_width="wrap_content"
            android:layout_height="wrap_content"
            android:layout_gravity="center_vertical"
            android:background="@mipmap/ic_launcher" />
        <LinearLayout
            android:layout_width="0dp"
            android:layout_height="wrap_content"
            android:layout_weight="2"
            android:orientation="vertical">
            <TextView
                android:id="@+id/title"
                android:layout_width="wrap_content"
                android:layout_height="wrap_content"
                android:layout_marginLeft="5dp"
                android:layout_marginRight="5dp"
                android:layout_marginTop="9dp"
                android:textColor="#FFFFFF"
                android:textSize="16sp"
                android:textStyle="bold" />
            <TextView
                android:id="@+id/text"
                android:layout_width="wrap_content"
                android:layout_height="wrap_content"
                android:layout_below="@+id/title"
                android:layout_marginLeft="5dp"
                android:layout_marginRight="5dp"
                android:textColor="#EEEEEE"
                android:textSize="14sp" />
        </LinearLayout>
        <LinearLayout
            android:layout_width="0dp"
            android:layout_height="wrap_content"
            android:layout_weight="1"
            android:orientation="horizontal">
            <ImageButton
                android:id="@+id/ibAtras"
                android:layout_width="wrap_content"
                android:layout_height="match_parent"
                android:layout_margin="0dp"
                android:background="@NULL"
                android:gravity="center_horizontal|center_vertical"
                android:padding="0dp"
                android:src="@drawable/ic_action_av_skip_previous" />
            <ImageButton
                android:id="@+id/ibAccion"
                android:layout_width="wrap_content"
                android:layout_height="match_parent"
                android:layout_margin="0dp"
                android:background="@NULL"
                android:gravity="center_horizontal|center_vertical"
                android:padding="0dp"
                android:src="@drawable/ic_action_ic_play_pause" />
            <ImageButton
                android:id="@+id/ibSiguiente"
                android:layout_width="wrap_content"
                android:layout_height="match_parent"
                android:layout_margin="0dp"
                android:background="@NULL"
                android:gravity="center_horizontal|center_vertical"
                android:padding="0dp"
                android:src="@drawable/ic_action_av_skip_next" />
            <Button
                android:id="@+id/ibQuitar"
                android:layout_width="wrap_content"
                android:layout_height="match_parent"
                android:layout_margin="0dp"
                android:background="@NULL"
                android:gravity="center_horizontal|center_vertical"
                android:padding="0dp"
                android:text="X"
                android:textColor="#444444"
                android:textSize="16sp" />
        </LinearLayout>
    </LinearLayout>
</LinearLayout>

Finally we set the previous view and launch the notification:
        setListeners(remoteView);
        nBuilder.setContent(remoteView);
        nManager = (NotificationManager) getSystemService(NOTIFICATION_SERVICE);
        nManager.notify(2, nBuilder.build());
Replicating notifications in Android
So far we have seen how to create a notification with a custom layout and how to interact with the elements that we define in this layout such as Buttons or ImageView, etc; in this second part of this entry we will see how to create notifications that can be replicated; this is a very used action in applications of messaging such as Google Hangout or WhatsApp itself on Android.
Compatibility and the transition to AndroidX
Originally, to ensure backward compatibility, the Support Library were used. This is the method that we could consider "Legacy". Classes like NotificationCompat.Builder came from the android.support.v4.app package.
Currently, the Android development ecosystem has evolved towards AndroidX. This is the new standard and recommended way. AndroidX replaces the Support Libraries and offers a more consistent and modern development. To use it, the dependencies must be declared in the build.gradle file of the application, which is analogous to how Composer is used in PHP/Laravel projects to manage packages.
For example, to include the necessary library for notifications, you would add something like this to your build.gradle:
dependencies {
    implementation "androidx.core:core-ktx:1.13.1"
}
Although this article will show examples that use the NotificationCompat.Builder class, it is crucial to understand that it now resides in the androidx.core.app package. The concepts are the same, but the implementation and dependencies have been modernized. Many options can be used that have from priority to styles, but always keeping in mind that some specific functions require more recent versions of Android.
Creating the means for passing data between components: PendingIntent
The first thing we must do is create a PendingIntent and associate the Intent which is the means used to pass data from a component; these components can not only be Activities or Fragments, they can also be others such as Broadcast to perform updates in the background without the need to invoke the activity; although for this we must use Android N onwards; so as not to extend this entry too much, we will go for the case in which the activity is invoked.
The PendingIntent is the existing mechanism that we have to pass data between different components such as activities, broadcast or services that embeds within it the data that we want to pass to these components (in case you want to pass a data):
RemoteInput remoteInput = new RemoteInput.Builder(KEY_TEXT_REPLY)
       .setLabel(replyLabel)
       .build();
Intent resultIntent = new Intent(this, MainActivity.class);
resultIntent.setAction(KEY_TEXT_REPLY);
TaskStackBuilder stackBuilder = TaskStackBuilder.create(this);
stackBuilder.addParentStack(MainActivity.class);
stackBuilder.addNextIntent(resultIntent);
PendingIntent replyPendingIntent =
       stackBuilder.getPendingIntent(
               0,
               PendingIntent.FLAG_UPDATE_CURRENT
       );
The setAction method allows you to associate the name of the data to be passed, which in this case will be the text that the user provides in the reply field and with this name we access the text that the user entered in the onCreate of our activity:
@Override
protected void onCreate(Bundle savedInstanceState) {
   super.onCreate(savedInstanceState);
   setContentView(R.layout.activity_main);
   Intent intent = getIntent();
   if (KEY_TEXT_REPLY.equals(intent.getAction())) {
       Bundle remoteInput = RemoteInput.getResultsFromIntent(intent);
       if (remoteInput != NULL) {
           Log.i("REPLICA", "" + remoteInput.getCharSequence(KEY_TEXT_REPLY));
       }
   }
   replyNotification();
}
With the RemoteInput method we indicate that we will create a mechanism for passing data within the PendingIntent; in addition to associating the label or text that will appear in the reply field.
Creating the reply notification
We associate the PendingIntent that we created previously:
NotificationCompat.Action action =
       new NotificationCompat.Action.Builder(R.mipmap.ic_launcher,
               "Reply", replyPendingIntent)
               .addRemoteInput(remoteInput)
               .build();
Creating the reply notification
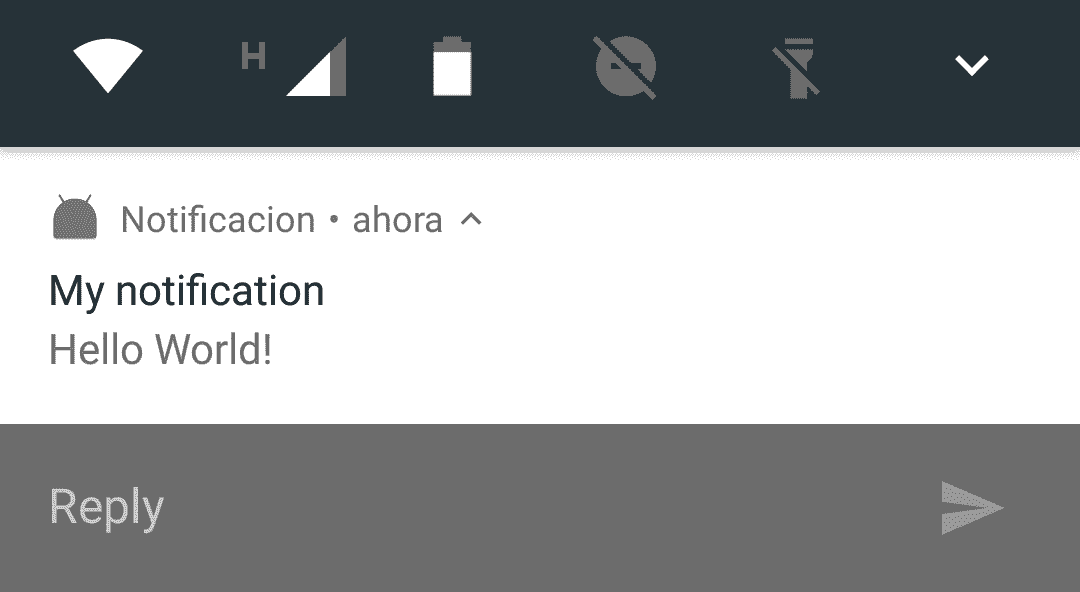
We create the notification by establishing its content: representative icon, title, content and the action that we configured in the previous block:
NotificationCompat.Builder newMessageNotification =
       new NotificationCompat.Builder(MainActivity.this)
               .setSmallIcon(R.mipmap.ic_launcher)
               .setContentTitle("My notification")
               .setContentText("Hello World!")
               .addAction(action);
Finally we launch the notification along with the actions that we configured in the previous steps through the build() method:
NotificationManagerCompat notificationManager =
       NotificationManagerCompat.from(MainActivity.this);
notificationManager.notify(NOTIFICATION_ID, newMessageNotification.build());
The complete method is as follows:
    public void replyNotification() {
        RemoteInput remoteInput = new RemoteInput.Builder(KEY_TEXT_REPLY)
                .setLabel(replyLabel)
                .build();
        Intent resultIntent = new Intent(this, MainActivity.class);
        resultIntent.setAction(KEY_TEXT_REPLY);
        TaskStackBuilder stackBuilder = TaskStackBuilder.create(this);
        stackBuilder.addParentStack(MainActivity.class);
        stackBuilder.addNextIntent(resultIntent);
        PendingIntent replyPendingIntent =
                stackBuilder.getPendingIntent(
                        0,
                        PendingIntent.FLAG_UPDATE_CURRENT
                );
        NotificationCompat.Action action =
                new NotificationCompat.Action.Builder(R.mipmap.ic_launcher,
                        "Reply", replyPendingIntent)
                        .addRemoteInput(remoteInput)
                        .build();
        NotificationCompat.Builder newMessageNotification =
                new NotificationMpat.Builder(MainActivity.this)
                        .setSmallIcon(R.mipmap.ic_launcher)
                        .setContentTitle("My notification")
                        .setContentText("Hello World!")
                        .addAction(action);
        NotificationManagerCompat notificationManager =
                NotificationManagerCompat.from(MainActivity.this);
        notificationManager.notify(NOTIFICATION_ID, newMessageNotification.build());
    }
Finally the result is as follows:
Next step, learn to connect to Rest APIs in Android Studio.