
Content Index
To start integrating maps into our application, the first step is to consult the official documentation by searching for "Google Maps Compose". The implementation basically consists of adding a dependency and following a minimal example that we will see below.
Remember that we discussed how to use Room Database (SQLite) in Android Studio with Kotlin.
1. Dependency Management
The first thing is to go to the build.gradle file. You must add the Google Maps dependency for Compose and sync the project. Once this is done, the import errors in your code should disappear.
implementation("com.google.maps.android:maps-compose:4.4.1")2. Creating the MyMap Composable
We are going to create a Composable called MyMap.
Avoid naming your function simply GoogleMap, as that is the name of the official component and you would cause a naming conflict.
Inside the component, we will define the latitude and longitude (coordinates for the 2D environment). In this example, we will use the coordinates for Madrid and a second position for the markers.
@Composable
fun MyMap() {
    val madrid = LatLng(40.4167, -3.7037)
    val marker2 = LatLng(41.4167, -3.7037)
    val cameraPositionState = rememberCameraPositionState {
        position = CameraPosition.fromLatLngZoom(madrid, 10f)
    }

    GoogleMap(
        modifier = Modifier.fillMaxSize(),
        cameraPositionState = cameraPositionState
    ) {
        Marker(
            state = MarkerState(position = madrid),
            title = "Mi oficina",
            snippet = "Aquí vivo"
        )
        Marker(
            state = MarkerState(position = marker2),
            title = "Mi carcelero",
            snippet = "Aqui estoy secuestrado, ayuda!"
        )
    }
}
API Key Configuration (Critical Step)
If you run the application now, it is very likely to fail or show an empty map. To make it work, you must configure your API Key in the AndroidManifest.xml file.
In the AndroidManifest.xml:
Inside the <application> tag, you must add the following meta-data block:
<meta-data android:name="com.google.android.geo.API_KEY" android:value="YOUR_KEY_HERE" />How to get the key?
- Go to the Google Cloud Console.
- Create a new project or select an existing one.
- In the navigation menu (hamburger), search for Google Maps Platform.
- Go to the Keys and Credentials section to generate your API Key.
In summary:
- Select/Create Project: In the top bar of Google Cloud (next to the "Google Cloud" logo), you will see a dropdown. Click there and select "New Project".
- Then click on the hamburger menu and enable the Google Map API.
- Go to APIs & services: In the left side menu of your image, click on the section that says "APIs & services" and then on "Library".
- Enable Maps SDK for Android: In the library search bar, type "Maps SDK for Android" and click Enable.
- Create Credentials: Once enabled, go to the "Credentials" tab in the same APIs & services menu. Click on "Create credentials" and choose "API key". That is the key you will paste into your Android Studio.
Google usually requests a credit/debit card to verify identity, although they generally offer a generous free tier that will not generate charges if you are only performing tests.
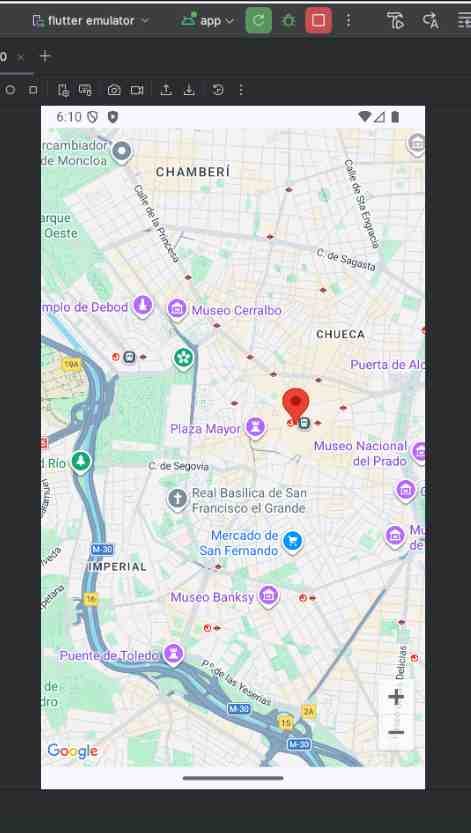
Final Result
Once you have configured the key correctly, the application should work without errors. You will be able to see the map centered on the initial position (Madrid, in our case) and the markers you defined with their respective titles and descriptions.
If the key is invalid or not configured, the application might close unexpectedly or show an "API Key not found" error in the Logcat. With the correct configuration, you will already have all the typical Google Maps interaction options integrated into your app.
If you have followed the previous steps, when you run the application you should see a screen similar to the following:
And with the markers:
Next step, learn how to make animations in Android Studio with Compose.